AppForms Scheduler
AppForms Scheduler helps end user to run tasks at scheduled time and at scheduled intervals. The interface is accessible from “Links” pane in AppForms designer.
A task is basically nothing but a form configured via ClaySys AppForms. This form can be configured by the user in any manner the user seems it fit to get the task executed. Generally, the configuration will be devoid of any input parameters from the end user as the task will run at the server and will not provide any interface at the time of execution. Nevertheless, user can pass in data to the form using global variables, rule variables, query strings and more.
Task once configured, will be saved in the server and executed at the scheduled time/intervals in conjunction to the server time. To maintain the integrity of the tasks, all the date time values are stripped of their corresponding time zones and are stored in UTC standards. Operating on tasks based on UTC standards gives a leverage of abandoning the concepts time zones completely. Only when the user needs to see the stored data, will the time is converted back to their corresponding time zone.
INSTALLATION
In order to get scheduler into any environment (except O365), user can do so by checking the “AppForms Scheduler” checkbox prompted during the install/update package wizard of ClaySys AppForms Installer. This will make sure the required services and binaries are installed in the respective machine (or site in case of Enterprise version). Few things to note regarding installation of Scheduler in different environment.
SharePoint (2010/2013)
only one instance of the service will be installed in the machine and will be shared among other SharePoint sites in the farm with AppForms activated in them.
Unselecting “AppForms Scheduler” while upgrading will result in un-installation of any previously installed AppForms Scheduler from the machine. Hence, tasks configured from any AppForms configured SharePoint site in the machine/farm will fail to execute.
Enterprise
Each instance of “AppForms site” installed in the machine will have its own unique AppForms Scheduler service to manage corresponding tasks.
Services installed via installer will have unique names identifiable by the following syntaxes –
o Display Name : AppForms Timer Job ([SiteName] – [SiteID])
o Service Name : ClaysysSchedulerService_[SiteName]_[SiteID]
Unselecting “AppForms Scheduler” while upgrading will result in un-installation of any previously installed AppForms Scheduler from the corresponding site.
INTERFACE
AppForms Scheduler’s interface is rather simple and straight forward. User has the option to create a new task or alter the already saved tasks from the same interface. User can also perform some advanced tasks over a selected task or generate a report for the latter.
Interface is split into three tabbed areas – Main, Advanced, and Report. “Main” is the tab that will be selected and displayed by default. Other two tabs will be shown upon selecting an already saved task from the “Scheduled Tasks” table.
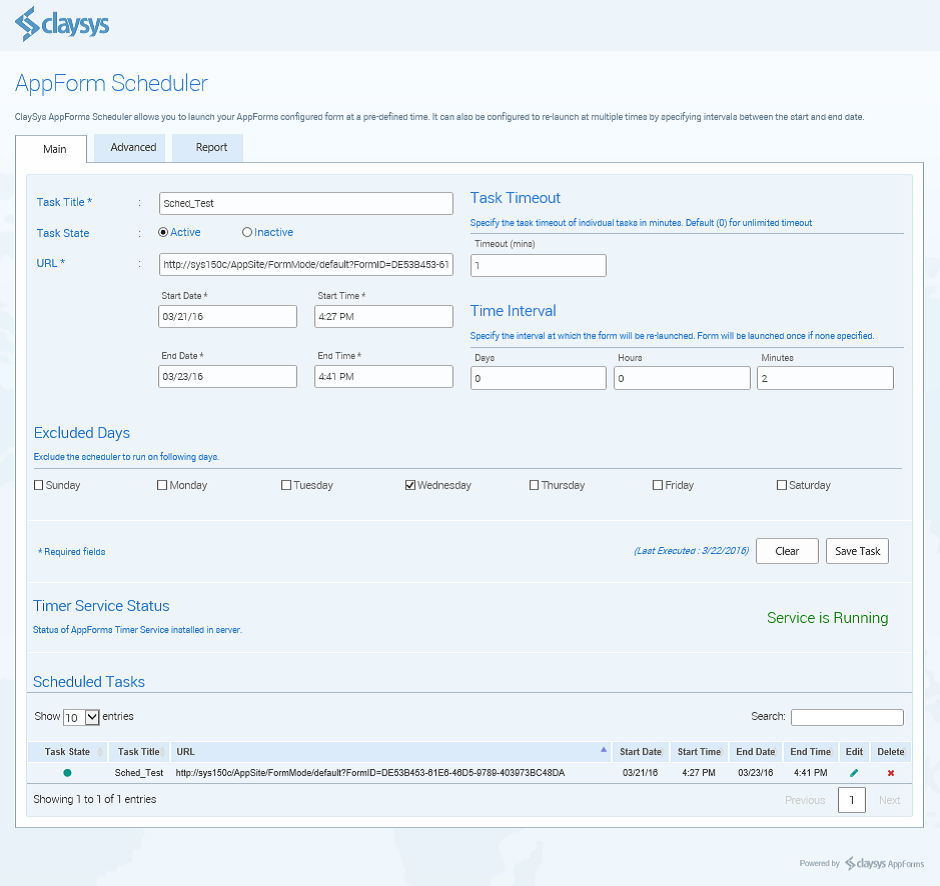
Main (Default) Tab
This is the view presented to the user upon accessing the scheduler from within AppForms designer. This view can be mainly divided into three:
- Create/Edit a task.
- Status of the scheduler service running at the server.
- A data table to display all the tasks entered by the user.
Creating a Task
Task creation comprises of the following elements.
- Task Title: A unique name to identify the task
- Task State: Default state of the task is created/edited.
- URL: Task URL that will be executed at the scheduled time/interval.
- Start Date: Date at which task will start.
- Start Time: Time on Start Date that the task will initiate.
- End Date: Date at which task will stop.
- End Time: Time on End Date that the task will cease to execute.
- Task Timeout: Maximum time that the task is allowed to execute its individual iteration.
- Time Interval: Interval between start and end time at which the task will re-run.
- Excluded Days: Days at which the scheduled task should be skipped.
Task URL’s
As discussed earlier in this chapter, a task is nothing but a form configured via ClaySys AppForms. Hence, a task’s URL would be the absolute URL to the form. In case of ClaySys AppForms for SharePoint this URL can be that of a web part, page, sub site or even a site that shows up a ClaySys form upon opening.
In case of forms configured in Enterprise version of ClaySys AppForms, the only URL format supported should be obtained from the “Form URLs” property in the properties panel of the corresponding form’s designer. The limited option of URL format is due to the fact that Enterprise version can run on different authentication modes.
Task Timeout
This is a failsafe option provided in scheduler so as to not hog up server’s memory in case the task (form) fails to execute properly and not cease execution timely. By default, this value is taken up as ‘0’ which means the longest possible interval supported by the server. Generally, this value falls under 60 minutes.
User can over-ride the default value using the ‘Task Timeout’ input. Value can range from the default value of 0 to 60 minutes.
Time Interval
A task can be configured to either run once or multiple times between its start and end time. Repetition interval can be configured in range of days, hours and minutes. By default all these assume a value of ‘0’ and will only be executed once, i.e. the start time.
Editing a Task
A task can be edited using the edit button provided in the corresponding task’s row of the scheduled tasks data table. This table will be available at the bottom region of main tab. Upon clicking the edit button, the fields on top of the main tab will get populated with values corresponding to the selected task. The task’s last executed time is also displayed here. Validation rules follow just as in task creation. Edited content can be saved back using the “Save Task” button or cleared off from the fields using the “Clear” button.
Validations
Fields are validated at server side before inserting it into the database. Following validations are performed before inserting task details.
Unique Field Validation
The title provided for task needs to be unique. If not, user will be redirected to an error page showing the error details.
Required Validation
While creating/editing a task, following fields are considered required. An error text will be shown when no value is provided.
- Task Title
- Task State
- Task URL
- Start/End Date and Time
Format Validation
Format validation is performed on the following fields
- Task URL: Should be absolute URL’s with proper scheme and no spaced in the input.
- Start/End Date: Should be in the format MM/DD/YY
- Start/End Time: Should be entered in the format H:MM TT
Range Validation
Range validation is performed on the following fields
- Timeout (Minutes): Value should be between 0-60
- Interval (Days): Value should be between 0-30
- Interval (Hours): Value should be between 0-24
- Interval (Minutes): Value should be between 0-60
Date Validation
Date validation is performed over the Start and End date and time. This is validated and an “invalid date range” message is thrown if the start date time doesn’t come prior to the end date time.
Service Status
This area in the main tab shows the status of scheduler service installed in server for the current instance of AppForms. Following statuses are shown over this area.
- Service is running (green) if the service is installed and running as expected.
- Service is idle (orange) if the service is installed but is not actively running.
- Service is not installed (red) if the service is not installed in the server.
Scheduled Tasks (Data Table)
A detailed data table is displayed in the main tab for the user to manage tasks. This table features pagination (with items per view), searching/filtering and sorting. Following details are displayed per task.
- Task state. Green for an active task and red otherwise.
- Task Title.
- Task URL.
- Start/End Date and Time.
- Task edit button.
- Task delete button.
Advanced Tab
When a task is selected from the scheduled tasks, an ‘advanced’ tab appears alongside the main tab corresponding to the selected task. The selected task will be shown at the top left of the tabbed area. Following operations can be performed on the selected task.
Reset Task
If for some reason the scheduler service is running in the server, but failing to run the task. Then user can try resetting the task. By doing so, a flag is set on the task stating that it hasn’t started yet. This should help the service to identify and pool the task over its next iteration.
Report Tab
A detailed task report table is displayed in the report tab for the user to inspect the progress/status of the selected task. This table features pagination (with items per view), searching/filtering and sorting. Following details are displayed for the selected task.
- A Serial num. column.
- Recorded time. Date and time at which the particular status was recorded.
- Status. The recorded status.
Reports can generate over 1000 entries for a task depending on the repeat interval, end time and several other factors. Hence, reports of the selected task will be automatically populated only the first time the tab is activated to reduce server calls. User can always refresh the report data using the “Refresh Data” button. This will fetch data and re-generate the reports table with all latest statuses till that instance.
Task Statuses
User can expect to see the following statuses in the reports table for a task.
- Pooling. Timer service try’s to collect the task.
- Skipped. When the timer service successfully pools the task into its memory but needs to skip it as the execution time has elapsed.
- Started. Timer service starts the task.
- Completed. Timer service completes the task.
- Not Started. Status forced to a task by user using the “Reset Task” button. This is also the status of a freshly created task.
TASK (FORM) CONFIGURATION
As mentioned in the introduction, task is anything but a form configured via ClaySys AppForms. When a task is executed from the server, the form basically opens and executes the rules and actions configured in it. The only difference here is that inputs cannot be fetched from a user. This limitation can be addressed to an extent using global variables, rule variables, query strings and more.
With the aforementioned, there are few special scenarios that need to be considered when configuring a task.
Scheduler Specific Actions
CloseScheduler
A task once executed, will exit once it attains timeout (default value is 60mins). If user wishes to override the timeout or terminate the task through configuration, this action comes handy. CloseScheduler() action terminates the task once executed. Configurator should be able look into the possibility of using this action suitably when used along with different sync/async operations.
Over-ridden Actions When Used With Scheduler
MessageBox
MessageBox() action is one such that requires user input to further continue with execution. Since an interface is not provided while operating a task, ClaySys AppForms will internally over-ride the operation when a task with messagebox() action is executed. The result of messagebox alert is defaulted to “OK” in these cases.
Actions Not Compatible With Scheduler
Following actions are presently not compatible to operate alongside scheduler.
- ExececuteJavascript()
- InvokeJavaScript()
A BRIEF INSIGHT ON SCHEDULER TIMER SERVICE
Along with the end-user UI to configure and schedule tasks, a scheduler timer service runs at the web server (or app server in case of enterprise edition) to make this functionality whole. To explain in detail of how a timer service manages tasks in beyond the scope of this documentation. So, here are the key facts.
Task Cycle
A task stored in the data base is fetched into the timer service over a procedure known as pooling. Pooled tasks are executed at their configured execution time. The flags set over tasks can be observed from the report section.
Pooling
Pooling is a procedure that ClaySys Scheduler Service utilizes to fetch task from the database at regular intervals and thereby limiting calls send out to database. A pooling interval of value 10 minutes is assigned by default in the timer service’s configuration file. When tasks are fetched from database, it is done so in manner that all tasks that needs to be executed till next pool interval are pulled in.
Pooling is also responsible for the fact that a task scheduled to execute at the next moment might fail to do so. Such tasks will only be pooled in over the next pool iteration and will be flagged “skipped”.