Default Triggers
Triggers in AppForms are used to execute predefined rules. There are two types of triggers available in AppForms:
1.Control Triggers
2.Default Triggers
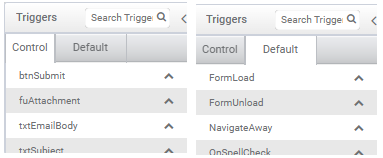
The list of available triggers can be viewed in the left section of the Rules panel within the designer, as illustrated in the image below.
This document provides an explanation of the default triggers in ClaySys AppForms.
Default Triggers
The default triggers in ClaySys AppForms are:
1. FormLoad Trigger
The FormLoad trigger is activated when the form is initially loaded. Any rules and primary actions that need to be executed during this phase should be defined under the FormLoad trigger. To use it, create a rule with the necessary actions and decision logic, and set its trigger to FormLoad. This is where you can specify the initial tasks that should occur as soon as the form loads.
2. Form Unload Trigger
The Form Unload trigger is executed when the form is being closed or when the user navigates away from it. Any actions that need to occur specifically during the form’s unload process should be defined in this trigger. Use it to perform tasks that should only run when exiting or leaving the current form.
3. Navigate Away Trigger
When a new form is opened from a parent form, the rule set under the NavigateAway trigger of the parent form will be executed. This typically occurs when another form is loaded using the LoadForm rule or when the form is opened through a button’s Click action.
4. On SpellCheck
When a spell check is performed, the rule associated with the OnSpellCheck trigger is executed. To better understand this, let’s look at an example.
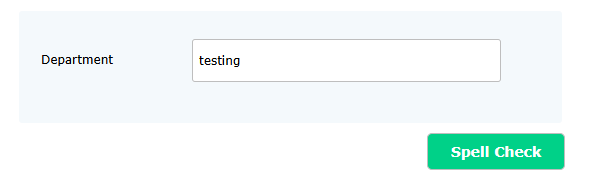
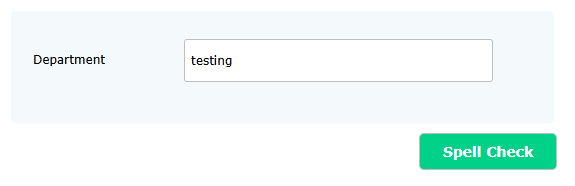
Drag and drop a Textbox, Label, and Button control onto the form, and rename them as needed.
Check Enable Spell Check property for Textbox as illustrated in the image below.

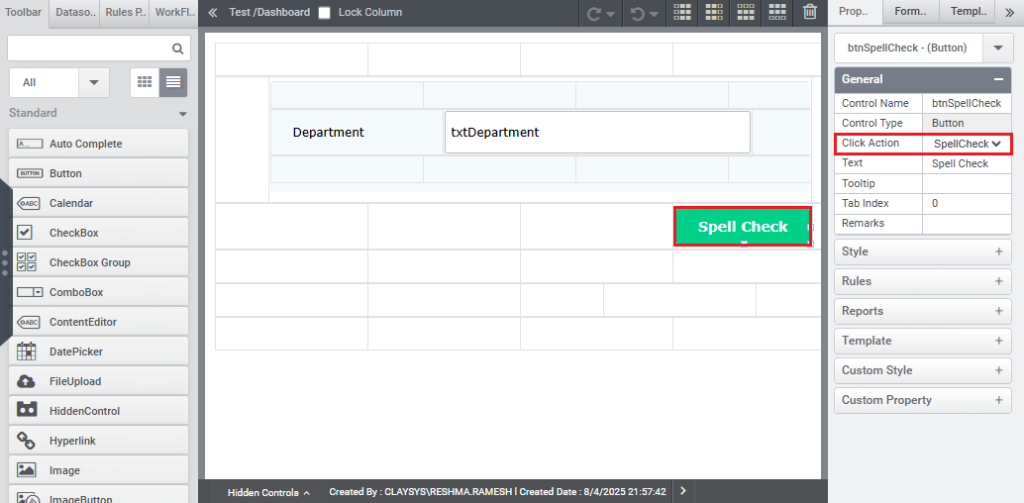
Select the SpellCheck option in the Click Action property of the button control, as demonstrated in the image below.
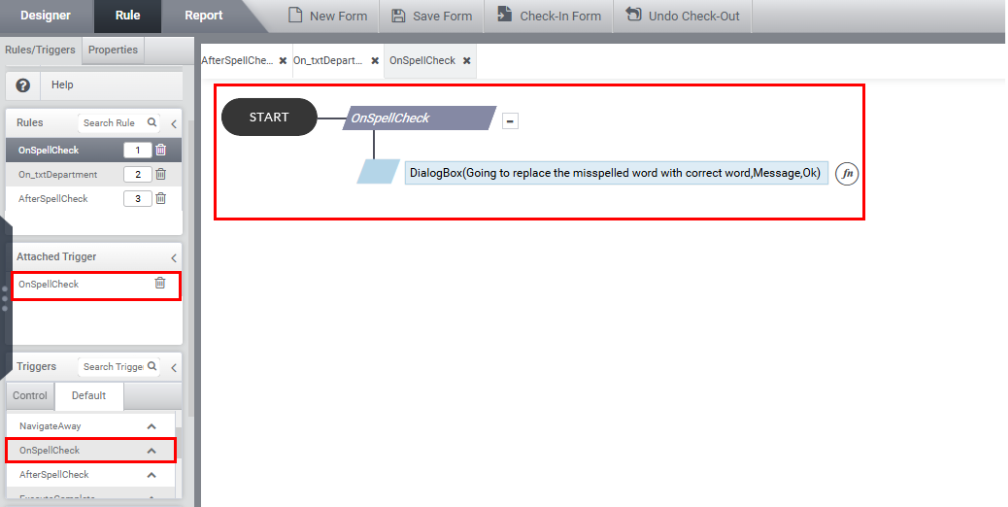
Create a rule to display a message box and set the trigger to On SpellCheck, as shown in the image below.
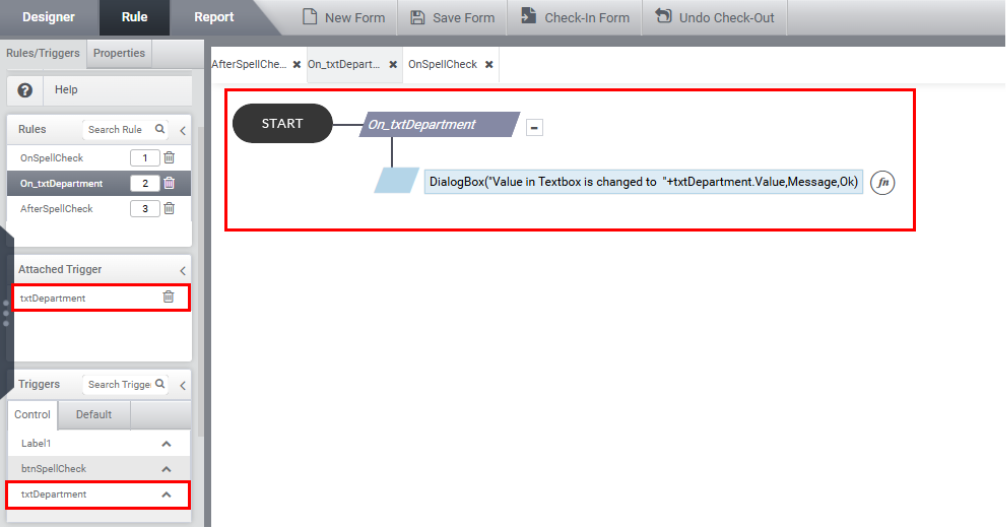
Create a rule to display a message box and set the trigger to textbox, as shown in the image below.
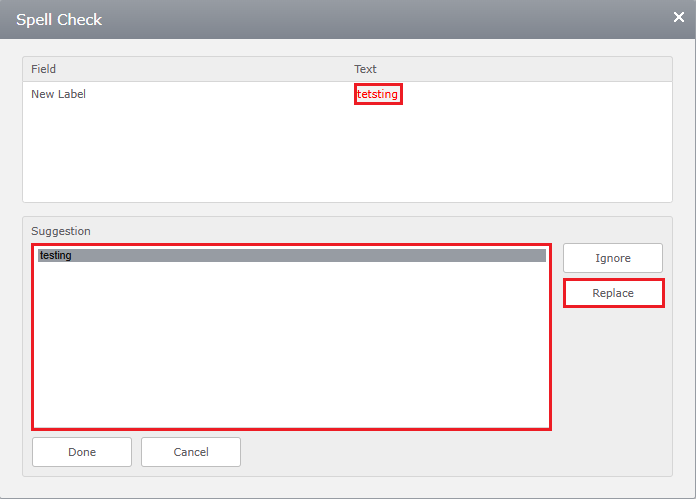
Click Preview and intentionally enter a misspelled word in the textbox. This will trigger the rule associated with the textbox. Next, click the Spell Check button to open the Spell Check popup window. In the popup, click the misspelled word to display a list of suggested corrections. Choose the correct word from the suggestions and click the Replace button, as shown in the image below.

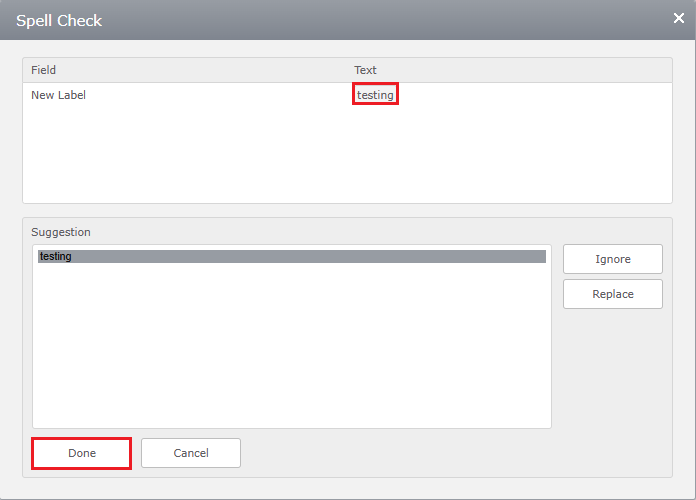
The misspelled word will be replaced with the correct word and click the done button in the popup window.

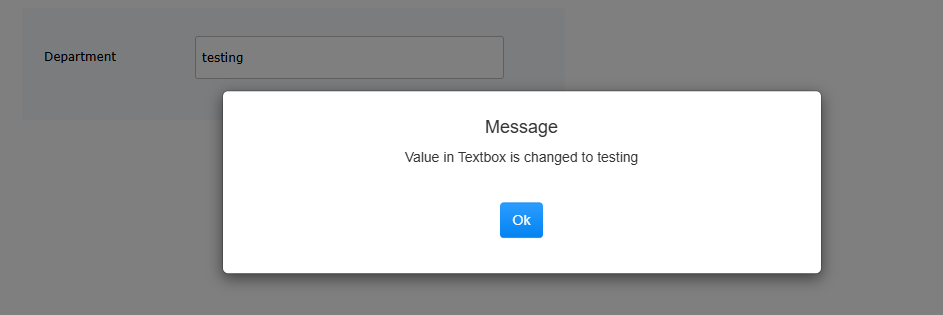
As illustrated in the image below, the rule defined under the On SpellCheck trigger will be executed.
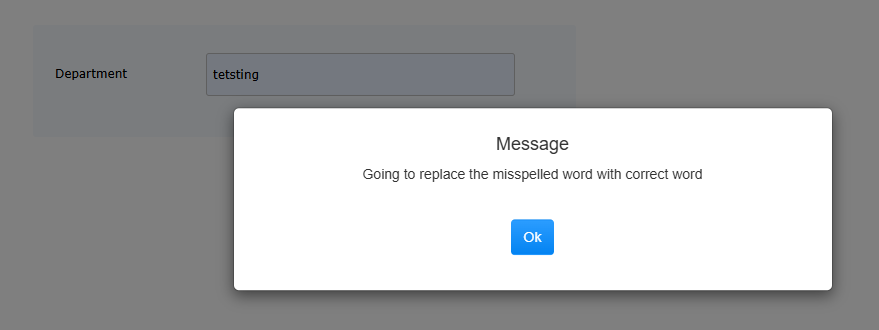
Click OK. This will execute the rule associated with the Textbox trigger, as shown in the image.

Click OK, and the value in the textbox will be updated.
Note: The value in the textbox will be updated only after the rule under the On Spell Check trigger is executed.
5. After Spell Check
When a spell check is performed, the value in the textbox is first updated, and then the rule under the After Spell Check trigger is executed. To better understand this process, let’s look at an example.
Drag and drop a Textbox, Label, and Button control onto the form, and rename them as needed.
Check Enable Spell Check property for Textbox.
Select the SpellCheck option in the Click Action property of the button control, as demonstrated in the image below.
Create a rule to display a message box and set the trigger to After SpellCheck, as shown in the image below.

Create a rule to display a message box and set the trigger to textbox, as shown in the image below.

Click Preview and intentionally enter a misspelled word in the textbox. This will trigger the rule associated with the textbox. Next, click the Spell Check button to open the Spell Check popup window. In the popup, click the misspelled word to display a list of suggested corrections. Choose the correct word from the suggestions and click the Replace button, as shown in the image below.
The misspelled word will be replaced with the correct word and click the done button in the popup window.
The rule under textbox triggers as shown in the image below.
Click OK. The value in the textbox will be updated, and the rule under the After SpellCheck trigger will be executed, as illustrated in the image below.
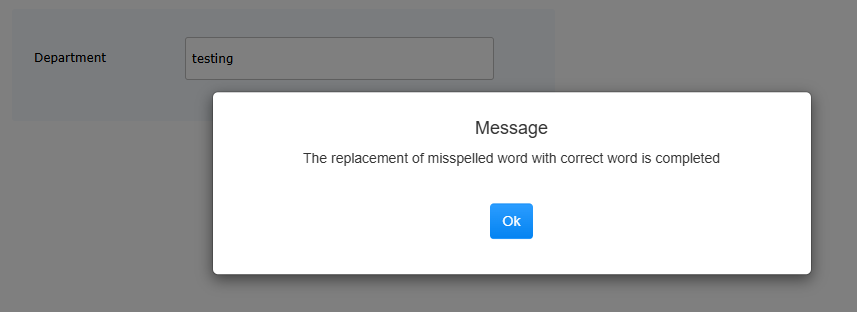
Click OK. The updated value is shown.
Note: The value in the textbox is updated first, followed by the execution of the rule under the AfterSpellCheck trigger.
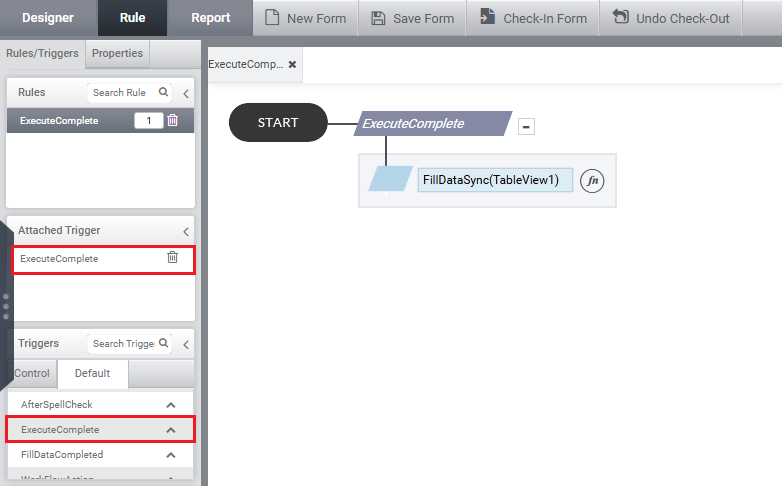
6. ExecuteComplete
The ExecuteComplete trigger is used to initiate a rule once an Async Execute Command has finished executing in the form. After the Execute Command completes its execution, the actions defined in the rule associated with the Execute Complete trigger will begin to run.
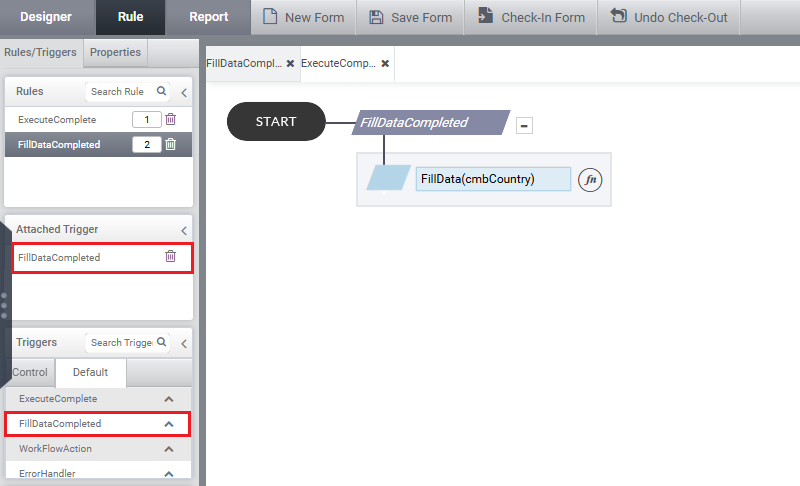
7. FillData Completed
This trigger functions similarly to the ExecuteComplete trigger, with the key difference being that it activates upon the completion of any fillData call within the form. Once an asynchronous fillData command finishes execution, this rule is triggered. This can be configured for a fillData call to any control, such as a Combo Box, Table View, and others.
8. Workflow Action
Workflow action is the default trigger used for workflow rule when disable default action is enabled. When this option is checked, the default action pop-up is skipped, and the flow proceeds based on custom rules defined in the “Rules” tab.
Example:
Enable Disable Default Action for Approve button as shown in the image below in workflow configuration window.

Click Add step.
Create a rule for the Approve button using the default trigger Workflow Action, as illustrated in the image below.

The rule triggered by WorkflowAction will execute, skipping the default pop-up when Approve button is clicked in a workflow.
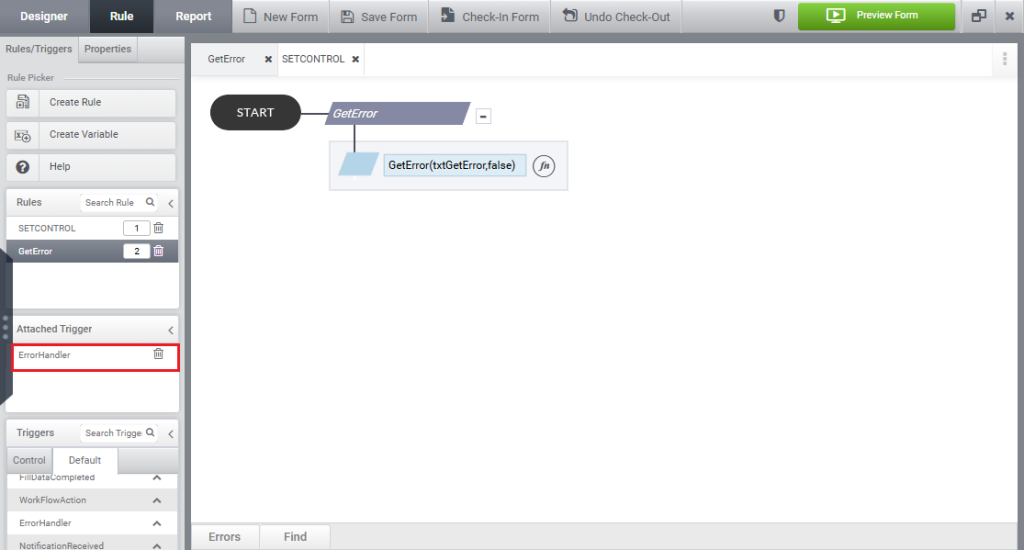
9.Error Handler
Error Handler is the default trigger associated with the GetError() function, used to capture any errors thrown within a control on the form.
Example:
To capture errors within a textbox control, the GetError() function can be used under the Error Handler trigger, as demonstrated in the image below.
10.Notification Received
The default trigger, NotificationReceived, enables users to create logic that responds to incoming notifications.