Installing AppForms SharePoint Version
Pre-installation Tasks
The current version of the ClaySys AppForms 2013/2016/2019 must be installed on any of the Microsoft Windows Platform which supports SharePoint.
Browser Client
EDGE chromium, Google Chrome and Fire Fox browsers are supported. Safari is supported for iOS devices.
Types of Installations
1.Stand-alone Installation
If you are using host name, ensure that it is added to back-connection names. AppForms installation will add it if it’s not present. But it may require a server restart to take effect.
https://support.microsoft.com/en-us/kb/896861
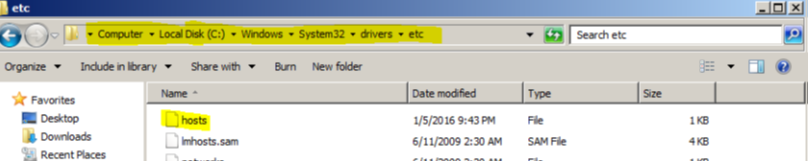
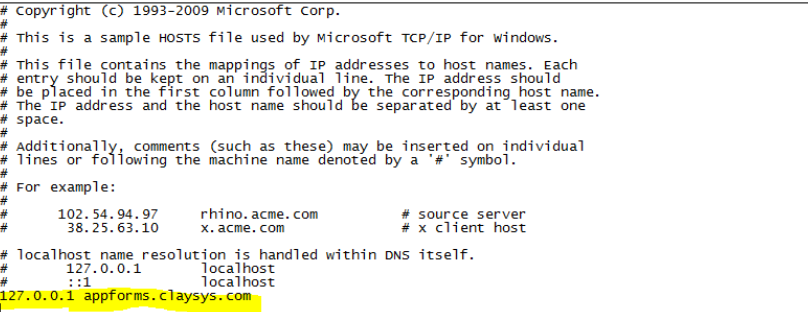
AppForms needs session to be enabled on SharePoint. A loopback needs to be added to the server’s host file.
Location c:\windows\system32\drivers\etc.
E.g.: 127.0.0.1 appforms.claysys.com (See Image on Load Balancer installation)
2.Load Balancer/Farm Installation
If you are using host name, ensure that it is added to back-connection names. AppForms installation will add it if it’s not present. But it may require a server restart to take effect. https://support.microsoft.com/en-us/kb/896861
AppForms needs session to be enabled on SharePoint. In case of Multiple Web Front End servers, using in process session will require the sticky session to be enabled in Load Balancer. Otherwise, SQL session or state server needs to be used. Loopback needs to be added to the server’s host file. Location c:\windows\system32\drivers\etc.
E.g.: 127.0.0.1 appforms.claysys.com
Ensure you run the configuration on other SP Web Front Ends.
I. Installing ClaySys AppForms
Before running the Installer
Ensure you are logged in to the SharePoint Machine as the farm account.
*This will ensure that the user has necessary permission.
Identify Farm account.
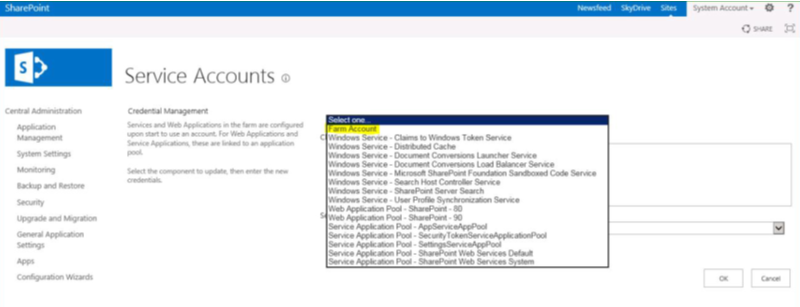
Login to the SharePoint Machine and take the SharePoint central admin. On the left menu select security, Click on the configure service account.
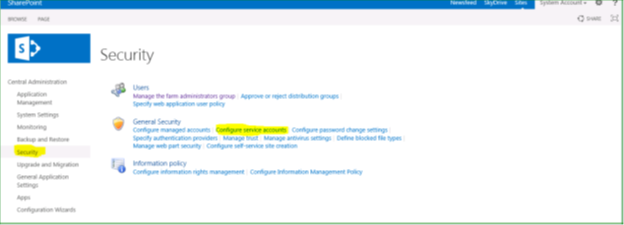
From the Credential management, select Farm account. On the second drop-down a user will be displayed, this will be the Farm account for this SharePoint Farm.
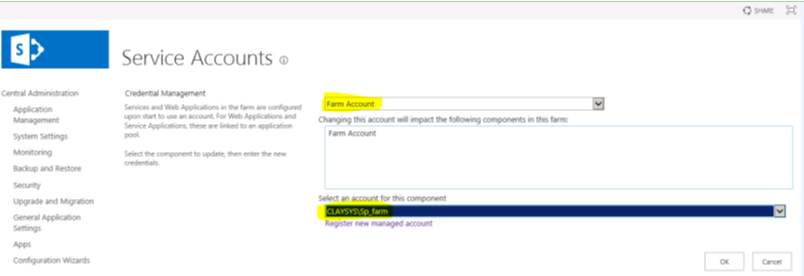
Ensure that you will be logged in as this user.
First Time Installation
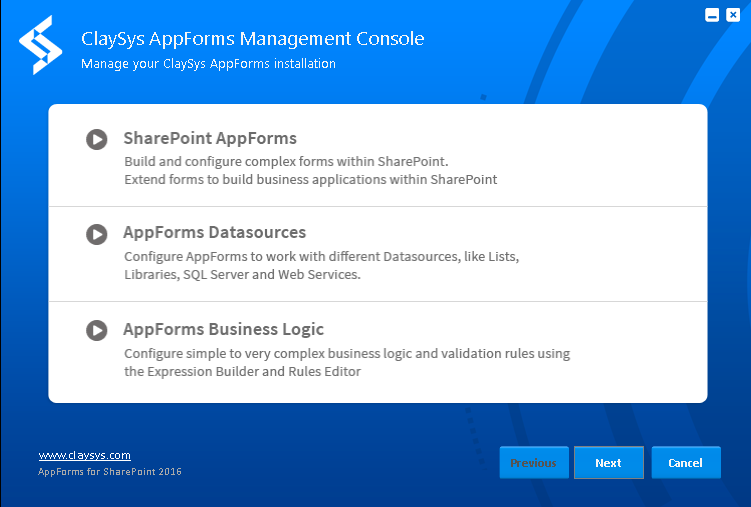
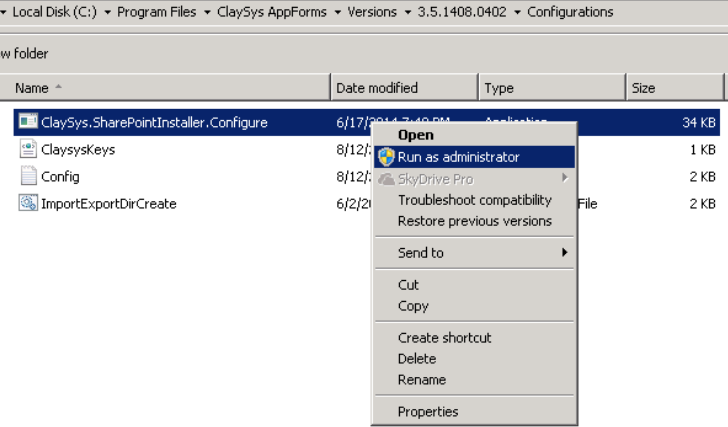
i. Right click the installer file (.exe) and select the “Run as administrator”.
ii. The ClaySys AppForms Management Console screen will show up. Click the ‘Next’ button to start installation.
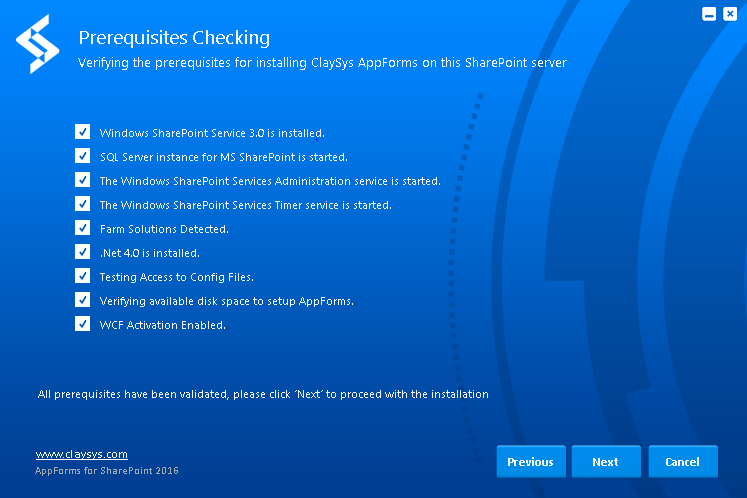
iii. The Prerequisites check for the installation will be performed.
iv. If any of the prerequisites fail, a “Question mark” icon  would show up against it. Hovering over this icon will display the information regarding the failed check.
v. A ‘click here’ link will be populated on the screen so that the Administrator can view the failure log.
vi. If a failure happens due to a service not running, or is stopped for some reason, it has to be manually started by the administrator.
vii. A ‘Refresh’ button will appear once all the prerequisite fails have been corrected and are active.
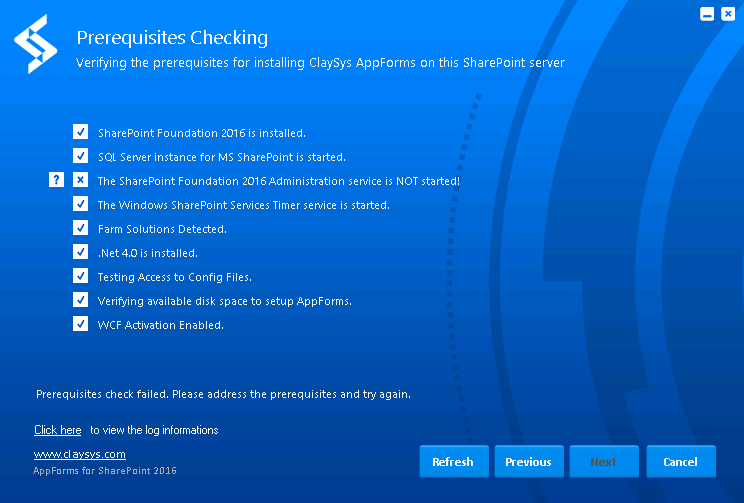
viii. Clicking ‘Refresh’ will refresh the installer and the ‘Next’ button will be enabled.
ix. The different package contents that are going to be installed will be listed on the screen.
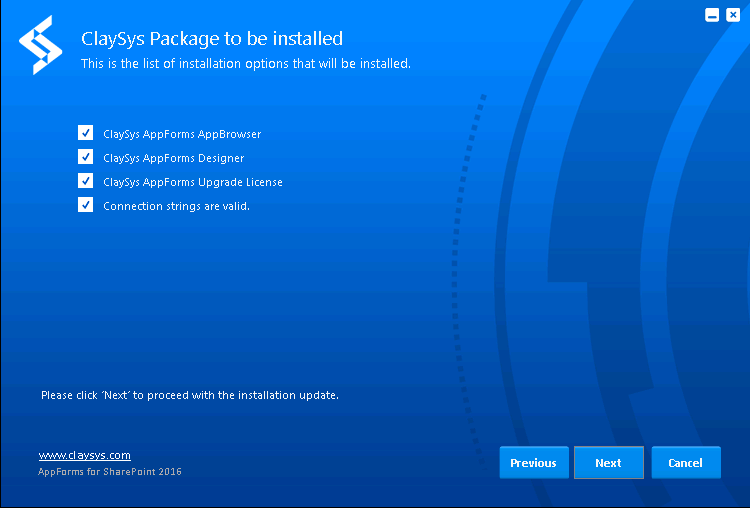
Clicking ‘Next’ will display the End-User License Agreement.
x. Read the End-User License Agreement and check the “I accept the terms in the License agreement” to enable the ‘Next’ button to proceed with the installation.
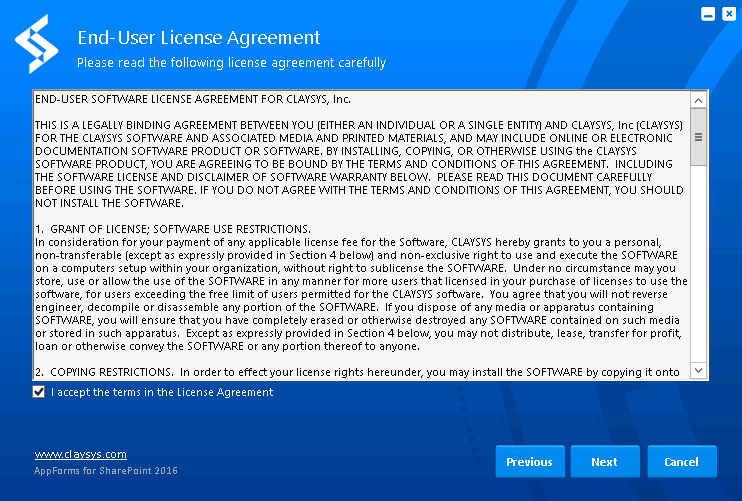
xi. Click the “Next” button.
xii. The MS SQL Server info screen with the default system selection will be displayed
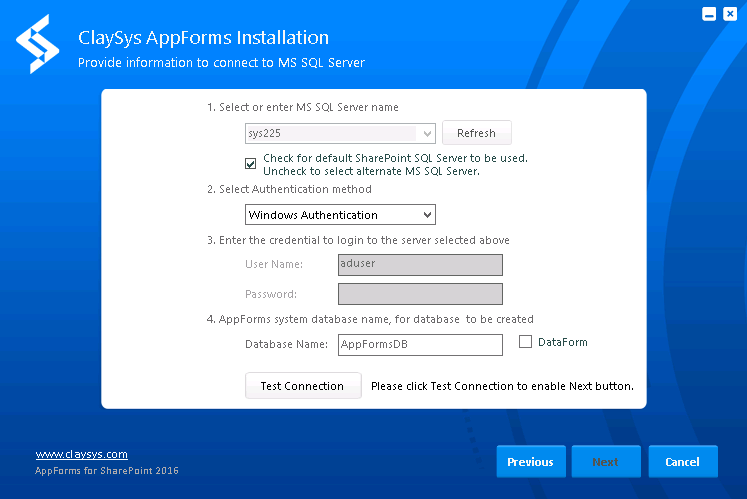
xiii. Select the MS SQL Server Name, Authentication method, Authentication credentials and the Database Name.
· The MS SQL server name would be the default server that is installed on the box. To select an alternate MS SQL Server Uncheck it.
· The Authentication method can be MS SQL Server Authentication or Windows Authentication.Windows would be the default selection.
· The Authentication credentials respective to the Authentication method should be provided.
· The default Database Name would be AppFormsDB. On subsequent installations, this can be Edited for pointing to another exiting DB.
· User can select DataForm option to activate ADB in AppForms.
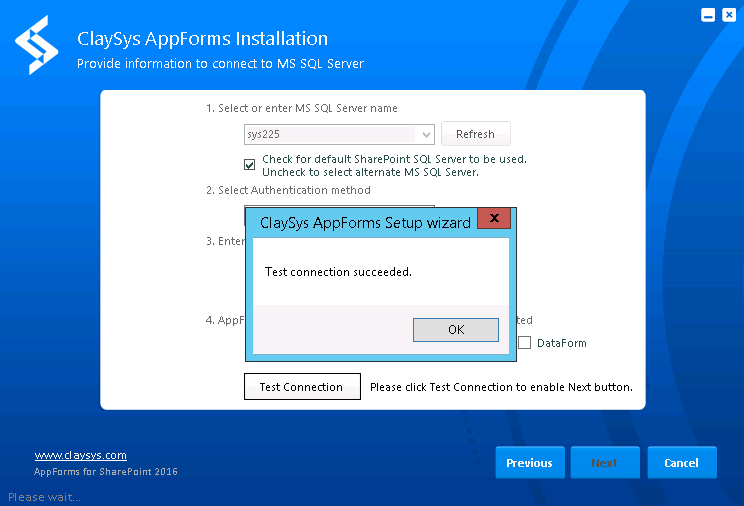
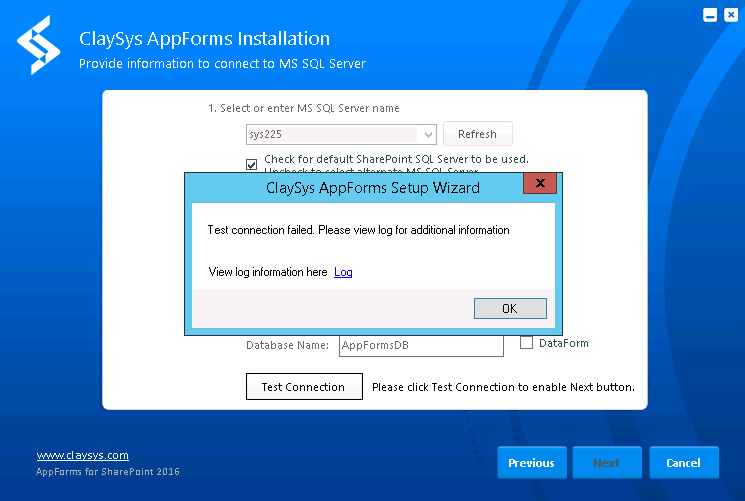
xiv. On entering the valid MS SQL Server info in all the fields, the “Test Connection” button would be enabled.
xv. Click on the “Test Connection” button to verify the connection and to enable the ‘Next” button.
· The ‘Next’ button will be enabled only when the “Test Connection Succeeded” alert message Appear.
- Clicking ‘Next” will display a window to provide details to connect to DataForm.
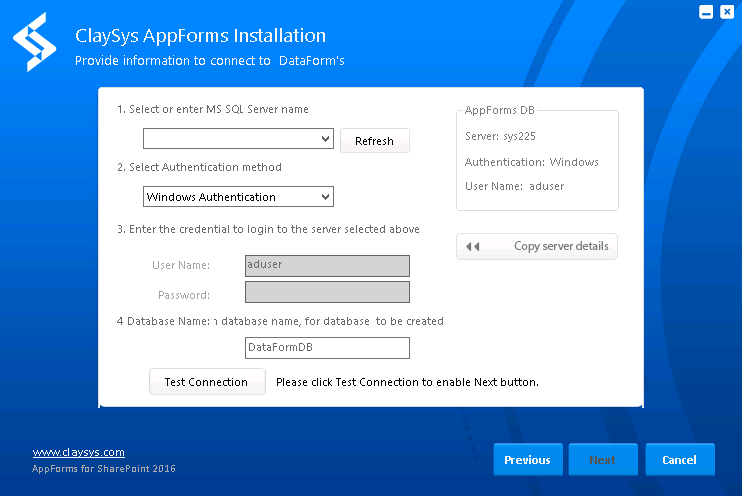
- A user can copy the server details entered in the MS SQL Server info screen by clicking on the ‘Copy server details’ button.
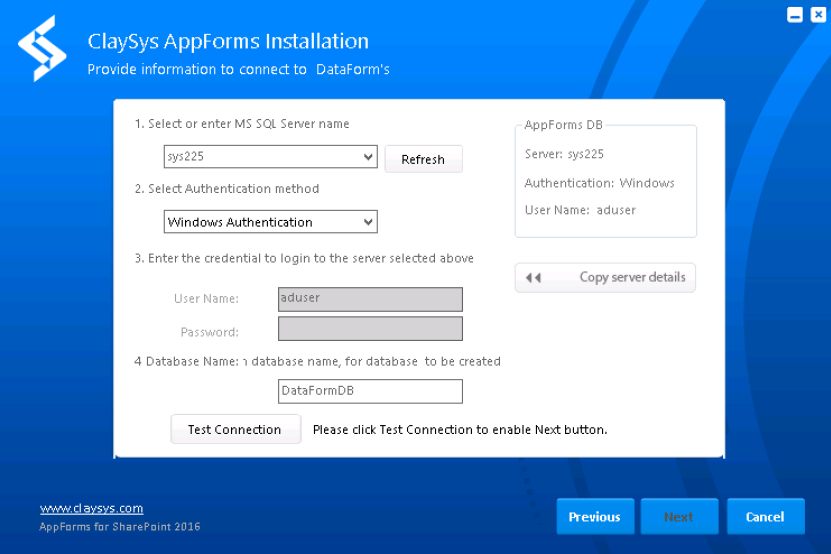
- Click on the “Test Connection” button to verify the connection and to enable the ‘Next” button.
· If the connection test fails, a “Test Connection Failed” alert message would appear with a link to view the failure log.
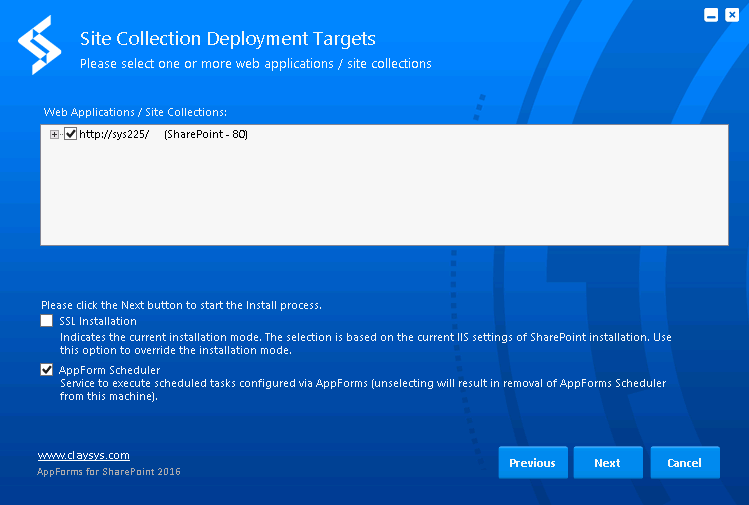
xvi. Clicking ‘Next” will display the Site Collection Deployment Targets screen.
· A tree view of all the MS SharePoint site collections and their respective sites will be displayed from the server. The specific site to be targeted for deployment can be selected from the view.
· A site would be listed in red color if the user does not have the necessary permissions to install the ClaySys AppForms on it.
· To select the SSL installation mode, check the ‘SSL installation’ check box. By default this checkbox is unchecked and on selecting this option it will override the installation mode.
· If the user need to activate the Scheduler services, enable the AppForms Scheduler check box and click ‘Next’.
To activate the ClaySys AppForms on sites where the current user does not have permission, the wizard has to be re-run as the user who has the necessary privilege.
[See Activate for Web Application].
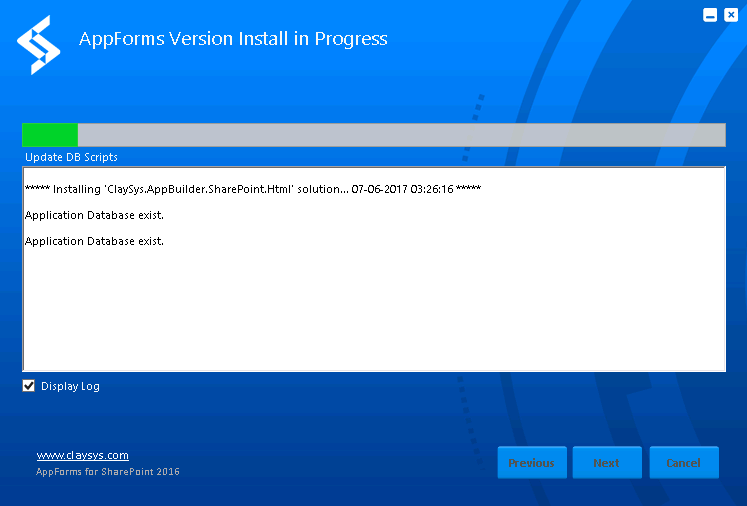
xvii. Click ‘Next’ to start installing the files. Once the installation is in progress, the ‘Cancel’ button will be disabled.
xviii. Checking the ‘Display Log Details’ will display the installation log.
xix. Clicking ‘Next’ would display the ‘Setup Complete’ screen and the user can open the Installation log by selecting the ‘View the Log information when the wizard closes’, checkbox.
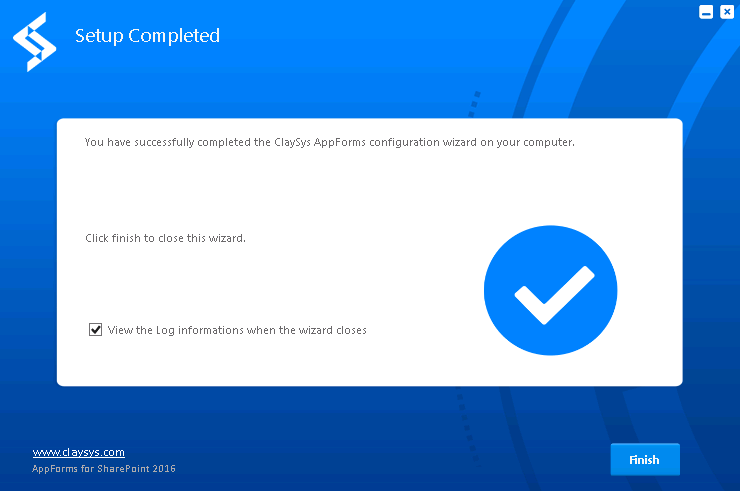
xx. Clicking ‘Finish’ will close the ClaySys AppForms Management Console and would open up the browser to display the Activation page in the default MS SharePoint site.
FAQ:
I. Install ClaySys AppForms on farm server.
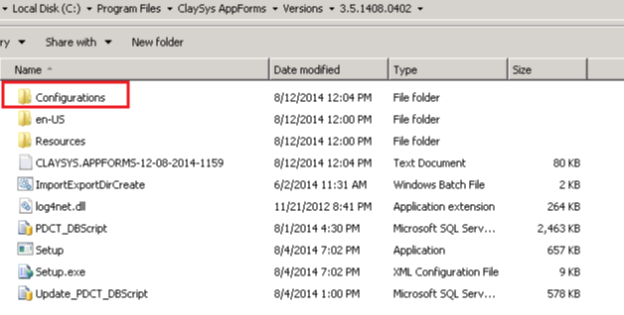
i. Locate the Configuration Files
a. Configurations files are created in the machine where the AppForm has been installed.
b. Example Location: – C:\Program Files\ClaySys AppForms\Versions\3.5.1408.0402\Configurations
ii. Make a copy of the Configuration folder across multiple servers to configure the ClaySys AppForms in all the servers.
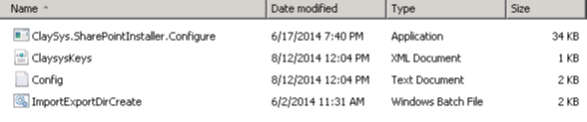
iii. Run the ‘ClaySys.SharePointInstaller.Configure’ application in each server to configure the AppForms.
iv. Press any key, to complete the configuration.

II. ‘Next’ button disabled in Site Collection Deployment Targets Screen.
Using the deployment package, ClaySys AppForms can be completely deactivated from the entire site Collections and it can be reactivated whenever required. While doing that the Upgrade, Rollback Upgrade, Repair Installation cannot be achieved while the AppForms has been deactivated in all the site collections as these processes requires a minimum of one site should remain active.
So the deployment process will be truncated at ‘Site Collection Deployments Screen [figure 20] to Continue the process of AppForms deployment please follow the steps listed below.
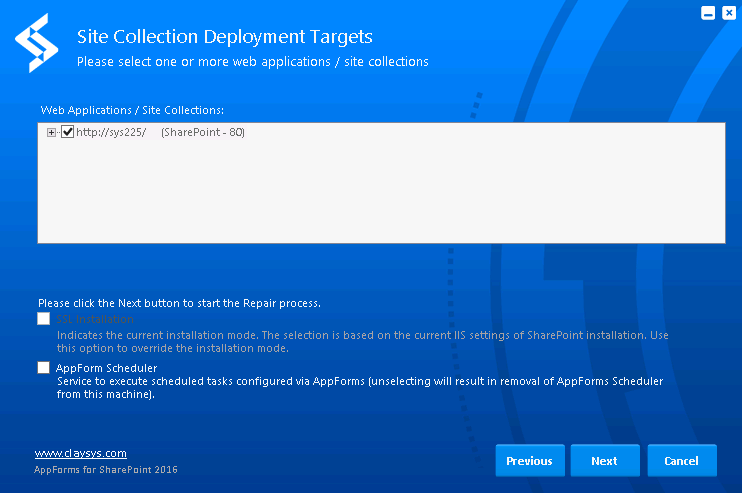
i. Navigate to control panel and find ‘ClaySys AppForms’ or Re-run the same ClaySys AppForms Setup which is currently installed.
Re-run the set up and activate the AppForms on at least one site, finish the set up.
ii. There after the Upgrade, Rollback Upgrade, Repair Installation could be done with the updated versions.
iii. Activation Page can also be accessed by clicking the AppForm designer from SharePoint site settings.
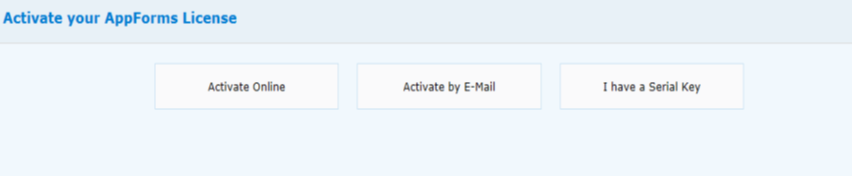
iv. Click “Activate Online”. MAC address of your machine will be displayed as an activation code.
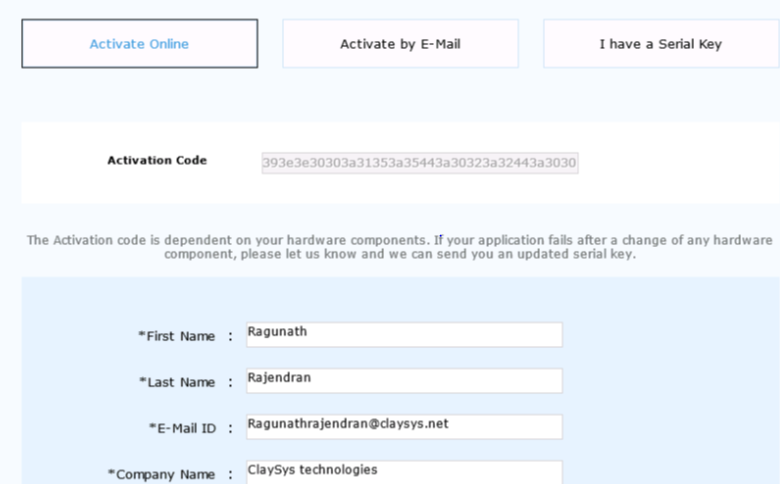
v. After filling all the mandatory fields click “Submit” button. Successful message will be displayed like below.
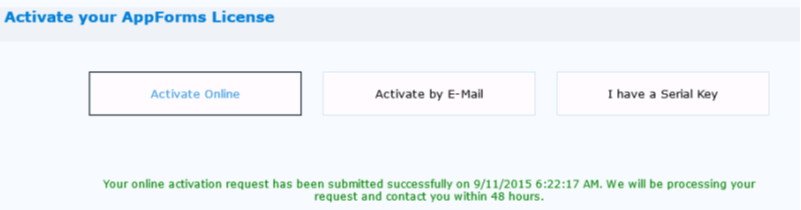
vi. Once we receive the activation request, we will send the serial key.
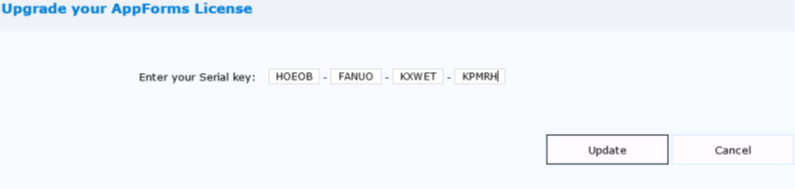
vii. After entering the serial key, click “Update” to activate the license.
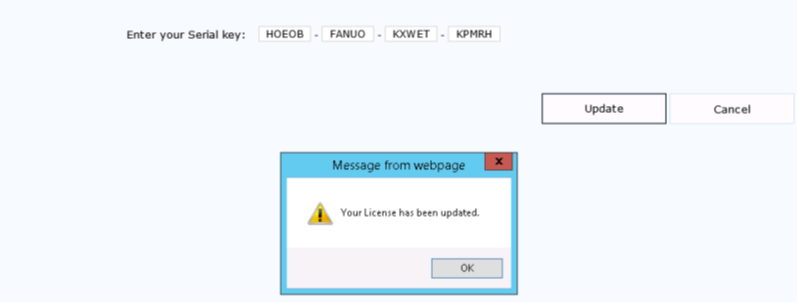
viii. User will be redirected to AppForms page.
Manage ClaySys AppForms
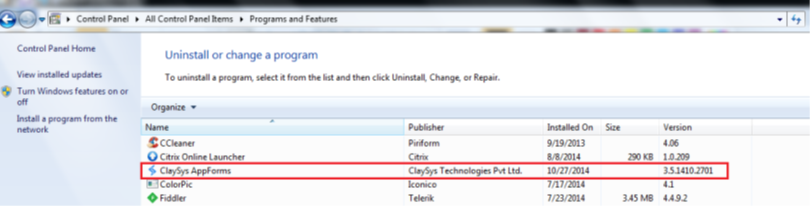
To manage the ClaySys AppForms 2016 installation administration, the setup wizard would need to be rerun until the Prerequisites are verified. The administrator can also navigate to the ClaySys AppForms 2016 from the Control panel for administration.
Steps
i. Once all the prerequisites are verified, all the different package contents that are going to be installed will be listed on the screen.
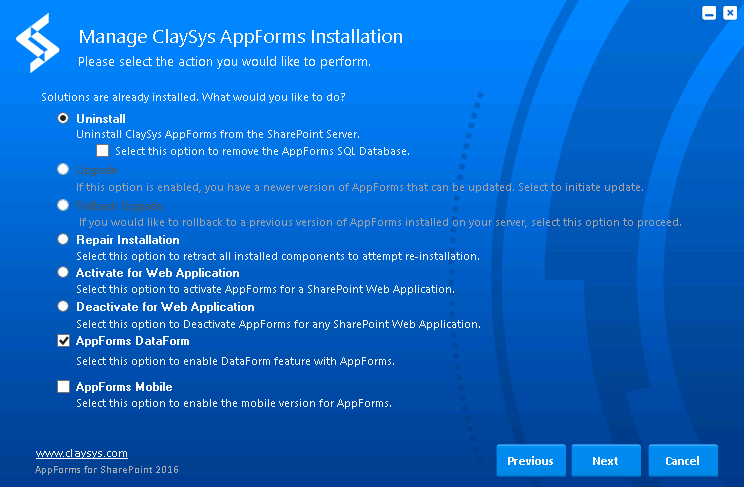
ii. During a ClaySys AppForms installation administration, the “Manage ClaySys AppForms Installation” screen would show up instead of the End-User License Agreement.
iii. The administrator can select the action to be performed. The different action options available are:
Uninstall, Upgrade, Rollback upgrade, Repair Installation, Activate for web application and Deactivate for web application.
I Uninstall
This option will remove the ClaySys AppForms installed on the machine. On checking the ‘Select this option to remove the AppForms SQL Database’ checkbox, the ClaySys AppForms and the associated database will be deleted. The forms created using the ClaySys AppForms will also be removed.

II Upgrade
This option will upgrade the ClaySys AppForms installed on the machine to the latest version. Selecting the “Upgrade” option will upgrade the newer version in place of older versions. That was not installed on the machine previously.
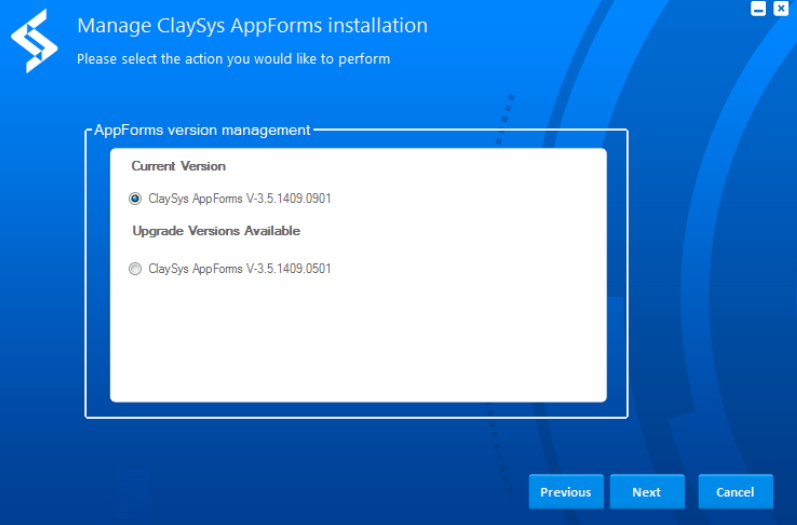
III Rollback Upgrade
These options will Roll back the ClaySys AppForms installed on the machine to the latest version. Selecting the “Rollback” option and click ‘Next’ will Display the “Manage ClaySys AppForm Installation” page with all the version details of previously installed ClaySys AppForms version in the machine.
Current Version: It will show Current ClaySys AppForms version details.
Upgrade Version Available: Previously installed or Available versions in the particular machine to Rollback. On Selecting the version and clicking ‘Next’ will rollback ClaySys AppForms to the selected version.
IV Repair Installation
This option is to repair the installed version of the ClaySys AppForms on the server. Selecting the “Repair Installation” option will retract all the installed components and attempt a clean re-installation.
V Activate for Web Application
Selecting the “Activate for Web Application” will allow the user to activate or extend the ClaySys AppForms to any other MS SharePoint site on the server.
VI Deactivate for Web Application
Selecting the “Deactivate for Web Application” will allow the user to deactivate the ClaySys AppForms for any MS SharePoint site on the server.
VII AppForms Caching
Checking this checkbox will enable server side caching of the AppForms to improve performance. A minimum of 16 GB Memory is required on the Server to enable this.
VIII AppForms Mobile
Checking this checkbox will enable the AppForms to be accessible in the Mobile phones.
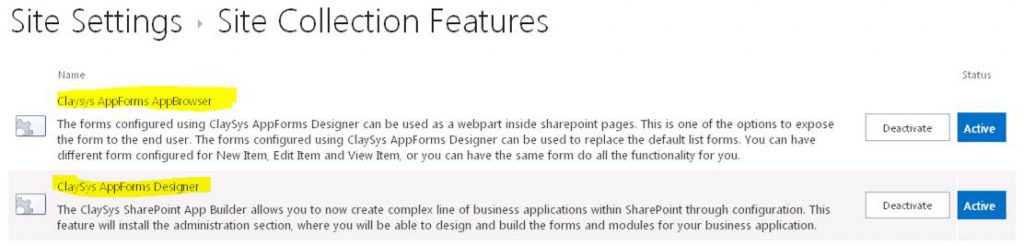
How To Activate ClaySys AppForms Features From SharePoint Site Settings
Step1: Launch the ClaySys AppForms SharePoint Site.
Step 2: Go to site settings.
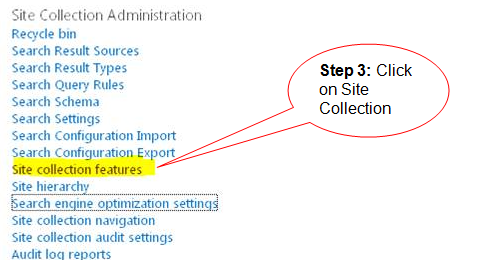
Step 3: Activate below highlighted features.