Employee Absence Tracking
In this example, we will be creating an Employee Absence Tracking form. We will be using CaySys AppForms to create the functionality explained below
The employee absence tracking is used to track the leaves taken by the employee for a financial year. There are three categories of leaves that an employee can take. These categories are
- Vacation
- Sick Leave
- Personal Leave
Vacation
The yearly vacation allocation for an employee is 80 hours. The employee can use the unused leaves from the previous years to the current year. A total of 24 hours of vacation leave can be carry forwarded from the previous year. If the employee has not utilized the vacation leaves and has a total hours more than 24 hours, then the employee is subject to forfeit the remaining hours.
The employee should apply for leave and get that approved before taking the vacation leave. So when a employee is applying for a vacation, the date of leave should not be less than the current date. The company also has a restriction that the employee should not take any company restricted date in the vacation.
Sick Leave
The yearly sick leave allocation for an employee is 40 hours. The employee can apply for the sick leave after he has taken the leave. So when a employee is applying for a sick leave, he can apply leave for the previous days and a date greater than the current date. But the total number of sick leave hours should not exceed 40 hours.
Personal Leave
The personal leave allocation for an employee is 40 hours. The employee should apply for leave and get that approved before taking the personal leave. So when a employee is applying for a vacation, the date of leave should not be less than the current date. The company also has a restriction that the employee should not take any company restricted date in the vacation.
Each time an employee comes to the absence tracking form, he should see the summary of leaves available, summary of leaves taken and the option to apply for new leaves. The steps to create the above functionality is explained in this help documentation.
This form will be divided into three sections.
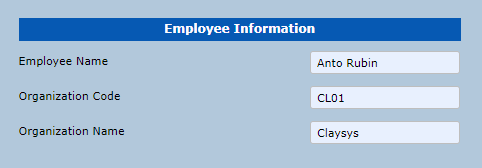
- Employee Information
This section will have the employee name, Organization Code and Organization Name.
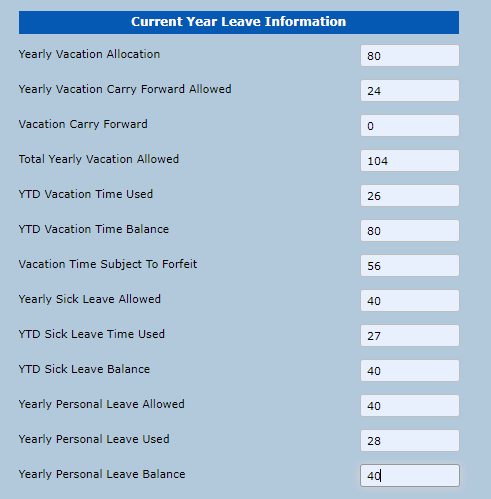
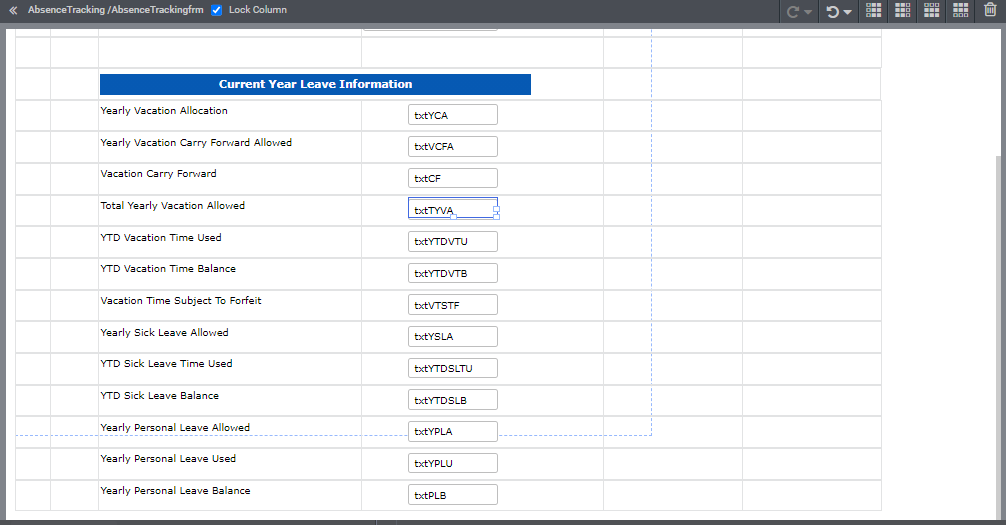
2. Current Year Leave Information
This section will have the Yearly Vacation Allocation, Yearly Carry Forward Allowed, Vacation Carry Forward, Total Yearly Vacation Allowed, YTD Vacation Time Used, YTD Vacation Time Balance, Vacation Time Subject To Forfeit, Yearly Sick Leave Allowed, YTD Sick Leave Time Used, YTD Sick Leave Balance, Yearly Personal leave Allowed, YTD Personal Leave Used and YTD Personal Leave Balance.
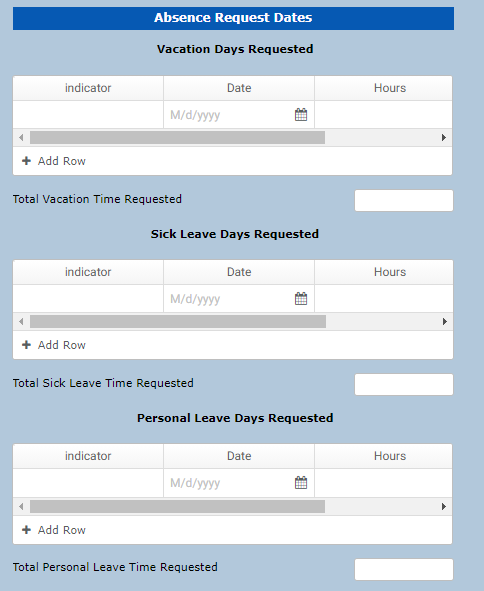
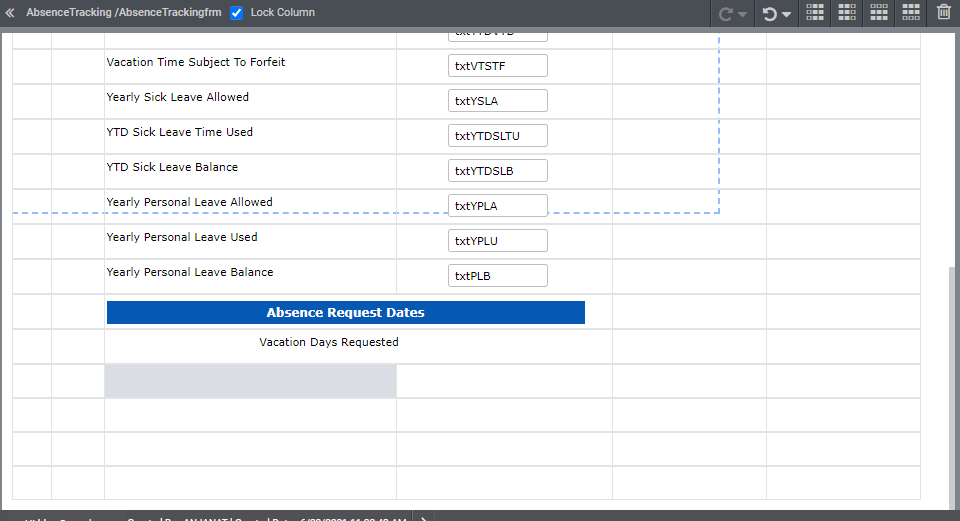
3. Absence Request Dates
This section will have three grids to capture the leaves. Vacation Days Requested, Sick Leaves Requested, Personal Leaves Requested.
Creating Required Tables
We will be using the following tables in this example
Name : EmployeeInfo
Type : SQL Table
| SI No | Column Name | Data Type | Description |
| 1 | User | VarChar | UserId |
| 2 | OrgCode | VarChar | Organization Code |
| 3 | OrgName | VarChar | Organization Name |
| 4 | FullName | VarChar | Full Name of user |
| 5 | VarChar | ||
| 6 | YearlyVacationAllocation | Number | Yearly Vacation Time Allocated |
| 7 | VacationCarryForward | Number | Vacation Carry Forwarded from previous year |
| 8 | VacationCarryForwardAllowed | Number | Vacation Carry Forward Allowed |
| 9 | TotalVacationAllowed | Number | Total Current Year Vacation Allocation |
| 10 | CurrentYearAvailableVacTime | Number | Total Current Year Vacation Time Available |
| 11 | YTDVacationUsed | Number | YTD vacation time used |
| 12 | YTDVacationTimeBalance | Number | YTD Vacation Time Balance |
| 13 | YearlySickLeaveAllowed | Number | Yearly Sick Leave Allocation |
| 14 | YTDSickLeaveUsed | Number | YTD sick leave time used |
| 15 | YTDSickLeaveBalance | Number | TD Sick Leave Time Balance |
| 16 | YearlyPersonalLeaveAllowed | Number | Yearly Personal Leave Allocation |
| 17 | YTDPersonalLeaveUsed | Number | YTD personal leave time used |
| 18 | YTDPersonalLeaveBalance | Number | YTD Personal Leave Time Balance |
Name : AbsenceRequestDates
Type : SQL Table
| Sl No | Column Name | Data Type | Description |
| 1 | User | VarChar | UserId |
| 2 | Date | Date and Time | Absence Request Date |
| 3 | Hours | Number | Total hrs |
| 4 | LeaveType | VarChar | Vacation/SickLeave/PersonalLeave |
Name : Restricted and Reserved Dates
Type : SQL Table
| Sl No | Column Name | Data Type | Description |
| 1 | Description | VarChar | Description of the restricted or reserved dates |
| 2 | Dates | Date and Time | Restricted and Reserved Date |
| 3 | Organization Code | VarChar | Organization Code |
| 4 | Organization Name | VarChar | Organization Name |
Creating the form
The AppForms gives a windows explorer kind of a experience in managing the forms and folders. The user can create folders and forms in the Forms Explorer. In this example we are going to create
- A folder named AbsenceTracking which will be the container of the form we will be creating.
- A AppForm named AbsenceTrackingfrm
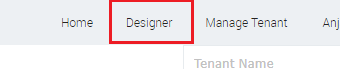
Step 1
Clicking on Designer link will load Appforms Designer
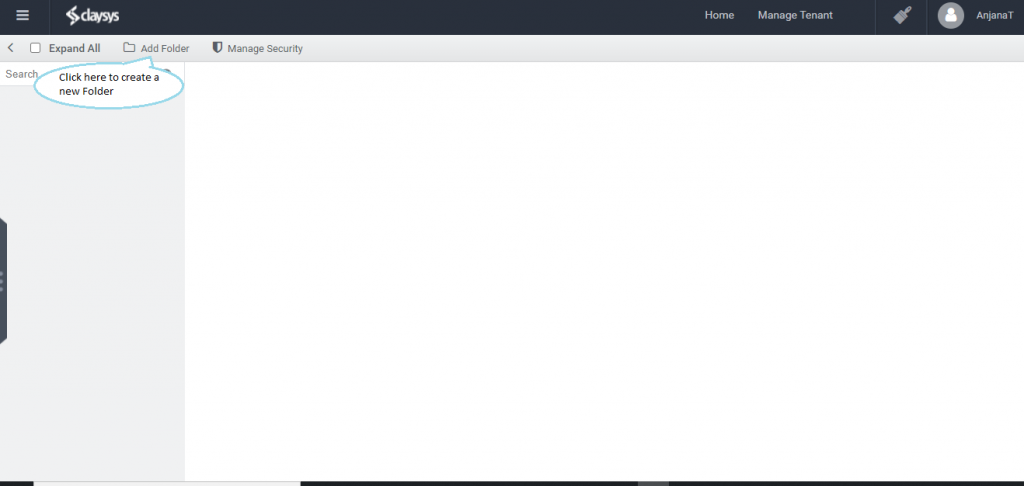
Step 2
Click on the New Folder toolbox to create a new folder
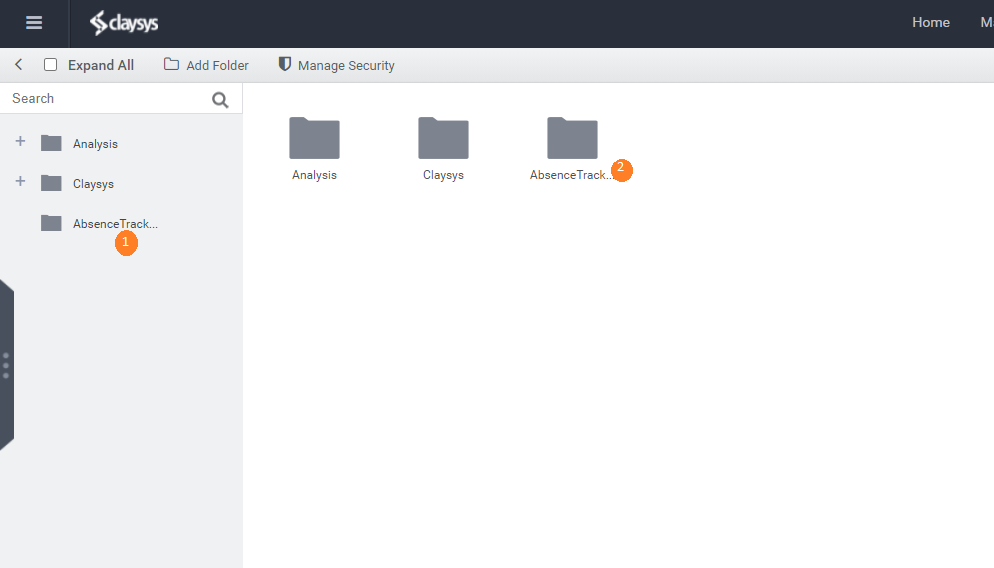
Step 3
Create a new folder named “AbsenceTracking”. Click on the folder in the1 folder tree view to select the folder or double click on the folder in the2 details panel to open the folder.
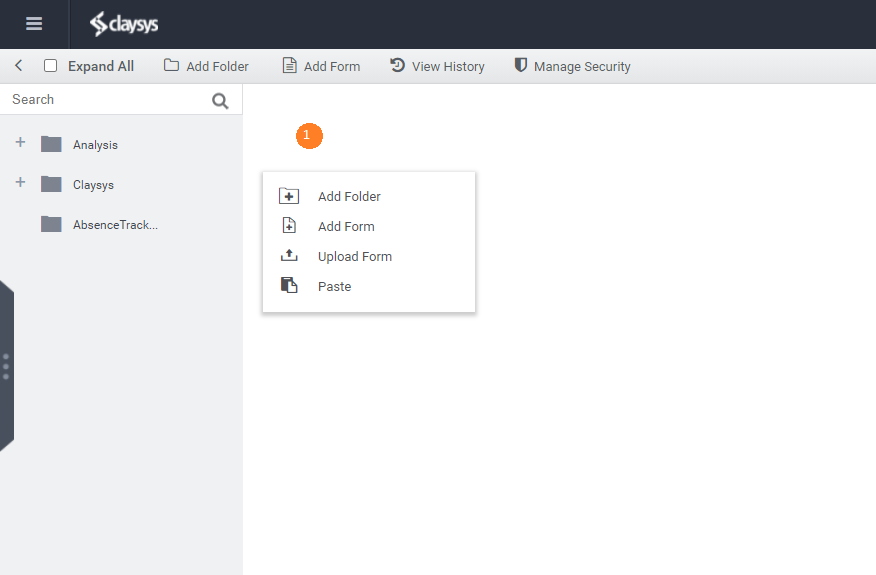
Step 4
Right click in the 1 details panel to see the context menu. Click on the new form option to create a new form.
Step 5
Clicking on the New form link in the context menu will navigate you to the forms designer. Click on the grid1 which will display the form properties where you can edit the form name. Rename the default name of “NewForm” to “AbsenceTrackingFrm”
Designing The Form
Step 1 – Form Properties
| Sl No | Property | Value |
| 1 | Name | AbsenceTrackingFrm |
| 2 | Width | 800 |
| 3 | Height | 1500 |
| 4 | Lock Column | True (This will allow the grid to behave like the grid format in MS Excel) |
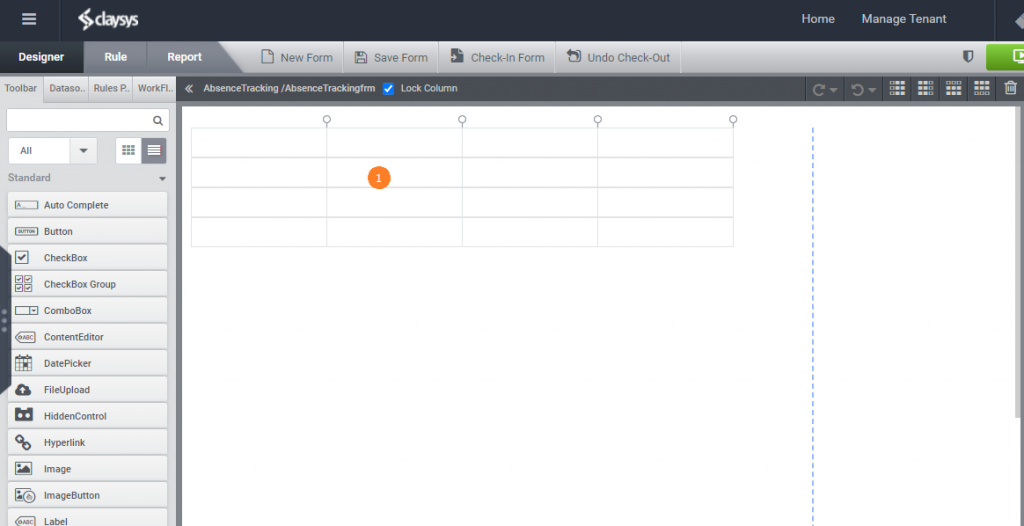
Adjust the column width for the first two columns using the 1 resize option at the top.

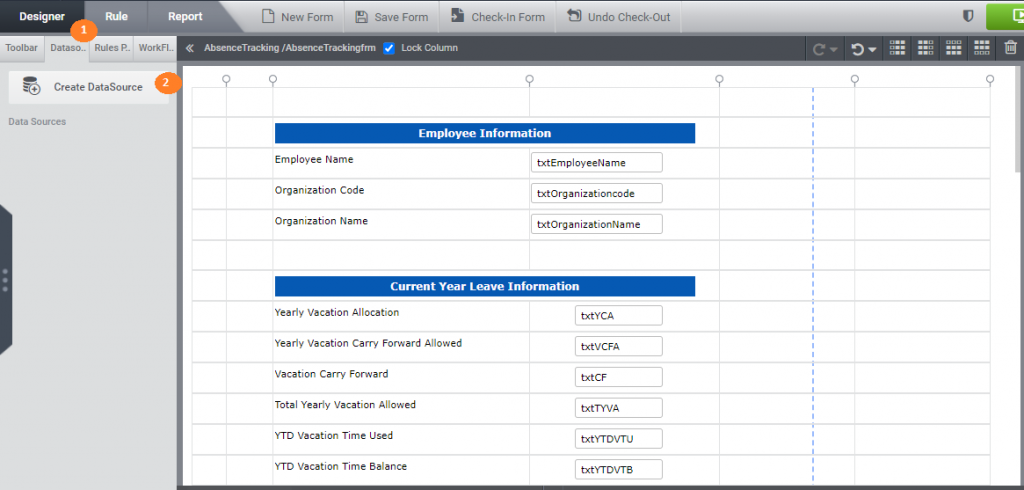
Employee Information
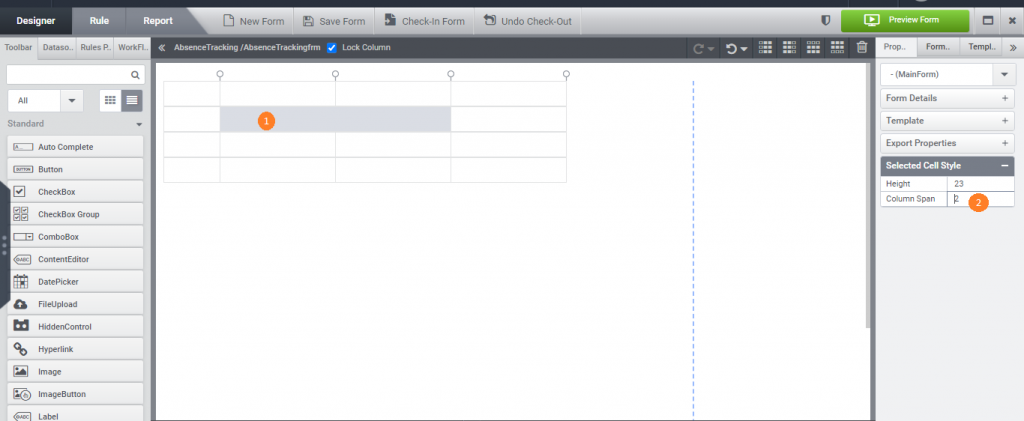
- Set the Column Span property of the cell in Row 2, Column 3 to 2. This will allow us to have a common title cell for the two columns below.
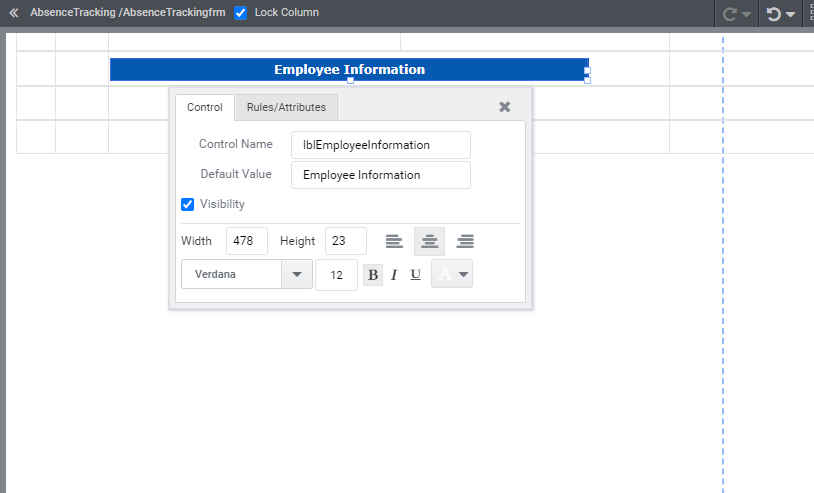
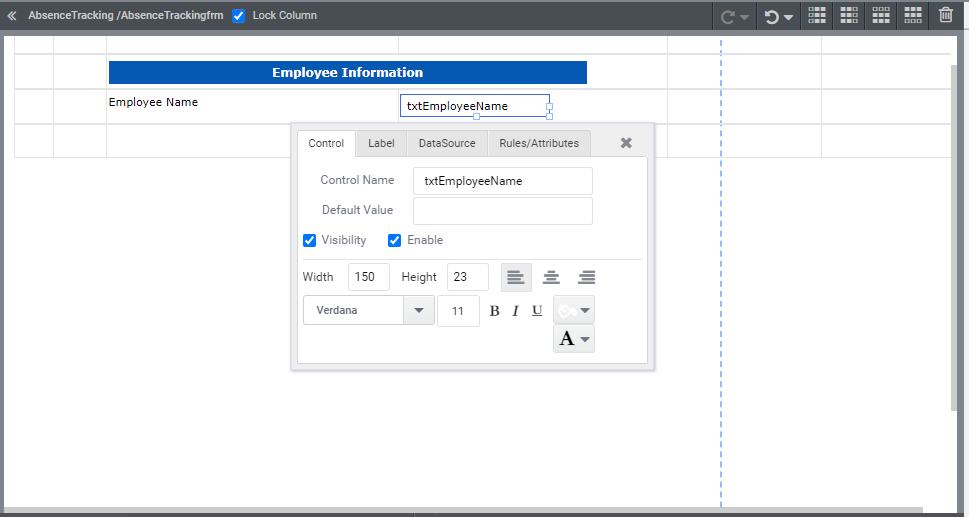
2. Drag a label from standard controls in the toolbox to the cell in row 2, column 3. Set the following properties for the label.
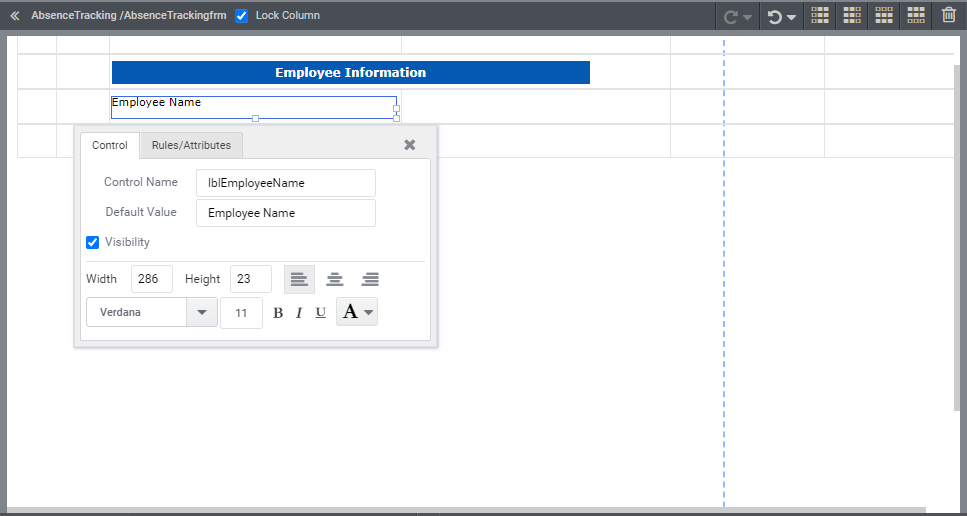
3. Drag a label from standard controls in the toolbox to row 3, column 3 and set the following properties
4. Drag and drop a textbox from standard controls in the toolbox to row 3, column 4 and set the following properties
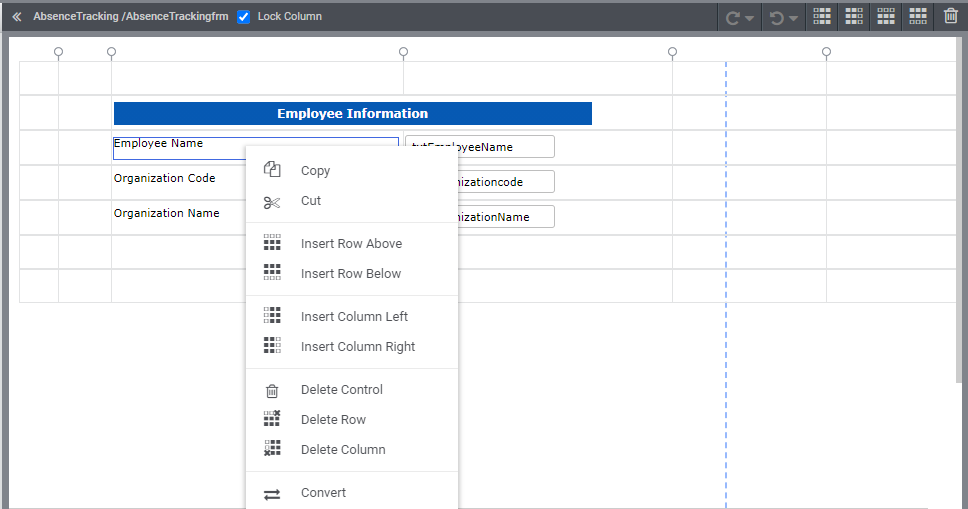
5. Now you can copy and paste the formatted controls to the next rows and edit the required properties and finally get the design output as shown below
Current Year Leave Information
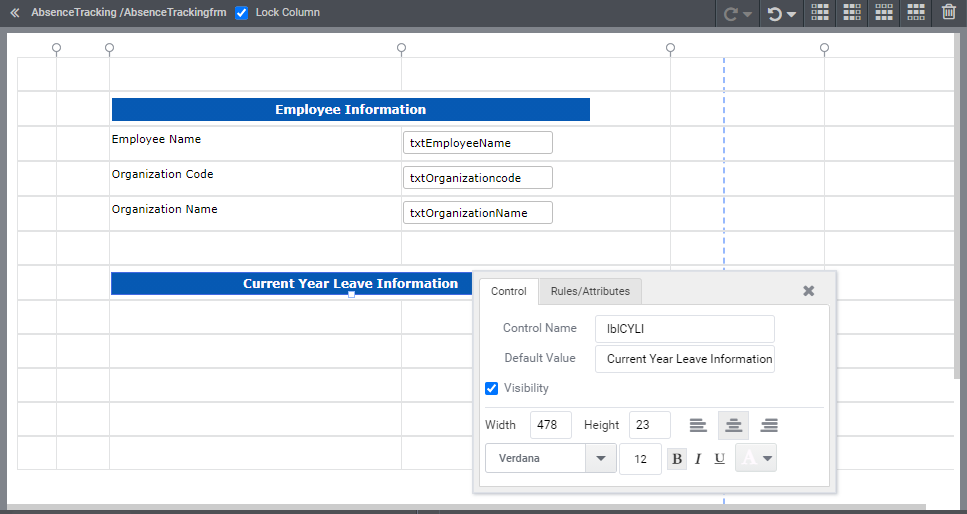
1. Set the Column Span property of the cell to 2 where we will be placing the “Current Year Leave Information” title. Place a Label control to this cell and set the properties similar to the “Employee Information”
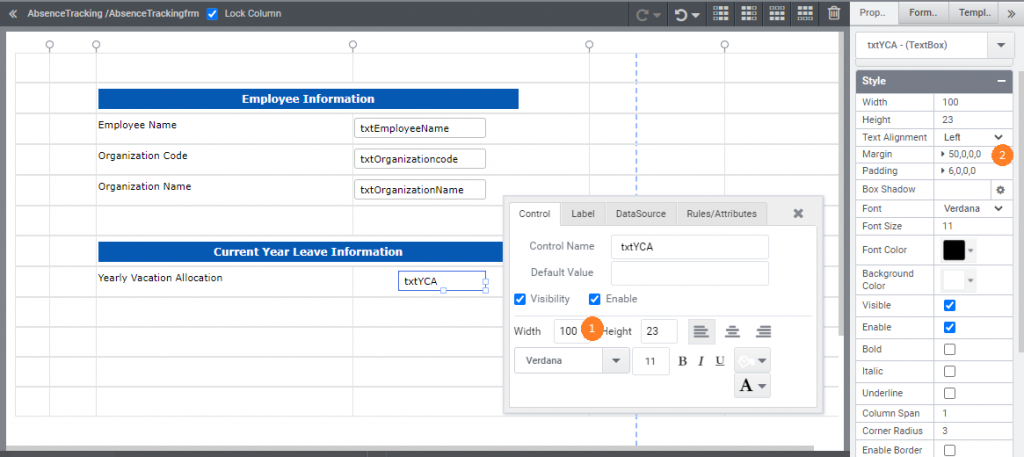
2. Now place the label and textbox in the next row to design the first row of Current Year Leave Information. The textbox width can be set to 100. Now to make sure that this textbox ends at the same level as of the textboxes in the previous section. We can set a left margin of 50 as shown in the image below.
3. Insert new rows required to add the controls in this section using the option in the toolbox at the top or using the context menu when you right click in the grid. Now copy and paste the label and textbox to the next rows and set the label and names of the textboxes as required. The naming convention we are going to use here is the short form of the label. For example “Yearly Vacation Allocation” as txtYVA. The section will have the following look after we place all the required controls.
Absence Request Dates
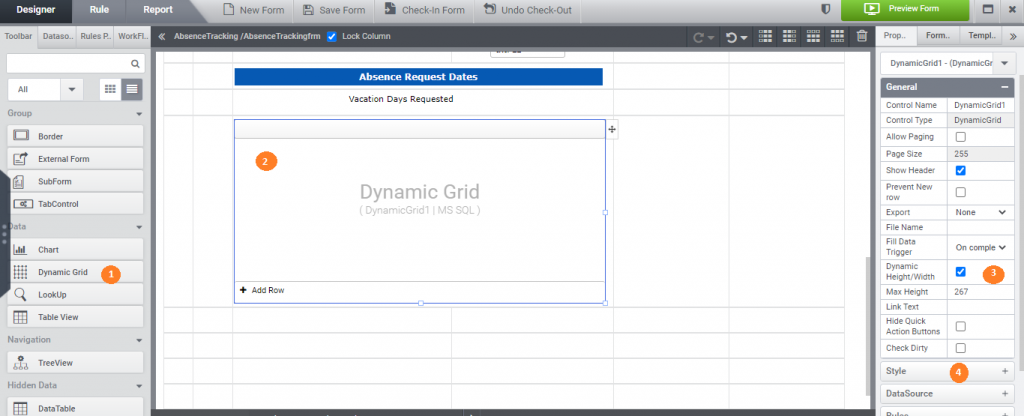
1 . Set the cell span property of the cell to 2 where we will be placing the “Absence Request Dates” title. Place a Label control to this cell and set the properties similar to the previous sections. Create a similar cell below the title for the “Vacation Days Requested” title.
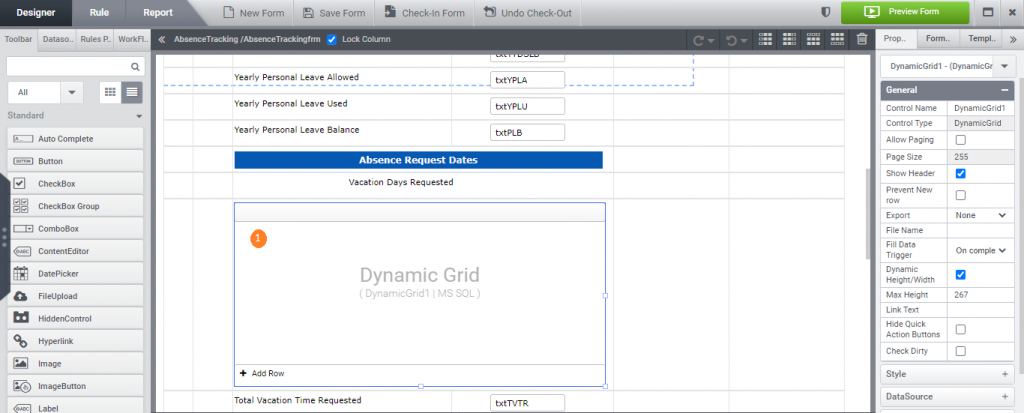
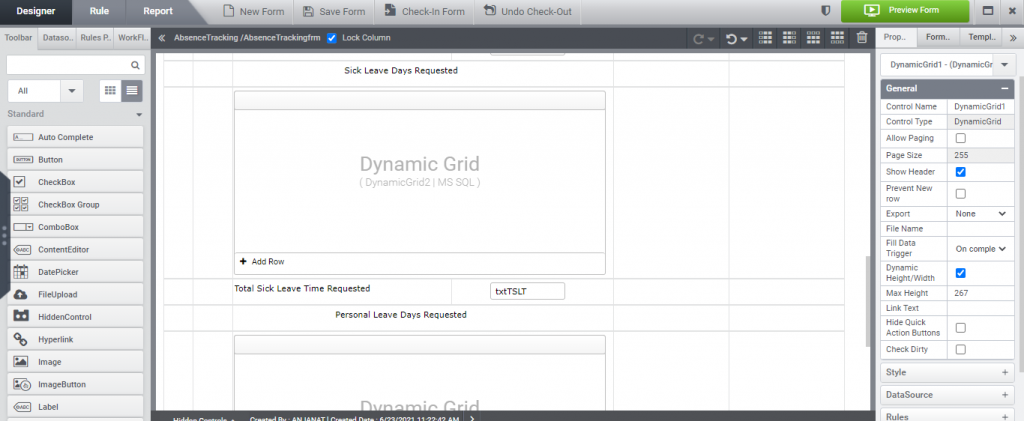
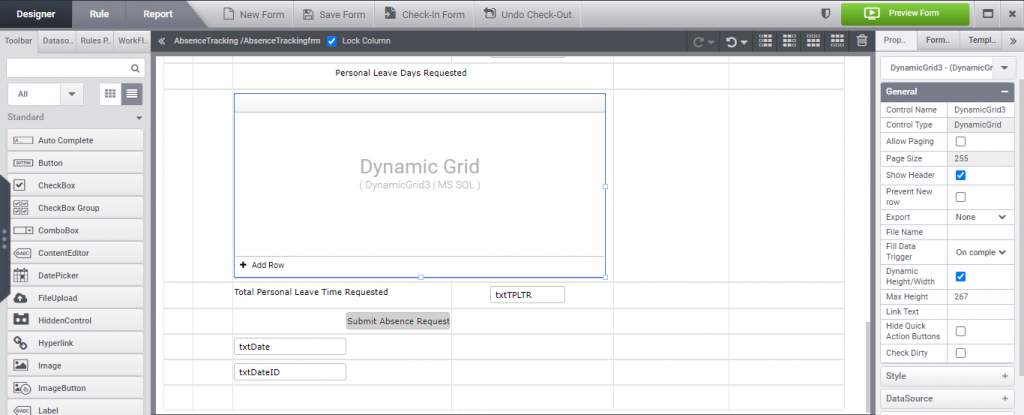
2 .Now set the cell span property of the cell to 2 where we will be placing the1 DynamicGrid control for the Vacation Days Requested. Drag and drop a Dynamic Grid control from the Toolbox (Data Section)2 to the cell below the Vacation Days Requested label. Make sure that the cell span is set to 2 before you place the dynamic grid. Now set the Dynamic Height/Width 3 property to true and the width of the4 control to 500.
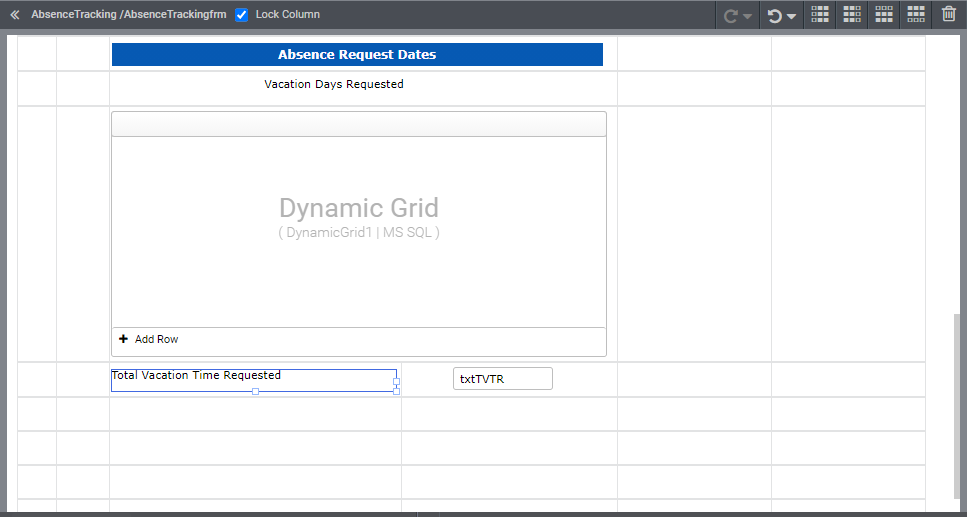
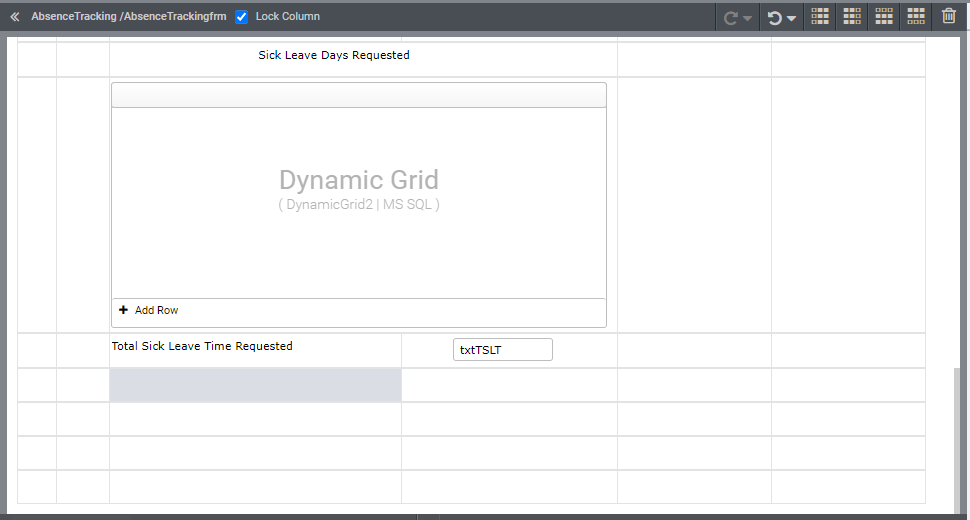
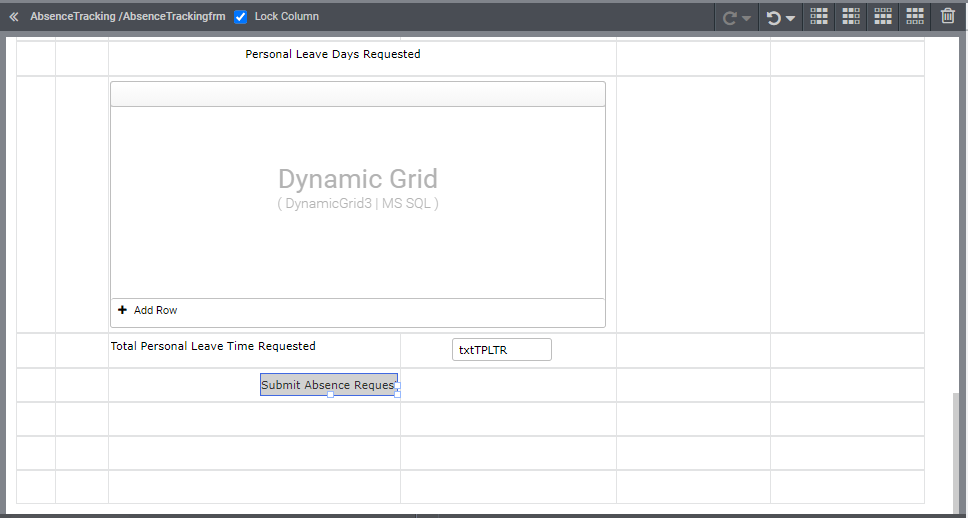
3 . Place a label and textbox below the grid control for the total for this section.
4 . Now do the same as step 2 and step 3 for the next two sections “Sick Leave Days Requested” and “Personal Leave Days Requested”. Or copy and paste the existing controls and change the label, which will save you the style formatting time.
5 . Now place a button at the end of the form as shown below.
Reading the logged in user details
The current functionality is assuming that we already have the user details in the EmployeeInfo list. So we can create a new DataSource for SharePoint pointing to this list. Please follow the instructions below to configure the DataSource to the EmployeeInfo SharePoint list.
Step 1
Click on the DataSources 1 panel on the left to bring up the following screen. There will be three datasources already in the table, because when you drag and drop a DynamicGrid to the form, it will also create its own DataSource in that form.
Click on the Create DataSource 2button which will start the wizard for configuring the new DataSource for you.
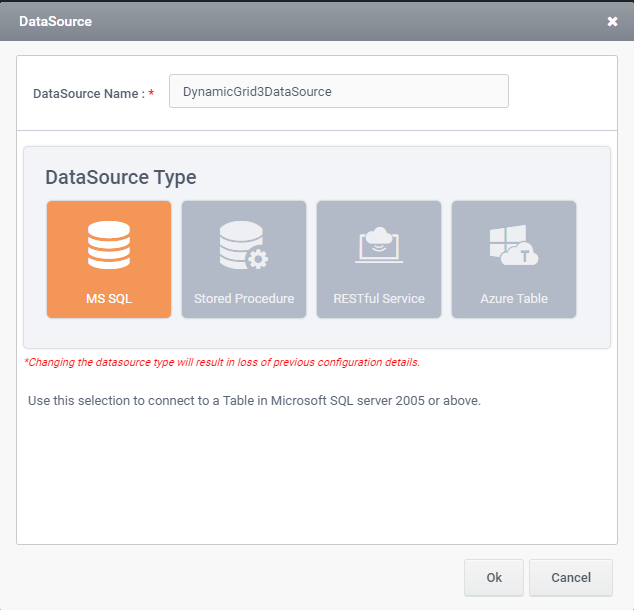
The first Step of the wizard will allow you to select the type of DataSource. Select MS SQL and click Ok button.

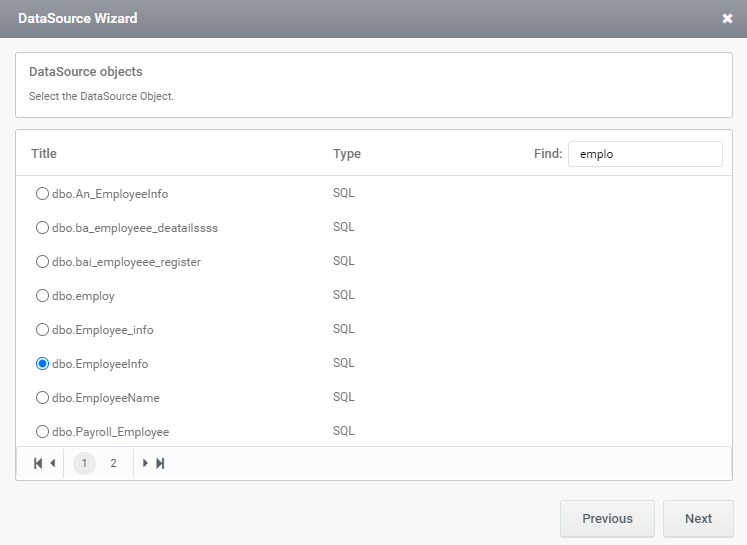
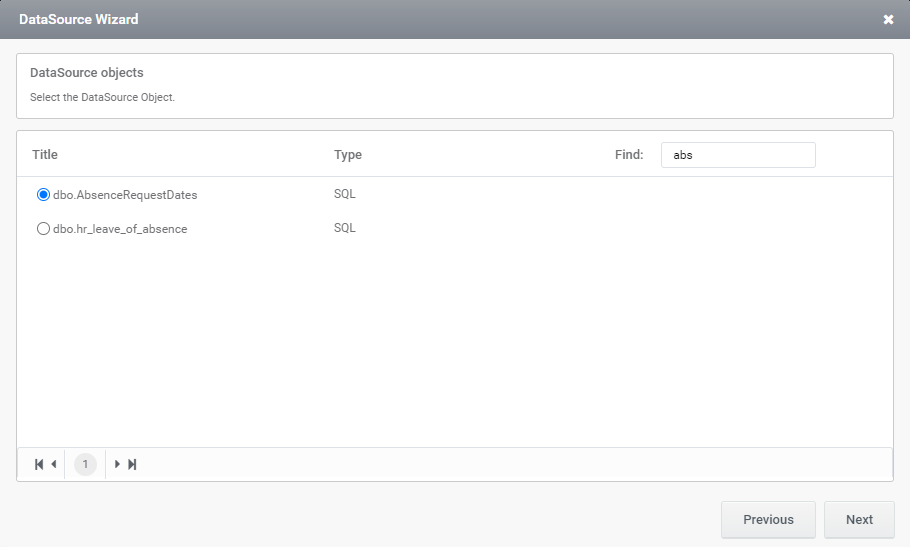
The second screen will show all the Databases. Select the database and click on Next button. All the tables in that database will be listed in the next page. Select the table EmployeeInfo and click Next.
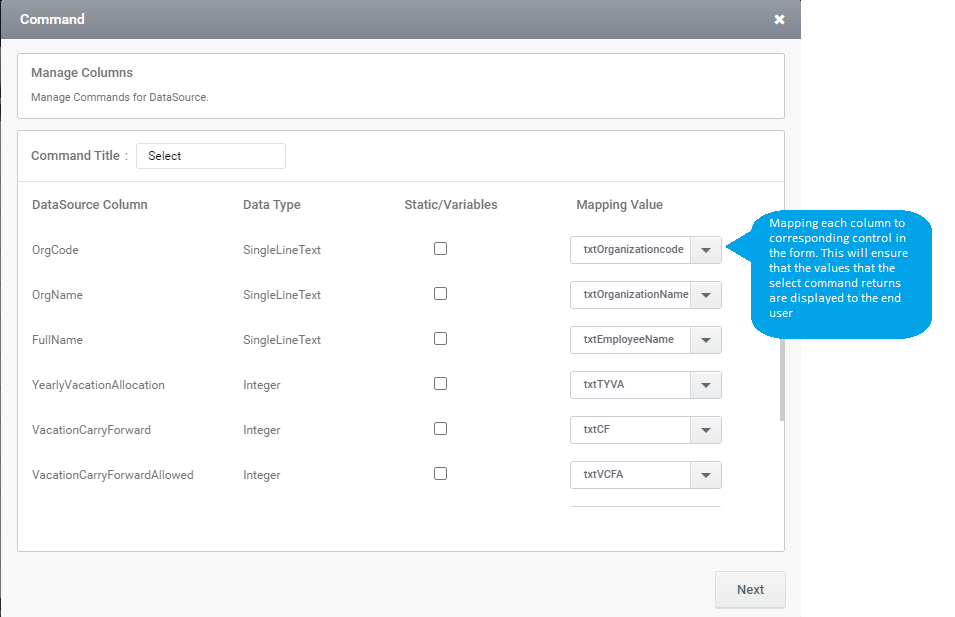
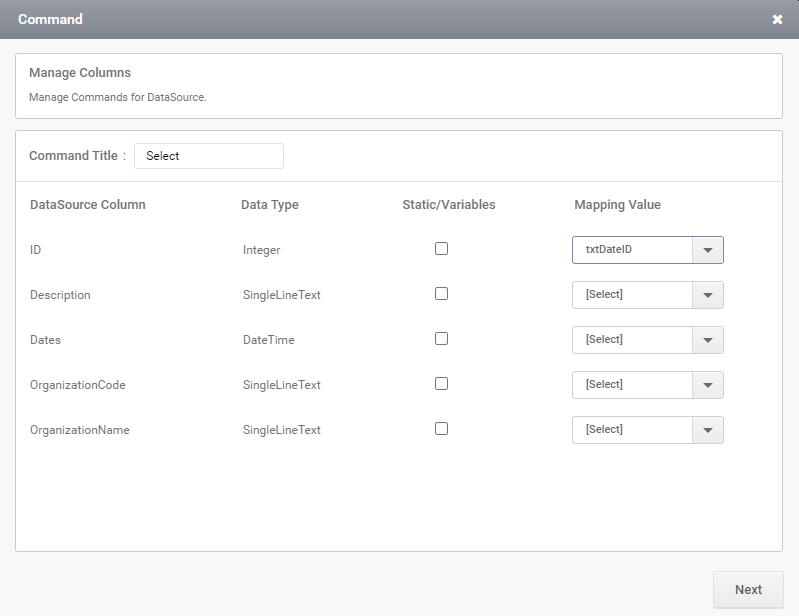
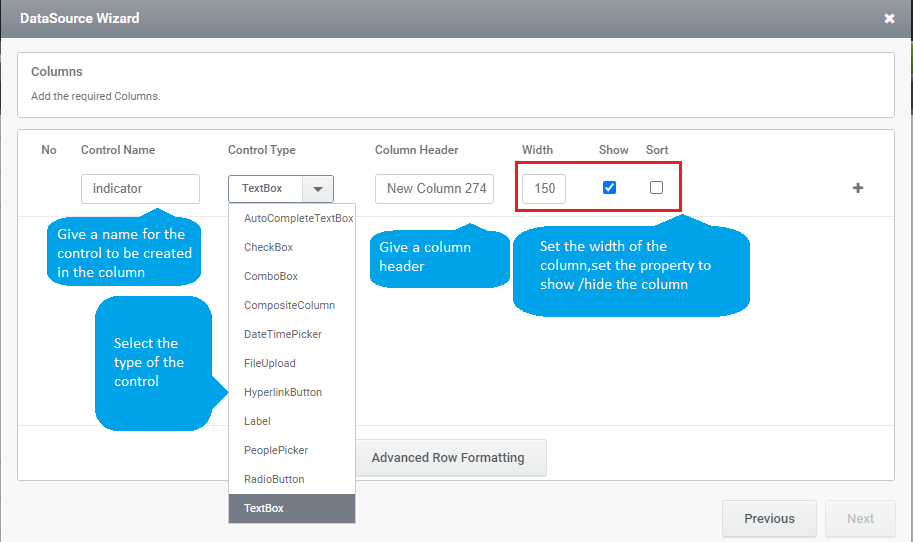
The next screen will display the columns in the table. Select the required columns and click on Next. Click on the add button in the screen below which will display the option to configure the select command.
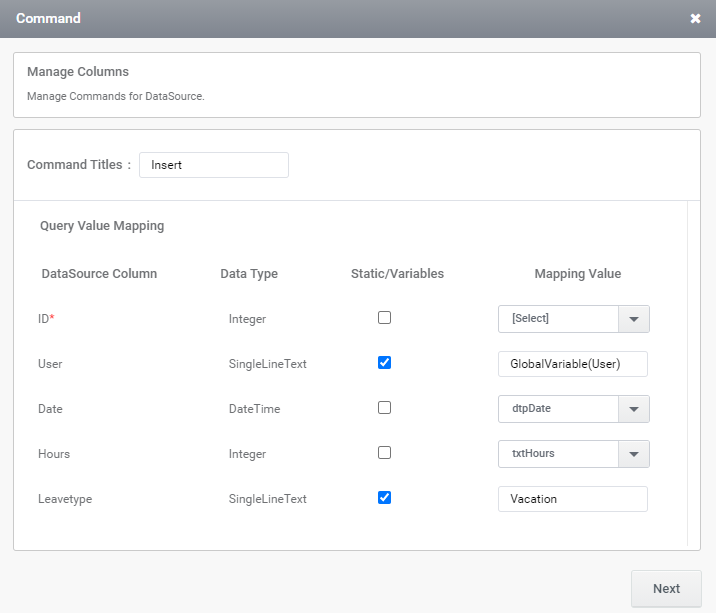
The screen shown below will allow you to create the select command. Once the select command mapping is completed, click Next button. Set the criteria for selection in the next window and proceed.( Click the link to know more about GlobalVariable(User) )
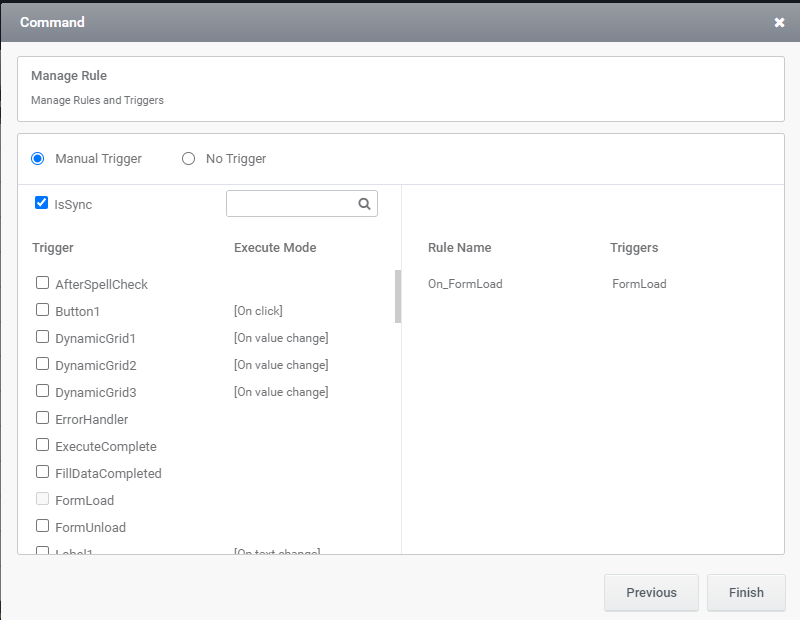
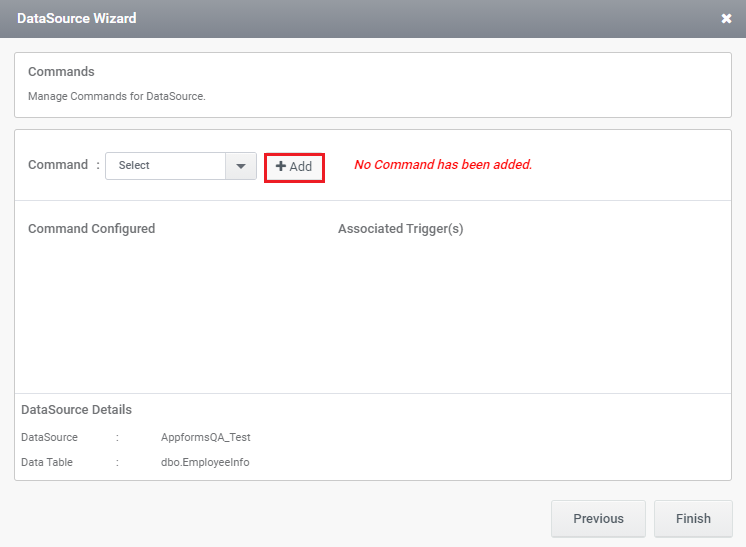
The new screen as shown below will allow you to configure when we need this DataSource Command to be executed. in the current case, we need this to be executed when the AppForm loads. So please complete the process as explained in the screen below.

Selecting Restricted Dates
We will have to check if the user has selected a restricted date using the dates saved in the list. We will create a new DataSource here to read the ID of the date which the user has selected. This will allow us to know if the end user has selected a restricted date, if the ID returned is a number greater than 0 then its a restricted date else its a correct date.
For this reason, we have two hidden textboxes one named “txtDate” the next named “txtDateId”.

Now we can create a new DataSource for the selection of a restricted date. Please follow the steps below to configure the DataSource.
Step 1 – Select MS SQL as the DataSource.

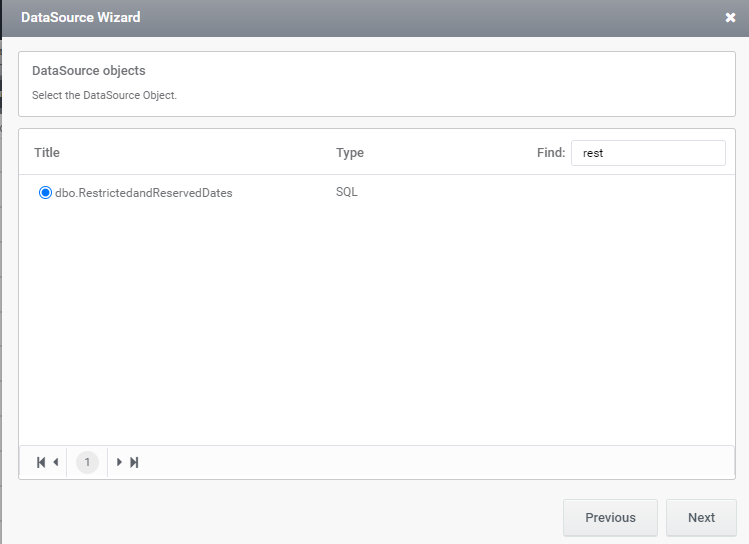
Step 2- Select the database and select the table “Restricted Dates and Reserved Dates”
Step 3 – Add a Select Command with the following criteria.
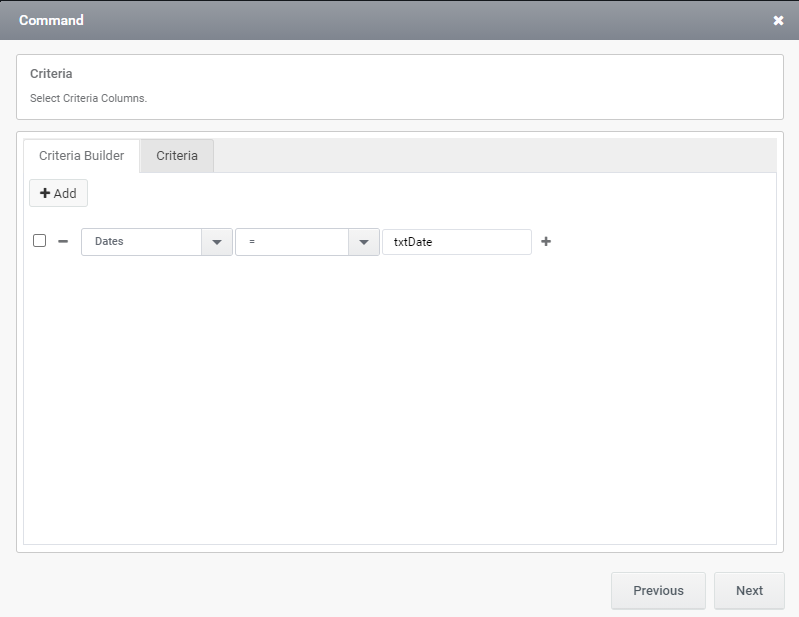
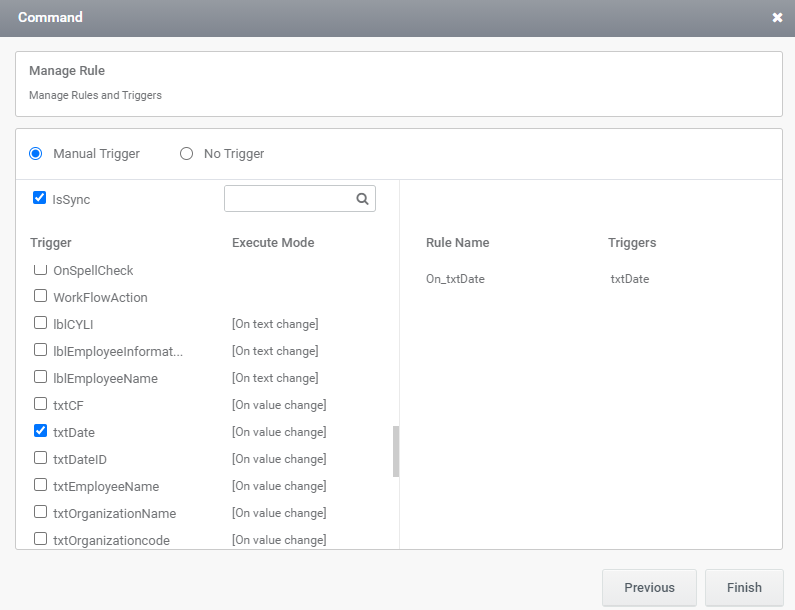
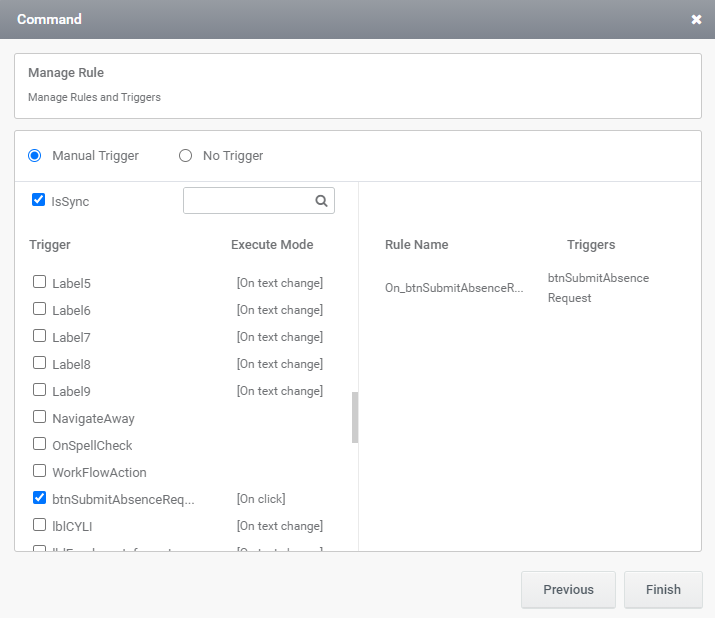
Step 4 – Add the Create Execute Rule trigger as the textbox “txtDate” so that this command is executed every time a new date is selected.
Vacation Days Requested
Step 1 – Click on the 1 DynamicGrid for the “Vacation Days Requested” section and launch the configuration wizard by clicking on the Columns properties button2.
Step 2- This will launch the following wizard step. Select the MS SQL as the DataSource type and click OK button to continue.
Step 3 – Select the database and and the table in the next steps.
Step 4 – Add the following columns and column type.
| SlNo | Control Name | Control Type | Column Header | Description | Width |
| 1 | Indicator | CompositeColumn | This column will be used as a indicator to show if the user has entered a correct date. a. When Status column Value is 0 then invalid date, so it will display the column as a Red Label. a. When Status column Value is 1 then valid date, so it will display the column as a Green Label. a. When Status column Value is greater than 1 then there is no date entered, so it will display the column as a white Label | 20 | |
| 2 | dtDates | DateTimePicker | Dates | DateTimePicker will allow the user to select a Date | 190 |
| 3 | txtHour | TextBox | Hour Value | TextBox will enable the user to enter the required hours | 190 |
| 4 | txtStatus | TextBox | Status | We will be using rule to set a value to this column based on the date selected by the user | 0 |
Step 5 – After you complete selecting/creating the required column, the screen will look as shown below.

Step 6 – Now we will have to go through the DataSource wizard to configure the grid to insert to the table named “AbsenceRequestDates”.
Step 7 – Now select the execute command trigger and click on Finish button.
Sick Leave Days Requested
Step 1 – Click on the1DynamicGrid for the “Sick Leave Days Requested” section and launch the configuration wizard by clicking on the Columns properties button2.
Step 2– This will launch the following wizard step. Select the MS SQL as the DataSource type and click OK button to continue.
Step 3 – The next step is to select the database and corresponding table for the Dynamic Grid control.
Step 4 – Add the following columns and column type.
| SlNo | Control Name | Control Type | Column Header | Description | Width |
| 1 | Indicator | CompositeColumn | This column will be used as a indicator to show if the user has entered a correct date. a. When Status column Value is 0 then invalid date, so it will display the column as a Red Label. a. When Status column Value is 1 then valid date, so it will display the column as a Green Label. a. When Status column Value is greater than 1 then there is no date entered, so it will display the column as a white Label | 20 | |
| 2 | dtDates | DateTimePicker | Dates | DateTimePicker will allow the user to select a Date | 190 |
| 3 | txtHour | TextBox | Hour Value | TextBox will enable the user to enter the required hours | 190 |
| 4 | txtStatus | TextBox | Status | We will be using rule to set a value to this column based on the date selected by the user | 0 |
Step 5 – After you complete select/create the required columns, the screen will look as shown below.
Step 6 – Now we will have to go through the DataSource wizard to configure the grid to insert to the table named “AbsenceRequestDates”. Map all the required columns of Dynamic grid to table.
Step 7 – Now select the execute command trigger.
Personal Leave Days Requested
Step 1 – Click on the1DynamicGrid for the “Personal Leave Days Requested” section and launch the configuration wizard by clicking on the Columns properties button2.
Step 2– This will launch the following wizard step. Select MS SQL as the DataSource type and click OK button to continue.
Step 3 – The next step is to configure the required columns for the Dynamic Grid control.
Step 4 – Add/select the following columns and column type.
| SlNo | Control Name | Control Type | Column Header | Description | Width |
| 1 | Indicator | CompositeColumn | This column will be used as a indicator to show if the user has entered a correct date. a. When Status column Value is 0 then invalid date, so it will display the column as a Red Label. a. When Status column Value is 1 then valid date, so it will display the column as a Green Label. a. When Status column Value is greater than 1 then there is no date entered, so it will display the column as a white Label | 20 | |
| 2 | dtDates | DateTimePicker | Dates | DateTimePicker will allow the user to select a Date | 190 |
| 3 | txtHour | TextBox | Hour Value | TextBox will enable the user to enter the required hours | 190 |
| 4 | txtStatus | TextBox | Status | We will be using rule to set a value to this column based on the date selected by the user | 0 |
Step 5 – After you complete selecting/creating the required column, the screen will look as shown below.
Step 6 – Now we will have to go through the DataSource wizard to configure the grid to insert to the table named “AbsenceRequestDates”. Map the columns to controls and click on next button.
Step 7- Now select the execute command trigger and click on Finish button.
Validate Vacation date
The employee should apply for leave and get that approved before taking the vacation leave. So when a employee is applying for a vacation, the date of leave should not be less than the current date. The company also has a restriction that the employee should not take any company restricted date in the vacation.
Logical Flow:
When the user selects a date in the “Vacation Days Requested” grid, we need to check if the date selected is less than or equal to current date.
If it is less than current date,
- Then display a message “Date should be greater than current date, please select another date”.
- The grid column “Status” should be set to 0, so that the red label is displayed as a indication of invalid date.
- The insert row option for the grid should be disabled.
if its a date greater than current date,
- Then we have to pass the date to the textbox “txtDate”
- When the date is passed to the textbox “txtDate” then that will execute the DataSource “Select Restricted Date”.
If this command return a ID from the list, then the selected date is a restricted date.
- Then we need to display a message “Select date is restricted date, please select another date” and set the grid column “Status” to 0, which will display the red label in the current row.
if there is no ID returned then its a proper date and the user can proceed.
- The insert row option for the grid should be enabled.
- Set the grid column “Status” to 1, which will display the green label in the current row.
Validate Sick Leave date
The employee can apply for the sick leave after he has taken the leave. So when a employee is applying for a sick leave, he can apply leave for the previous days and a date greater than the current date.
Logical Flow:
When the user selects a date in the “Sick Leave Days Requested” grid, then we have to pass the date to the textbox “txtDate”
- When the date is passed to the textbox “txtDate” then that will execute the DataSource “Select Restricted Date”.
If this command return a ID from the list, then the selected date is a restricted date.
- Then we need to display a message “Select date is restricted date, please select another date” and set the grid column “Status” to 0, which will display the red label in the current row.
if there is no ID returned then its a proper date and the user can proceed.
- The insert row option for the grid should be enabled.
- Set the grid column “Status” to 1, which will display the green label in the current row.
Validate Personal Leave Date
The employee should apply for leave and get that approved before taking the vacation leave. So when a employee is applying for a vacation, the date of leave should not be less than the current date. The company also has a restriction that the employee should not take any company restricted date in the vacation.
Logical Flow:
When the user selects a date in the “Personal Leave Days Requested” grid, we need to check if the date selected is less than or equal to current date.
If it is less than current date,
- Then display a message “Date should be greater than current date, please select another date”.
- The grid column “Status” should be set to 0, so that the red label is displayed as a indication of invalid date.
- The insert row option for the grid should be disabled.
if its a date greater than current date
- Then we have to pass the date to the textbox “txtDate”
- When the date is passed to the textbox “txtDate” then that will execute the DataSource “Select Restricted Date”.
If this command return a ID from the list, then the selected date is a restricted date.
- Then we need to display a message “Select date is restricted date, please select another date” and set the grid column “Status” to 0, which will display the red label in the current row.
if there is no ID returned then its a proper date and the user can proceed.
- The insert row option for the grid should be enabled.
- Set the grid column “Status” to 1, which will display the green label in the current row.
Validate Vacation date
The employee should apply for leave and get that approved before taking the vacation leave. So when a employee is applying for a vacation, the date of leave should not be less than the current date. The company also has a restriction that the employee should not take any company restricted date in the vacation.
Logical Flow:
When the user selects a date in the “Vacation Days Requested” grid, we need to check if the date selected is less than or equal to current date.
We can use the Expression Builder to create the rule.
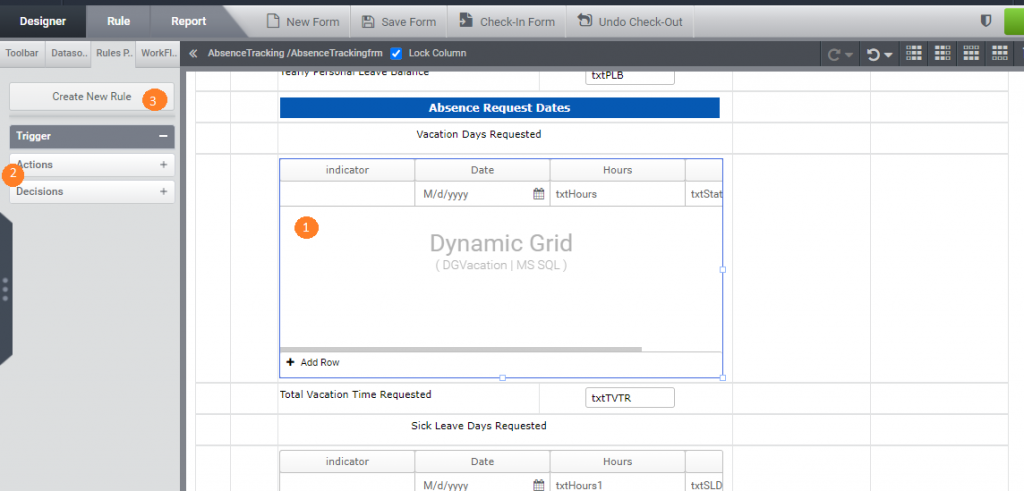
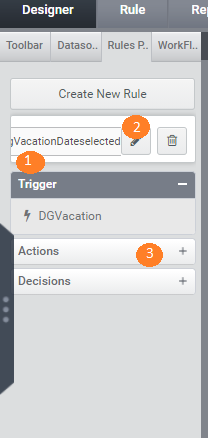
Step 1:
1Click on the dynamic Grid to select the control
2 Click on the “Rules Panel” to display the rules panel
3Click on the “Create New Rule” button to create a new rule
Step 2:
1 The new rule will be created with the default name.
2 Click on the edit button to rename the rule name.
3 Click on the “+” button in the Decisions section to to create a new decision.
Step 3: In this step we are going to add a decision to check if the current column is 2 (date) and if the date selected is less than current date
- Click on the controls in the first listbox. This will display all the controls in the current form in the next listbox.
- Select the control named “dgVacation” to select the dynamic grid. This will display all the properties of the grid control.
- Select the ColIndex property, which will let us know the current column in focus in the grid.
- Click on the add button which will add the expressions section. Then click on the “=” button to add the operator to the expression.
- Click on the operator “=” to display the “Add LHS” and “Add RHS” buttons.
- Clicking on the “Add RHS” button will insert a new textbox right side of the operator.
- Type the value 2 in the “RHS” textbox.
Now we have a expression that checks if the current row is the first column
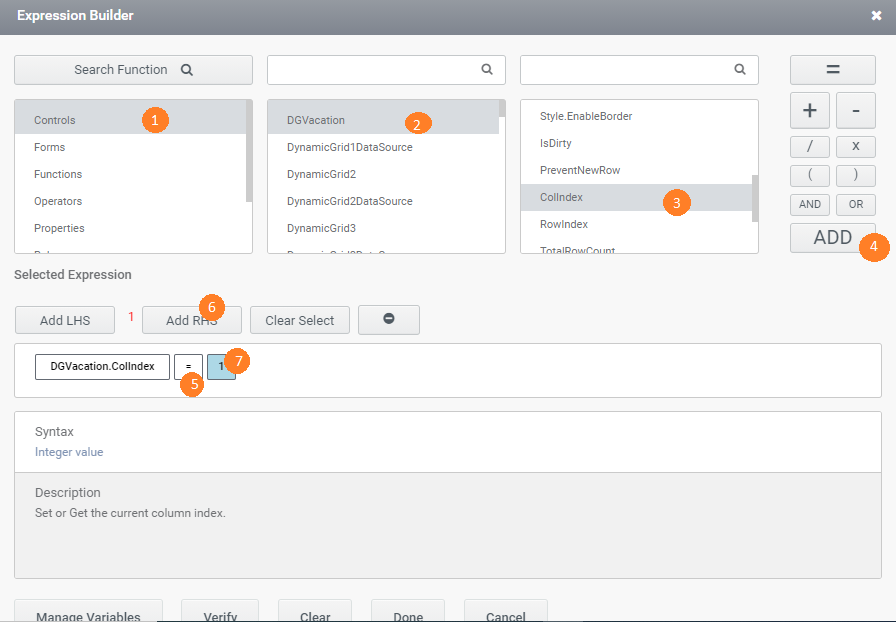
Once we complete the rules expression it will have a look as shown below. The expression will read
“dgVacation.ColIndex=1 & GridGetValue(dgVacation,dgVacation.RowIndex,2)<=GlobalVariable(ServerDate)“
If it is less than current date,
- Then display a message “Date should be greater than current date, please select another date”.
- The grid column “Status” should be set to 0, so that the red label is displayed as a indication of invalid date.
- The insert row option for the grid should be disabled.
Click on the “+” button in the next to the Decision we just created. This will add actions under this section. Add the expression as shown in the screen below. The expression will read “MessageBox(“Date should be greater than current date, please select another date”)”

Click on the “+” button in the next to the Decision we created. This will add another action under this section. Add the expression as shown in the screen below. The expression will read “GridSetValue(dgVacation,dgVacation.RowIndex,4,0)”

Click on the “+” button in the next to the Decision we created. This will add another action under this section. Add the expression as shown in the screen below.The expression will read “dgVacation.PreventNewRow=true”
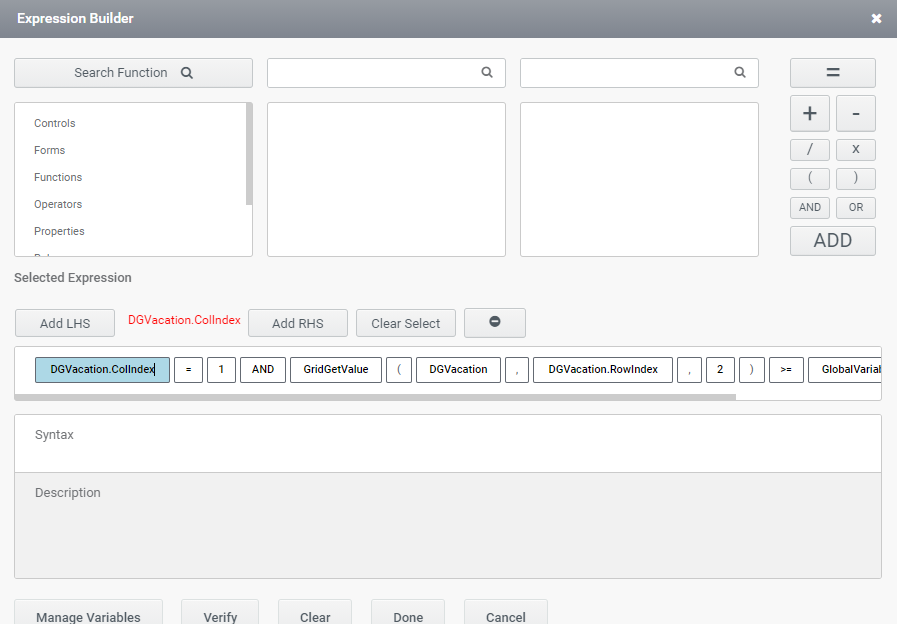
if its a date greater than current date,
- Then we have to pass the date to the textbox “txtDate”
- When the date is passed to the textbox “txtDate” then that will execute the DataSource “Select Restricted Date“.
Once we complete the rules expression it will have a look as shown below. The expression will read
“dgVacation.ColIndex=1 & GridGetValue(dgVacation,dgVacation.RowIndex,2)>=GlobalVariable(ServerDate)“

The expression in the action below this decision will read as
Action 1 : txtDate.Value = GridGetValue(dgVacation,dgVacation.RowIndex,2)
Action 2 : dgVacation.PreventNewRow=false
Action 3 : GridSetValue(dgVacation,dgVacation.RowIndex,4,0)
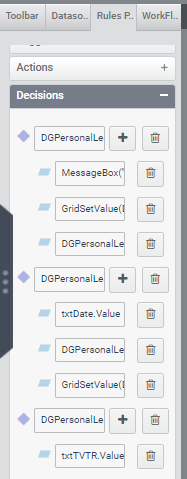
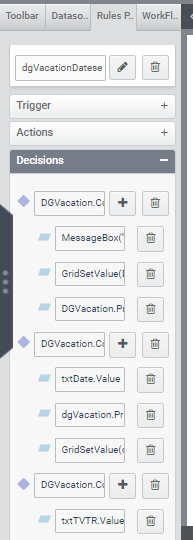
So this rule when completed will display as:
DynamicGrid dgVacation – Column Value Change Event fill trigger the following rule
Rule 1 :
dgVacation.ColIndex=2 & GridGetValue(dgVacation,dgVacation.RowIndex,2) <= GlobalVariable(ServerDate)
( If the current column in the dynamic grid is 1 and the selected date is less than current date )
Action 1 : dgVacation.PreventNewRow=true (Disable the Insert New Row Link button )
Action 2 : GridSetValue(dgVacation,dgVacation.RowIndex,4,0) (Display a red label in the row to indicate a invalid date selected )
Action 3 : MessageBox(“Date should be greater than current date, please select another date”) (Show a alert that the date selected is wrong)
Rule 2 :
dgVacation.ColIndex=2 & GridGetValue(dgVacation,dgVacation.RowIndex,2)>=GlobalVariable(ServerDate)
( If the current column in the dynamic grid is 1 and the selected date is greater than current date )
Action 1 : txtDate.Values = GridGetValue(dgVacation,dgVacation.RowIndex,2) (pass the date to the hidden textbox which will trigger another rule )
Rule 3 :
dgVacation.ColIndex=3 ( If the current column is the hours )
Action 1 : txtTotalVTR.Value=GridSum(dgVacation,3,false)( Display the sum in the textbox below )
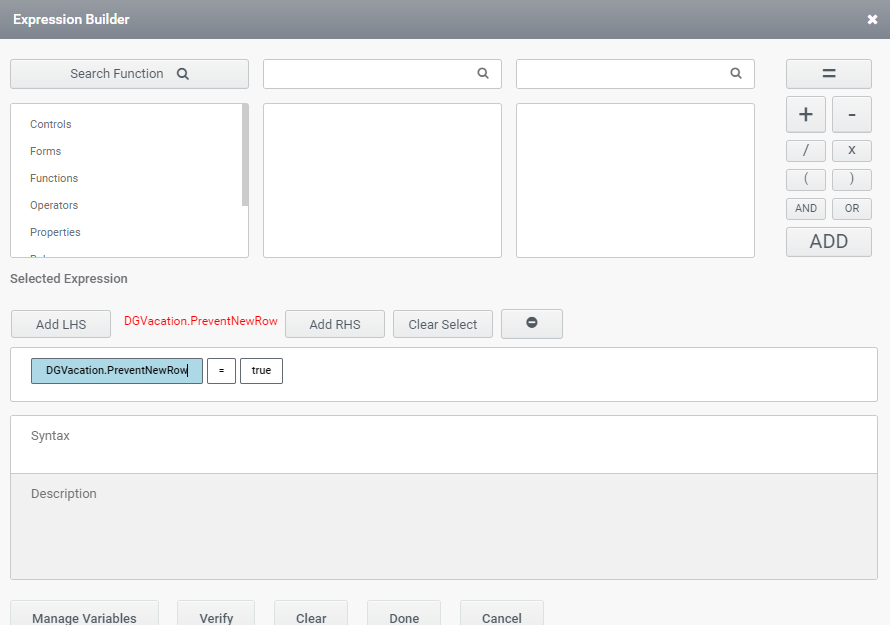
The textbox txtDate will trigger the ExecuteCommand of the Select Restricted Date. We need to make sure that the following actions are added to the same rule before the command is executed.
Action 1 : dgVacation.PreventNewRow=false (enable the Insert New Row Link button )
Action 2 : Clear(txtDateId) (Clear the value in the textbox txtDateId )
Action 2 : GridSetValue(dgVacation,dgVacation.RowIndex,4,1) (Display a green label in the row which will be overridden if it is a restricted date)
We will need to add a rule for the textbox txtDateId to see if there is a positive number returned from the server for this date criteria. If it returns a valid date id, then the user has selected a invalid date. So the rule should read as following.
Rule 1 :
txtDateId.Value > 0
( If the command execution has returned a valid Id )
Action 1 : dgVacation.PreventNewRow=true (Disable the Insert New Row Link button )
Action 2 : GridSetValue(dgVacation,dgVacation.RowIndex,4,0) (Display a red label in the row to indicate a invalid date selected )
Action 3 : MessageBox(“Selected date is restricted, please select another date”) (Show a alert that the date selected is wrong)
Validate Sick Leave Date
The employee can apply for the sick leave after he has taken the leave. So when a employee is applying for a sick leave, he can apply leave for the previous days and a date greater than the current date.
So there will be no check for the sick leave when the date is entered, We will only check if the leave exceeds the expected leave limit.
The employee should apply for leave and get that approved before taking the personal leave. So when a employee is applying for a personal leave, the date of leave should not be less than the current date. The company also has a restriction that the employee should not take any company restricted date in the personal leave.
So this rule when completed will display as:
DynamicGrid dgPersonal – Column Value Change Event fill trigger the following rule
Rule 1 : dgPersonal.ColIndex=2 & GridGetValue(dgPersonal,dgPersonal.RowIndex,2) <= GlobalVariable(ServerDate)
( If the current column in the dynamic grid is 1 and the selected date is less than current date )
Action 1 : dgPersonal.PreventNewRow=true
(Disable the Insert New Row Link button )
Action 2 : GridSetValue(dgPersonal,dgPersonal.RowIndex,4,0) (Display a red label in the row to indicate a invalid date selected )
Action 3 : MessageBox(“Date should be greater than current date, please select another date”) (Show a alert that the date selected is wrong)
Rule 2 : dgPersonal.ColIndex=2 & GridGetValue(dgPersonal,dgPersonal.RowIndex,2)>=GlobalVariable(ServerDate)
( If the current column in the dynamic grid is 1 and the selected date is greater than current date )
Action 1 : txtDate.Value = GridGetValue(dgPersonal,dgPersonal.RowIndex,2) (pass the date to the hidden textbox which will trigger another rule )
Rule 3 : dgPersonal.ColIndex=3 ( If the current column is the hours )
Action 1 : txtTotalPLTR.Value=GridSum(dgPersonal,3,false)( Display the sum in the textbox below )
The textbox txtDate will trigger the ExecuteCommand of the Select Restricted Date. We need to make sure that the following actions are added to the same rule before the command is executed.
Action 1 : dgPersonal.PreventNewRow=false (enable the Insert New Row Link button )
Action 2 : Clear(txtDateId) (Clear the value in the textbox txtDateId )
Action 2 : GridSetValue(dgPersonal,dgPersonal.RowIndex,4,1) (Display a green label in the row which will be overridden if it is a restricted date)
We will need to add a rule for the textbox txtDateId to see if there is a positive number returned from the server for this date criteria. If it returns a valid date id, then the user has selected a invalid date. So the rule should read as following.
Rule 1 : txtDateId.Value > 0
( If the command execution has returned a valid Id )
Action 1 : dgPersonal.PreventNewRow=true (Disable the Insert New Row Link button )
Action 2 : GridSetValue(dgPersonal,dgPersonal.RowIndex,4,0) (Display a red label in the row to indicate a invalid date selected )
Action 3 : MessageBox(“Selected date is restricted, please select another date”) (Show a alert that the date selected is wrong)