Mail Template
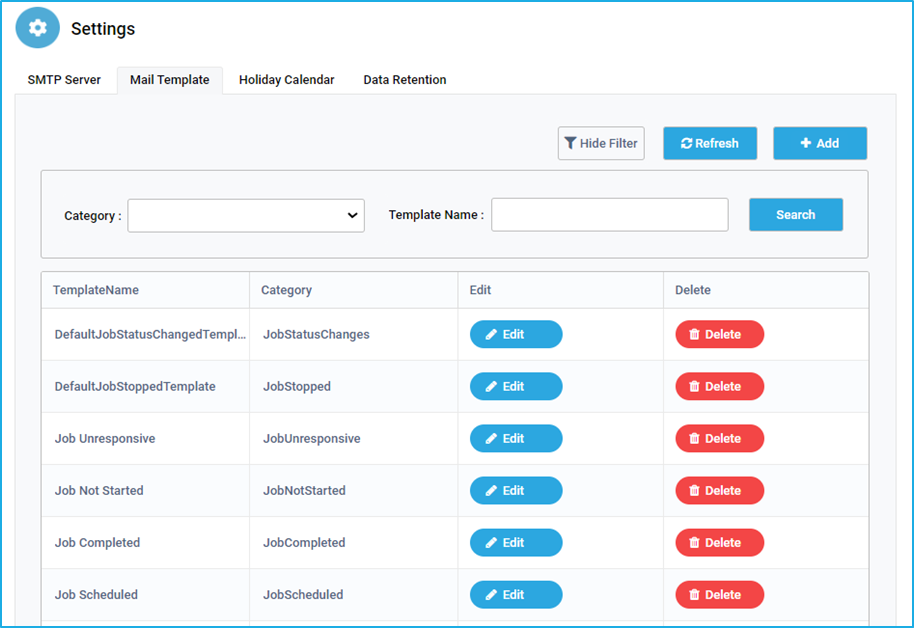
In the Mail Template tab, users will be able to see all default templates of the mail notification alerts for each event that takes place pertaining to robots, machines, jobs, queues and triggers. Apart from the default template, the user has the option to create a custom template by clicking on the ADD button.
This tab displays the TemplateName and Category for the created templates. The user has to click on the ‘Edit’ button next to the respective template name if the user wants to alter the Template name, Category, subject and body of the email. The ‘Delete’ option is also available if a specific template is no longer needed.
The “Show Filter” button helps to filter the mail templates based on the Category and Template Name. The “Search” button can be clicked after entering the required data in the respective field(s). The “Refresh” button helps to reload the window so that user can view the latest details.
Adding a new Mail Template:
Apart from the default template, the user has the option to create a custom mail template.
Steps to create a Mail Template in the Bot Manager:
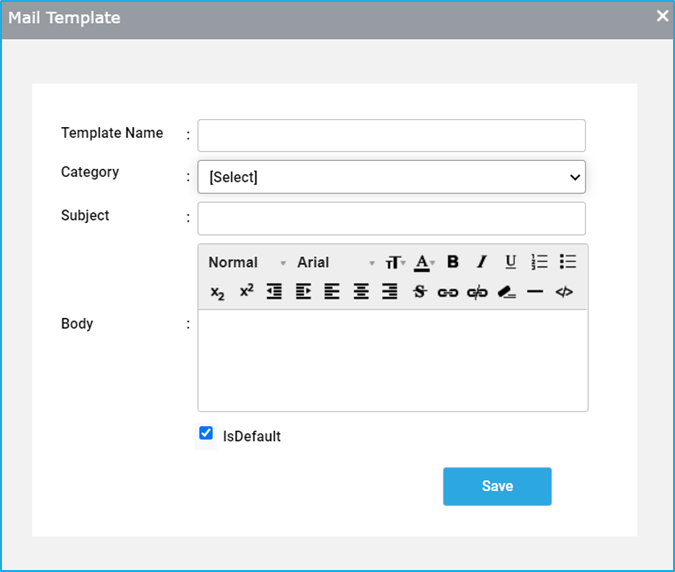
- Click on the ‘+Add’ button to create a new mail template.
- In a new window that will appear, provide input to the mandatory fields such as Template name, Category, Subject and Body that need to be filled out depending on the alert type.
- If the “IsDefault” toggle button is enabled, then the default mail template would be the custom template created by the user.
Editing/Deleting an Existing Template
The user has to click on the ‘Edit’ button next to the respective template name if the user wants to alter the Template name, Category, subject and body of the email. The delete option is also available if a specific template is no longer needed.
Customizing the Mail template
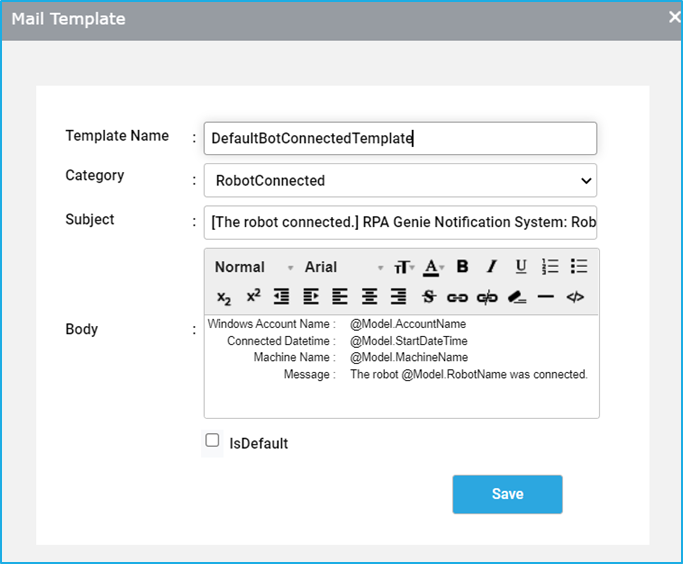
While customizing the Mail template user can give a meaningful template name and a subject line. The user can customize the subject line of the notification mail by using the BOT manager notification template. When it comes to the body of the mail, user needs to follow the below given formats in order to fetch the ROBOT, QUEUE, MACHINE and JOB details
The format for creating the body is @Model.[Model Variable].
Category indicates the specific alert type for which the notification mail has to be sent.
Example: The body template for the category of ROBOTConnected.
Please note: Model variable name can be taken from the below table.
Below is an example of BODY template for category ROBOTConnected.
Windows Account Name: @Model.AccountName
Connected Date&Time: @Model.StartDateTime
Machine Name: @Model.MachineName
Message: The Robot @Model.RobotName was connected.
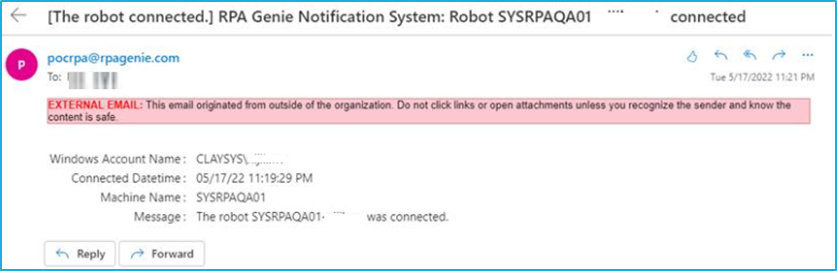
Screenshot of rendered mail body
BOT Manager Notification Template
Refer to the below provided tables for the available categories and Model variable name which can be used in mail templates:
Machine
Categories: MachineConnected, MachineDisconnected
| Model Variable | Description |
| Machinename | The Name of the Machine |
| StartDateTime | Agent Service start Date and Time. |
| EndDateTime | Agent Service end Date and Time. |
Robot
Categories: RobotConnected, RobotDisconnected
| Model Variables | Description |
| AccountName | Account Name of robot session. |
| StartDateTime | The robot session’s start date and time. |
| EndDateTime | The robot session’s end date and time, only if Robot is disconnected. |
| MachineName | The name of the Machine. |
| RobotName | The name of the connected Robot. |
| RobotId | The connected Robot’s ID. |
Job
Categories: JobCancelled, JobCompleted, JobFaulted, JobNotStarted, JobScheduled, JobStarted, JobStatusChnages, JobStopped, JobUnresponsive
| Model Variable | Description |
| RobotName | Name of the connected Robot. |
| RobotId | The Id of the connected robot. |
| CreatedBy | Author of the job. |
| AccountName | Name of robot session’s account. |
| Source | The source of the job. |
| StartDateTime | Created job’s start Date and Time. |
| EndDateTime | Created job’s end Date and Time. |
| ProcessName | Process name of the job. |
| ErrorMessage | If the job fails, the error message is displayed. |
| ErrorSource | If the job is faulted, the source of the mistake is displayed. |
| JobId | Job’s Id of the scheduled job. |
| CreatedDateTime | The scheduled job’s created Date and Time. |
| RequestedDateTime | The scheduled job’s requested Date and Time. |
| ExpiredTime | End Date and Time of the scheduled job. |
| Arguments | Arguments of the scheduled job. |
| Status | The status of the job. |
Queue
Categories: QueueItemAbandoned, QueueItemAdded, QueueItemCompleted, QueueItemFailed, QueueItemStarted.
| Model Variable | Description |
| TransactionId | The transaction ID of the Robot Transaction. |
| QueueItemId | The Queue Item’s ID. |
| Key | The Queue item’s key. |
| QueueName | The name of the Queue. |
| QueueId | The queue ID. |
| Description | Description of the queue is specified here. |
| Deadline | Deadline of queue item. |
| Postpone | The date on which the queue item will be postponed. |
| CreatedDatetime | The queue item’s created DateTime. |
| CreatedBy | The queue item’s author. |
| Priority | The item’s priority in the queue. |
| ReviseStatus | Boolean that represents the queue item’s revised status. |
| ReviseBy | The user who edited the queue item. |
| Reason | The reason for the modification. |
| Output | The output of the transaction. |
| Progress | Progress of the transaction. |
| ErrorType | The type of error that is either application or business. |
| TransactionName | Name of the transaction. |
| TransactionItem | The items of the transaction. |
| Reference | The reference of the transaction. |
| Status | The transaction’s current status. |
| EndDateTime | The transaction’s end date and time. |
| StartDateTime | Transaction’s start date and time. |
| ProcessName | Name of the process. |
| RobotName | The name of the Robot. |
| SessionId | The robot session Id. |
Trigger
Categories: TriggerAutoDisabled
| Model Variable | Description |
| TriggerName | The name of the Trigger. |
| Reason | Displays error message if job fails even after last attempt with same error. |
| FailureCount | Displays number of job execution failures after which the trigger will be disabled. |