RPA Genie Co-Pilot V2 Features
RPA Genie Co-Pilot is an enhanced version of the RPA Genie Agent. Even though the functionality is the same as that of the Agent, Co-Pilot consists of some additional features.
Major features of the Co-Pilot are as follows:
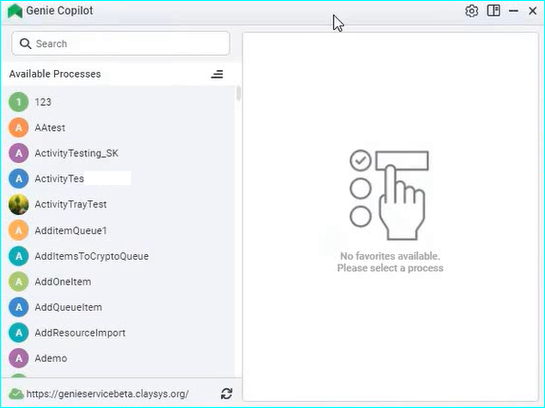
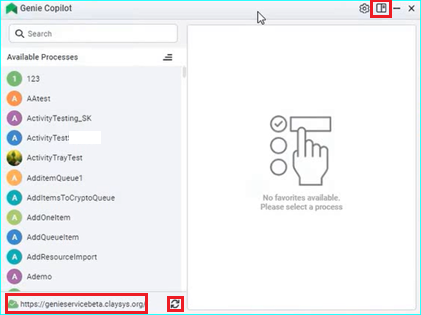
- Dashboard displays the list of all available processes that were created and published via RPA Genie Studio. There are two options to sort this list by clicking on the three lines next to ‘Available Processes:
- Sort by alphabetical manner (A-Z and Z-A).
- Sort by date of creation.
- Dashboard has a search option, where users can find a particular process they wish to execute.
- From the dashboard, the listed processes can be managed (started, paused and stopped). To initiate a process, click on the play button. While the process is being executed, you will be able to pause or stop the process.
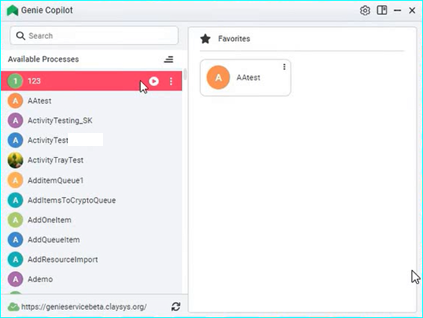
- Users are allowed to add or remove processes as favorites by clicking on the three dots. After adding as favorite, the process will appear in the favorites window. The user will be able to start/pause/stop execution from here. The process can also be removed from the favorites window with the help of favorite settings.
- Users have the option to add images for each process and can configure the title of the process which can be added in the project property settings at the time of publishing a project using the studio. This will make it more convenient for the user to select and run the required process.
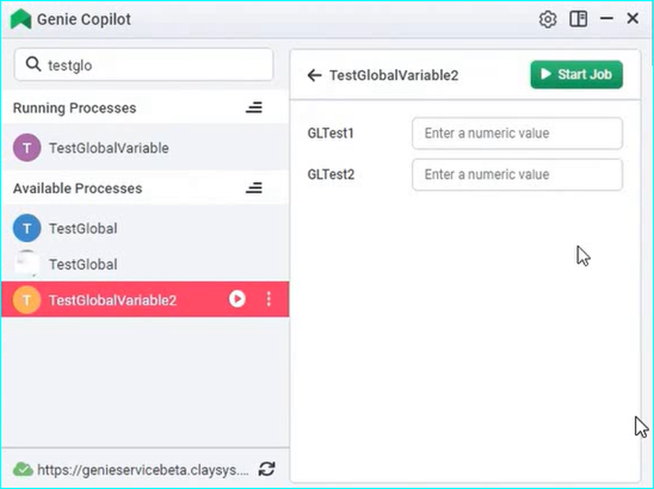
- If any of the automation processes are using global variables, prompting for user input, it will get reflected on the co-pilot dashboard where the user will be able to provide the input.
Note: The global variable only supports string, whole number and Boolean types. It will only get reflected in the co-pilot if the direction of the global variable is set as ‘In’ in the Genie Studio project.
- At the bottom, dashboard shows the Genie service URL to which it is connected. If connected, it will be indicated with green tick else if it is offline, it will be indicated as a red cross sign.
- At the bottom, there is an option to refresh the co-pilot. It will help re-load all the available processes as well as the favorites window.
- At the top right, next to the settings icon, the user can change the grid/view of the Co-Pilot dashboard such that available processes will be shown either in the left panel or in the entire window by collapsing the favorites section.
- When Co-Pilot is offline due to lack of internet connectivity or a disconnected VPN, it displays the status:
SE_Disconnected -Unable to connect to the service.During this time, a ‘Take Offline’ button is available. Clicking this button allows users to access and execute their projects offline within Co-Pilot.- Once connectivity is restored and the service becomes operational, users receive a notification: “Server is now online. The service URL is now accessible. Would you like to switch back to online mode?” The user can then choose to proceed by clicking ‘Yes’ or remain in offline mode by selecting ‘No’.
- This feature ensures a smooth transition between offline and online modes.
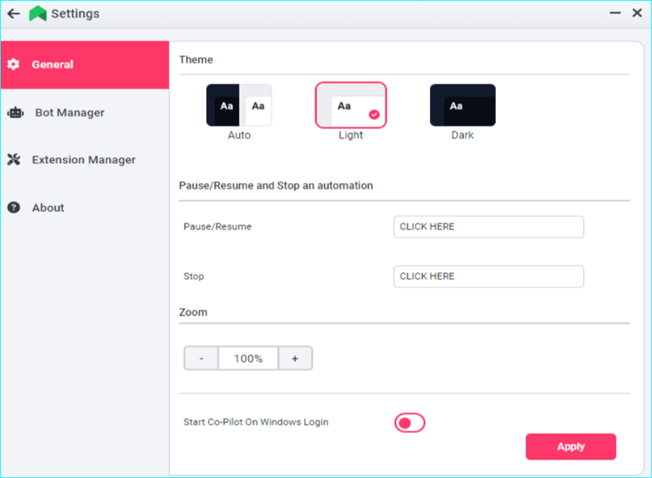
- By using the settings window, the user may change the copilot preferences to improve the experience. Under general settings, it is possible to change the theme (Auto, dark and light mode), able to zoom in/out, able to pause/resume/stop any automation by stating the key condition and enable automatic start of co-pilot upon windows login. Users may save these preferences by clicking on the apply button.
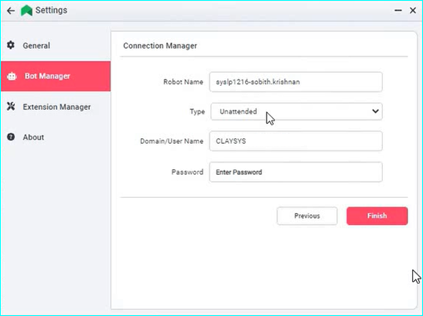
- By using the settings window, the user has the ability to connect or disconnect from the BOT using the bot manager tab. Here, the service URL, robot name, type (Attended/Unattended), domain/user name and password can be configured to make the connection possible.
- In the Bot Monitoring Tool, AppForms utilizes the Forms Authentication method for user authentication. This approach grants access to both Active Directory (AD) Users and custom users within the site. The AD Users are individuals listed in the active directory, whereas custom users are individuals whom an admin user can create within the site. To grant access, users must be added to the AppForms Site through the security module.
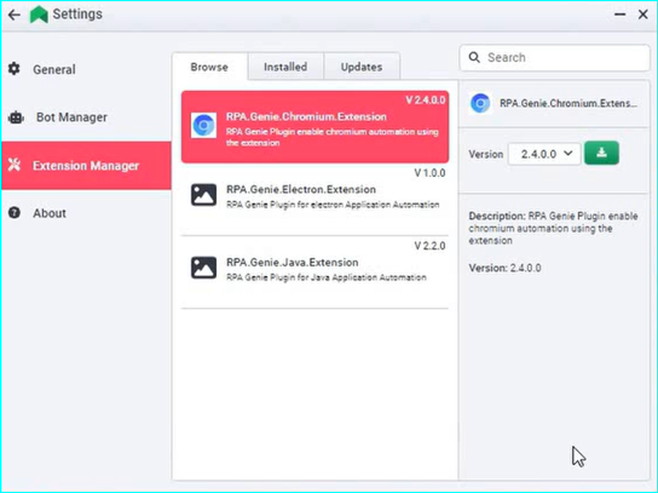
- By using the settings window, the user can manage various plugins by using the extension manager. Users will be able to browse various extensions, see the previously installed extensions as well as check for any updates. The plugin details such as the description and version number will be displayed. Users will have to manage extensions manually based on the versions that users prefer to download and use.
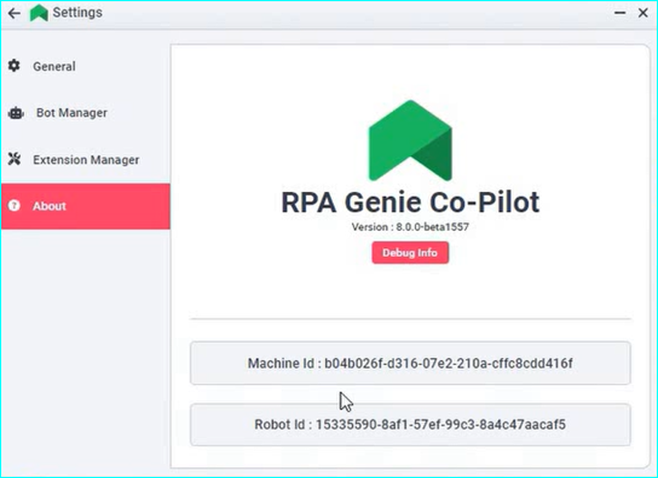
- The user can access the “About” window to learn more about RPA.Genie.Co-Pilot V2. The installed version number, Machine ID and Robot ID can be viewed from here. More details regarding the configurations can be accessed by clicking the ‘Debug Info’ option.