Time Scheduler
A Time Scheduler is used when a job needs to be triggered based on a specified date and time. On clicking the ‘Time Scheduler’ option, it takes the user to a window where they need to fill out the necessary details regarding the Date, Time and Frequency of the trigger based on their requirement.
- Name: The name for the trigger that is to be created can be provided.
- Process Name: Select or search for the process that needs to be triggered using the drop-down.
- Calendar: Using the Calendar drop-down, select holidays that were created previously. This can be useful to manage the trigger on the selected holidays.
- Robot Name: Select one or more robots which is used to execute the process using the dropdown.
- Priority: The priority of the job can be set to either High, Medium or Low using a dropdown.
- Enabled: The ‘Enabled’ checkbox determines the status of the trigger. If it is ticked, the trigger will get executed.
- Refresh Last Scheduled DateTime: This checkbox enables the user to reset the last scheduled date time i.e. change it to null. This can be beneficial if the user wants to run the trigger again.
- Prevent Parallel Job Creation: If this checkbox is ticked then, it will avoid another job with the same process name and robot to be scheduled until the execution of the ongoing job has been completed.
- Tags: This field allows to enter a relevant tag name for easy filtering in Bot Manager. (Optional)
- Schedule Type: Using this dropdown, the user can select the schedule type of the process. It is a plan for the execution of a trigger. Users can either select the “Recurring” or the “One Time” option:
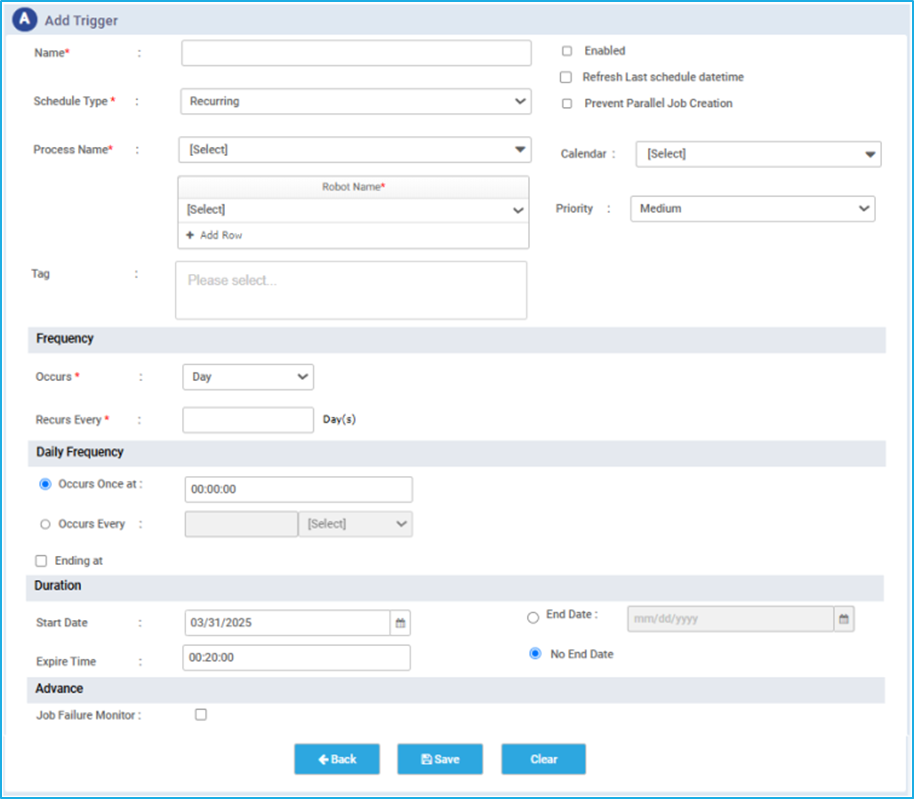
- Recurring: Recurring trigger occurs periodically or repeatedly. If the user selects Recurring, then they need to provide the frequency, daily frequency, duration and job failure monitor option for that particular trigger.
- Frequency: Select the frequency of execution occurrence from the drop-down list given below:
- Daily triggers which will be executed based on the specified number of days.
- Recurs every- Specify the frequency of the days for which the trigger should be executed.
- Weekly triggers will be executed based on the specified number of weeks.
- Recurs every- Specify the frequency of the weeks for which the trigger should be executed.
- Select the days for which the triggers need to be executed
- Monthly trigger is performed in a scheduled manner in the specified months. Two options are available:
- A trigger can be executed on a particular day of the month either every month or at certain intervals of months.
- A trigger can be executed on a particular day of the month based on a specified interval of the day of the week. This trigger can be set for every month or at certain intervals of months.
- Daily triggers which will be executed based on the specified number of days.
- Daily Frequency: Specify the regular frequency of a trigger. There are two options: “occurs every” and “occurs once at”.
- Occurs Once At- If the trigger needs to be executed once, then the time as to when it should occur should be specified. If the ‘Ending at’ checkbox is ticked, the ‘stop request type’ option will be available to either stop or request to stop the trigger.
- On selecting the “Stop” option, the process will be immediately terminated without completing the active transaction.
- On selecting the “Request” option, the process will stop. In addition to that, the running transaction will get processed and all subsequent transactions will not execute, which will cause the job to halt eventually.
- Occurs Every- If the trigger needs to be executed at certain time intervals on a day repeatedly, then we must specify the time intervals (hours/minutes/seconds) along with the start and end time. If the ‘End Job Execution After the Specified End time’ checkbox is ticked, the ‘stop request type’ option will be available to either stop or request to stop the trigger.
- On selecting the “Stop” option, the process will be immediately terminated without completing the active transaction.
- On selecting the “Request” option, the process will stop. In addition to that, the running transaction will get processed and all subsequent transactions will not execute, which will cause the job to halt eventually.
- Occurs Once At- If the trigger needs to be executed once, then the time as to when it should occur should be specified. If the ‘Ending at’ checkbox is ticked, the ‘stop request type’ option will be available to either stop or request to stop the trigger.
- Duration: It determines for how long the trigger should continue to run.
- Start Date: The date on which the trigger starts executing.
- End Date: The date on which the trigger stops.
- No End Date: Indicates that triggers are capable of running continuously without an end date.
- Expire Time: The Time at which the trigger should stop executing and end the trigger.
- Advance: It allows the user to monitor the trigger by using the below option:
- Job Failure Monitor – If this checkbox is ticked then, the user must specify the job failure count for which the trigger will try to execute the job. Trigger will be automatically disabled if a job is unable to execute even after the last attempt, provided the error message for the errored jobs remains the same.
- Frequency: Select the frequency of execution occurrence from the drop-down list given below:
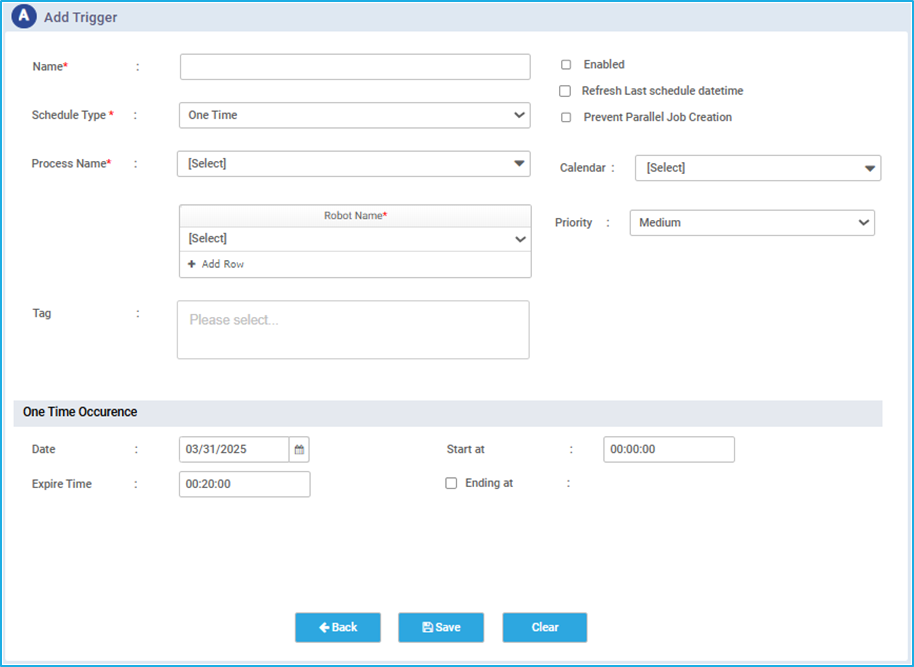
- One Time: The trigger will be executed only once according to the specified date and time.
- Date: Specify the date on which the trigger should be executed.
- Start at: Specify the time at which the trigger needs to be executed.
- Expire Time: Specify the time at which the trigger should stop executing and end the trigger.
- If the ‘Ending at’ checkbox is ticked, the ‘stop request type’ option will be available where to either stop or request to stop the trigger.
- On selecting the “Stop” option, the process will be immediately terminated without completing the active transaction.
- On selecting the “Request” option, the process will stop. In addition to that, the running transaction will get processed, and all subsequent transactions will not execute, which will cause the Job to halt eventually.