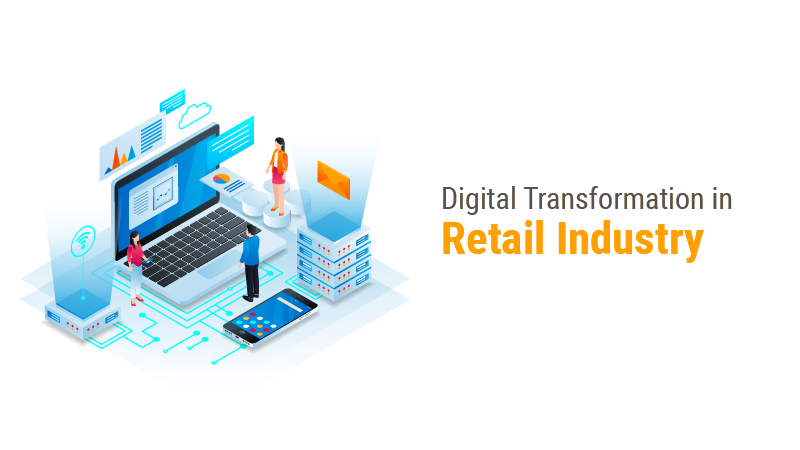
Digital Transformation in Retail Industry

Digital Transformation: Definition and Importance 

The process of incorporating digital technologies into every stage of your business to cope with the market and business needs is known as Digital Transformation. It is not limited to any single industry; Instead, it is relevant to industries that have been slightly hit by the emergence and evolution of technology. In short, digital transformation is the concept that reveals the importance of using the latest technological trends and business models to encourage productivity in employees and to provide quality services to the customers.

Digital transformation in the retail industry mainly focuses on three aspects – enterprise flexibility, customer satisfaction, and inventory management.  

Enterprise agility  

Enterprise agility not only involves making fast decisions, new systems, allocation of resources but also enables access to live digital data and workflows fitted in digital devices. 

Customer satisfaction  

Providing bad service to the customer is the last thing a retailer would want to do. As per the study conducted by PwC’s, 32% of consumers will stop associating with the brand they like once they get a bad experience from the brand. 

Inventory management/ Better supply chain  

A better digital supply chain offers co-operation and enhanced process visibility, which in turn provides increased efficiency. 

Tools for Digital Transformation in the Retail industry 

There are mainly 3 tools used for digital transformation in the retail industry. These tools are; 

Artificial Intelligence  

It is more convenient for customers if they get a response to their queries any day at any time. Artificial Intelligence solutions pave the way for delivering quality customer service to the users 24/7. AI chatbots are the best examples of this as they can provide instantaneous responses to customer queries through messages. Chatbots are a low-cost, fast response service tool that helps you pay for conversions and generate new sales. Additionally, chatbots provide programmed answers to the users that match the voice of the brand. Unlike human agents who get impatient with customers’ questions, chatbots will never act rude and will remain patient throughout the conversation. 

Machine Learning and Predictive Analysis  

Machine learning helps in strengthening the relationship between customer and retailer as it allows retailers to apprehend and predict the customer requirements. Machine learning is the science of collecting data from single or multiple sources and then inputting that data into machine learning models that enable anticipate the future outcomes. The data collected by ML also allows retailers to: 

  • Recognize shopping patterns 
  • Analyze buying behaviors of the customers  
  • Provide special offers 
  • Customize products as per recommendations 
  • Tweak pricing on the fly, and 
  • Create predictions on the basis of historical trends and customer choice. 

Unified Commerce  

Customers use different channels for shopping such as websites, personal devices, social media, etc. and they want retailers to be ready across channels to assist them while they make a purchase. For this purpose, many retailers are using a single unified trading strategy that controls multiple mechanisms to run a business from a single interface. Prior to the concept of unified commerce, various mechanisms have been used for managing their business aspects. Attempting to reconcile data extracted from different systems is a resource and consuming process. To maintain data integrity safe and complete, data storage should be opened, and data from different sources must be integrated into a unified commerce system. 

Pillars of digital transformation in the retail industry 

A retailer should understand the 4 pillars in order to make digital transformation possible in their retail industry. 

Customer engagement  

Since user engagement occupies the top position of everything in the retail industry, businesses rely on a satisfied customer base to grow their bottom line. Advancements in technology such as mobile computing and data analytics have facilitated smooth interaction and understanding between consumers and retailers like never before. The customer relationship management system (CRM) helps to take a customer-retailer relationship to another level as they are designed to offer detailed insights on customer demographics and evaluate customer data depending on their behavior and preferences. The statistics created by the CRM can be used to generate more customer-oriented marketing and sales campaigns in an effort to create a higher quality and customized experience. 

Employee empowerment  

Employee empowerment involves inculcating confidence in your employees by providing them knowledge, skillset, and tools they need to perform well in their job. A CRM allows employees access to details of customers via a single, easy-to-use management interface to sell and provide customer suggestions, apart from offering insights on customer behavior and demography. 

Optimize operations  

One of the 4 pillars of retail digital transformation is optimizing operations, highlighting faster, data-oriented decision-making, more efficient workflows, and more functional visibility across channels. Your business requires functional stability if you want to give an uninterrupted cross-channel experience to the customers. You can install Enterprise Resource Planning to support integration. ERP systems eliminate the obstacle between applications to give a comprehensive overview of multi-channel functions, including supply chain, customer service and transactions, purchases, returns, and more. 

Reimagine your products  

It is essential to actively look for ways to integrate new technological developments into your offerings, to maintain the speed of innovation. It also requires proper software and tools just like the other pillars of retail digital transformation. In order to get the best Return on Investment (ROI), you need to give priority to software and systems that highlight the predictive analysis. Some systems combine statistics obtained through ERP, CRM, and BI (Business intelligence) with machine learning to identify possible failures before that happens; take a self-defense or compensatory measures, and utilize digital intelligence to detect new sources of revenue and growth opportunities. 

Wrap Up 

There is no doubt that the retail industry has become more competitive than before. Here the customer is in complete control, and nothing can attract the customer other than a customized or unique retail experience. In spite of this, there are many retailers who are slow to incorporate such technological innovations that allow them to change. The fact is that retailers have to meet the changing customer needs: you can’t bring the customer to your track, you have to follow their track.  

Top 10 Programming Stacks

Are you planning to utilize software development services for your business? If so, then let’s talk about the software stack otherwise known as the development stack or technology stack. Before building software for your organization, you need to make sure that the right technology stack is used in the development of your software. To choose the right software stack, you must have a proper understanding and knowledge about software stack as there are a lot of stacks available in the market, from those you should pick the apt one.  

What is a Programming Stack? 

A technology stack comprises a bundle of tools, frameworks, technologies, and languages that enable us to develop software solutions, products, mobile and web applications, etc. To put it simply, consider your software like a house. A house needs pillars, building materials, and other tools to make it functional. A stack includes building materials and tools required for the buildout and efficient functioning of the software. These technology stacks are responsible for bringing life into every software product we depend on. This affects the design, functionality, and future measurement capability of mobile or web applications.

There are mainly two elements for a tech stack: 

  • Front-end/ user-end/ client-side – which includes JavaScript, HTML, CSS.  
  • Back-end/ server-side – includes operating systems, programming languages, servers. 

Top Software Stacks 

With the changing standards and trends in software development, it is important to be aware of the top-ranking technological trends which are currently dominating the market. You will be able to build an efficient product for your business by evaluating the strengths and weaknesses of various application stacks, which can help you to reduce risks in development. Here are some of the major software stacks in the current market: 

The MEAN Stack

Being one of the most popular tech stacks, MEAN offers multiple advantages to the developers. One of the notable benefits is that it uses a single language (JavaScript), thereby saving time and cost for organizations already having JavaScript specialists to write user-end code. In addition, you can reuse the same code throughout the entire application, reducing unnecessary redundancies. An added advantage is that every standard technology is free and non-proprietary. Since it offers scalability and flexibility, it is the best choice for various websites and interactive applications. 

The MERN Stack

There is not much difference between MERN and MEAN, basically, they are similar. The only dissimilarity is that the Angular.js in MEAN is replaced with React. React Integration is one of the main advantages of MERN as it has a strong library, the capacity to use codes simultaneously across browsers and servers, and offers full-stack development options (both client-side and server-side). In addition, flexibility and efficient development of front-end operations are notable features of React. 

The MEVN Stack

MEVN is the second version of MEAN other than MERN, which replaces Angular.js of MEAN with Vue.js. As the user-end framework. By integrating the best features of React and Angular.js, Vue.js has earned wide popularity among developers. It offers clear programming, excellent performance, and is very simple to learn. 

LAMP

The name LAMP stands for: 

  • L – Linux (Operating system) 
  • A – Apache (HTTP Server) 
  • M – MySQL (Relational database management) 
  • P – PHP (Programming language) 

When it comes to technology stack models, LAMP is a basic model in the industry. In web development, it provides the best cost-effective,  flexible, and highly operational web applications, and is still one of the first widely used open-source software stacks. 

ASP.NET

Recent years have witnessed the emerging popularity of Microsoft’s .NET, which can operate on Windows as well as Linux because of its lightweight nature. Microsoft’s adoption of open source technologies has attracted the eyes of developers around the world. Some of the common application tech stacks by Microsoft such as Microsoft Azure, SQL Server, ASP.NET MVC, and IIS are used by .NET to develop applications. 

The Ruby Stack

Ruby on Rails (RoR) is a development environment that uses a vigorous programming language named Ruby. It is a ‘ready to operate’ stack that makes quick development of applications and simplifies the whole development process. If a user-end web development app is written in Ruby programming language, then there is no need for professional knowledge to work on it.  This enables you to use the default structures for handling databases and web pages.  

Django Stack

Django stack is the object-centered programming environment of Python. Python is one of the rapidly emerging languages. It is a simple language and that is why it has been taught to college students as a development language for beginners. This stack promotes rapid development and simplifies deploying Django software, which allows users to focus more on the business logic rather than setting up the server-side. It comprises Python, MySQL, JavaScript, and Django. Python has been widely used in data science and machine learning, which makes it common and popular among the masses.  

Flutter for Web

In a cross-platform development world, flutter can be considered as a game-changer. When you use flutter, there is no need to waste time on deployment and it uses similar UI and business logic on every platform. Moreover, it allows you to add additional features, build a User Interface, and fix bugs without affecting the speed. 

Java 

With many new projects are being pulled into newer, lighter application stacks such as Node.js and ASP.NET, the popularity of java has faded over time. But it is still a favorite choice of enterprise applications and has been used widely by developers across the world. 

Serverless technology stack

It is time to move to serverless stacks or build applications on cloud infrastructure. This computing platform offers kinds of services and tools, thereby simplifying infrastructure management. The best and first example for a serverless platform is AWS Lambda. With a serverless stack, spikes can easily scale up to thousands of users quickly and scale down as the spike decreases. 

Wrap Up 

So far we have discussed various stacks that can be used to develop software solutions or applications. But the point lies in how you choose your stack. There are certain factors to be considered why choosing a stack for your company – scalability, the purpose of your project, final outcome, functioning of the product, the capacity of your server – are some of the things to be noted. Always keep in mind that you don’t have to choose a stack just because it is used by a big company, choose the one for yours. 

A Guide To Digital Transformation In Banking Industry

What is Digital Transformation?

Digital transformation, sometimes called “digitization”, is a vital process in the 21st century. It is typically referred to as utilizing digital technologies or Information Technology (IT) to redesign existing, traditional, analog business operations. These may include logistical, financial, management, and even academic or training operations. 

The main purpose of digital transformation process is to meet the needs of the growing market demands and heighten customer experience in the most efficient way possible. Hence, this process completely redefines how value is delivered to customers by optimizing the way a business is operated and managed.

The effects of such digital transformation have become more and more apparent in recent times. Industries such as freight forwarding, academics, and business marketing have already established their transformed services into the mainstream by offering new “Software as a Service” (SaaS-based) solutions such as Enterprise Resource Planning (ERP) software, online learning modules, and product upscaling through e-commerce respectively.

The end goal of the transformation process is to ensure that the industry or enterprise uses technology to continually evolve all facets of its business operation and customer interaction. And a prime example in this regard can be derived from the financial industry – particularly in the banking sector. Here are some strong utilities of digital transformation in the banking industry:

Blockchain Technology

This is the most recent and possibly most controversial digitization initiative taken by members in this sector. It entails setting up a decentralized ledger for payments to facilitate swift and efficient payments. This improves security, enhances efficiency, and streamlines the banking process. It allows for complete autonomy within banking processes and allows customers to engage in more secure transactions with banks in the form of smart contracts. 

Blockchain technology also aims to revolutionize intermediary banking operations such as bank-to-bank payments, cross-border payments, processes involving KYC, loans and money lending, and so on. The security aspect of it is aimed at reducing fraudulent activities from personal accounts, such as unauthorized use of credit or debit cards, detection of unusual activities within accounts, and the ability to transparently see transactions between accounts within the public general ledger. 

Artificial Intelligence (AI) 

Artificial Intelligence development companies help banks to run under proper regulatory compliance. An AI-based digital infrastructure is used widely in fraud detection and indicates suspicious activity, thus enhancing security against hackers. This aspect of digitization aims to work in close collaboration with the aforementioned blockchain technology. Consider, for instance, a transaction between person X and Y. This transaction will be recorded in the decentralized ledger using the encrypted account numbers of both X and Y. Furthermore, when implemented alongside blockchain technology, it will be easier to detect both when the transaction was made as well as at what frequency any transaction was made between the two accounts. Using Machine Learning to teach an AI system to locate these discrepancies can easily weed out fraudulent or uncharacteristic activity to provide reasonable doubt for suspicion, if not red-handed evidence of fraud.

Customer Data Collection, Analysis, and Management 

This is a more mainstream utility of digital transformation in banking where powerful insights and analytics derived from computer processes (such as big data) can facilitate customer service. It is possible, and often more beneficial, to incorporate a solid technical framework to help gauge customer preferences, unveil common patterns, and deduce reliability, and so on.

A good use case for this criterion would be the conjunction of Data Science with digital data collection in order to make an informed financial decision. For example, the spending nature of an individual may be discerned from their recent transactions. This information may be extrapolated to determine the trajectory of loan repayment (if one has been issued) or the anticipated return on a loan if one is to be issued.

It is also quite useful to use digital methods to provide financial advice to people based on their spending/investment habits to better facilitate customer satisfaction and to endorse the goodwill of the bank.

Challenges Faced By Existing Technologies

There are a few major challenges that plague the current outlook of the banking sector, each with its own relevance to requiring digital transformation. These are summarised below:

Growing Competition 

The dangers presented by FinTechs (financial technology) to traditional banking processes, which generally focus on the most productive areas of financial administrations, are immense. Prior expertise in various realms of manual financial management is easily outclassed by implementing modern technology, as suggested in the above examples.

The new industry sharks who have incorporated a stellar digital framework into their financial sector force numerous smaller organizations to look for partnerships or acquisition opportunities as a backup plan or security measure, just to keep themselves afloat, unless they adapt to FinTechs themselves.

Cultural Obsolescence 

It is rapidly becoming a well-known fact that there is no room for manual models and frameworks in the computerized world. Banks and similar financial unions need to proactively consider technologically forward goals to resolve challenges in the financial industry. This is in no way unachievable or unrealistic; moreover, it is a necessity to avoid obsolescence. In fact, it is the big players in the realm of finance that endorse a culture of development and evolution in which technology is used to improve existing processes and to provide strategies to achieve the best results.

This game-changing social shift toward a more culturally adaptive business framework is the minimum requirement to compete in today’s financial climate, and is indicative of a larger, mutually agreed upon change for a digital future.

Growing Expectations 

The present buyer (particularly a millennial) is more intelligent, savvy, and educated than any generation before. The current climate of expectations from any sector, particularly finance, is of a targeted personalization and organic comfort out of banking experiences.

Easily influenced clients and indirect marketing to more informed demographics play a significant role in these expectations: each new decade of banking client comes with more specifications, an innate and detailed comprehension of technology, and, as a result, a greater expectation from their banking experiences.

Client Retention 

In continuation of the previous point, financial service clients rely on anticipating customized, basic, and instinctive interfaces on smart devices to derive meaningful experiences from their endeavors. This may be something as meager as running a Google search through speech, or as convoluted as sending a personalized gift to a loved one through e-commerce websites. 

The faithfulness of a client is rapidly turning into a point of reference that influences prospective clients, which is in turn dependent on their overall satisfaction in order to be retained. The loyalty of any client is heavily reliant on rich customer relationships built by deeply understanding the client and their expectations from the firm.

Why Is Digital Transformation A Necessity In The Banking Industry

Now that it is clear how large of an impact digital transformation is to have on the future of finance as a whole, it is important to also recognize what utility corporations will derive from this change in the long run. Each digital transformation drive will have its own distinct motivations pertaining to any of the challenges discussed above, or even more that are specific to their mode of operation. Generally speaking, however, the prime reason behind any transformation initiative is to improve a firm’s existing operations and processes for better returns on investment (ROI). 

Digital transformation is significant to the banking industry in this way because it helps banks and associated firms grow and evolve to stay relevant in their industry. If a business refuses to capitalize on the revolution and develop, they stand no chance of competing with the current market sentiment, let alone adapt to future changes.

However, mistakes are commonly made in attempting large systemic changes such as this. Incorporating a whole new framework into a business that has been running lucratively for generations will definitely come across setbacks if manipulated carelessly. 

For instance, various banks commit to this process of digitization erroneously by taking on a series of independent and incoherent digitization initiatives. These struggle to succeed financially because they do not have the lasting dedication or coordination to contend with long-term employers of similar solutions.

All things considered, digital transformation in banking should involve a systematic approach when it comes to implementation. Understanding the requirements of clients, the use of computerized frameworks, the application of related software, and how it all comes together in infrastructure is paramount in order to achieve the best results from this vital change.

Where To Get Started With Digital Transformation

Digital transformation requirements will vary extensively depending on the goals of a business (both immediate and long-term) and its consequence to their target audience, current digital climate, existing business model (and possible room for consistency), and predicted trajectory of their market. To this end, the most imperative stages of digital bank transformation can be summarised as follows:

  • Become proficient with data and analytics, and learn to use them to your advantage.
  • Decide where to and enhance the consumer experience and what aspects of your brand to keep unique.
  • Follow-up with peers and employees, and encourage innovation within the organization.
  • Find places to use existing technologies to your advantage and reinforce the rest with modern innovations.
  • Implement these changes into regular operations.
  • Adjust and re-skill your employees to suit the novel changes.
  • Re-align the company’s short and long-term goals with improved, digital prospects.

Conclusion

Bank digital transformation is not as easy as it sounds; and it sounds quite convoluted to begin with, as evident from the large sum of banks presently coming up short at their own transformative endeavors. With reasons ranging from a lack of conviction to a particular objective to an obvious lack of support in implementing new digital horizons, banks will need to make this change towards digitalization by evolving their approach towards the current market, replacing obsolete frameworks, and attempting to make peace with the new era of informed clients.

This will help develop a wide variety of single-use digital features and eventually lead to the access of a completely digital framework. When the digital transformation is accomplished, banks and the industry as a whole can offer more prominent worth to buyers, particularly when upheld via troupes of transparent, smart technologies.

Tips for Starting a Virtual Call Center

Businesses today often look out to outsource the work of handling incoming calls to an external call center. This is because they do not want to invest in having an in-house call center. These businesses also understand that a call center is essential for their existence because customers need a place where they can reach out and have their queries and issues resolved. 

Thus, having a call center is another way of making your customers feel valued. Setting up a virtual call center is one of the trends that are fast catching up with the commercial business sector. 

Advantages of Virtual Call Centers

  • The start-up costs are substantially less than having a conventional call center setup. It is a computer system that you need along with a telephony software system.
  • Virtual call centers can be deployed easily since there is no involvement of physical hardware on the business’s end. If you are deciding to utilize any of the existing virtual call center service providers, all it takes to get started is a few computers equipped with fast internet connectivity. 
  • With a virtual call center, you are not restricted to a particular geographical location or region. You can work with local, as well as national and international clients seamlessly.
  • Virtual call centers are easily scalable. Adding additional team members and getting them started with the call center operation is easy as creating another user account in the cloud-based call center software. 
  • When you appoint and hire staff members, they can also now work in the remote ecosystem. You can also appoint agents who are spread across the globe where they can work as per their time zones.

How To Start A Virtual Call Center?

Keen to start a home-based virtual call center? Here are a few tips to start your virtual call center.

Deciding the Call center software. 

The choice of the right call center software is critical for the success of your business. The call center software has to be cost-effective, scalable, and easy to use. Features such as advanced reports, the ability to monitor calls, and review performances of support agents will improve the overall quality of the service provided. 

Look for a trained workforce

Even if it is a home-based virtual call center, you will need staff members as your business catches up and you find new clients. Ensure that you choose people who have excellent communication skills, confidence, and also have domain expertise. Also, do make sure that the hardware and the software requirements are met accurately for the work to happen seamlessly.

Technology choice

Virtual call centers leverage the power of cloud-based software systems. Voice over Internet Protocol or VoIP enables remote working for home-based agents a seamless experience! Some of the advanced technology expected for running a virtual call center is IVR or Interactive Voice Response, customized voicemail greeting, automatic call distributor, opening and closing hours that can be programmed, and so on.

When you choose and decide the right technology, you need to consider the following parameters:

  • The software used for call center operation should be scalable and flexible. Since there will be a need to scale up the number of employees depending upon the growth of the company, adding or removing users should be an easy process.
  • How fast can the setup be done? Setting up the virtual call center is a much faster process because there is no need for a local configuration of hardware, or setting up workstations or miles of wiring to be done. The technology should be easy to set up – as easy as installing an app on your device. 
  • How easy or complex is it to operate the technology? Make sure it has a seamless user interface, one that is intuitive and helps users spontaneously do their work in an efficient manner.
  • The virtual call center software you are choosing should be able to easily integrate with your existing suite of software such as a CRM for better improving the overall service provided to your customer. 

Is Cloud-Hosted Call Centers the Right Choice in 2020?

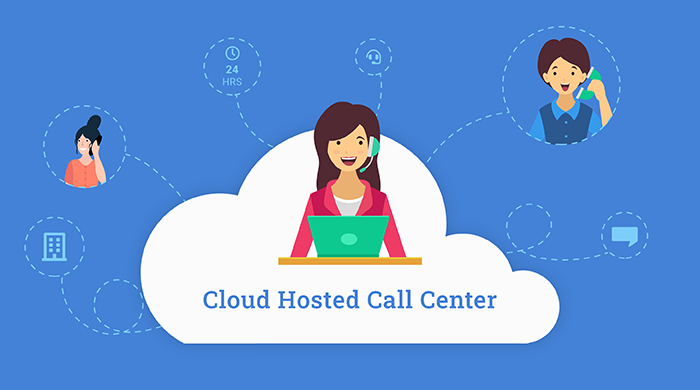
A cloud-hosted call center is a modernized alternative to the traditional option of an on-premise call center. This means that the call center would be entirely based online and not in the form of a physical office anywhere. In this case, every instance of communication is taken up via the internet by the integration of voice- video call solutions, emails, and social media. These new digital channels have sprung up in usage in recent times and are picking up pace rapidly. All that is required for a fully functional cloud-based call center setup is access to the internet with enough bandwidth so as to accommodate a cloud server platform.

The arrival of new technology does not necessarily mean that the utility of the old scheme of things is completely decimated. Both setups have their own advantages and disadvantages. This article is going to help you understand the basic advantages and disadvantages of a cloud-hosted call center with respect to the on-premise call centers so that you can make an informed decision for yourself while choosing one of the two.

Does On-Premise Call Centers Make Sense Anymore?

Innovation in any field tries to solve an existing problem to give a better experience to us. Obviously, cloud-hosted call centers offer a lot in terms of ease and functionality and are better than traditional setups in many ways, but still, there are some things that one can get only with these traditional on-premise setups.

Good old reliable management from ground zero

An industry veteran might argue that the authenticity of work can be better overseen by a manager if he is on the spot. On-premise systems enable you to closely oversee all the workforce and equipment so that you know exactly where and how to spend the resources. This way all the costs and the decisions therein can be upfront.

Sense of peace and camaraderie

An on-premise call center offers a certain sense of reliability that all of the data and documents are stored in one particular place without any chance of confusion. Apart from this, the working professionals experience enhanced motivation when they are physically present with their peers and are working with them in an office environment.

Why Cloud Hosted Call Centers Could Be a Better Choice in 2020 and in Future

The first and foremost reason why cloud-hosted call centers can be a better choice in 2020 is the fact that the world is going through the COVID 19 pandemic right now. It is no news that the only way to fight this global virus is to break the transmission chains by following social distancing as much as possible. Cloud-hosted call centers do not require executives and operators to be physically present at a common space. This scheme of operation proves to be monumental to achieve social distancing as everyone would follow a work- from- home pattern. Apart from this, there are other benefits of switching from traditional on-premise setups to modern cloud-based setups.

A faster way to implement initiatives and deploy personnel

When you move the call center service to the cloud, every decision and initiative can be implemented at the touch of a button uniformly for every employee of yours. Hiring and deploying new personnel is also very easy as there have to be no physical hassles of accommodation when one is on a cloud-based workspace. 

Easy upgrades result in new features every now and then

The cloud-based setups and software keep updating and improving themselves from time to time. This results in new features that make the work of operators easy, and also in enhancing the overall experience of the customers.   

Enhanced flexibility and scalability of services

When you are not confined within 4 physical walls of an office, there is no limit to the scalability of any venture. There is increased flexibility where you do not have to be worried about physical assets and you can easily optimize your venture as per your needs without physical constraints.

Monumental reduction in costs

Now one of the most important factors that play in favor of cloud-hosted call center ventures is that there is a huge reduction in costs for the management because the use of physical resources here is next to nothing as everything is online and everyone can be working from their homes.

What is ClaySys AppForms?

ClaySys AppForms is a no-code application builder platform. You can design your forms, add workflow and rules logic to the forms, add data sources to read and write data to the back end, add the security layer, build reports, pass values between the forms and much more. You can do all these activities using the browser based designer in ClaySys AppForms.

Claysys
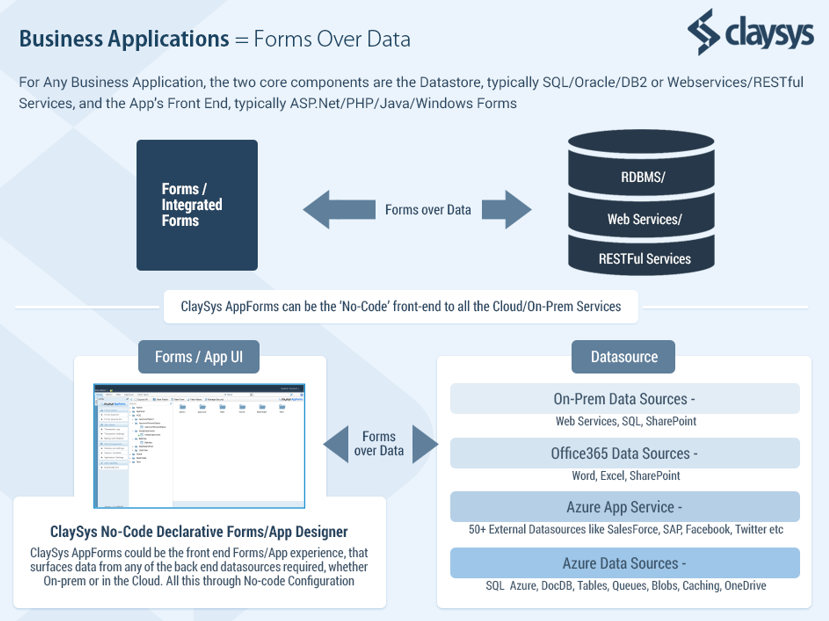
This platform will allow the users including the non-developers to build electronic forms and applications faster than ever before. They can connect to any data sources like SharePoint, MS SQL, and Web Services, WCF, Web Requests, Restful Services and many other back ends. This will include the legacy databases.
Forms
ClaySys
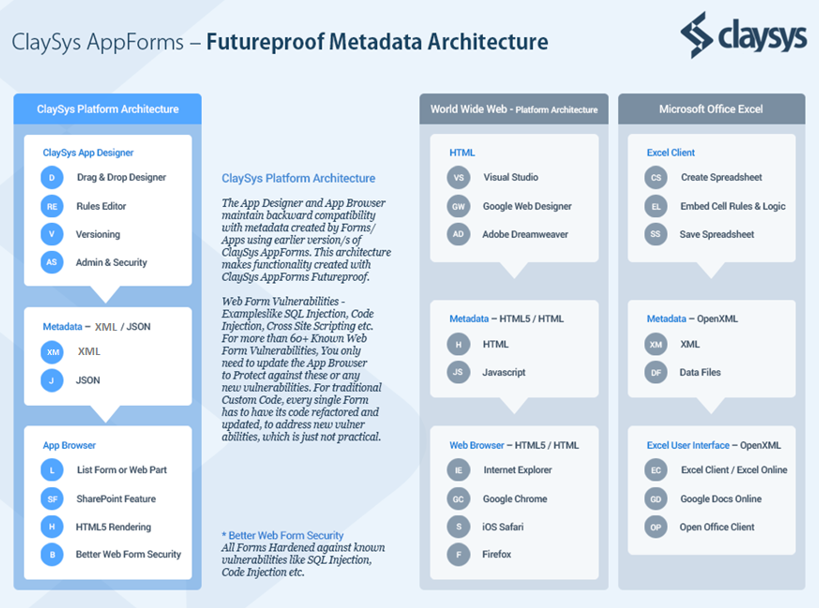
From an authentication standpoint, ClaySys AppForms support Windows Authentication as well as SQL Membership as an option to setup independent authentication for any Web Application or Forms experience created with Enterprise AppForms. This allows clients to simply provide a link to a Form, and can launch the form from any existing Portal Experience, while having the User authenticated through the pass through Windows Authentication option itself, when they access and load the form. SQL Membership provider is used as an option typically for external facing public forms or partner/vendor B2B forms, where credentials can be maintained in SQL Server instead of AD.

In this blog, we will be discussing about the following items:

  1. ClaySys AppForms Editions
  2. Types of Controls in ClaySys AppForms
  3. Data connections ( DataSources )
  4. Mobile device compatibility
  5. Browser compatibility and rendering
  6. Business Logic/Rules engine
  7. Data validation/messaging, error handling.
  8. Conditional formatting
  9. Printing/Reporting
  10. Versioning (both data and template)
  11. Multi-environment promotion/support Dev>Stage>Prod
  12. Ability to recognize current user/Role based UI.
  13. Integration with workflow
  14. Deployment to the farm
  15. Security
  16. Scalability


ClaySys AppForms Editions

ClaySys AppForms are available in the following versions:

  1. ClaySys AppForms Enterprise On Premise
  2. ClaySys AppForms Enterprise Cloud
  3. ClaySys AppForms For SharePoint On Premise (SharePoint 2010 and SharePoint 2013)
  4. ClaySys AppForms For SharePoint Online ( Standard and Enterprise )

ClaySys AppForms Enterprise On Premise

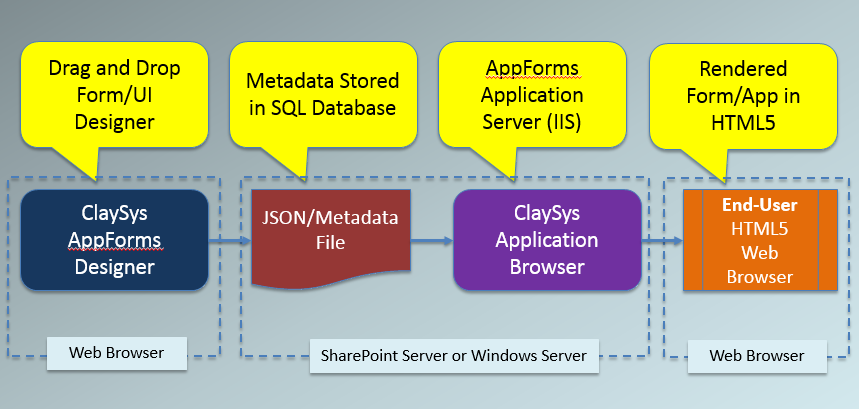
The Enterprise version of ClaySys AppForms is a standalone product which can be hosted in a windows server running IIS 7 or above. This is a complete multi-tenant application builder platform which is hosted in IIS.

The end users will be able to add any number of tenants which can be considered as separate application hosted in the same server. There are two sections to this application which is the designer or administration section and the rendering or the end user section. The administrator users will be able to design the forms and create the navigation section for the end users.

Most of the companies have multiple applications running inside the company which consumes the same database. So if they have to migrate to the latest platform, then it has to be done across all the applications that consumes this data. But when ClaySys AppForms comes into the picture, you can migrate applications one by one without disturbing any of the other applications and data.

The other area where ClaySys AppForms can be a major player is in places where users use MS Excel, MS Access or even Lotus Notes. These applications works great when it has to be used by one user, but you end up with multiple versions of the files and data. This problem has been eliminated to an extend with the release of office online. But ClaySys AppForms can help you solve this problem completely and build replacement for each of these files by creating rapid applications hosted on the internet or intranet.

ClaySys AppForms Enterprise Cloud

The Enterprise Cloud version of ClaySys AppForms is the replica of on premise version hosted in the cloud infrastructure. This will allow any user or company to subscribe to the cloud AppForms, where they can create multiple tenants. The users will be added at the subscription level and each user can be given access to one or multiple tenants created within the subscription.

The database can be in any of the cloud infrastructures like Azure or Amazon AWS. The ClaySys AppForms hosted environment will be hosting only the forms and the data will be with the user themselves.

Most of the companies are moving to the hosted cloud environment to maintain their applications and data. ClaySys AppForms will allow these companies to fulfill the requirement of moving the applications online easily.

ClaySys AppForms for SharePoint on Premise (SharePoint 2010 and SharePoint 2013)

ClaySys AppForms is an add-on to Microsoft SharePoint that enables you to build business forms and extend them to include complex business logic, working with data from SharePoint lists and libraries, SQL Server databases, Web Services, and WCF services. The key difference between AppForms and other products for building forms in SharePoint is that AppForms can evolve into complex business applications, including workflows. ClaySys AppForms for SharePoint is supported for SharePoint 2010 Foundation, Standard and Enterprise Edition, SharePoint 2013 Foundation, Standard and Enterprise Edition, SharePoint Online in Office365 through installing the ClaySys AppForms App from the Office365 AppStore. We are on track to Support SharePoint 2016 once the RTM version is available.

Microsoft deprecating Infopath has created a significant demand for addressing the gap in SharePoint that Infopath used to address. ClaySys AppForms for SharePoint is a Enterprise Scale product that fills in the gap left by Infopath, and extends the capabilities beyond what was possible with Infopath, by enabling the creation of not just Forms but complex line of business applications through the configuration no-code paradigm.

ClaySys AppForms for SharePoint Online (Standard and Enterprise)

ClaySys AppForms is available as an App in the Microsoft Office365 App Store. Once you install the AppForms App in your SharePoint Online environment within Office365, you get access to the Forms and Application building capabilities of AppForms, within your SharePoint Online environment. We also support an Enterprise App deployment model for ClaySys Cloud AppForms, where ClaySys AppForms can be deployed on servers managed by the Enterprise, but can be configured as an App in Office365, through the Enterprise App Catalog option.

Types of Controls in ClaySys AppForms

The different types of controls available in ClaySys AppForms are

  • Generic Data Entry controls ( Textbox, Rich Textbox, Checkbox, Radio Button, File Upload etc)
  • List Controls ( Combo Box, List Box, Checked List box, Radio button group, etc)
  • Grid Controls ( Grid View control[Read Only], Dynamic Grid Control)
  • Grouping Controls ( Tab Control, Sub Form, External Form, Border Control, etc)
  • Action/Navigation Controls ( Button, Image Button, Tree view, Menu, etc)
  • SharePoint Controls ( People Picker, Lookup control, Metadata control, etc)


Data connections

The main data connections to secondary data sources supported in ClaySys AppForms are (There are options to include custom data source to any of the data source type that’s not listed below.)

  • SharePoint (List/Library)
  • External SharePoint(List/Library)
  • MS SQL Tables
  • MS SQL Stored procedures
  • Oracle
  • WebServices (SOAP)
  • Basic REST services
  • Hosted XML files
  • WebRequests


Mobile device compatibility

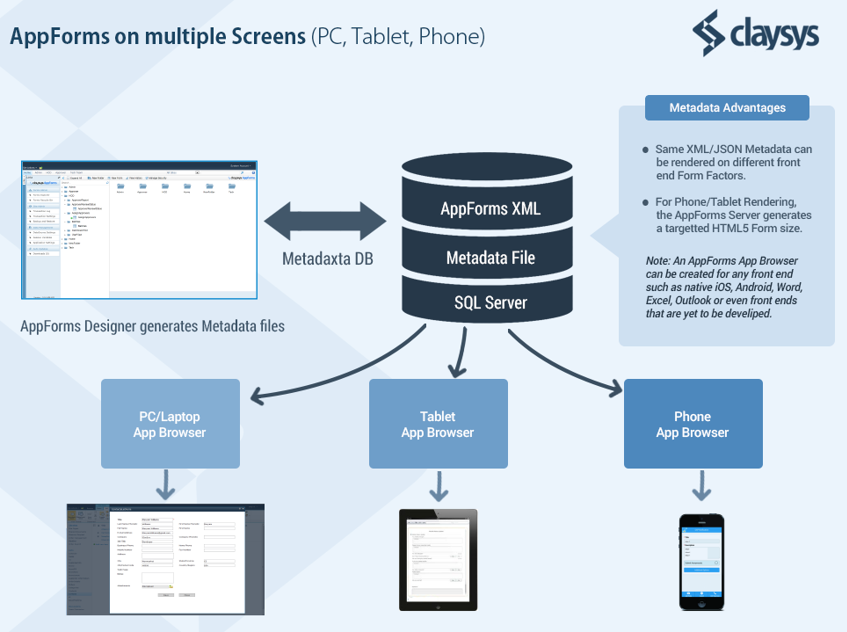
ClaySys AppForms is using HTML5 for the rendering part of the ClaySys AppForms. The forms designed using the AppForms are rendered in the mobile browsers

AppForms

Browser compatibility and rendering

ClaySys AppForms support the following browsers for the AppForms rendering

  • IE 8 +
  • Latest Versions of Firefox
  • Latest Versions of Chrome


Business Logic/Rules engine

You can create the business logic using two of the following Rule Editor options

  • Basic ( Rules Panel & Expression Builder)
  • Advanced ( Rules Engine Designer)

Data validation/messaging, error handling

  • The basic validations like IsRequired, Regular Expressions check & Data Type validations are part of the control properties.
  • We also have Validation control to group the validation messages in the form.
  • You can use the rules engine to have advanced validation logic or a validation using datasource.


Conditional formatting

  • The Rules engine can be used for the conditional formatting in the basic controls.
  • We also support expressions for the formatting in the grid controls


Printing/Reporting

  • Reporting is supported using the controls like Grid View and Graphs & Charts.
  • Printing is supported in any form designed using AppForms. AppForms has a built in Rules function for the printing functionality which can be configured to a ‘Print’ button.


Versioning (both data and template)

  • Each form created using AppForms supports versioning.
    • The user will be able to visually compare the difference between two versions.
    • The details of the changes between two versions of the form is also displayed as a list.
  • If versioning is required for the data saved in a list, we will have to use the default versioning functionality supported in SharePoint.
  • Data versioning is also supported when the data is saved to MS SQL Server

Multi-environment promotion/support Dev>Stage>Prod

Each sub-site in SharePoint is treated as a tenant in ClaySys AppForms. The form can be downloaded as a ZIP file and restored to another environment. The options available to move the forms from one environment to another are

  • Backup the forms created in the entire Site Collection/Tenant and restore that in another environment.
  • Moving the forms of one sub-site(tenant) to another environment or sub site in the same site collection.
  • Moving one form from an environment to another.

Ability to recognize current user/Role based UI

  • The form UI can be changed using the security module.
  • The AppForms supports only one view per form. The security module allows the admin to define control level security. So we can Enable/Disable, Show/Hide the controls in the form based on the user/role.

Integration with workflow

  • If the SharePoint workflow is associated to a list, and the AppForms is used as the list form. Then the workflow will work. AppForms is designed to work and support SharePoint workflow
  • The SharePoint workflow can be triggered manually using the rules engine. The invoke workflow function can be used to invoke any existing SharePoint workflow created in the site collection.

Deployment to the farm

  • ClaySys AppForms SharePoint Versions
    • The AppForms will be installed only on the WebServers.
    • The ClaySys AppForms is installed as a site collection feature.
  • ClaySys AppForms Enterprise versions
    • ClaySys AppForms can be installed in single webserver or a web farm consisting of web servers and app servers


Security

  • The ClaySys AppForms security can be managed using the SharePoint users and groups.
  • Control level security ACL can be set for the forms designed using the AppForms.


Scalability

  • App Server Scalability – The ClaySys AppForms ‘App Browser’ module is simply an ASP.Net Application written in C#, that runs on IIS. It can be scaled through horizontal load balanced servers
  • Data Tier Scalability – No Proprietary Database Model, Uses SQL Server, so scalability on the ‘Data’ tier is simply scaling the SQL Server Cluster
  • Note: The Performance of any Form or Application created using ClaySys AppForms also has a dependency on how the Forms or Apps are designed. E.g. A Form with 500 fields, connecting to 50 different datasources, and having 500+ complex Business Rules, will work but might take 7 to 8 seconds to load, but the ClaySys AppForms performance will still be at least as good as the performance of a Custom Coded ASP.Net Form of a similar design.


What does ClaySys AppForms bring to SharePoint??

ClaySys AppForms is a no-code forms builder which installs in SharePoint on premise as a site collection feature. When you come to the online version of SharePoint, ClaySys AppForms comes in the form of an App. ClaySys AppForms runs inside SharePoint without disturbing any of its features. ClaySys AppForms can be called as an extension of SharePoint rather than embedded feature.

Most of the SharePoint developers coming from the InfoPath world, relate ClaySys AppForms as forms over list/libraries. But ClaySys AppForms can be called as forms over data. This means you can have more than one form working with more than one form of data. One form can connect to multiple data sources like SharePoint list/libraries, MS SQL Server, SQL Azure, Azure data sources (like Azure Table, Document DB, Blob, etc.), web services, restful services, web requests, etc.. The number of data sources supported in ClaySys AppForms will keep increasing so that the developer will not have t to think outside ClaySys AppForms to design a form.
We will be discussing on the following features in ClaySys AppForms:

  • ClaySys AppForms Components
  • ClaySys AppForms SharePoint Versions
  • Advantages of using ClaySys AppForms
  • Functionalities that can be built using ClaySys AppForms
  • Best Candidates to use ClaySys AppForms
  • SharePoint Users Question – After InfoPath?

ClaySys AppForms Components

The basic components in ClaySys AppForms that help you in building Applications are:

  • The ClaySys AppForms Form
  • Form Controls
  • DataSources
    • Form DataSources
    • Collection Control DataSources
  • Rules Integration
  • Security Integration

The ClaySys AppForms Form is where you start designing your form. The form has its own properties that can be customized based on the user requirements. These attributes can be set during the designing time or it can also be set at runtime using the rules engine. The form has its own events like form load, form unload, form navigate away, etc. that can be used by the designer in the rules engine.

ClaySys AppForms has all the controls that the developer needs to build any enterprise scale applications. The controls can be grouped based on the functionalities and some of the groups in ClaySys AppForms are:

  1. Data entry controls
  2. Collection controls
  • Grouping controls
  1. Grid controls
  2. SharePoint specific controls

ClaySys AppForms SharePoint Versions

Once you have learned about these features, you can build a complete application using ClaySys AppForms. The functionalities of ClaySys AppForms is uniform across all the versions. The different versions of ClaySys AppForms in SharePoint are:

  • ClaySys AppForms Enterprise for SharePoint Online (O365, app model)
  • ClaySys AppForms Standard for SharePoint Online (O365, app model)
  • ClaySys AppForms for SharePoint 2013
  • ClaySys AppForms for SharePoint 2013 (app model)
  • ClaySys AppForms for SharePoint 2010

Advantages of using ClaySys AppForms

In ClaySys AppForms world, each control is not directly bound to the data source column. This is where this forms designer is different from any other product in the market. The column binding to the control in the form is done only in the data source. The advantages of this are:

  1. You can save the control value to as many data sources as you like.
  2. It is easy to work with different data sources from the same form.
  • Easy to manage the security at the data source level.
  1. You can have multiple forms working with the same data source.
  2. It brings complete flexibility and comes closer to the programming paradigm.

Functionalities that can be built using ClaySys AppForms

I will expand on each item that’s mentioned in the points mentioned above using the example below. This is one of the typical

  1. Consider you have a legacy MS SQL database where you have your customer details.
  2. Now you need to capture the orders placed by the customer and save the order details to SharePoint List. The next part would be to save the order details to two different lists. The first one to save the order details and the second one to save multiple line items in that order.
  3. You need to relate these two SharePoint lists by saving the order id to the order details list.
  4. You will be able to create one form that talks to all the datasources explained in the points above. The rules can be configured so that you have all the business rules embedded to the form.
  5. Once the rules and datasources are implemented, we can set the security for the form which is optional.
  6. Finally we need to publish the form so that it can be used by the end users.
  7. The published form can be displayed in a webpart of a SharePoint page so that the end users can start using the form.

Best Candidates to use ClaySys AppForms

Microsoft InfoPath forms migration

If your company has invested heavily in InfoPath or you are looking for the best InfoPath alternative, then ClaySys AppForms is the way to go. When you compare the functionalities in InfoPath, you will get much more features that you have in InfoPath. The wish list features like the ones below, that was expected in new version of InfoPath are already part of ClaySys InfoPath.

  • Check in/Check out
  • Versioning and an overall better deployment process
  • Complex nested rules with robust Expression Builder support
  • Master/Detail (repeating items) record creation, save and look-up without code
  • Create, Update and Delete to an arbitrary number of external sources without code
  • Tabs and Wizard capabilities as well as embedded forms
  • Can invoke the opening of multiple forms and external events (workflows)
  • Error Handling/Debugging of rules logic
  • JavaScript invocation
  • Works on any SharePoint version on-premises and on-line and form applications can be moved without modification
  • Centralized form management and administration
ClaySys AppForms does not limit you to these features and you have much more advanced features which will make sure that you are not stuck at any point of migration cycle.
Most of the products out there will promise you all the features until you discover the limitations during your migration process. But ClaySys AppForms has a proven history of InfoPath migrations where you are never stuck because of features. With all the new features available, you can do much more than the existing features in your form.

Microsoft Access forms migration

 Most large organizations today are in a situation where business users and departments have leveraged Microsoft Access to meet specific solution requirements. As these Access solutions grow beyond their initial scope, Enterprise IT is then faced with the challenge of taking control of many of these Access applications, and migrating them to a more stable, secure and robust environment like SQL Server. But this entails a number of issues and challenges related to migration effort and cost, the lead time to support such a migration, the continuing need for the business to retain control and rapidly modify the app etc.
 Since ClaySys is a no-code metadata driven rapid application development tool, it requires a skillset equal to or simpler to working with MS Access, for creating the migrated version of the Access application. ClaySys AppForms is a viable option to help organizations migrate any number of Access apps to a SQL Server environment very easily and feasibly. Since the application functionality and User Experience over the database can be created through just configuration versus writing code, it is very feasible to rapidly re-create the application front end and business logic, to work with the same Access Database schema and existing Access data, which was migrated to SQL Server.
The User Group that created the Access database can still retain control over maintaining the functionality, and to incorporate ongoing changes, while IT can manage the centralized maintenance of the application platform by managing the SQL Server environment for data backups, restores, high availability and security, while managing and monitoring the ClaySys application servers hosting the multi-tenant ClaySys AppForms Web Applications on Windows IIS Servers.

Microsoft Excel migration

From an Excel Migration standpoint, the typical model is to migrate the spreadsheet to SQL Server Tables, and then build or recreate the front end forms experience using ClaySys AppForms. Once the SQL Table structure is defined, you can import the data directly to SQL server from your Excel spreadsheet. This approach prevents data migration issues, and ensures that historic data is available even after completing the migration from Excel to SQL, given that the schema has been defined in MS SQL.

Legacy Application migration

Enterprise AppForms version that runs on just Windows Server with SQL Server as its back end. This version basically allows you to build Web Applications that can talk to diverse back end datasources, including SharePoint. So if you want to build a Forms solution or a Web Application independent of SharePoint, you could install Enterprise AppForms, and configure the Forms experience you want, and have the forms connect to SQL Server, Web Services, Rest Services, SharePoint, SQL Azure, Table Azure etc, to read/write data.
All the versions of ClaySys AppForms supports connecting to the datasources mentioned in the list above. This means you can choose your new platform as any SharePoint version or it can also be hosted in the enterprise version of ClaySys AppForms.

Forms over SharePoint List

ClaySys AppForms installed in any SharePoint version will give you the option to create a list form with just one click. The List form creation option is just another ribbon button in the SharePoint List/library. Click on this button will generate the form along with the rules and datasource connections required.

Forms over any existing relational Database

The Enterprise AppForms version that runs on just Windows Server with SQL Server as its back end. This version basically allows you to build Web Applications that can talk to diverse back end datasources, including SharePoint. So if you want to build a Forms solution or a Web Application independent of SharePoint, you could install Enterprise AppForms, and configure the Forms experience you want, and have the forms connect to SQL Server, Web Services, Rest Services, SharePoint, SQL Azure, Table Azure etc, to read/write data.

SharePoint Online (O365) forms

ClaySys AppForms allows you to create forms in the SharePoint Online. You can publish the forms to end users in the form of a webpart or a list form.
ClaySys AppForms is available in the SharePoint online store in two different versions. You can choose the required version and install it in your site. Once ClaySys AppForms is installed, you can create the online forms which can connect to your SharePoint list/library or any datasource that’s accessible online.  Most of the clients go with the Azure cloud datsources to store their data.

SharePoint Users Question – After InfoPath?

The companies who have invested heavily in Microsoft InfoPath has one question in their mind. There is no clear answer from Microsoft about the replacement product. The InfoPath users had many features in their wish list like the following ones. But the news from Microsoft was that there is no new version of InfoPath to be released. This means that the following wish list remains a dream for InfoPath users.

  • Check in/Check out
  • Versioning and an overall better deployment process
  • Complex nested rules with robust Expression Builder support
  • Master/Detail (repeating items) record creation, save and look-up without code
  • Create, Update and Delete to an arbitrary number of external sources without code
  • Tabs and Wizard capabilities as well as embedded forms
  • Can invoke the opening of multiple forms and external events (workflows)
  • Error Handling/Debugging of rules logic
  • JavaScript invocation
  • Works on any SharePoint version on-premises and on-line and form applications can be moved without modification
  • Centralized form management and administration

ClaySys AppForms the heir apparent

This means that ClaySys AppForms not only includes the features of InfoPath but much more than the wish list. The features in ClaySys AppForms are much more than a normal InfoPath user’s expectation. Most of the products out in the market today focus themselves as an InfoPath replacement product. But ClaySys AppForms is much more than a replacement for InfoPath.

ClaySys AppForms started as a version of Application builder that runs on a windows server with IIS and MS SQL server as its backend. This platform was used to migrate legacy applications from the traditional and obsolete platform to the latest versions of the database and windows servers. Once the platform proved its worth in the legacy application migration world, all these features was included as a Site Collection feature in SharePoint. This helped the SharePoint power users to build applications that does not require new deployments each time they wanted a new form. Creating a form now was part of the sharepoint configuration to them.

Today ClaySys AppForms exists as a standalone platform running on a windows server with IIS and MS SQl as the back end in the form of ClaySys AppForms Enterprise version. ClaySys AppForms for SharePoint can be installed on SharePoint 2010 and SharePoint 2013. Now ClaySys AppForms is also available in SharePoint Online (O365) in two flavours (Standard and Enterprise). New version of ClaySys AppForms is waiting for the release of SharePoint 2016.

The best way to evaluate the product is to recreate some of the most complex functionality in any of your existing form. So go ahead and download your evaluation copy of ClaySys AppForms today.

Working with ClaySys AppForms form

This feature is to design a simple form in AppForms.

1. Creating a new form.
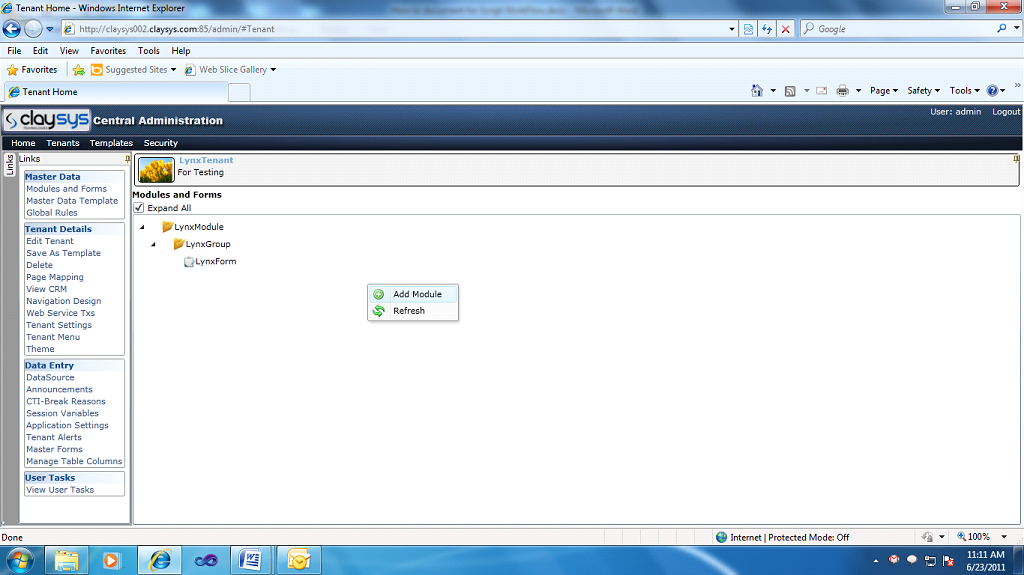
1.1. Right click on the tenant screen

g1
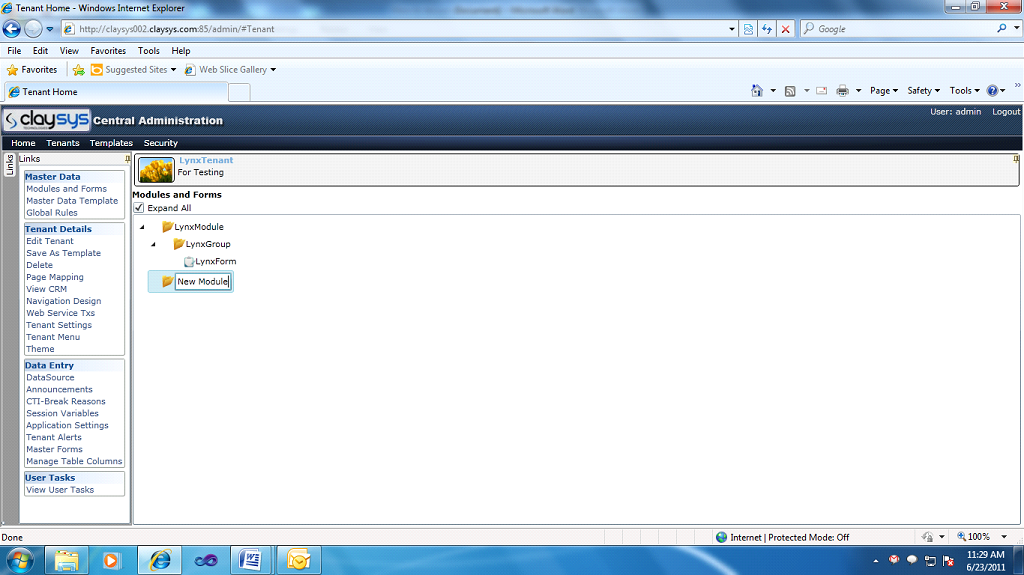
1.2. Click “Add Module” (This action will create a new module as shown below):

g1
Change the default module name to “SampleModule”

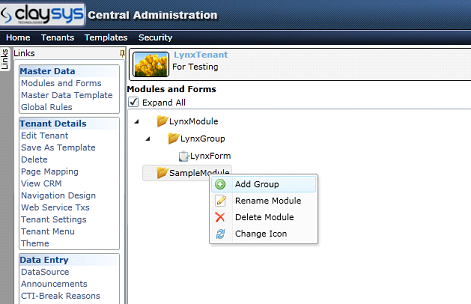
1.3. Select the module “Samplemodule” and right click. This will show a context menu as shown below:

g1
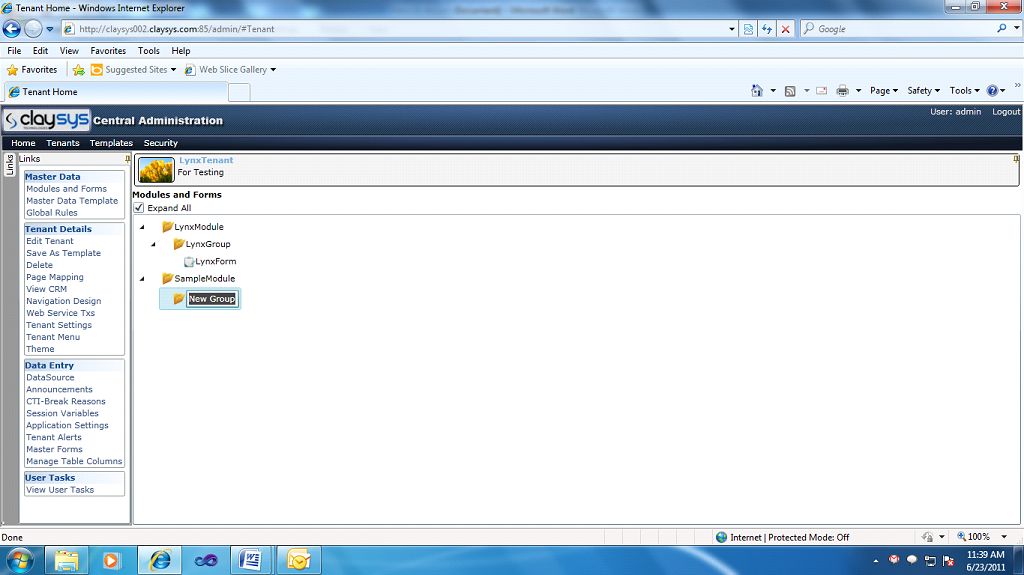
1.4. Click “Add Group”. (This action will create a new group as shown below):

Change the default group name to “SampleGroup”.

g1
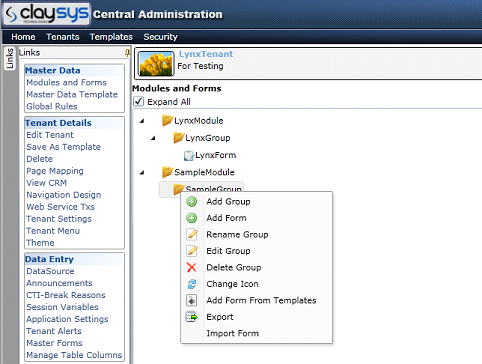
1.5. Select the Group “SampleGroup” and right click. This will show a context menu as shown below:

g1
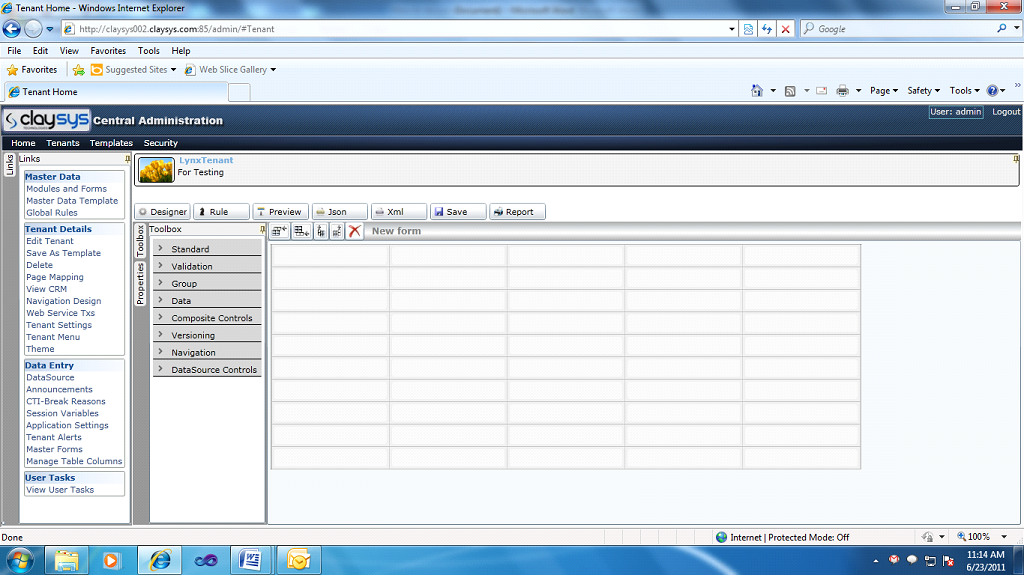
1.6. Click “Add Form”. (This action create a new form named “New form” as shown below):

Tool Box

g1
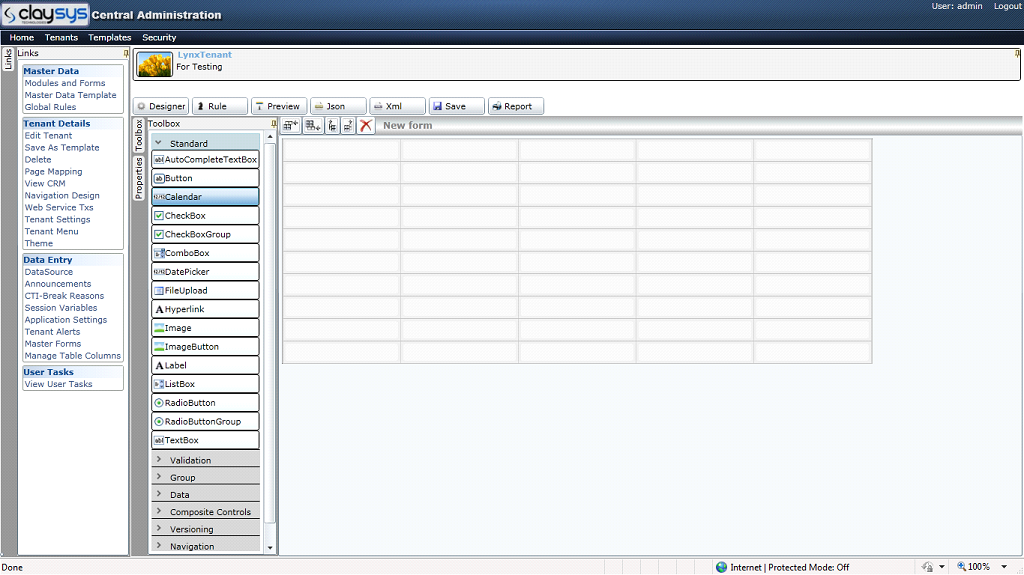
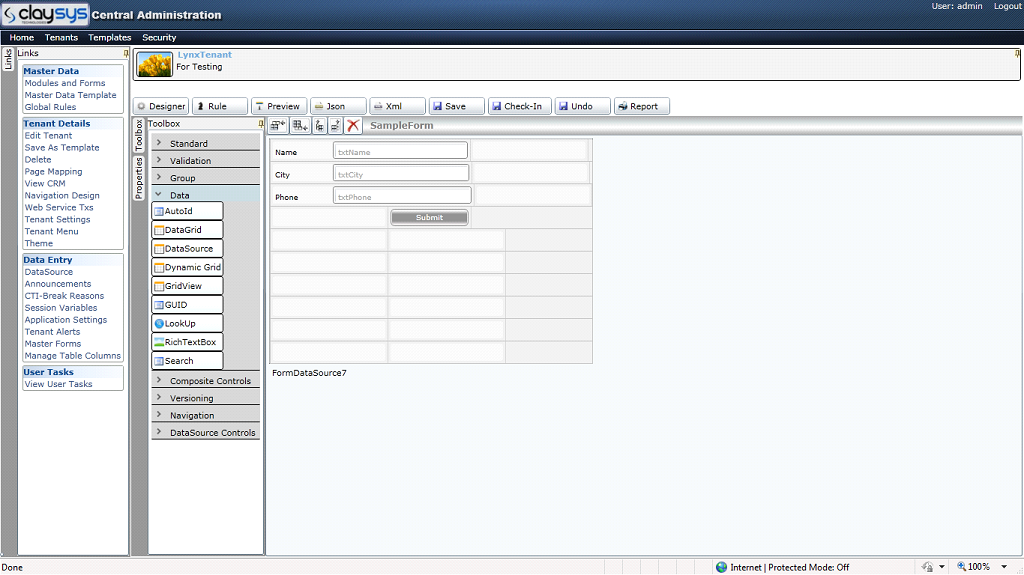
1.7. Tool Box is available in the left side of the form designer. The tool box is categorized   into 8 groups. User can drag and drop controls from the toolbox.

g1
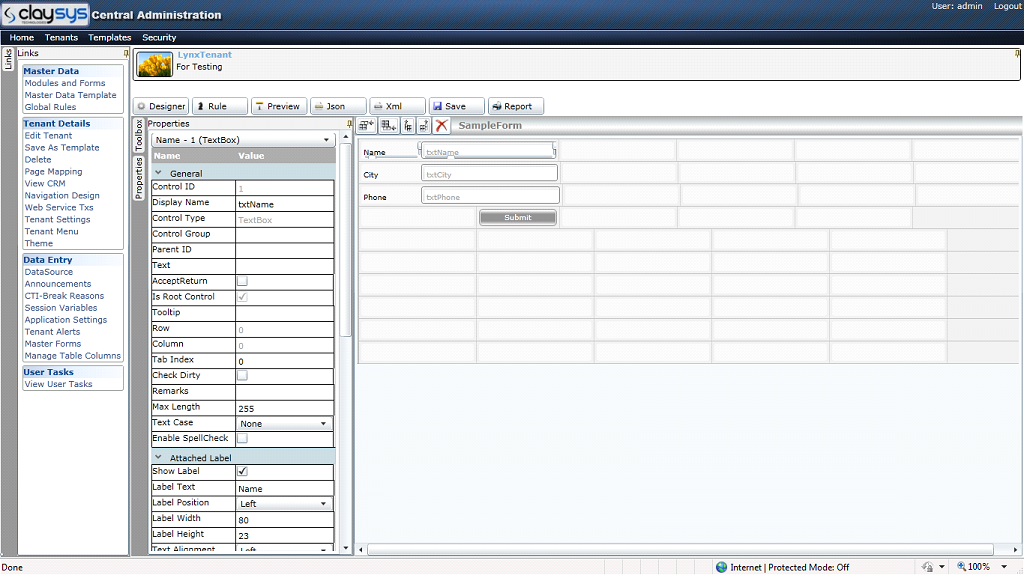
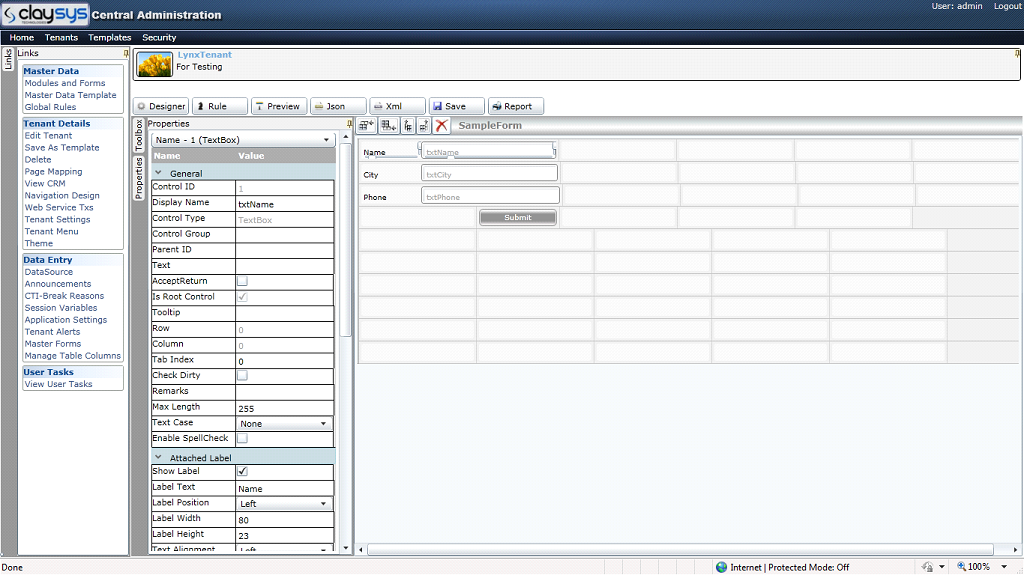
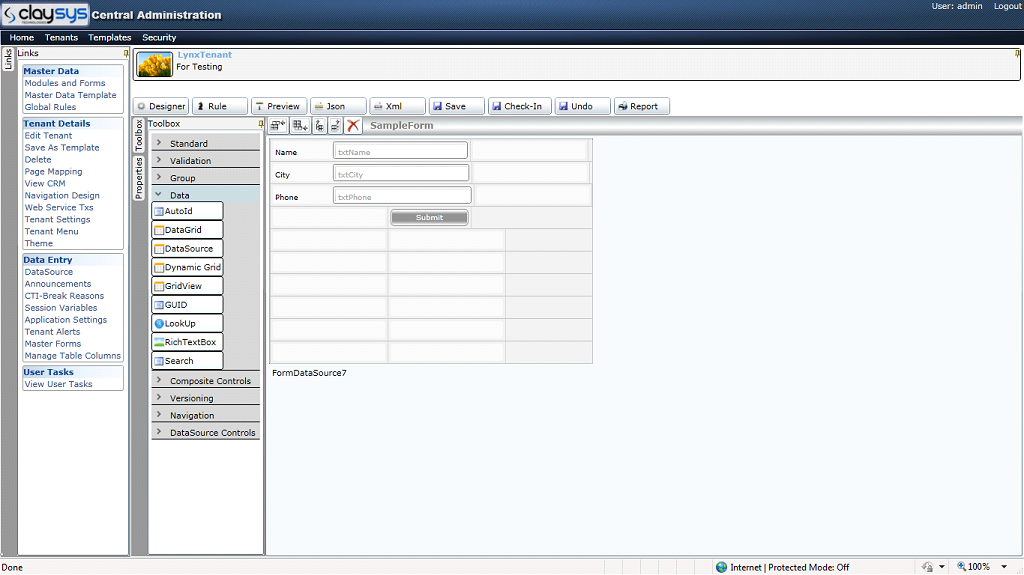
1.8. A sample form is created with 3 textboxes and 1 button. User can change the control’s properties using the properties window.

Properties window

g1
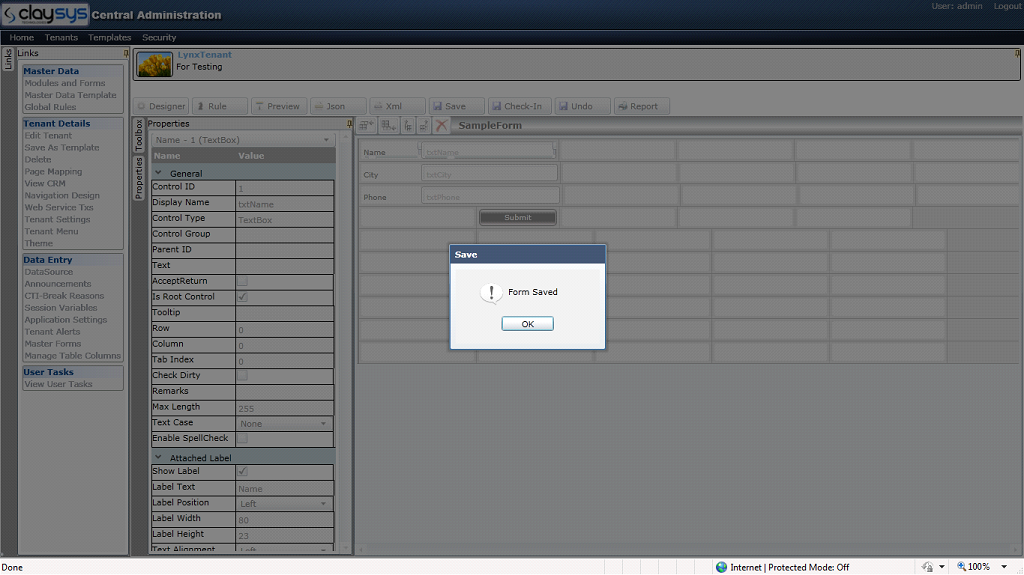
1.9. Click “Save”(This action will save the form).

Save button

g1
g1
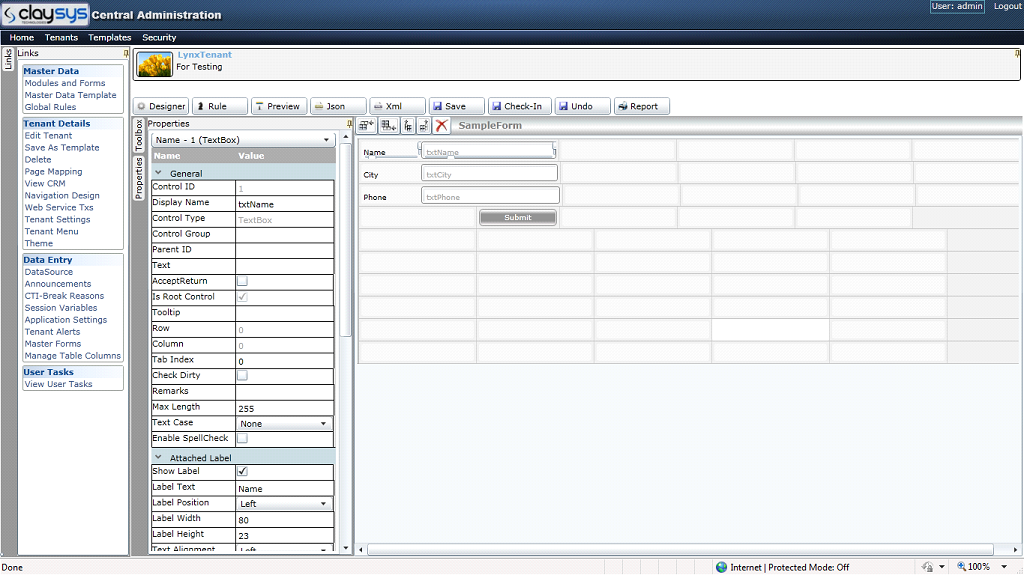
1.10. Click “Check-In” (This action will Check-in the form).

Check-in button

g1
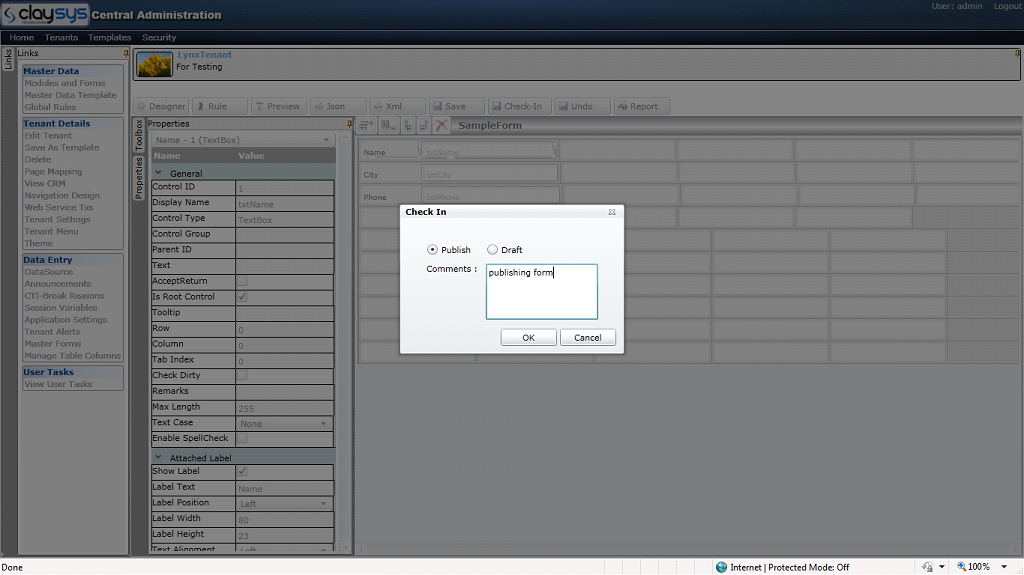
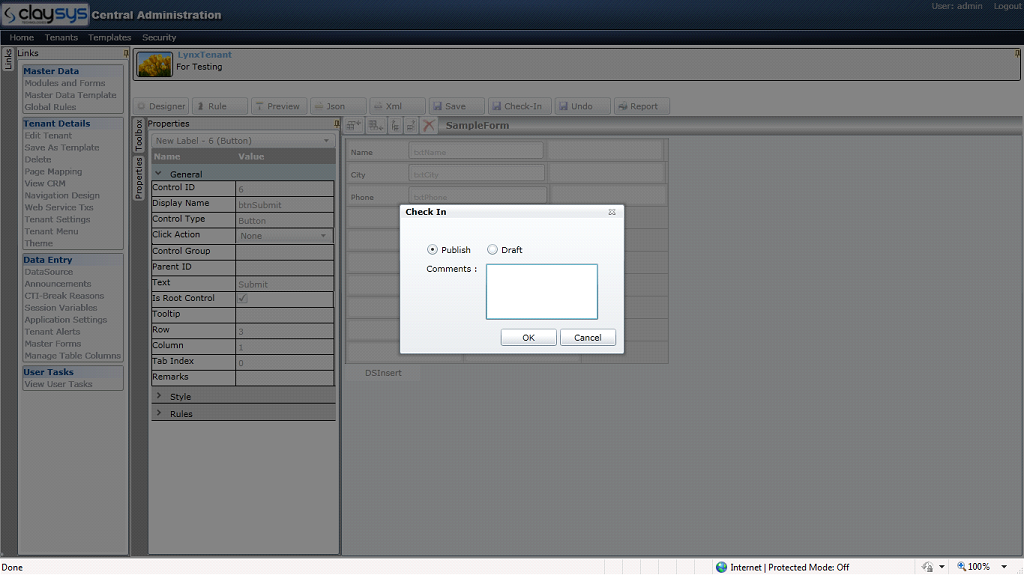
1.11. On clicking the “check-in” button, a popup window will be displayed as shown below.

Select”publish” and click “OK”

g1
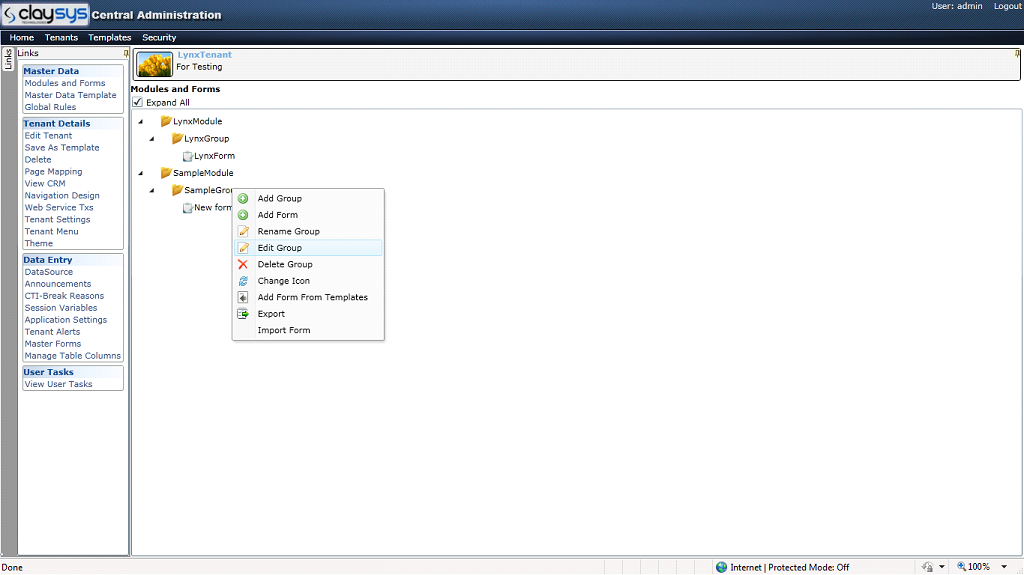
2. Edit a group and add the form
2.1. Right click the group, to which the form is to be added.

g1
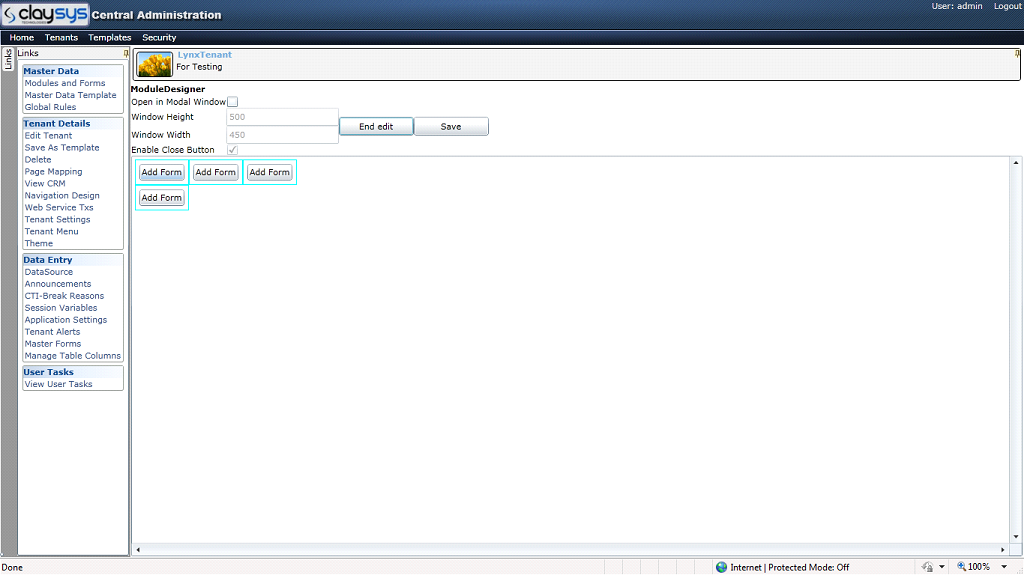
2.2. Click “Edit Group” from the context menu. This will result in the following screen:

g1
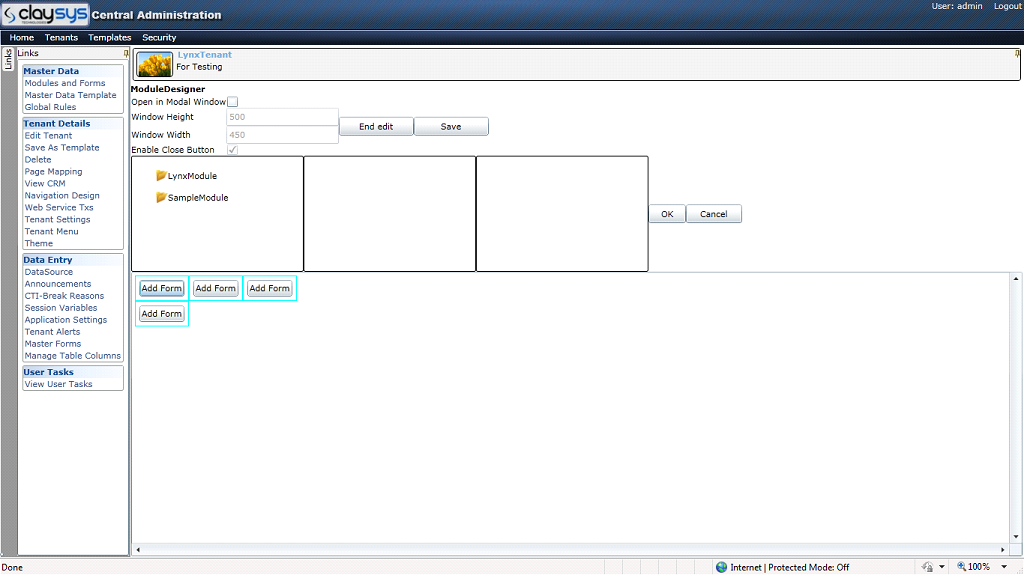
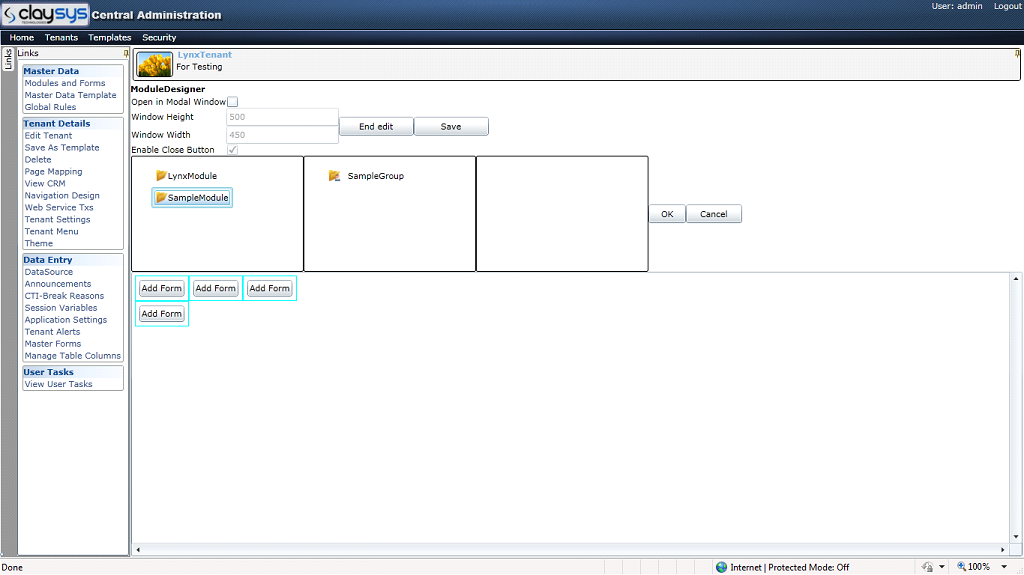
2.3. Click “Add form”. Now the page is displayed with all available modules in the tenant.

Available Modules

g1
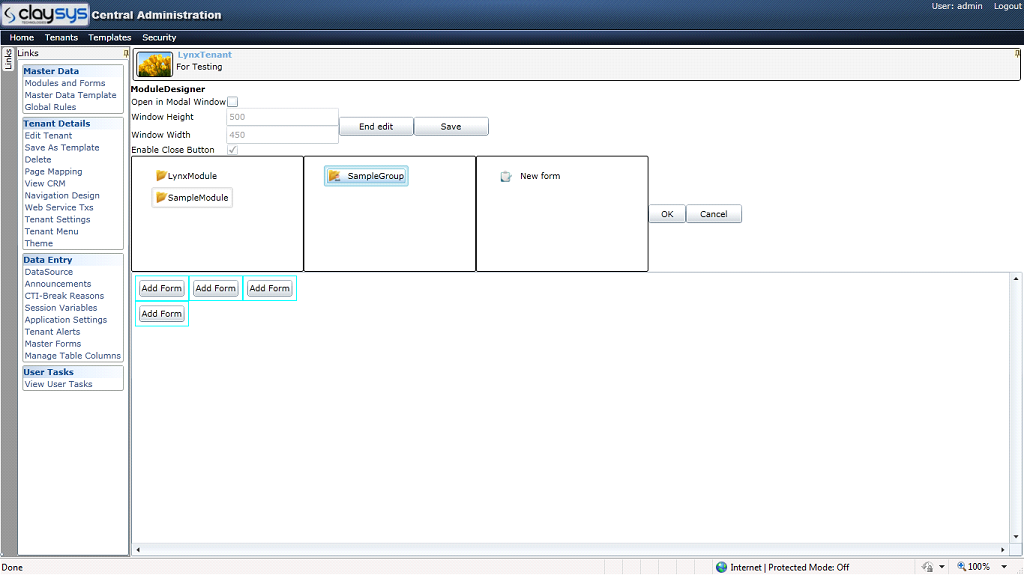
2.4. Click “SampleModule”. Now the page is displayed with all available groups in the selected module.

Available Groups

g1
2.5. Click “SampleGroup”. Now the page is displayed with all forms in the selected group.

Available Form

g1
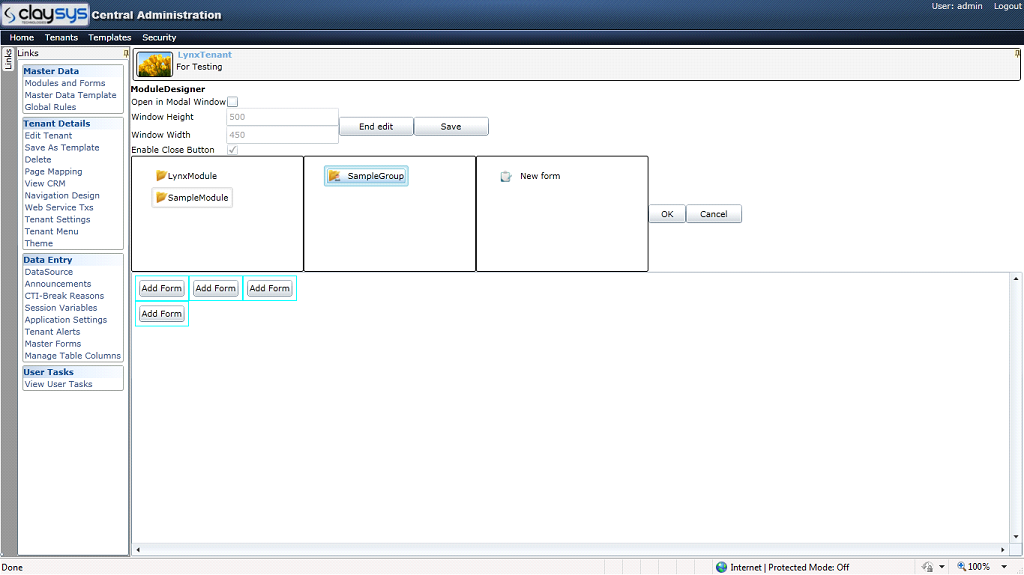
2.6. Click the form named “New form”. Now the page is displayed with the form.

Save Button

g1
2.7. Click “Save” button to save the form.

3.Configuring a ComboBox

3.1. Configure ComboBox using Static datasource

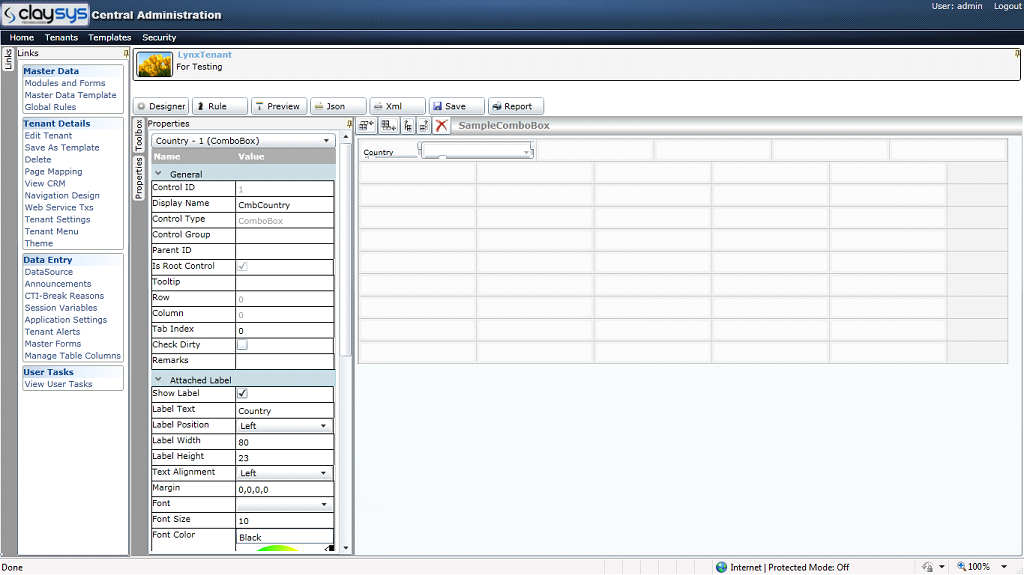
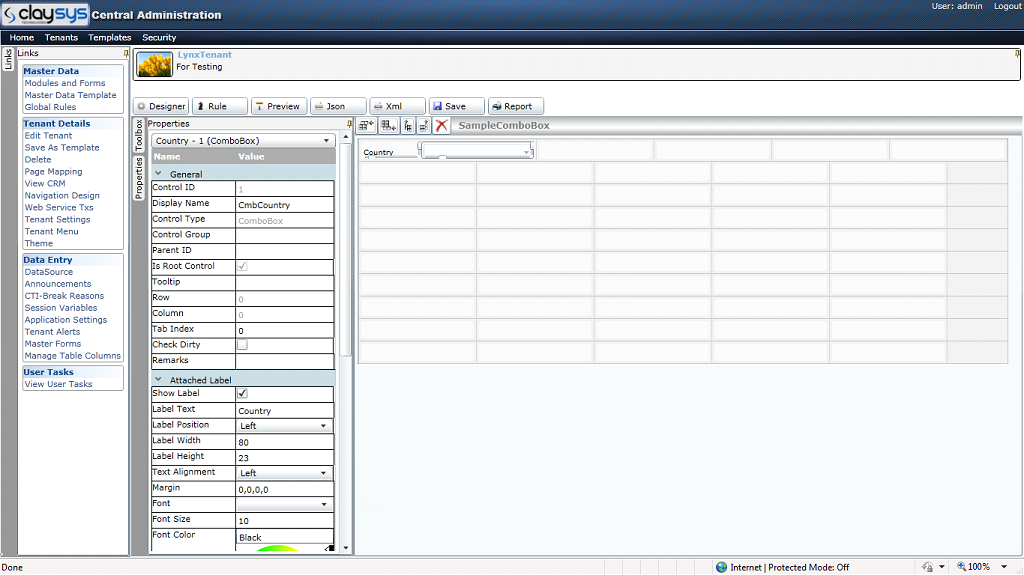
3.1.1. Drag and drop a combobox from the toolbox. Change the properties “Display Name” and “Label Text”.

g1

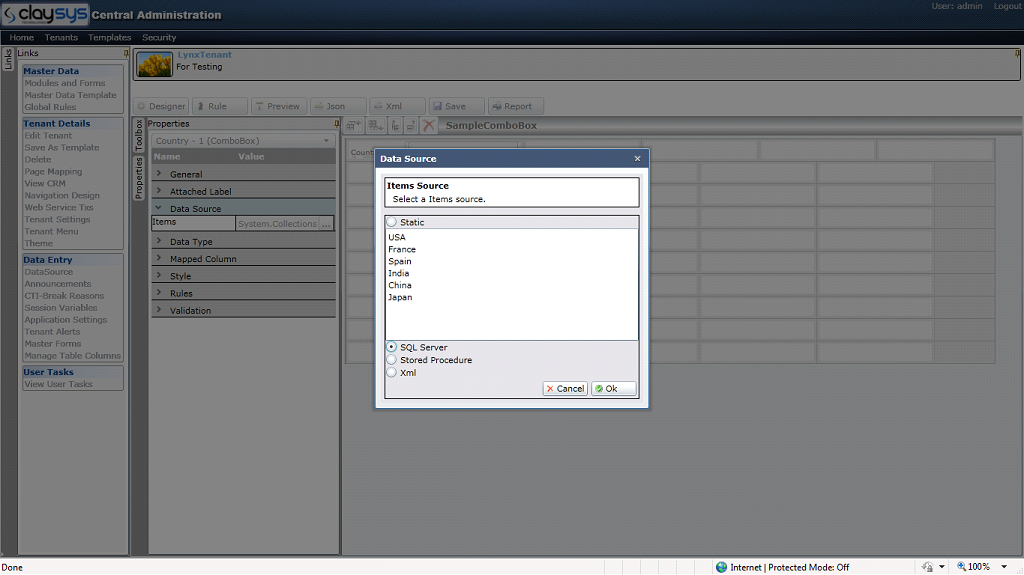
3.1.2. Select “Data Source” from the properties window. After clicking “datasource”, a popup window is displayed as shown below:

g1
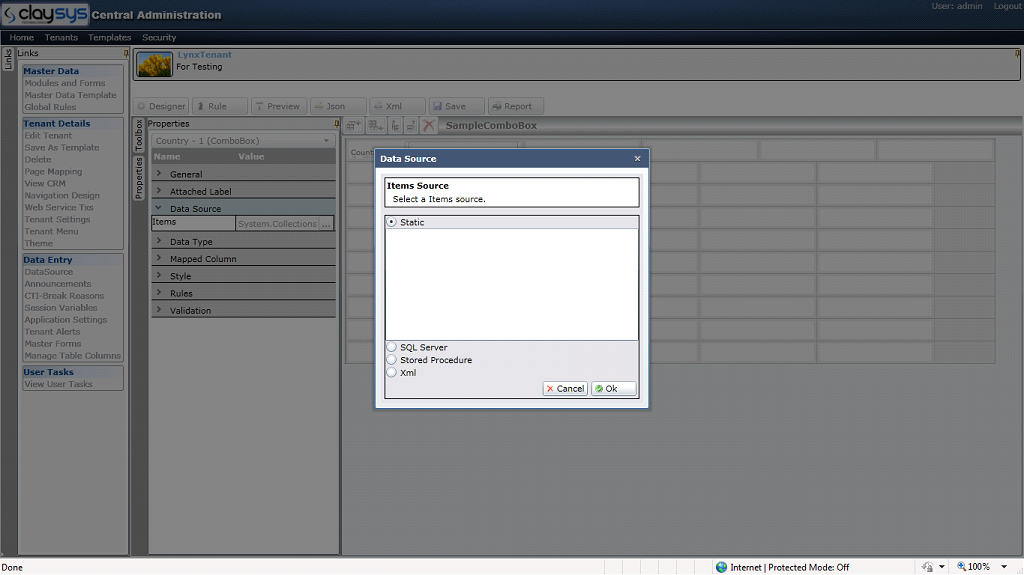
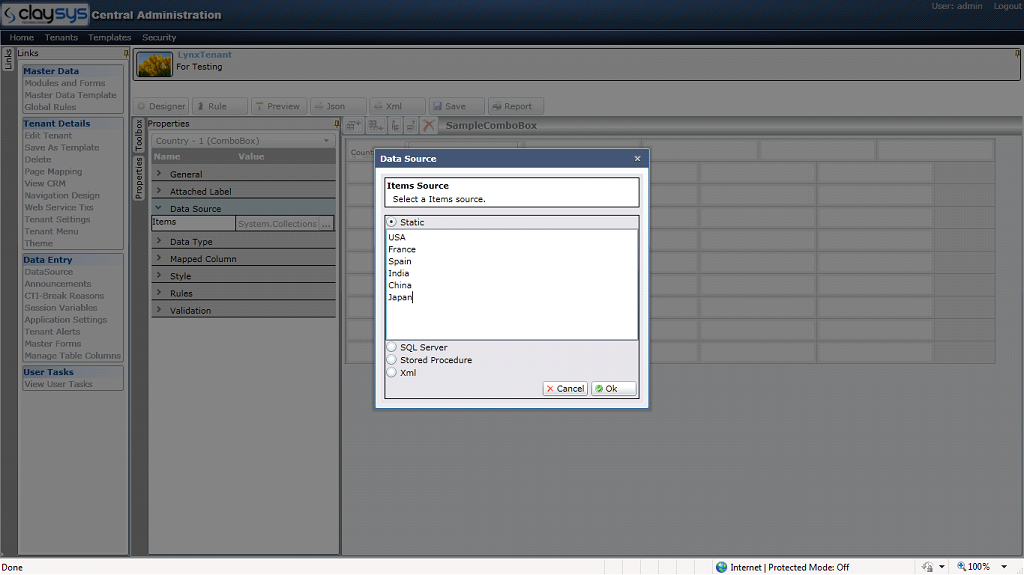
3.1.3. Select the radio button named “Static” and add the values as shown below, then click “OK”.

g1
3.2. Configure ComboBox using SQL datasource

3.2.1 Drag and drop a combobox from the toolbox. Change the properties “Display Name” and “Label Text”.

g1

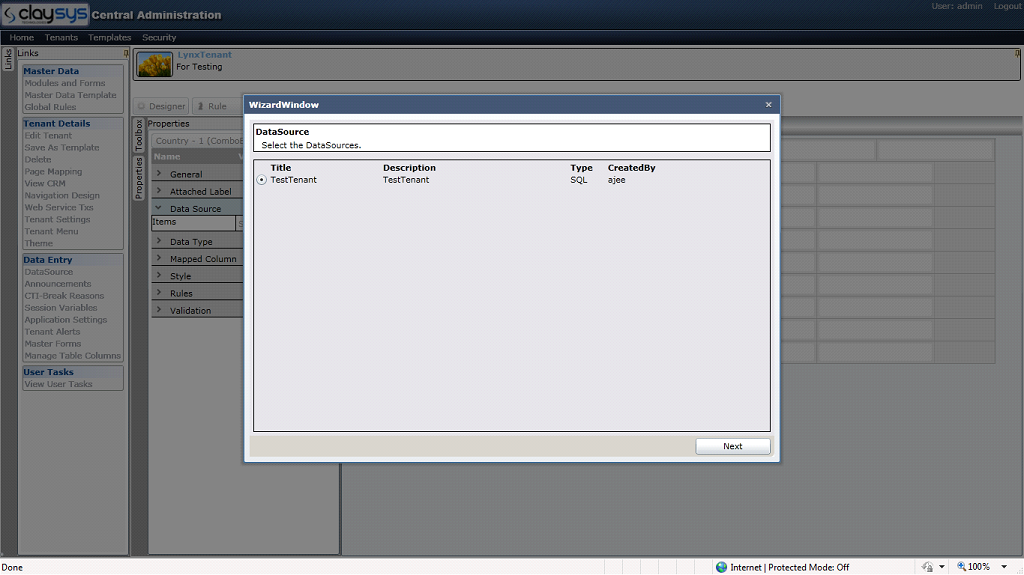
3.2.2 Select “Data Source” from the properties window. After clicking “datasource”, a popup window is displayed as shown below:

g1
This window shows available SQL Server datasources

3.2.3 Select the radio button named “SQL Server”, then click “OK”. After clicking “OK” a popup window is displayed as shown below:

g1

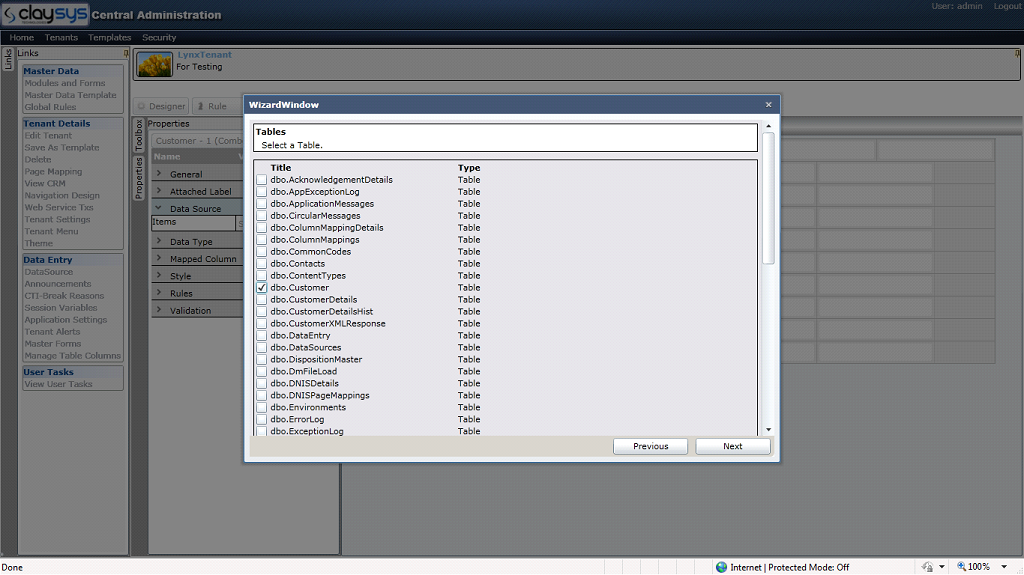
3.2.4 Select a datasource and click “Next”, all the available tables will be displayed as shown below:

This window shows available Tables

g1
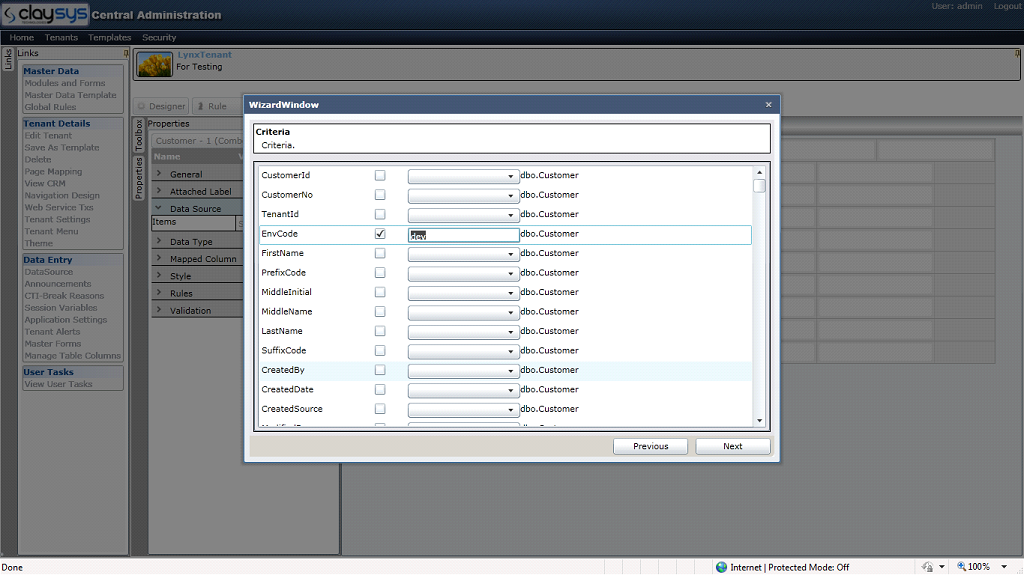
3.2.5 Select a table by tick the checkbox and click “Next”. This will lead to a screen where we can set the criteria for the select query as shown below:

g1
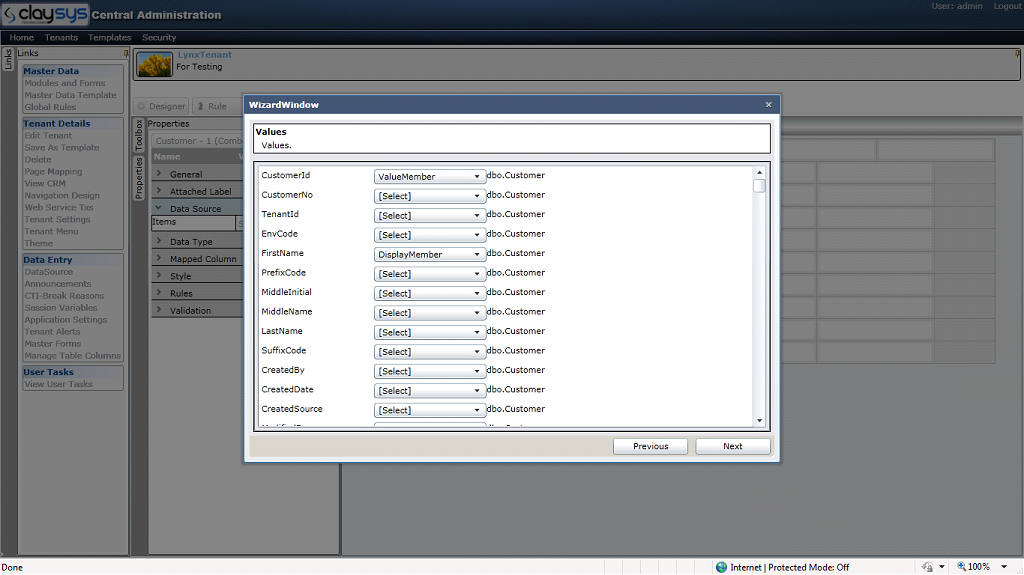
3.2.6 After setting the criteria click “Next”. This will lead to a screen where available fields in the table are displayed as shown below.
Here user can set one field as value member and another field as Display member

Display member

Value member

g1

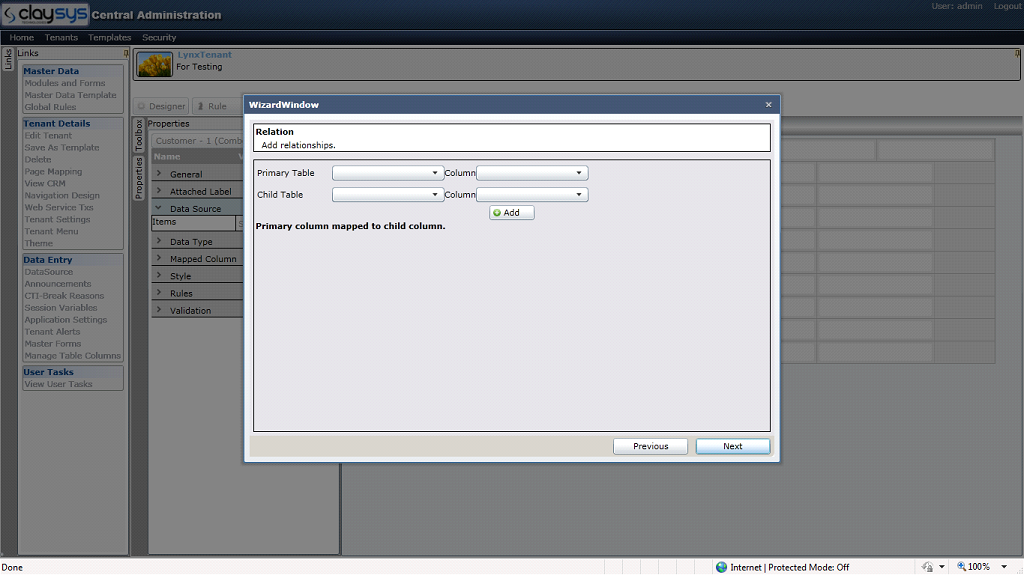
3.2.7 After setting Value member and Display member click “Next”. This will lead to a screen as shown below:

Here user can set the relationship between tables if more than 1 table is selected from the datasource.

g1

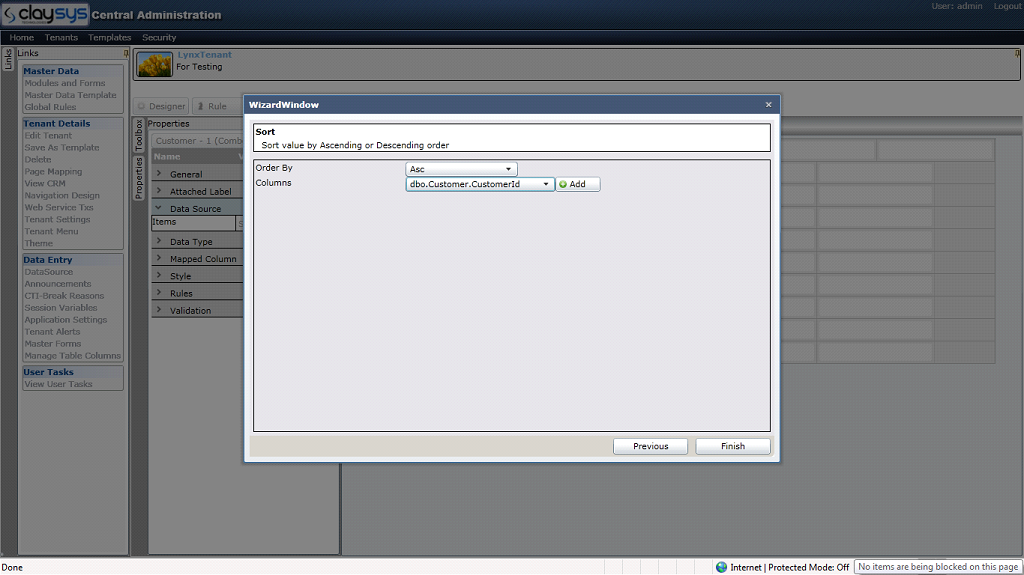
Here user can set the sort order.

3.2.8 After setting the relationship click “Next” (In this case no relationship is required as we are selecting only one table). This will lead to a screen as shown below:

g1

3.2.9 After setting the sort order click “Finish”.

Now the combobox is configured with SQL Server datasource. A Rule is required to bind the SQL Server datasource to the combobox.

3.2.10 Rule for combobox binding

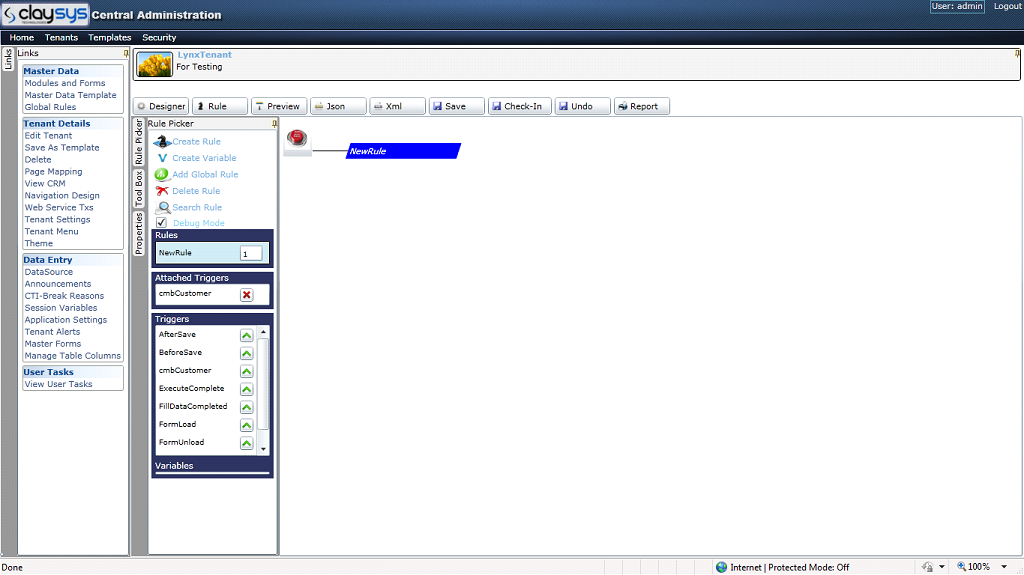
3.2.10.1 Click “Rule” button. This will lead a screen as shown below:

Change the Rule name

g1
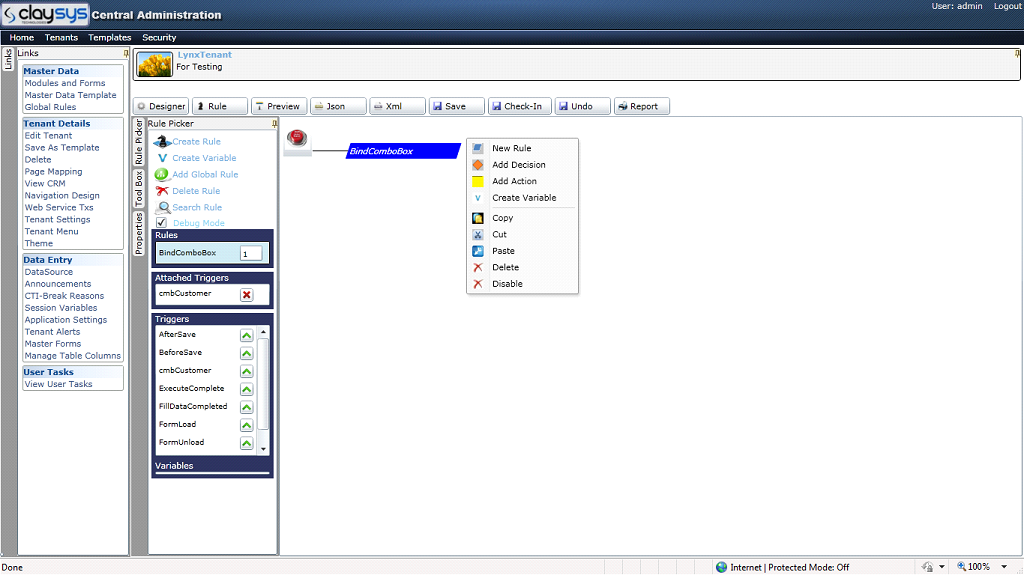
3.2.10.2 Select the Rule and right click. A context menu will be open.Click Action

g1
3.2.10.4 Select “Add Action” from the context menu and write the rule “ExecuteCommand(cmbCustomer)” as action. Set “FormLoad” as Attached Trigger.

Triggers

Attached Trigger

g1

3.3. Configure ComboBox using Stored Procedure

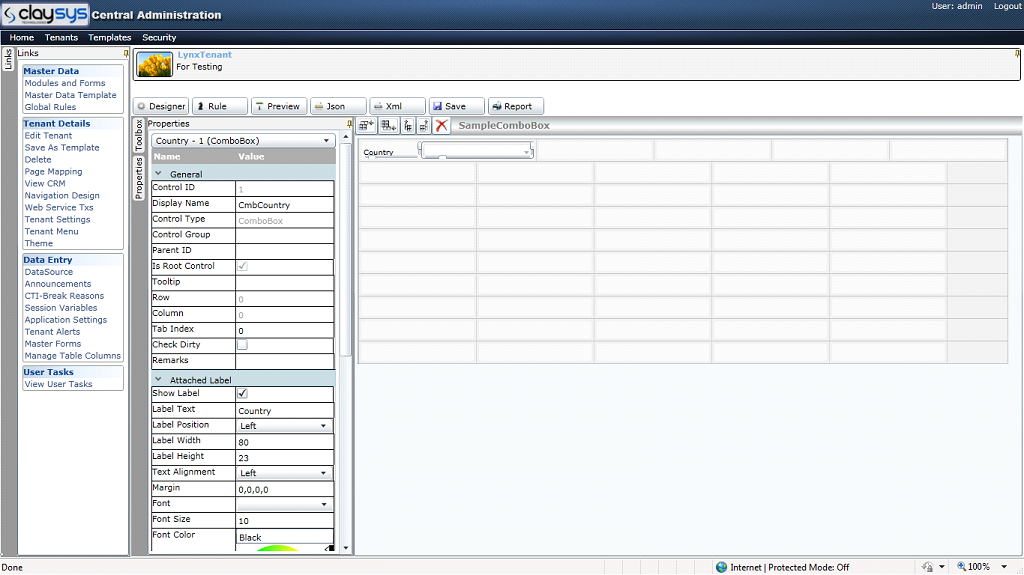
3.3.1 Drag and drop a combobox from the toolbox. Change the properties “Display Name” and “Label Text”.

g1

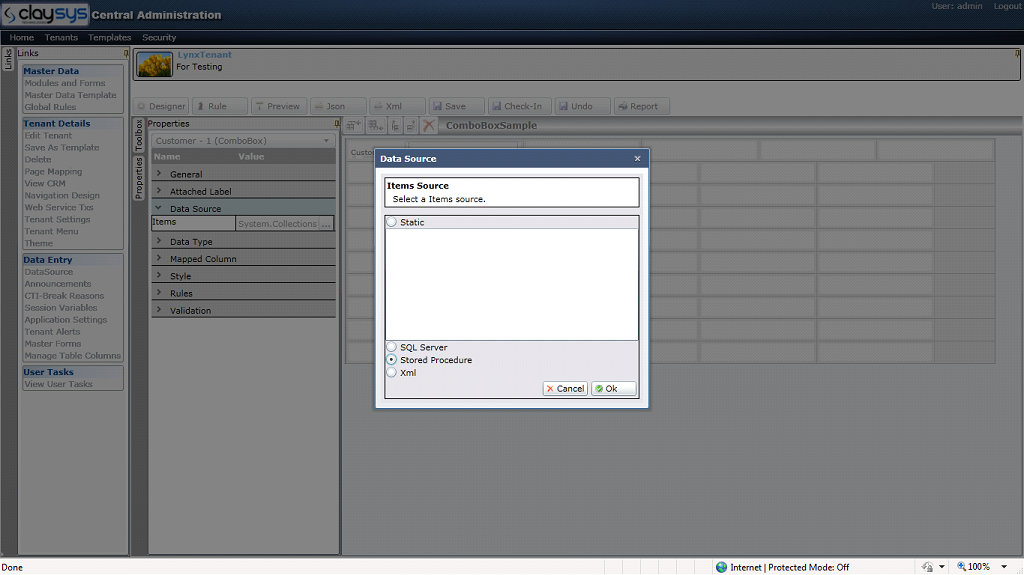
3.3.2 Select “Data Source” from the properties window. After clicking “datasource” a popup window is displayed as shown below:

g1

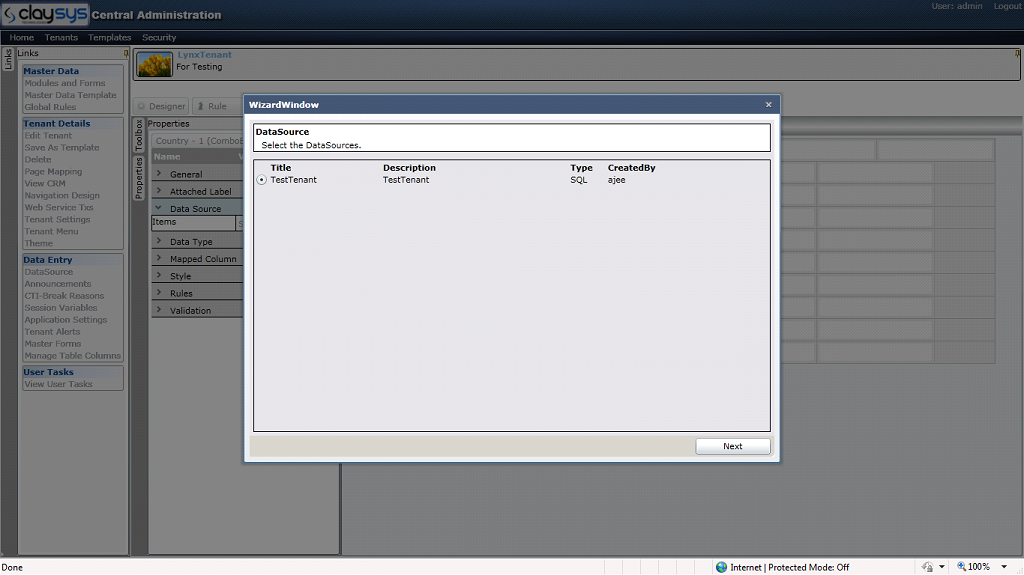
3.3.3 Select the radio button named “Stored Procedure”, then click “OK”. All the available datasources are displayed as shown below:

This window shows available SQL Server data sources

g1
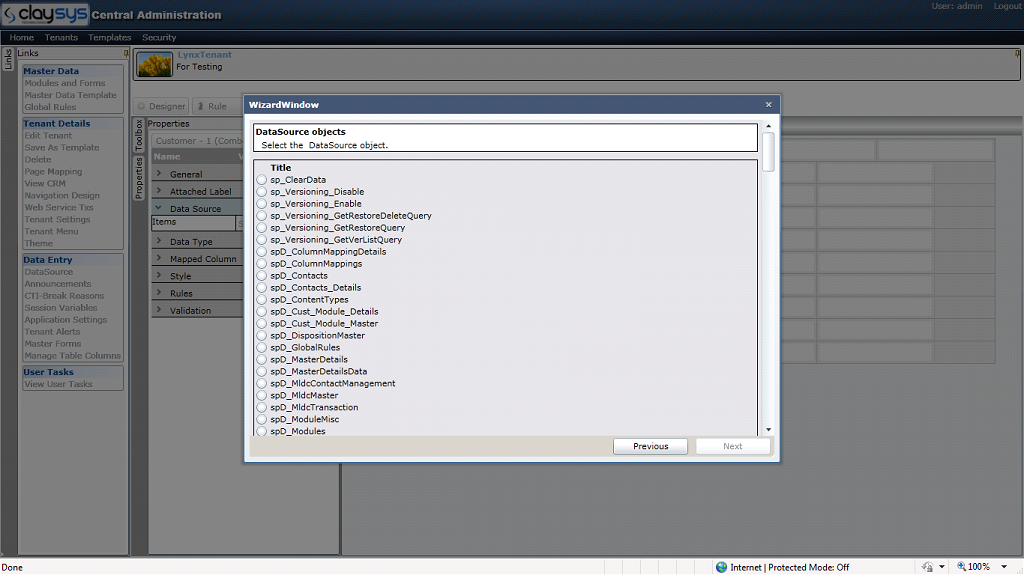
3.3.4 Select a datasource and click “Next”. A list of stored procedures will be displayed as shown below:

g1
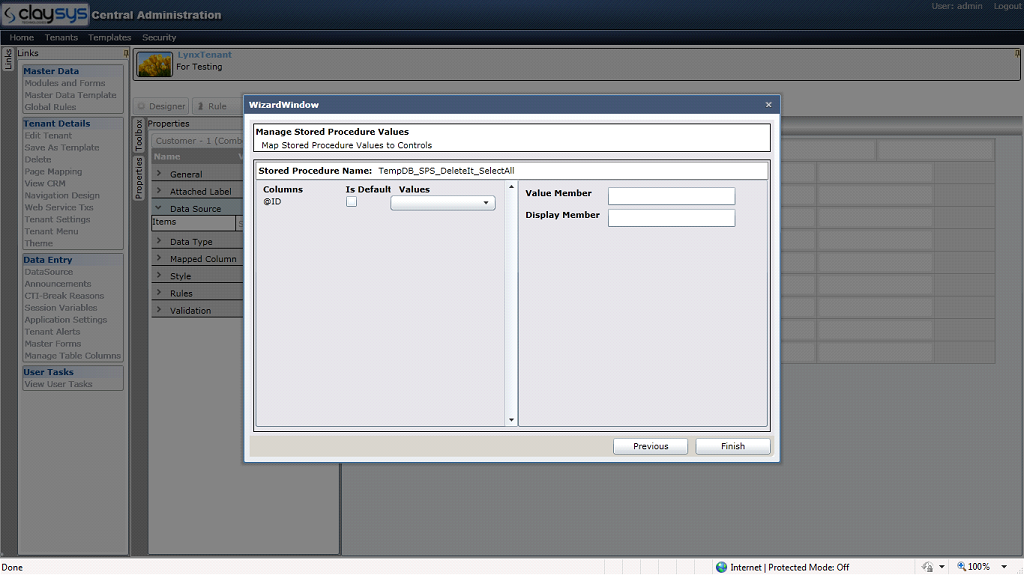
3.3.5 Select a Stored procedure and click “Next”. This will lead to the next screen as shown below:

Here user can set the output Parameter

Here user can set the Input Parameter

g1
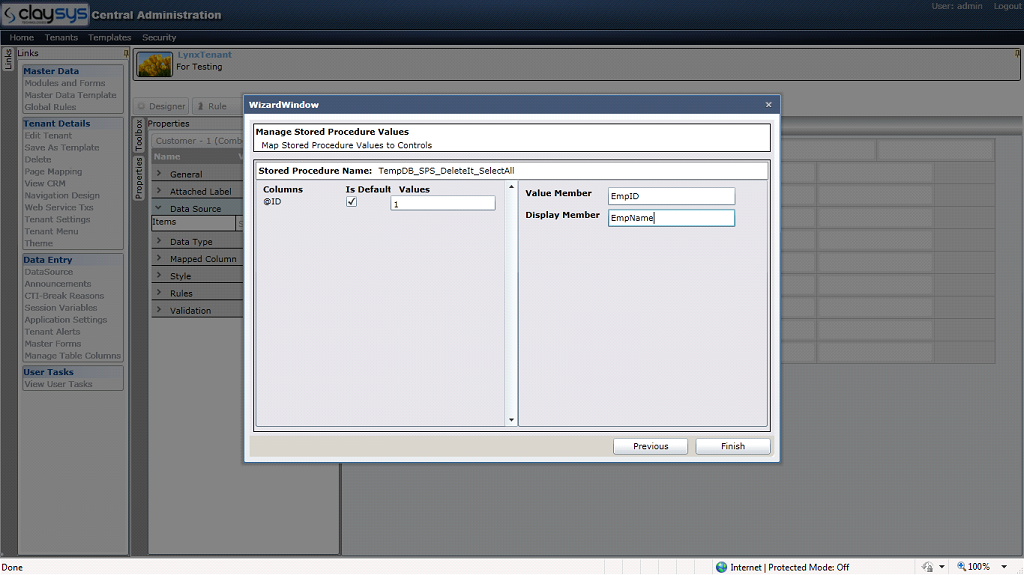
3.3.6 After setting the input and output parameters the screen will be as shown below:

g1
3.3.7 Click “Finish”.

3.3.8 Writing Rule for combobox binding.

Refer index 3.2.10.

4 Insert/Update/Select connect to table using SQL Server as datasource

4.1 Insert to a table using SQL datasource

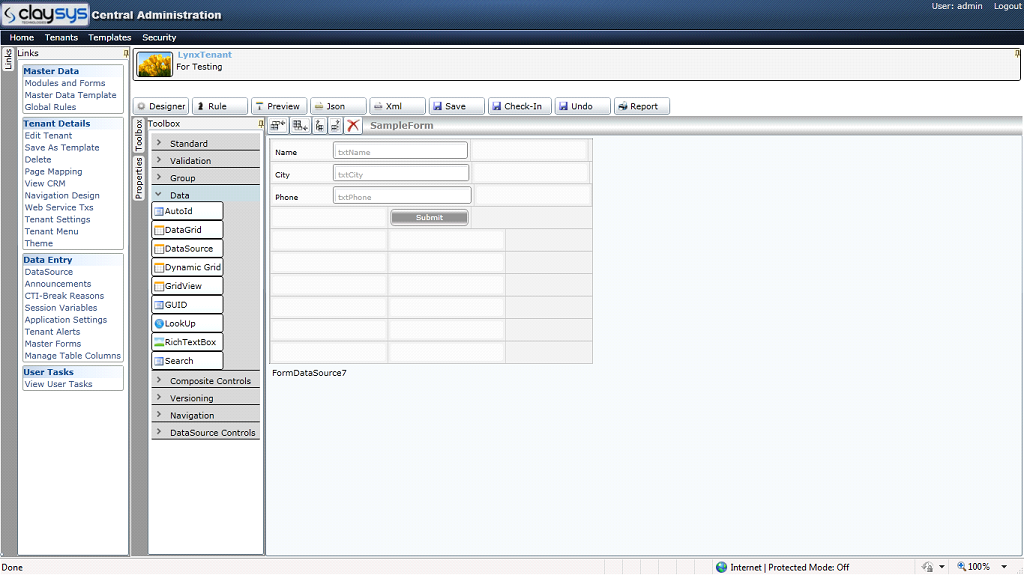
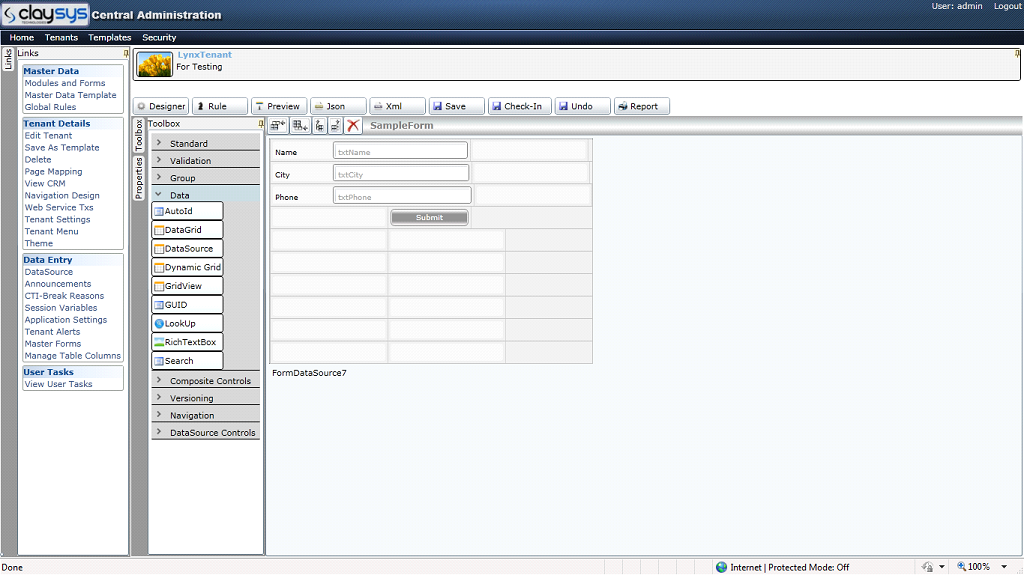
4.1.1 Create a form with three TextBoxes and one Button. Change the properties as shown below:

Dragged Datasource
Datasource

g1

Drag and drop a datasource from toolbox(Toolbox/Data) and change its name as “DSInsert”.

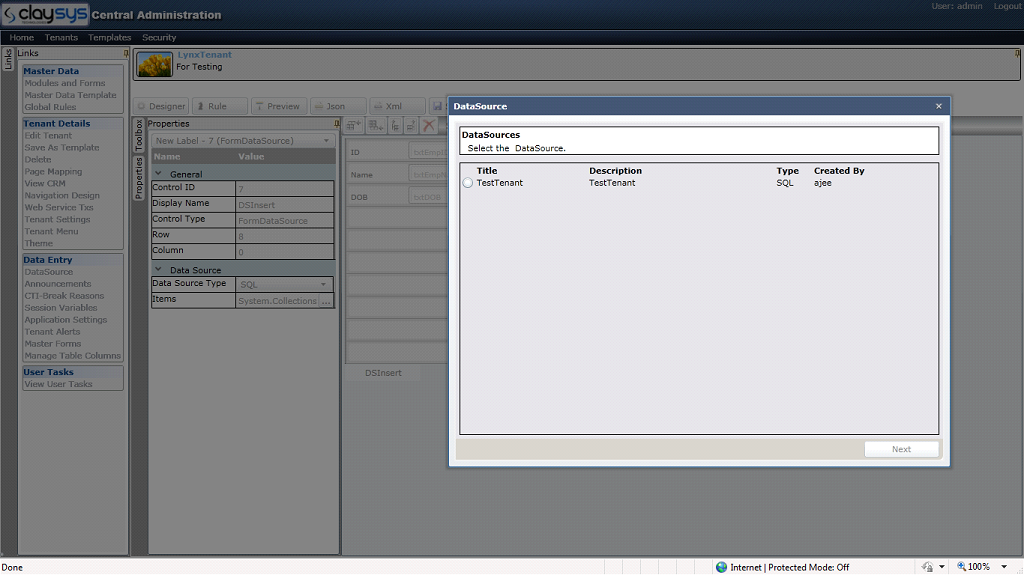
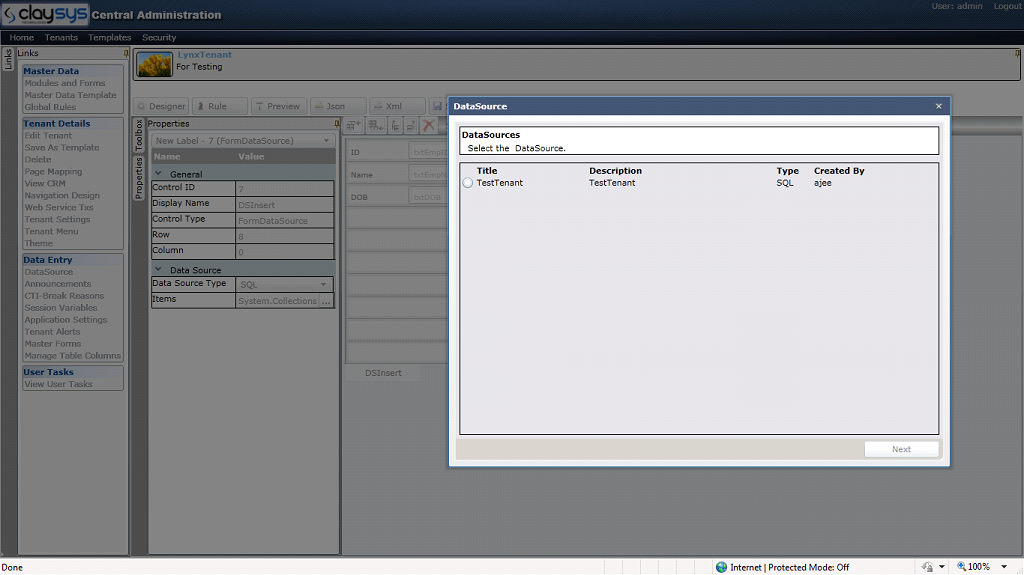
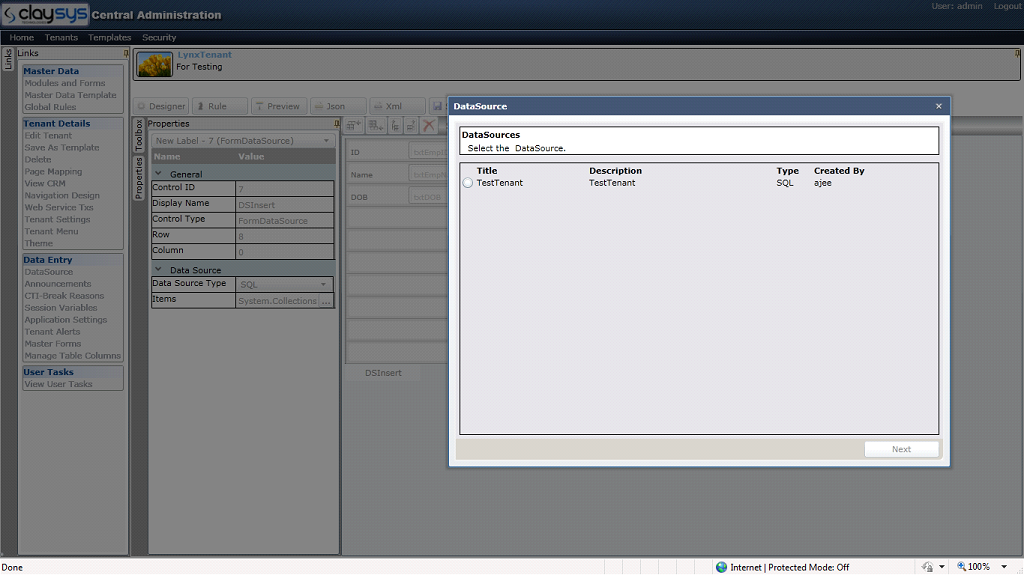
4.1.2 Select the datasource and select the properties. Set SQL as datasource and click Items. This will lead to a popup window as show below:

Available Datasource
Items
Datasource Type as SQL

g1

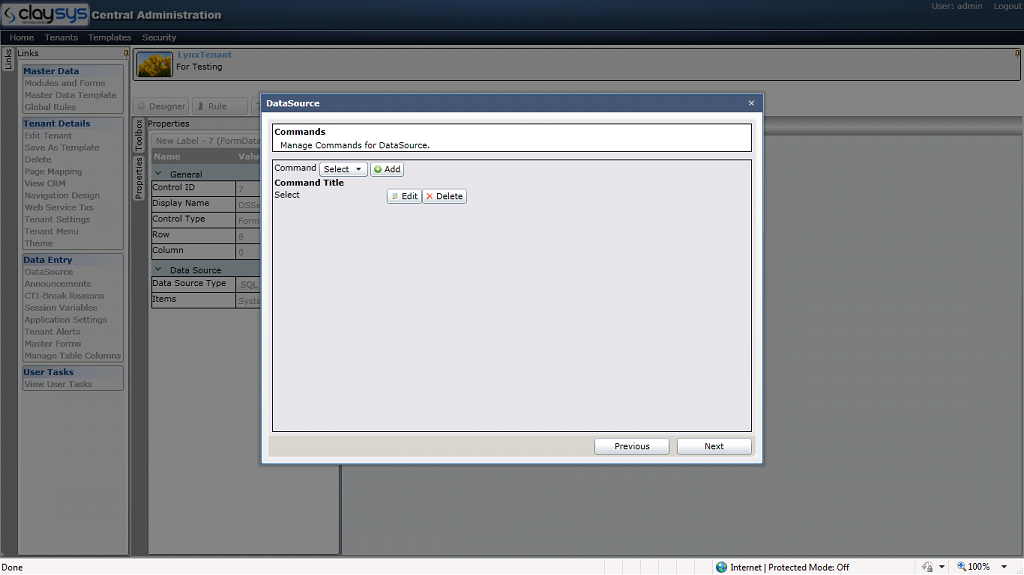
4.1.3 Select a datasource and click Next.

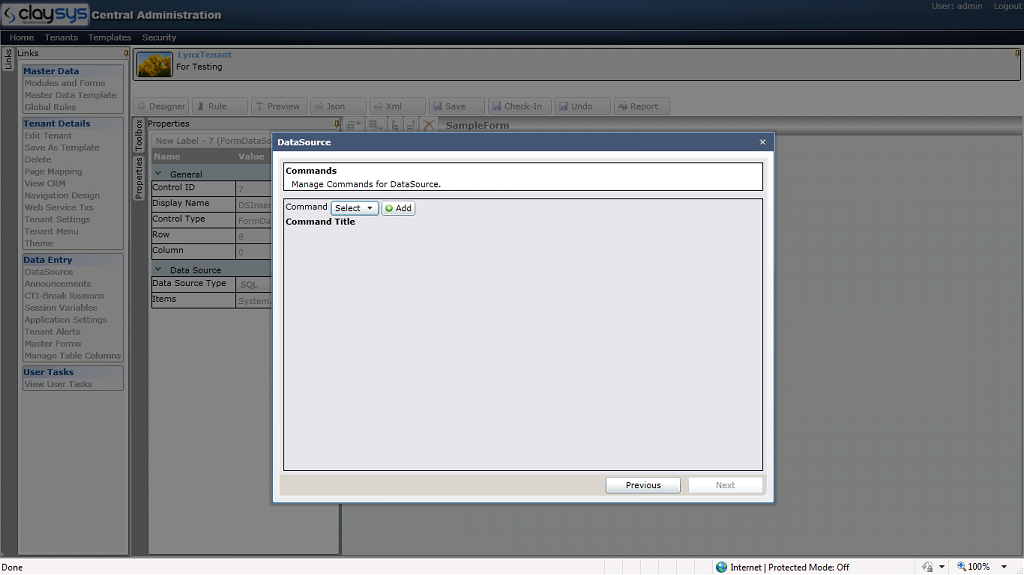
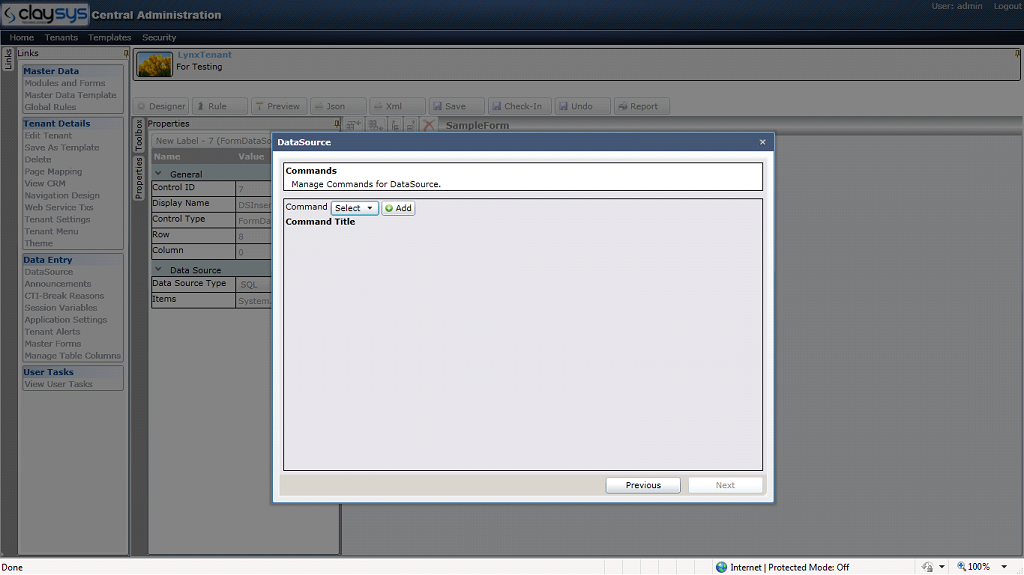
Change the command to Insert

g1
Change the command from “Select” to “Insert”.

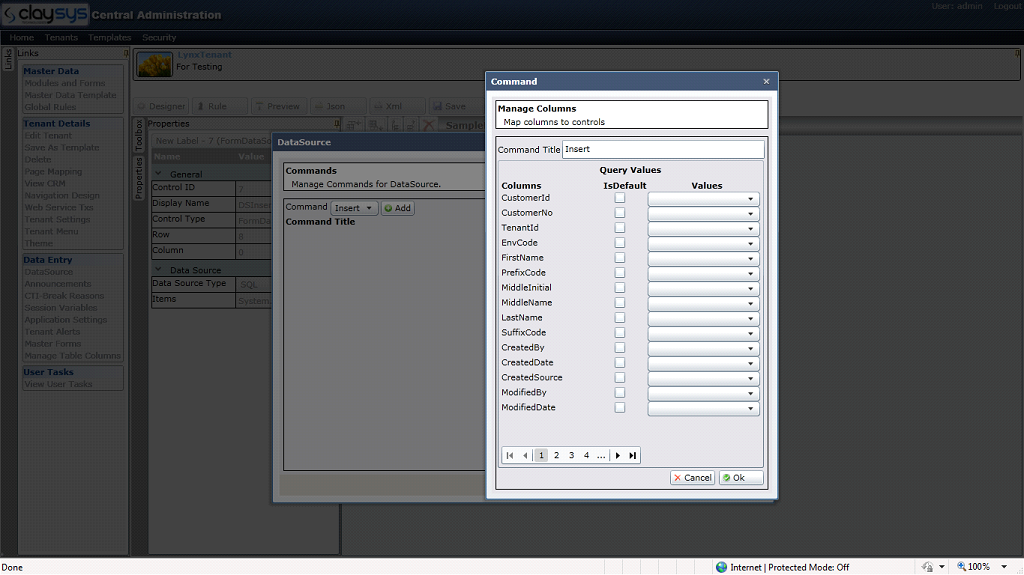
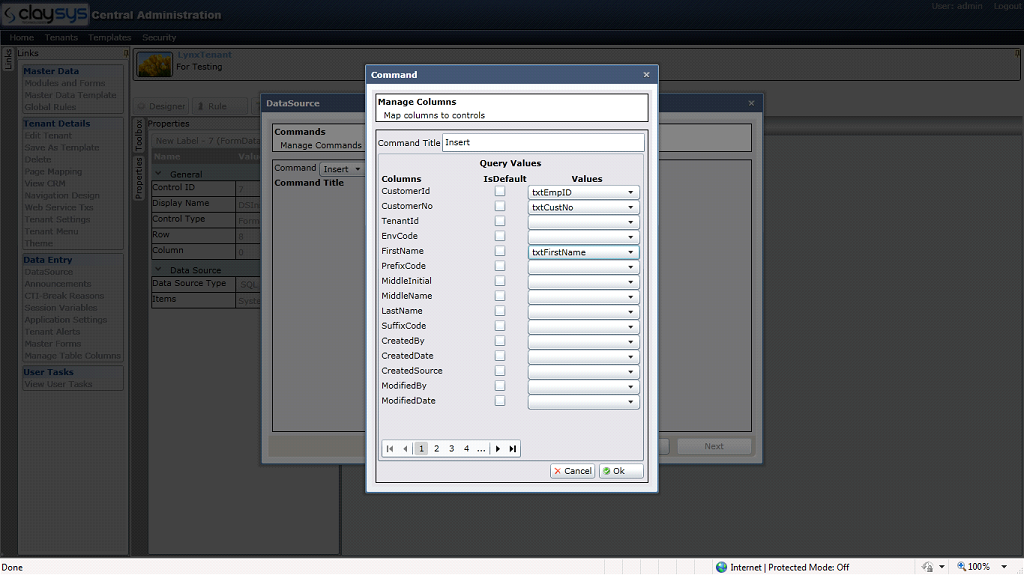
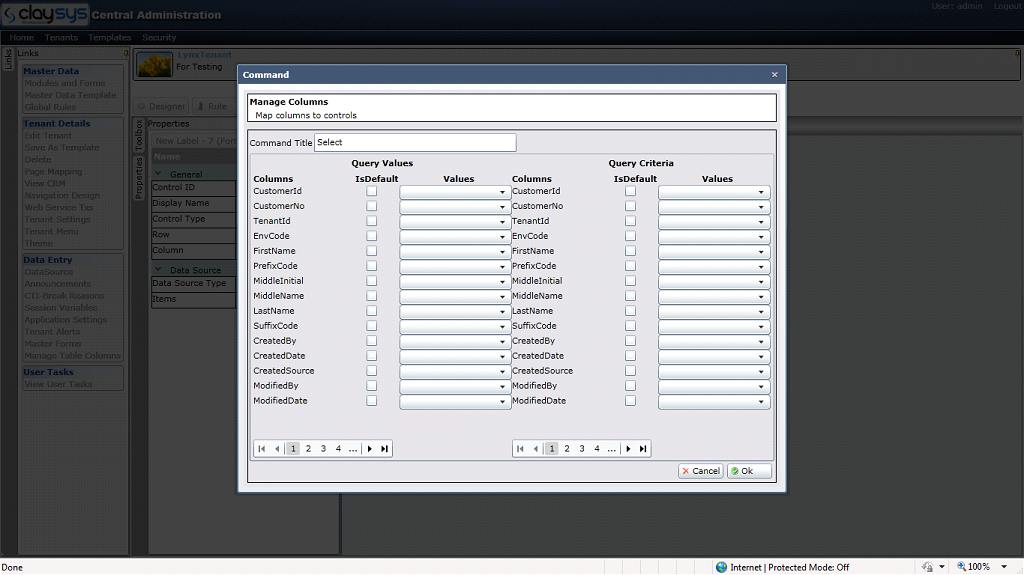
4.1.4 Click “Add”. A new pop up window named Command will be open.

g1
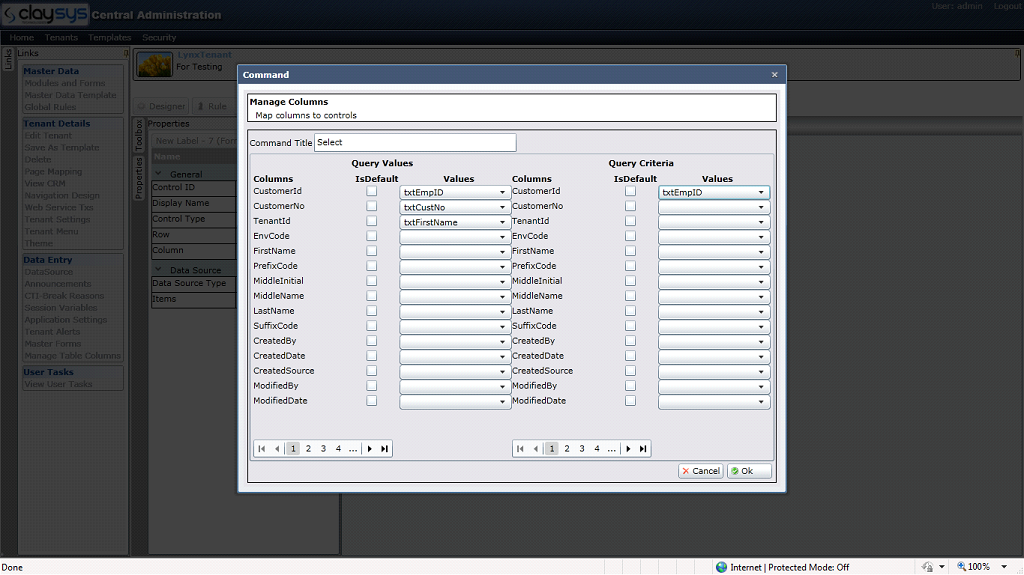
4.1.5 Configure the fields with corresponding controls.

g1
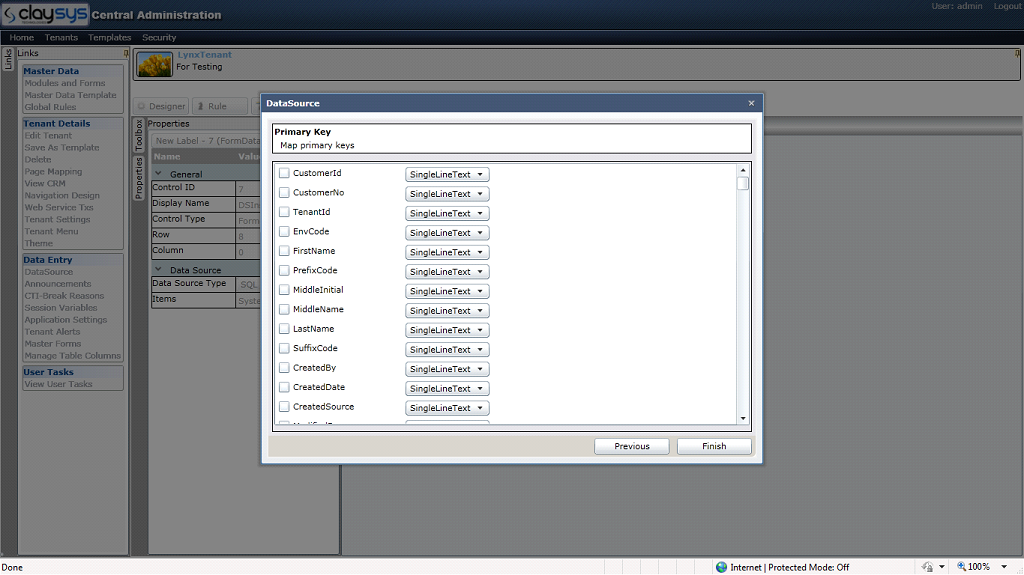
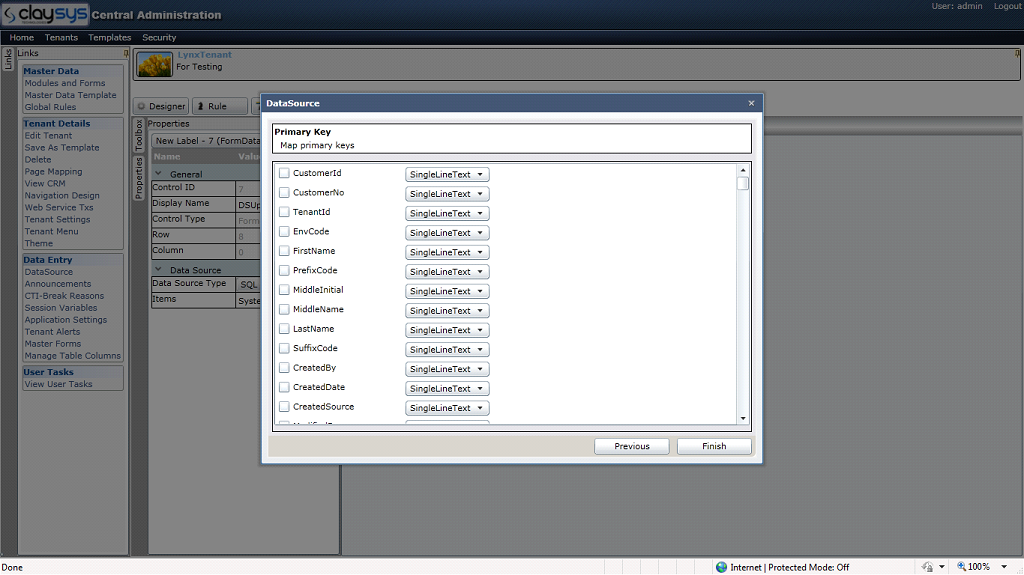
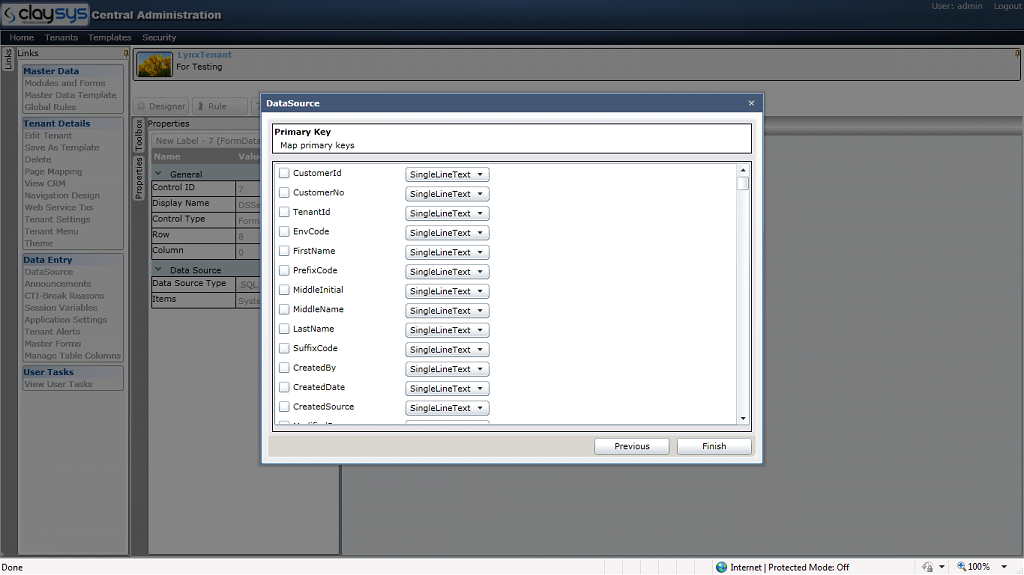
4.1.6 Click on “OK” after the configuration .This will lead to the following screen where user can set the primary keys, if exist.

g1
4.1.7 After setting the primary keys click “Finish”.

4.1.8 To execute the insert action the user can follow two steps, either by setting the “Clickaction” of submit button as “Insert” or by Rule. For more details please refer 6.

4.2 Update table using SQL datasource

4.2.1 Create a form with three TextBoxes and one Button and change the properties as shown below:

Dragged Datasource

Datasource

g1
Drag and drop a datasource from toolbox(Toolbox/Data) and change its name as “DSUpdate”.

4.2.2 Select the datasource and select the properties. Set SQL as datasource and click Items. This will lead to a popup window as show below:

Available Datasource
Items
Datasource Type as SQL

g1
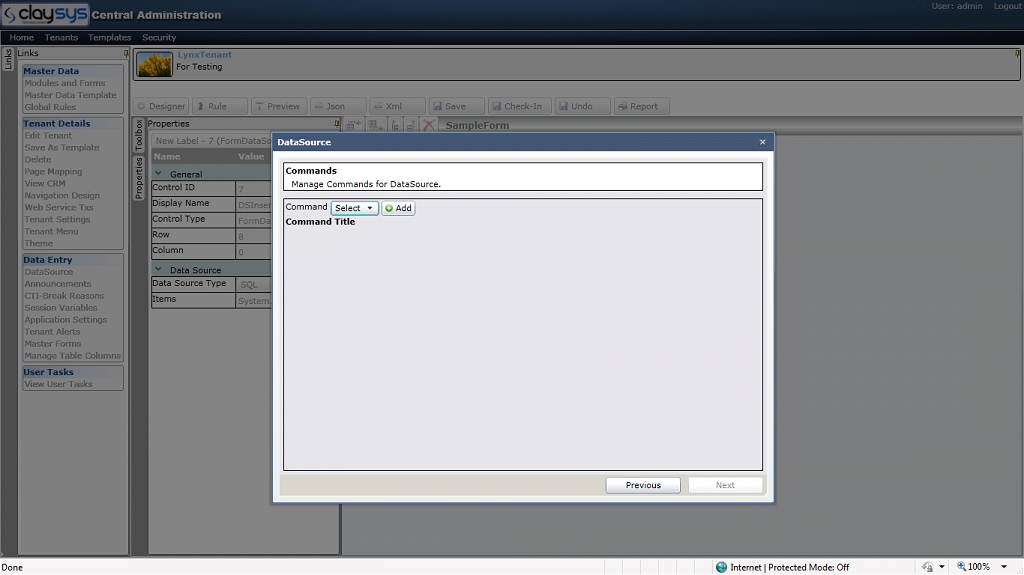
4.2.3 Select a datasource and click Next.

Change the command to Update

g1
Change the command from “Select” to “Update”.

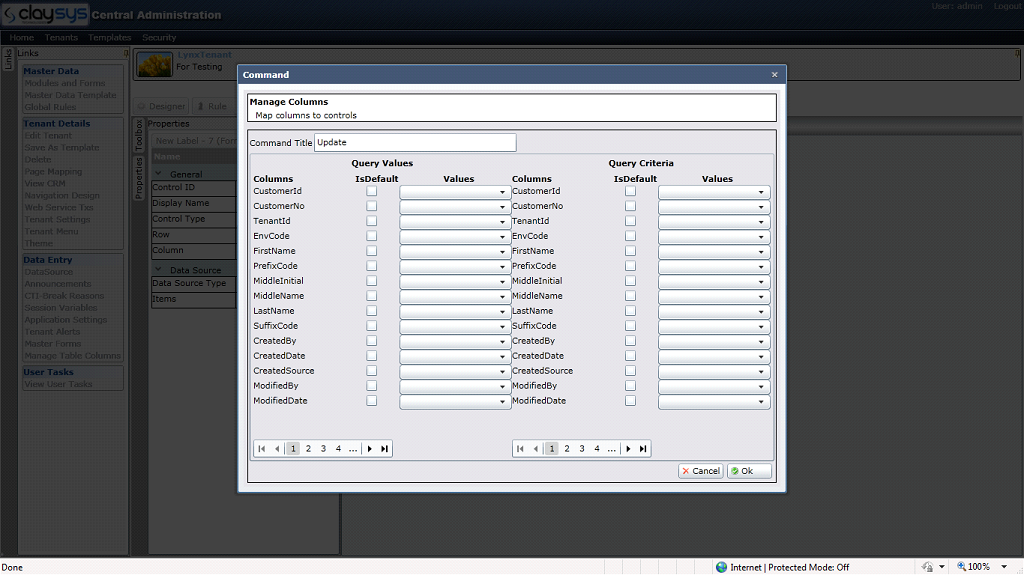
4.2.4 Click “Add”.

g1

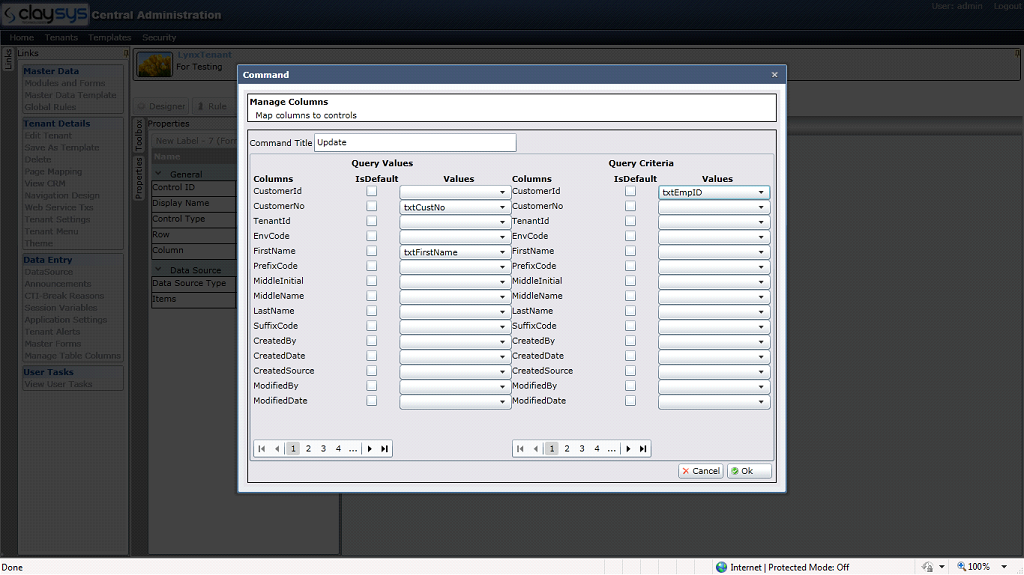
4.2.5 Configure the popup window as shown below:

g1

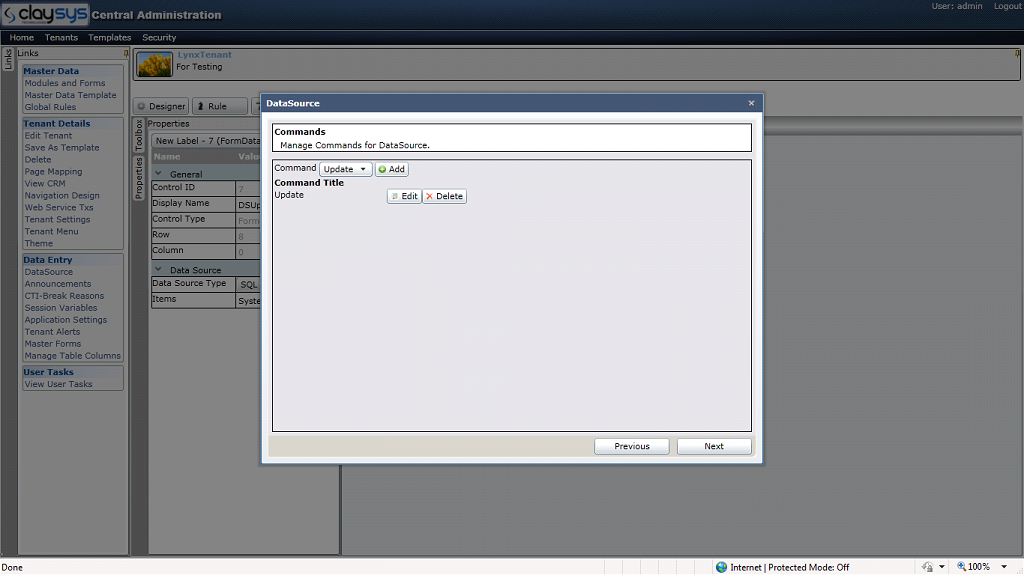
4.2.6 Click on “OK” after the configuration.

g1

4.2.7 Click “Next” this will lead to a screen as shown below. User can set primary key if exists.

g1

4.2.8 After setting the primary keys, click “Finish”.

4.2.9 To execute the update action the user can follow two steps, either by setting the “clickaction” of submit button as “Update” or by Rule. For more details please refer 6.

4.3 Select table data using SQL datasource

4.3.1 Create a form with three TextBoxes and one Button and change the properties as shown below:

Dragged Datasource
Datasource

g1

Drag and drop a datasource from toolbox (Toolbox/Data) and change its name as “DSSelect”.

4.3.2 Select the datasource and select the properties. Set SQL as datasource and click Items. This will lead to the popup window as show below:

Available Datasource
Items
Datasource Type as SQL

g1
4.3.3 Select a datasource and click Next.

Change the command to Select

g1
4.3.4 Click “Add”.

g1
4.3.5 Configure the popup window as below:

g1
4.3.6 Click on “OK” after the configuration.

g1
4.3.7 Click “Next”.

g1
If there is any primary key, configure it and click “Finish”.

4.3.8 To execute the Select action the user can follow two steps, either by setting the “Clickaction” of submit button as “Select” or by Rule. For more details please refer 6.

5 Insert/Update/Select connect to table using Stored Procedure as datasource

5.1 Insert/Update/Select/Delete to table using Stored Procedure

5.1.1 Create a form with three TextBoxes and one Button and change the properties as shown below.

Dragged Datasource
Datasource

g1
Drag and drop a datasource from toolbox(Toolbox/Data) and change its name as “DSInsert”.

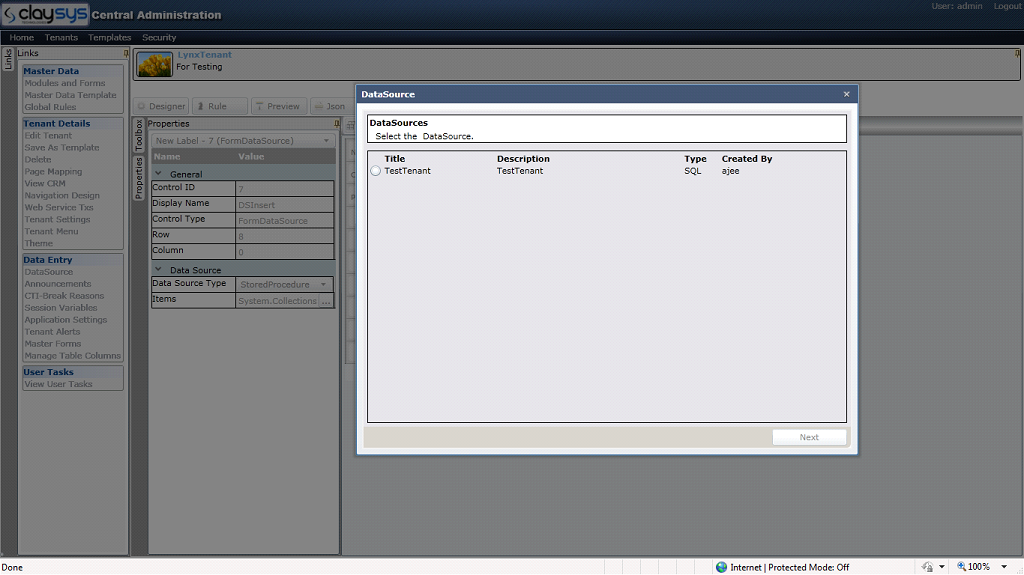
5.1.2 Select the datasource and select the properties. Set Stored Procedure as datasource and click Items. This will lead to the popup window as show below:

Datasource Type

g1
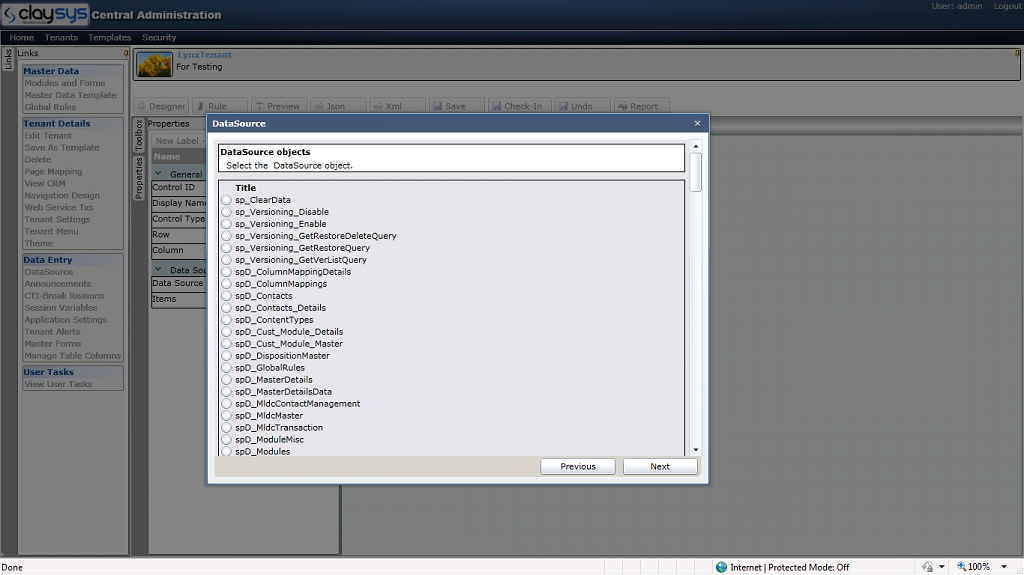
5.1.2 Select a datasource and click “Next”. This will show a list of stored procedures.

g1
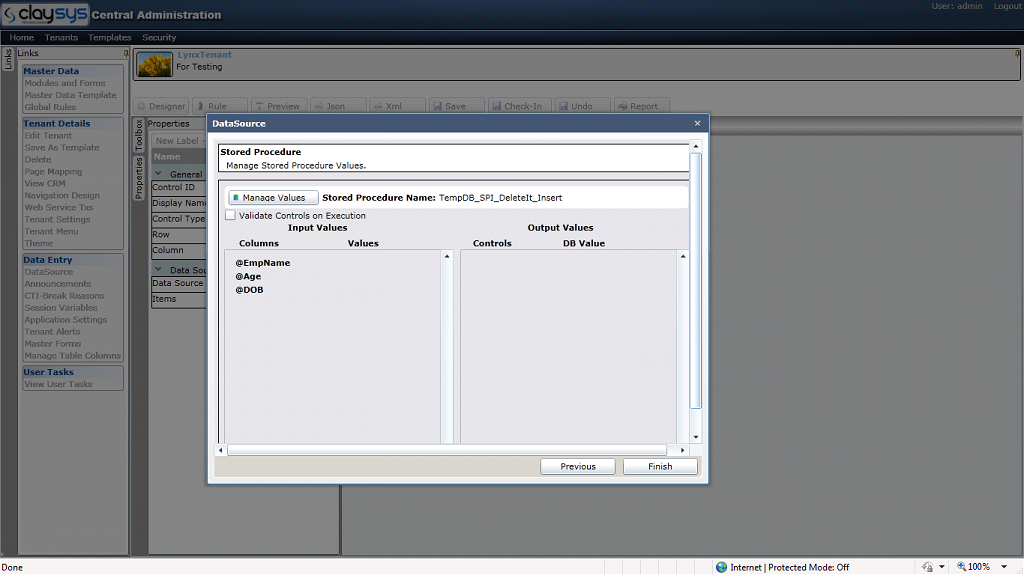
5.1.3 Select a Stored Procedure and click “Next”.

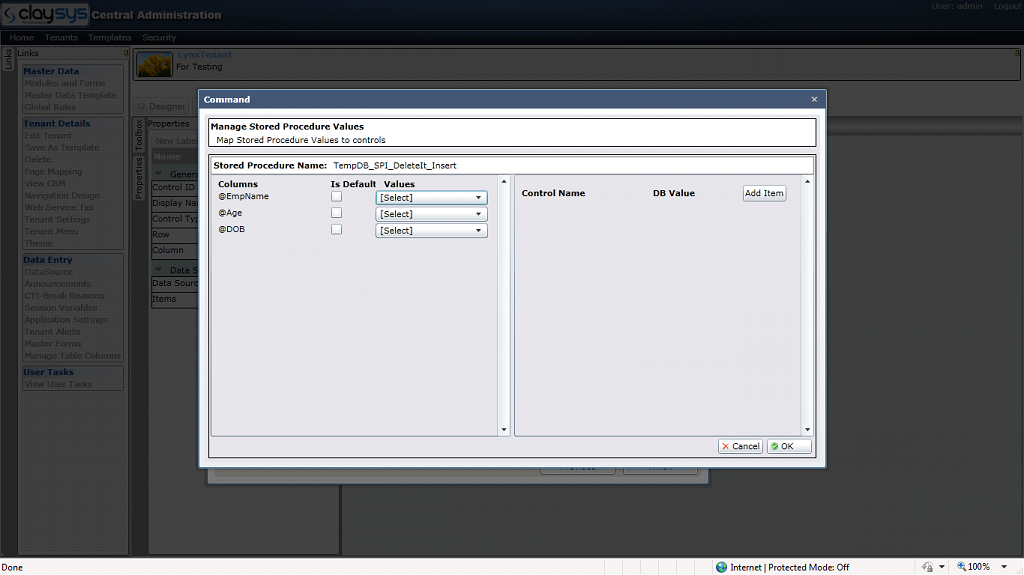
Manage Values

g1
5.1.4 Click “Manage Values”.

Configure Output values
Configure input values

g1
5.1.5 After configuring input values, click “OK”.

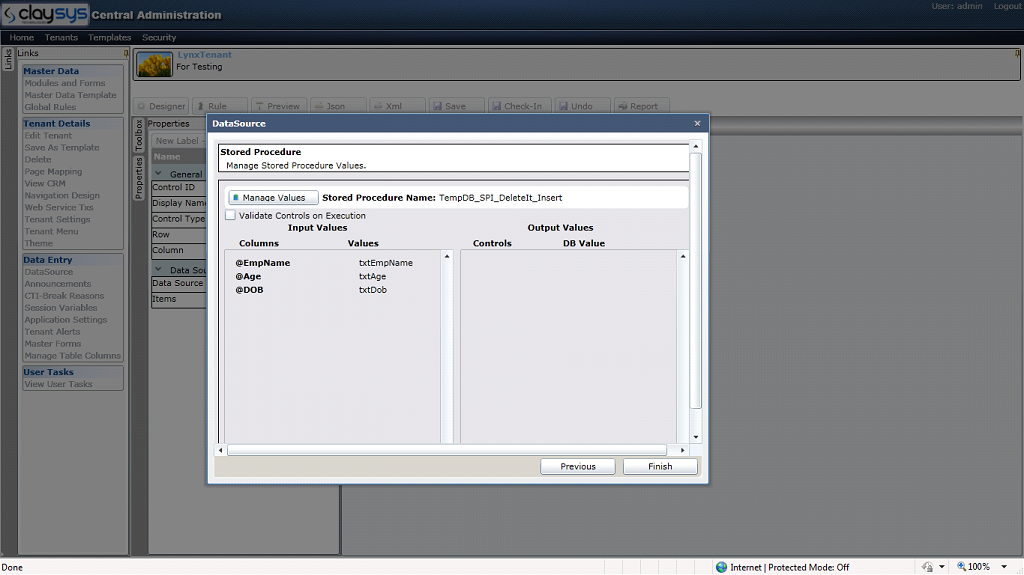
g1
5.1.6 Click “Finish”.

5.1.7 To execute the selected action the user can follow two steps, either by setting the “Clickaction” of submit button as “ExecuteSP” or by Rule. For more details please refer 6.

6. Executing DataSource Methods

6.1 Setting button’s ClickAction for datasource operation

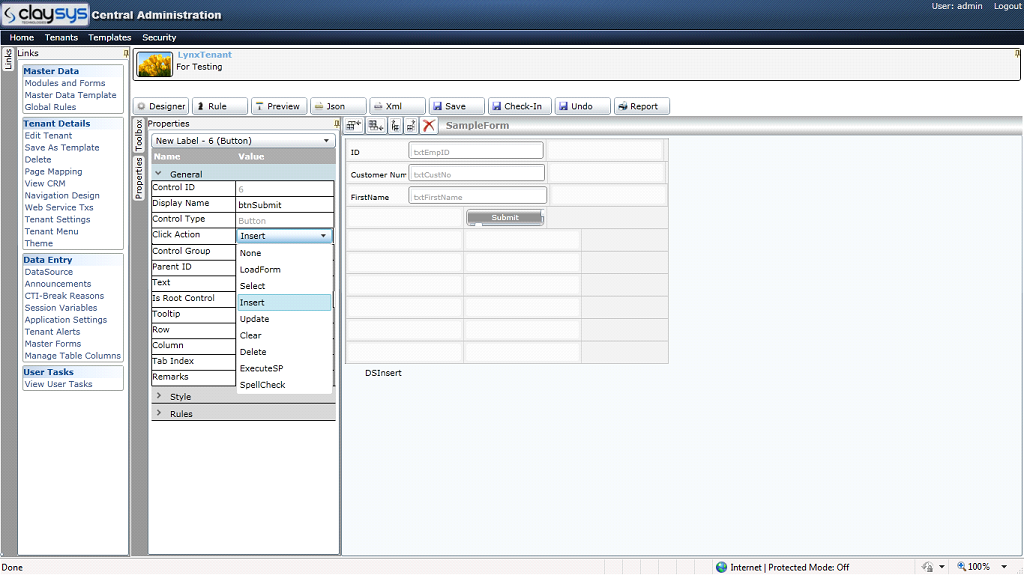
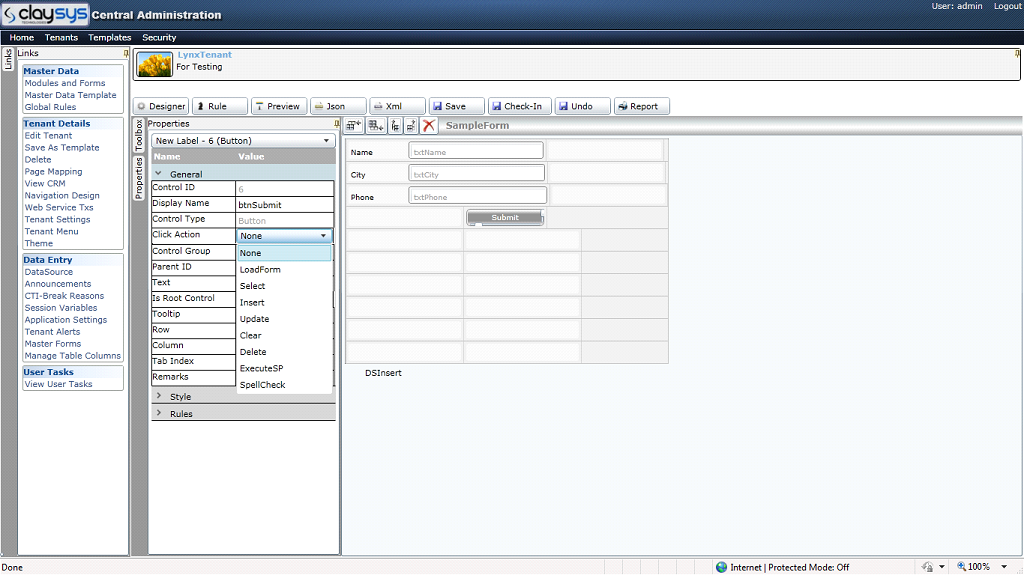
6.1.1 Select the Submit button and set the Clickaction property as shown below:

Click Action

g1

Based on the datasource operation associated with a button user can set the button’s ClickAction property .Available ClickActions for datasource are,

1. Insert
2. Update
3. Select
4. Delete

6.1.2 After setting the ClickAction save the form.

6.2 Setting Rule for datasource operation

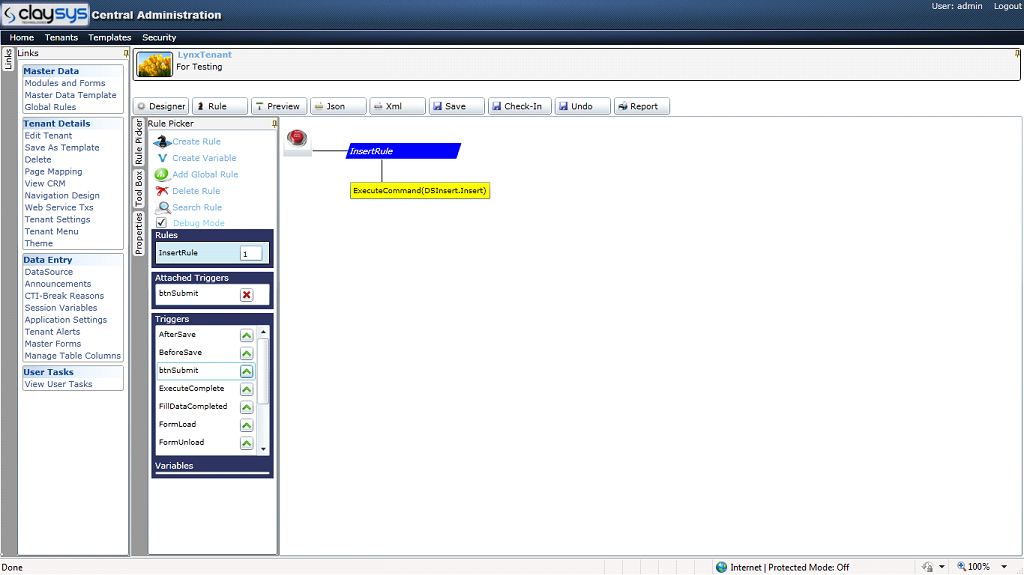
6.2.1 Select the Rule tab and set the rule as shown below:

Attached Trigger
Rule Action
Rule Name

g1
6.2.2 If the datasource is SQL Server then the user can write the rule action as “ExecuteCommand(DatasourceName.dbOperation)”.

Here DatasourceName is the name of the datasource which is configured in the form and dbOperation is the name of operation which is to be executed, for example Insert,Delete,Update,Select.

In the case of an insert operation the rule should be,
“ExecuteCommand(DSInsert.Insert)”.

6.2.3 If the datasource is Stored Procedure then the user can write rule action as,
“ExecuteCommand(DatasourceName.SP)”.

Here DatasourceName is the name of the datasource which is configured in the form.

SP is a common name which executes all stored procedure operations.

In the case of an insert operation the rule should be,
“ExecuteCommand(DSInsert.SP)”.

7. Check-In & Check-Out

7.1 Check-In

7.1.1 The check-in button is visible in a form after the form is created and saved.

Check-In

g1
7.1.2 Click “Check-in”.

g1
Here user can set the form status as “publish” or “Draft” and click “OK”.

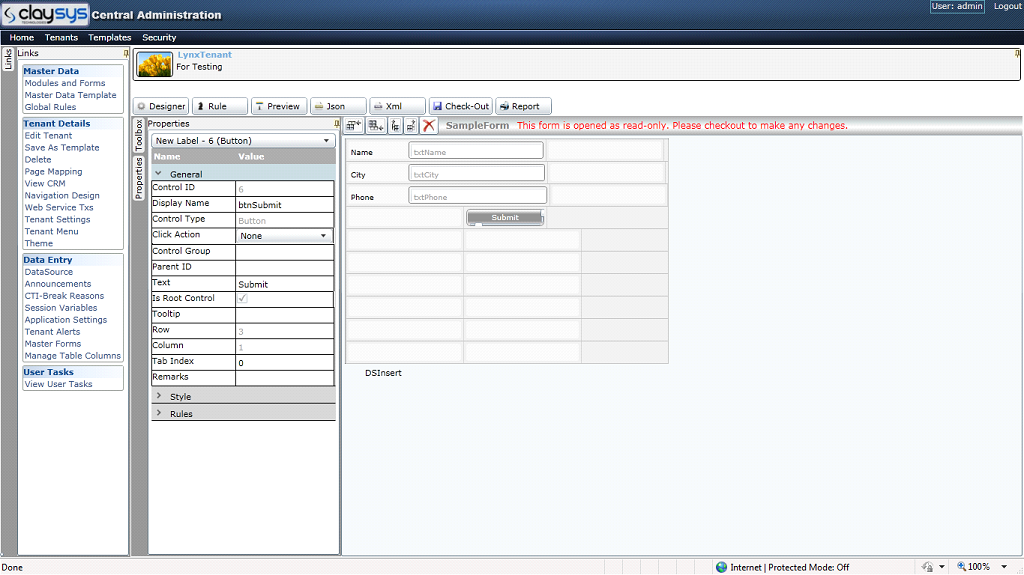
7.2 Check-Out

7.2.1

g1
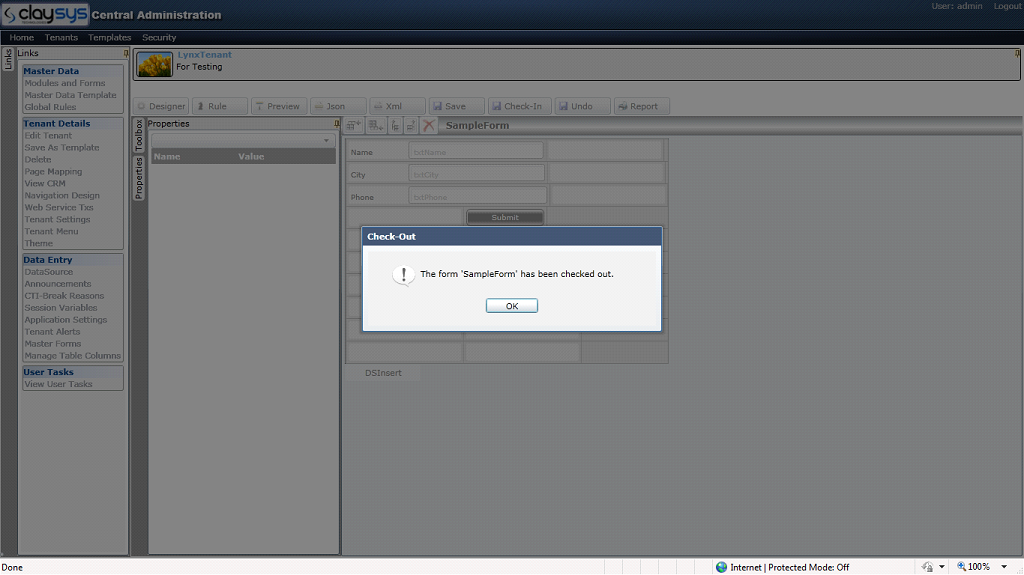
7.2.2 Click Check-Out.

g1

Attached Label in ClaySys AppForms

ClaySys AppForms V1.0


Introduction

Each and every data capture control that is placed in a form needs a description to guide the user to enter the valid data. ClaySys AppForms has come up with a feature to have the label attached to the control itself. This will help the person designing the form to have more control of the labels. There are many advantages of using the attached label when you will have to control the behaviour of the control from the rules or changing the layout of the control, etc.

Properties of the Attached Label

The properties of an attached label remains the same for all the control in ClaySys AppForms.

  1. Show Label

This property is to decide if the user would like to display or hide the attached label for the control.

The default value for this property will be false. You will have to enable this property to display the attached label.

This property accepts a Boolean value, so when you use this property in the rule you will have to pass either True or False.

The syntax of using this property in the rules is,

ControlName.Label.ShowLabel = true

  1. Label Text

This property is to enter the text that needs to be displayed in the label.

The default value for this property will be “New Label”.

This property accepts a string value, so when you use this property in the rule you can use any string in quotes (“”)

The syntax of using this property in the rules is

ControlName.Label.Text = “Sample Text”

  1. Label Position

This property is to decide the position of the label. You can place the label to the left, right, top or bottom side of the control.

The default value for this property will be Left.

This property accepts the four positions as a string value, so when you use this property in the rule you can pass the position value with quotes.

The syntax of using this property in the rules is

ControlName.Label.Position = “top”

  1. Label Width

This property is to change the width of the label. The control and the label has separate width, so these will add up to the complete control display width.

The default value for this property will be 80.

This property accepts a numeric value, so when you use this property in the rule you can directly pass a numeric value without quotes.

The syntax of using this property in the rules is

ControlName.Label.Style.Width = 100

  1. Label Height

This property is to change the height of the label. The control and the label has separate height, so these will add up to the complete control display height if you use the position as top or bottom.

The default value for this property will be 23.

This property accepts a numeric value, so when you use this property in the rule you can directly pass a numeric value without quotes.

The syntax of using this property in the rules is

ControlName.Label. Style .Height = 100

  1. Text Alignment

This property is to change the alignment of the text displayed in the label.

The default value for this property will be Left.

This property accepts the alignment as a string value, so when you use this property in the rule you can directly pass the position value with quotes.

The syntax of using this property in the rules is

ControlName.Label.Style.TextAllignment = “Right”

  1. Margin

This property is to change the margin of the label. This property accepts the margin of all four sides. These values are separated by a coma(,).

The default value for this property will be 0, 0, 0, 0.

This property accepts the margin as a string value, so when you use this property in the rule you can directly pass the margin value with quotes.

The syntax of using this property in the rules is

ControlName.Label.Style.Margin = “10, 0, 0, 0”

  1. Font

This property is to change the font style of the text displayed in the label.

The default value for this property will be Verdana.

This property accepts the font as a string value, so when you use this property in the rule you can directly pass the font value with quotes.

The syntax of using this property in the rules is

ControlName.Label.Style.Font = “Arial”

  1. Font Size

This property is to change the font size of the text displayed in the label.

The default value for this property will be 11.

This property accepts the font size as a numeric value, so when you use this property in the rule you can directly pass the font size value without quotes.

The syntax of using this property in the rules is

ControlName.Label.Style.FontSize = “15”

  1. Bold

This property is to make the text displayed in the label as Bold.

The default value for this property will be false.

This property accepts the Bold as a boolean value, so when you use this property in the rule you have to pass true or false.

The syntax of using this property in the rules is

ControlName.Label.Style.Bold = true

  1. Italic

This property is to make the text displayed in the label as Italic.

The default value for this property will be false.

This property accepts the Italic as a boolean value, so when you use this property in the rule you have to pass true or false.

The syntax of using this property in the rules is

ControlName.Label.Style.Italic = true

  1. Underline

This property is to make the text displayed in the label as underlined.

The default value for this property will be false.

This property accepts the underline as a boolean value, so when you use this property in the rule you have to pass true or false.

The syntax of using this property in the rules is

ControlName.Label.Style.Underline = true

  1. Font Color

This property is to change the font color of the text displayed in the label.

The default value for this property will be Black.

This property accepts the font color as a string value, so when you use this property in the rule you can directly pass the font color value with or without quotes. This property accepts both Hexa code and named colors.

The syntax of using this property in the rules is

ControlName.Label.Style.FontColor = “#0000FF”

  1. BackGround Color

This property is to change the background color of the label.

The default value for this property will be Transparent.

This property accepts the background color as a string value, so when you use this property in the rule you can directly pass the background color value with or without quotes. This property accepts both Hexa code and named colors. Transparent can also be used if you don’t want any background color for the label.

The syntax of using this property in the rules is

ControlName.Label.Style.BackGroundColor = “#0000FF”