Traditional Coding vs No-code/Low-code Development

How do No-Code/Low-Code Application Development platforms compare with traditional coding?

To build an application through writing code, you first decide on a targeted platform like Windows, LINUX or iOS for example, after which you choose the relevant language supported on each platform, for example C# on Windows. You can then start building your application by writing code in C# and compiling your code, before deploying it on a Windows Server. The dependencies you then have are the version of the .Net Framework that you targeted with your code, and you would need to refactor and recompile your code to maintain it appropriately, as Microsoft upgrades the .Net Framework periodically. Now when you put in all the effort to upgrade the App to target the latest version of the .Net framework, the Business User sees no incremental value, as no new functionality has been added.

If your custom code is not maintained over time, in a few years the code is termed legacy code, as it is built on an old version of the framework, and may not be following the new best practices, and the business may keep delaying an upgrade to the latest version of the .Net Framework, as they get no incremental value in terms of functionality by doing so. And when the business requests for new features or functionality in the application developed, you need to edit your code to add the functionality, and then recompile and deploy the updated application, which is a time consuming and expensive process.

What’s The Difference Between Low-Code/No-Code and Programming?

While comparing with traditional programming, in the No-code or Low-code world, there are foundational differences architecturally on how an application is developed and deployed. True No-code products like ClaySys AppForms are 100% metadata driven development platforms. This means that all the application functionality created by a developer is maintained as Metadata (Data that describes data). This Metadata is then interpreted when an application runs, to render the App Interface to the end users.

The key components of a No-code Metadata driven platform are a Designer Interface, where you can use a Drag and Drop Experience, to create the functionality required. Typically this means designing a library of integrated forms that interact with the necessary business data in Databases, Web Service End Points or any other target data API. The output of the No-code Designer when you publish any functionality created, is a Metadata file, where in the case of ClaySys AppForms, we generate a JSON Metadata file. This Metadata file is maintained on the ClaySys AppForms Server. The End User who then consumes or interacts with the App created using ClaySys, connects to a module we call the ‘App Browser’ which interprets the Metadata behind an App deployed, and dynamically renders the App UI in HTML5 for the End User in their Web Browser.

So in summary, for a No-code Platform, you have a Designer Tool that generates Metadata, you have a Server and you have a App Browser to renders the HTML5 App UI to the End Users.

The advantage of this architecture is that when newer versions of the Designer, Server and App Browser are released, and when a customer upgrades the ClaySys Platform version, all functionality created using the platform in the past continues to work. So in this respect, any functionality created using a No-code platform is ‘Future-proof’, in the sense that the functionality created continues to work with future versions of the platform. So the experience is like Microsoft Excel, where with each new release of Excel, the old Excel files created in earlier versions of Excel, continue to work.

Advantages to creating applications using a Low-code/No-code Platform:

  • Lower Skill set Required – Since No-code/Low-code platforms provide configuration based design experiences, the skills required to create functionality are similar to the skills required to configure an Excel Spreadsheet. This widens the group of individuals who can participate in building applications, as there is not developer level skill set required.
  • Speed to market – Since configuration is significantly faster than writing, debugging and compiling code, end user functionality can be created exponentially faster. In our testing we have seen productivity increases of 6x to 10x depending on the complexity of the App being developed.
  • Security – Since all Web Form Vulnerabilities are hardened in the App Browser module, any Web App created using ClaySys AppForms has a much higher level of security, compared to typical web applications. This is because any new vulnerability identified needs to only be fixed in the App Browser module, and all Forms and Apps already created now inherit the latest security protection. This is simply not possible in the traditional coding architecture, and the code behind each form or module will need to be edited to build in the necessary defences.
  • Agile Change Management- Since Metadata driven platforms like ClaySys AppForms support metadata versioning for any changes made to applications, it supports true agile development and change management, as you can roll back a change that broke something with a single click. This options builds confidence, and the business can roll out changes rapidly, after basic testing, and if a showstopper issue is identified, they can quickly roll back that particular form or module to its prior stable state.

Once the benefits of building business applications using No-code/Low-code platforms like ClaySys are experienced, it really opens up the opportunity to feasibly build business applications both at the department level and the enterprise level, to continuously automate, monitor and optimize business processes.

The Future of Enterprise Applications

1.  Fundamental shifts driving imminent change for Enterprise Software Applications

(i) The emergence of the Cloud Computing paradigm:
What is Cloud Computing?

As per the Wikipedia definition, “Cloud computing is internet-based computing in which large groups of remote servers are networked to allow sharing of data-processing tasks, centralized data storage, and online access to computer services or resources. Clouds can be classified as public, private or hybrid”.

Practically Cloud computing is simply the ongoing shift where organizations and enterprises that manage their IT Infrastructure and IT Applications within a Data center and Network maintained and managed by the organization, are moving to a model where the physical IT Infrastructure is owned, and maintained by the Cloud Service Provider (CSP), and the organization or enterprise rents or leases the required resources on both the Infrastructure side and the applications side, to manage their IT Automation needs.

The key benefits of the shift to the cloud

  • The cost of managing the IT Infrastructure and Applications are reduced significantly due to the economies of scale that allow the CSP to offer very competitive prices for the IT Infrastructure and Applications as compared with the costs of managing it internally.
  • The CSP’s provide an On-demand resource that allows an organization to scale up and scale down the CSP services rented, to meet the evolving business requirements, thus also transforming IT Expenses to an Operational Expense instead of a Capital Expense.
  • While ‘Security’ is a contentious issue, it can be argued that the CSP’s have a more efficient security model, as they can invest into the evolving best practices and apply them across all their clients infrastructure on an ongoing basis, a lot more efficiently than in-house IT keeping up with the evolving security threats. The major security breaches and data losses across large US companies in the last year or so, support this position that a CSP is probably better suited to managing security, than each individual organizations IT Department.
  • Speed to market is another key advantage that organizations can leverage through CSP’s as it would take minutes to spin up new server capacity, or adopt new business applications. The ‘try before you buy’ approach for cloud business Enterprise Applications also allow an organization to test the viability of adopting innovative new business applications at practically a negligible cost, as compared to the current model of investing into expensive business applications, and waiting for months or years before getting a chance to review the performance of the applications in meeting business requirements.

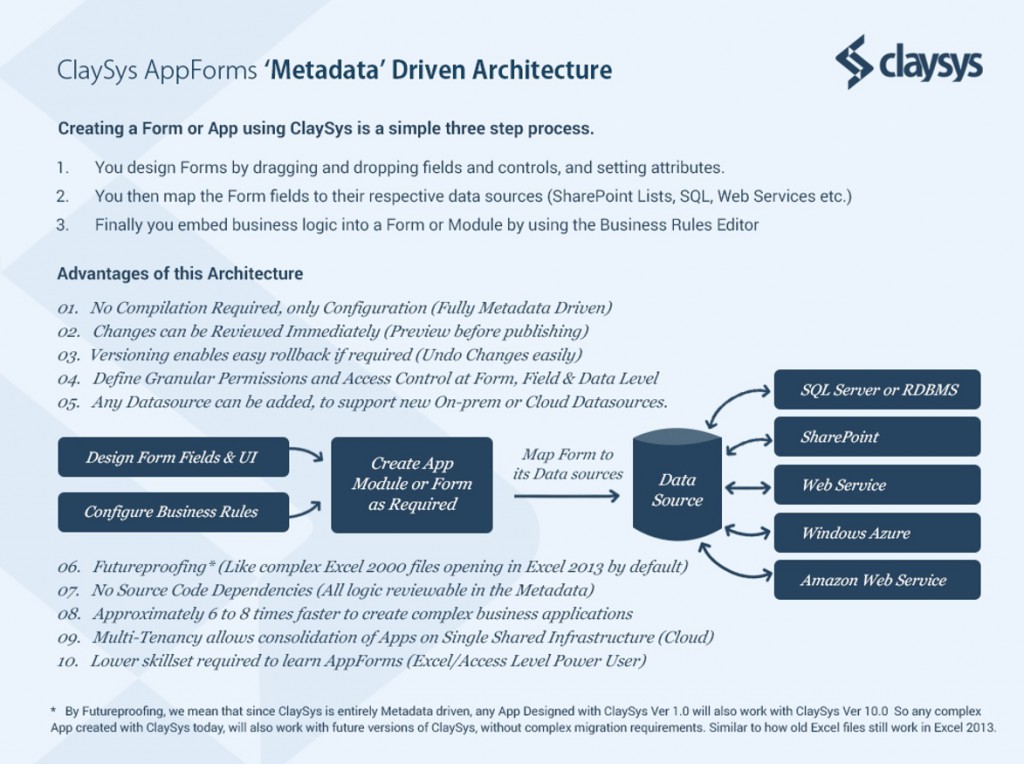
(ii) The emergence of ‘No-code’ metadata driven application platforms:

What is ‘No-code’ application development?

  • Good examples of ‘No code’ applications are Microsoft Excel and Microsoft PowerPoint, in fact everything within the MS Office suite of applications. Microsoft SharePoint and Force.com from SalesForce are other examples of no-code driven application development. Businesses do not depend on IT support to build whatever they want in Excel or PowerPoint, and can do it on their own. Similarly with adopting SharePoint or SalesForce, IT only has to facilitate provisioning access to these platforms to their Users, after which the Power Users or Business Users can manage their requirements directly through a ‘Self Service’ model.
  • No-code Application Development is an approach to building software business applications at a level of abstraction that makes it easier for ‘Power Users’ or ‘Business Users’ to create and maintain their own applications, without needing to depend on specialist ‘Software Programmers’ for translating the business requirements into working functionality within an application.
  • The success of such no-code models are proven by simply contemplating the option of switching off access to Excel or other spreadsheet software within an organization as an example. In spite of organizations having other major enterprise applications like SAP or Oracle implemented, they cannot function without spreadsheets, as the operations of an organization could literally come to a standstill if using spreadsheets was not allowed.
  • No-Code Application Development leverages a ‘Metadata’ driven architecture for creating the functionality required by their Users. Metadata is simply data that describes data, and a good example is HTML. HTML is just text described using certain text tags that describe the formatting of a web page. A Web Browser is served an HTML file from a Web Server, after which the textual HTML data is rendered into the Web Page that the user interacts with in their browsers.

The key benefits of ‘No-code and Metadata’ driven Application Development:

  • When the creation of an application is possible through a ‘Drag and Drop’, ‘Point and click’ type of interface, without needing to write low level cryptic software code, the number of people who can participate in the creation of business applications within an organization increase exponentially.
  • Such no-code metadata driven application development models enable you to create the functionality you want exponentially faster, and it is proven to be at least 8 to 10 times more productive as compared with the custom coding model.
  • Avoiding the layer of pushing requirements down to the ‘Software Programmers’ also reduces the changes or misinterpretation of business requirements of ongoing change management significantly, thus improving the turnaround time of getting working functionality available to the business users.
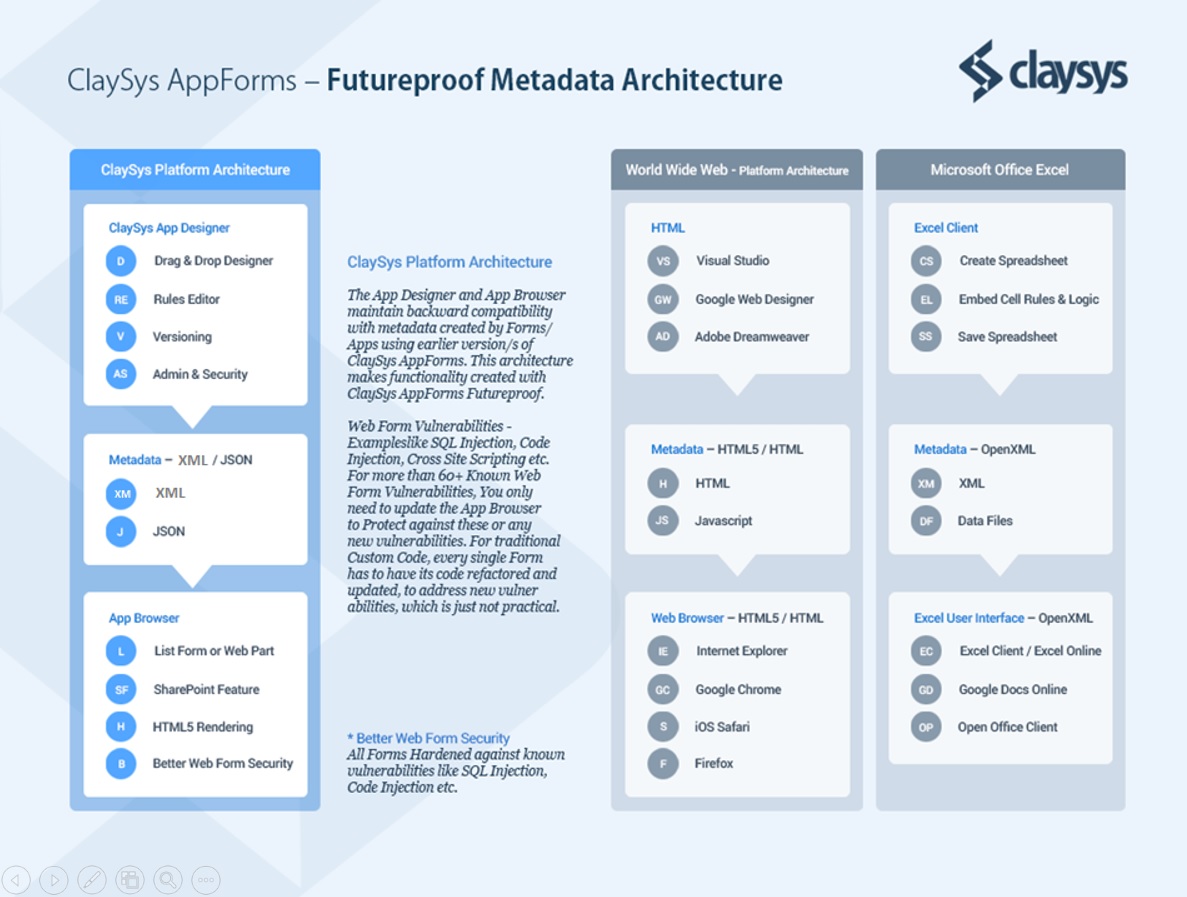
  • Defining the structure and logic of a software business application in ‘Metadata’ also ensures that the application is ‘Future-proof’, as it is now possible to have the applications created with earlier versions of the no-code platform, continue to work with the latest and greatest versions of the no-code platforms, simply because the newer versions are backward compatible with the metadata of the historic versions, thus allowing the old applications to continue working in the latest versions of the no-code environments. Good examples of this are the latest Microsoft Excel versions continuing to support and work with old versions of Excel files created with Office 95, which is almost 20 years old. Another good example is HTML pages created way back in the nineties, continuing to work and render just fine in modern web browsers like Google Chrome, which did not even exist at the time the early HTML pages were created.
  • No-code metadata driven applications also have an architecture better suited to ensuring better security, and the application of ongoing security updates in a feasible and practical manner. Since the definitions of all the Forms and Modules in an Enterprise application are maintained as metadata, there is a single Forms or UI Rendering Engine that renders the front end of the Forms at run time. This architecture allows for all security hardening to be done at the Form or App Rendering engine level, to ensure that every Form rendered inherits all the web form security best practices. As new vulnerabilities are identified, the Form Rendering engine can be updated to defend against the new vulnerabilities, after which every existing form and new form, created with it inherits the same protection. This security model that is available in the no-code metadata driven architecture is not available for the hard coded traditional applications that exist today, so as new vulnerabilities are identified, each and every Form created in .Net or Java has to have its code modified to incorporate the defense’s to the newly identified web form vulnerabilities, which is most cases is just not practical or feasible to do.
  • Finally, with the structure and logic of a software business application defined in metadata, this architecture enables future renderings of the business applications conceived and built today, on front end platforms that have not even been invented as yet. As such future platforms can simply interpret the ‘Metadata’, and understand the structure and logic of the underlying business application defined in the metadata, to now support its rendering on any future platforms that have not yet been invented. An example of this concept is books written at a time when electronic devices did not even exist, are now being rendered on eBook devices, simply because the eBook devices support the rendering of the alphabet on an electronic device, thus recreating the experience of reading from an electronic screen, just like you read a book off paper. When the bible was written, nobody envisioned the future existence of eBooks, but today you can read the very same bible on an eBook like the Amazon Kindle.

2. The current state of Enterprise Applications:

(i) Total Cost of Ownership
Organizations and their IT Departments are struggling with the total cost of simply maintaining the existing suite of Enterprise Applications, as the cost of such maintenance increases every year, without significantly improving the applications or adding additional capabilities to these existing Enterprise Applications.

(ii) Change Management
Organizations have to continuously evolve as they react to market changes or competitor actions and strategies, which in turn require them to modify the behavior of their existing Enterprise Applications. But introducing changes to the existing Enterprise Applications are a very painful, time consuming and expensive process, which hold back most organizations from reacting in an agile manner to the evolution in the marketplace.

Since the existing paradigm of Enterprise Applications being built on custom coded platforms requires highly skilled programmers, it is also an ongoing challenge to maintain these applications with new programmers, when the experienced programmers who built or customized the applications leave the organization. This problem introduces an additional layer of complexity and risk when attempting to change or modify the existing business applications.


(iii) Challenges in ‘doing more with less’

So while IT Departments within organizations struggle to simply maintain the status quo with their existing Enterprise Applications, they are also challenged to react and modify the Enterprise Applications using the same resources and budget constraints that exist.  This situation arises not by choice, but due to a need for every organization to evolve based on evolving market trends and competitor actions, and such evolution can only be implemented operationally by applying the required changes to the existing Enterprise Applications, to support the new requirements specified. This ongoing challenge to ‘Do more with less’ is another imperative that justifies the transition to a No-code, Metadata driven model for Enterprise Applications. All the benefits summarized above for the No-code, Metadata driven model of creating and maintaining Enterprise Applications are significantly better suited to the challenges faced by IT Departments today.

3. The Enterprise Applications Opportunity today

(i) Doing more with less
If an organization reviews the benefits of a slow but sure transition to the cloud computing paradigm, without needing to change anything else, significant capital and operational cost benefits can be leveraged through such a transition.

Adopting No-code, Metadata driven models for application development will significantly increase the efficiency and productivity of the existing resources available to an organization, to deliver significantly more functionality and innovative new applications, without needing to invest in advance of tasting any benefits, as they are forced to do today.

(ii) Adapting to change efficiently
All organizations have to be able to react to market trends and competitor actions efficiently and in a timely manner, to be able to survive and grow their business in this hypercompetitive marketplace in the world today.

Such agility can only be achieved through leveraging the ‘On-demand’ capacity model of the Cloud, along with the No-code, Metadata driven application development model. Even if an organization is willing to absorb the cost of incorporating changes to existing Enterprise Applications, they are still faced with extended and usually unacceptable time periods, for realizing the changes required in their Enterprise Applications built with the current custom coded model.

When departments and power users are presented with a ‘Self Service’ type option to introduce changes to their Enterprise Applications, this approach also enables delegating the authority and ability to introducing change, to the frontlines of an organization, thus making it more efficient and cost effective, versus the centralized model that exists today, which is painful with high risk, high cost and a lack of predictability. Very often, by the time IT introduces a change to an Enterprise Application as requested by the business, due to the delays and time constraints in implementing the changes, the business need for such a change itself would have evolved with additional changes required, or would have been made redundant due to the delays in incorporating the required changes.

(iii) Adopting the best aspects of Cloud computing
Cloud Computing really presents a tremendous opportunity to Enterprise IT Departments, to enable them in being more agile, efficient and cost effective in meeting the business requirements that they support.

While there is no need to plan a ‘big bang’ type migration to the cloud, it just makes sense for organizations to plan a transition to the cloud, as the opportunity presents more agility, lower cost, and ongoing efficiencies in meeting the evolving business requirements. E.g. If an application is designed to have a User load of a 1000 users, and is therefore sized to work on a smaller server to suit the required capacity, it would take weeks or months for the organization to increase the server capacity available to the application, if the Users scale to 10’s of thousands for reasons that nobody could predict, which is a common occurrence. In the cloud paradigm, IT could spin up additional server capacity in minutes. Also if the peak load of Users is only for specific periods of time, IT can spin up additional capacity only for those days when high workloads are expected, as in the cloud you pay for the capacity you use by the hour.

(iv) Planning for the future
While it is easy to review and understand the potential benefits of Enterprises leveraging the value of Cloud Computing and the available No-code, Metadata driven application development models, it is not practical to rip out huge existing Enterprise Applications and replace them with new versions built on the latest best practices of cloud computing and No-code, Metadata driven Application Development models.

There is a lot of time and effort that went into building and implementing existing Enterprise Applications, and though the tools available to create newer, better versions of such applications exist today with the cloud and no-code app dev models, the time and effort that would go into a re-build of such entrenched applications would introduce risk and significant migration costs, that could make this process challenging.

So the recommended approach would be to first classify existing Enterprise Applications into what is termed ‘Systems of Record’ and ‘Systems of Engagement’. Systems of Record are the entrenched Enterprise Applications like an SAP or an Oracle Financials or a Core Banking system, which over time incorporate the core operational and administrative needs of an organization. Systems of Engagement on the other hand are the systems developed to extend the access to Systems of Record, to new channels and new user communities for the purpose of efficiency and fostering innovation. Below are three good examples of Systems of Record and their complementary Systems of Engagement which are presented in the table below.

Systems of Record Systems of Engagement
Core Banking Systems used by Bank Employees across branches Internet Banking Exposed to Banks Customers for online transactions
Financial Systems used by a closed group of internal employees Procurement process automation and Order management systems exposed to clients, vendors and partners
HR & Payroll Systems used by HR, Finance and Accounting Users within a company Expense Reimbursement and Absence Request systems exposed to all employees

Once such a classification between Systems of Record and Systems of Engagement are made, the Systems of Engagement present the most immediate and viable opportunity to adopt the cloud computing and no-code application development paradigms. The key thing to note also are that 90% of the requirements to incorporate changes to Enterprise Applications are typically for the Systems of Engagement. So planning for the opportunities presented today to be applied to the Systems of Engagement within organizations, present the most practical and best return on investment for any organization wanting to start down this path.

Web Form and Web Application Vulnerabilities

One of the biggest challenges in creating an Enterprise Scale Web Form or Web Application is to ensure that it is secure from all the known web form vulnerabilities. The scary fact is that most web forms or applications are developed with the primary objective of achieving the functional objective of the form or app, and the security aspects of the form or app are largely ignored. At most, a diligent architect or developer may address obvious Web Form vulnerabilities like SQL Injection. To clarify what the SQL Injection vulnerability is, Wikipedia describes it as, SQL injection is a code injection technique, used to attack data-driven applications, in which malicious SQL statements are inserted into an entry field for execution (e.g. to dump the database contents to the attacker). It is basically a vulnerability where SQL Scripts are input into Text Fields on forms, which execute on form submission, and can possibly delete or modify all or any of the data in the database, which obviously can be a major security issue, especially for public facing web applications.

So the problem is that if the developer chooses to focus on writing the defensive code in the web forms to defend against such vulnerabilities, very quickly the security aspects of the web forms can take up a significant percentage of the overall development effort. Though as i mentioned earlier, from my experience building web applications for decades, there are only a handful of applications where the focus was on security, so most web applications built in the enterprise today have multiple security vulnerabilities, and are exposed to security threats if an attacker chooses to exploit any of the known vulnerabilities.

Just like SQL Injection, the most common web form vulnerabilities are Remote Code Injection, Remote File Includes, Cross Site Scripting, Frame Injection, exploiting .Net Tracing Capabilities etc. Today there are close to 60+ known vulnerabilities, and every few months you can hear of a new type of vulnerability.

From a traditional application development standpoint, it is simply not practical to keep up with the defensive code to protect against all the known and newly evolving web form and web application vulnerabilities.

So what are the options available, that could be practical. From our experience, the one option that addressed both the security protection requirement, and the ability to feasibly keep the defenses up to date against newer vulnerabilities was possible with the metadata-driven application development architecture. In this architecture you have design tooling that allows you to create a web form interface by laying out the form controls etc, and embed business logic and rules using the designer features, and the output of the designer is a metadata file in XML or JSON. Then there is a complementary component of this architecture, which is the rendering engine or application browser that enables you to consume the metadata output by the designer for each form, and render the web form output in HTML/JS, which is then displayed in the browser. The ClaySys AppForms product was envisioned and developed with just such an architecture, which ensures the ability to write all your defensive code against web form vulnerabilities in the rendering engine or application browser module, which ensures that every form ever created now inherits this security layer. And every time there is a new vulnerability identified, it just needs to have additional defensive code written into the rendering engine or application browser, after which every form inherits the updated security protection.

The schematic below highlights the ClaySys AppForms Metadata driven architecture that enables the creation of highly secure web forms and applications, with the ability to keep updating the security layer supporting any form or application created using the product.

ClaySys


The Futureproof web forms and web applications made possible using ClaySys AppForms is one of the key value propositions and benefits of applying the metadata-driven architecture towards developing web forms and web applications.

The schematic above also highlights two other examples of similar Futureproof architectures, one being the World Wide Web (WWW) where you create HTML/JS using any developer tool out there, of which there are 100’s, and the output of any such developer tool is HTML/JS, which you host on any web server, after which you can consume it on any Web Browser like Chrome, Safari, IE etc. As the designer tools are updated or as web browsers are updated, all the websites existing simply continue to work, and for any new web browser vulnerabilities, the vendor just updates the web browser to defend against them, without worrying about each and every web page or website.

The Excel example is another good example of a Futureproof platform. You would have noticed that any old Excel spreadsheet file created with very old versions of Excel, simply open and continue to work in the latest version of Excel. This is possible as anything you design in Excel is maintained as Metadata in OpenXML, and every Excel runtime maintains backward compatibility with the OpenXML standards used for any earlier version of Excel.

The Security and Futureproof experience you can have with Excel and Web Pages or Sites is not one you can have through the traditional app dev model, where functionality is hardwired in C#, Java, PHP and other languages. This is simply because you then own the responsibility of defending against all known web form vulnerabilities when developing and writing code for each form. You would also then need to go back and update the code of each form to defend against any new vulnerability identified, which in most cases is simply not practical with Enterprise Apps in production.

Understanding Enterprise Application Architecture

In this post, I will highlight the typical portfolio of Enterprise Application requirements, and touch on an architecture that is better aligned towards leveraging the benefits of an off-the-shelf software application, while continuing to pursue the customization’s required to have the final solution align with the unique business processes and user experiences of each unique organisation.

A Typical Company,

  • Buys (Raw Materials or Products to Trade)
  • Makes (Saleable products and/or manages inventory
  • Sells (Sells Finished Products and/or Consulting Services)
  • Hires and Pays Employees

To support these core functions, the typical company invests in a Business Application like an ERP system from SAP, or products as basic as QuickBooks, which allows them to automate the core regulatory and compliance functions around:

  • Buying – Accounts Payables or AP, to manage purchasing and paying vendors
  • Manufacturing – Costing, Production Planning, Warehouse Management (MRP)
  • Selling – Accounts Receivables or AR, to capture and process orders, and track collections
  • Hires and Pays Employees – Automating payroll, salary disbursement and expense reimbursement

While almost every company has the same needs in relation to the core software modules from a regulatory or compliance standpoint, the challenges arise in extending the collaborative features touching each of the core functions, to align with the unique way in which the processes have been defined within the organization. Every organization needs to have the software application work a certain way, to meet the practical process requirements and user experiences required, to ensure the application can be used effectively by its employees.

As an example, we will look closer at the Purchase Management function which is illustrative of why the need for customization of off- the- shelf Accounting packages arises.  The basics of issuing a PO and tracking the payments to the vendor are handled routinely by the likes of QuickBooks or SAP.  They do an excellent job of handling the regulatory and compliance requirements around tracking of payments, as well as the calculation and disbursement of taxes.

The challenge for every organization is in the collaborative side of the Purchase Management function, which usually is unique to the operational processes defined within each organization. These unique processes create the need to ‘customize’ the off the shelf software products, and are the cause of most of the pain related to maintaining and using these software packages.

In this Purchase Order example, once a PO is finalized, it is simply an entry into the Accounts Payable Ledger, for a purchase of goods and/or services made with a vendor. The areas where organizations get into unique scenarios around the purchase process are highlighted below,

  • Purchase Requisition Workflow – Companies want to have a requisition process, where the requirement for any product/service is requested by an Employee or Department, after which it is reviewed and approved by different stakeholders, prior to a Purchase Order being created.
  • Cost Allocation – While the accounting entry is a Purchase Order entry resulting in an Accounts Payable record, each PO may need to be mapped to the accounting Cost Center, to decide which department or from which approved budget code, the specific PO needs to be applied. So approving a Requisition may require to see how it impacts the budgets allocated for a specific cost center or project, prior to having a PO issued.
  • Vendor Quote Management – Some companies may want to receive multiple Vendor Quotes, before finalizing a Purchase Order with a specific vendor. In such scenarios, the requisition that is approved, results in submission of the requisition or an RFQ to multiple vendors, against which the vendors submit quotes. The quotes are evaluated internally, after which a decision is made on which vendor to issue the PO to.
  • Purchase Consolidation – In some scenarios, requisitions may arise from different departments for the same product. E.g. New Laptop computers, where different departments want to procure new laptops. In such scenarios, the purchase department may want to consolidate the different requisitions into a single requisition that is then sent to the vendors for quotes. Since an increase in purchase quantities qualify for vendor discounts, such consolidation allows the company to save on purchase costs.

The more efficiently a company handles their processes, the more competitive they become.   Enterprise Applications were not created for agility, they were created to enforce a pure vanilla, ‘best practices’ way of doing things, which is why unique ways in which the Purchasing Process may need to be setup as highlighted above, are required to be achieved. The question then is whether such custom requirements should be achieved by ‘Customizing’ the ERP system itself, or whether there are any other more practical and efficient options.

While customizing the ERP is the default thought process within most organizations, i have highlighted below, some of the challenges and issues that arise out of customizing these monolithic programs:

  • Implementation Lead Time – While an off-the-shelf product can be installed and setup relatively quickly, it is the customization requirements that delay the implementation to take months if not years for completion.
  • Additional Costs – There is significant cost incurred in executing customization’s, as proprietary skills on a specific product are required, and the hourly technical consulting rates can be exorbitant.
  • Significant Cost to upgrade – If no customization’s are implemented, most ERP vendors support upgrading their products to the latest version very easily, with the upgrade supported with tooling provided by the ERP vendors themselves. But when you have customization’s implemented, then upgrades can get quite complex, with the need to first migrate the customization’s, and then re-test the migration with all historic data migrated, which is time consuming, expensive and complex.
  • Product Support – For many migration projects, by the time the migration is ready to go into production, the vendor has released at least one, if not several additional upgrades to the product version. So the newly migrated version itself is outdated when it goes live. If the client chooses to avoid a migration, as they can manage with the functionality of the existing legacy version, they are eventually forced to migrate when the Product Vendor retires support for the version that they are on.

So is there an alternative to meeting Enterprise Application customization requirements?

The following steps offer a way to realize the off the shelf benefits from commercial ERP or Accounting products, as well as an approach towards tailoring  the processes around them to meet the specific business requirements of each organization:

Step 1 – Avoid Customizing the ERP system like SAP, Oracle or QuickBooks.

Step 2 – Ensure the API (Application Programming Interface) Module license is procured with the prepackaged off-the-shelf application licensing, which ensures support to integrate with the ERP functionality and data.

Step 3 – Deploy a ‘No-code’ Application Development platform, to be the platform on which customization’s would be conducted.

Step 4 – Create all customization’s for the collaborative processes in a ‘No-code’ application layer, while integrating with the core ERP system through the API, or through read-only access to the ERP’s data layer for direct data access.

There are many ‘No-code’ platforms in the marketplace today, that support such a capability, and the ClaySys AppForms platform is one of the leading products in this space. By following the approach above, the core ERP can always be upgraded, as no customization’s are done on it, and so upgrades can be conducted easily using the tooling provided by the ERP Vendor.

Since all customization’s are done in the No-code Application Development platform, it is easy to achieve the customization’s required, in a fraction of the time, as the traditional software development life cycle is circumvented by the no code configuration paradigm that is significantly more productive.  Conservatively speaking, there is an 8x to 10x productivity gain, in comparison to hiring expensive specialists to hard code the customization’s within the ERP itself. Since the no-code platform integrates with the ERP using the API module, the customization’s are not limited, and full read/write access to the core ERP functionality can be managed through the API.

Since the API layer does not change significantly during the version upgrades of the ERP, carrying forward the customization’s done using the no-code layer to support the newer ERP Versions are possible and quite feasible, and significantly faster and less expensive than the migration of customization’s done within the ERP itself.

The no-code platform itself is futureproof, which means every update to the no-code platform can be done by carrying forward all functionality created with any earlier version of the no-code platform, so there is no upgrade related pain point in this layer.

Security is also enhanced, in that customizations on the no-code platform do not require each form to be inoculated against the 60+ known vulnerabilities compromising web forms. The no- code forms are presented to the users via a rendering engine or application browser, which becomes the one place to keep the web form security up to date with blocks against all the known vulnerabilities, which are then inherited by every form created with the platform. The same principle is used by the browser vendors, as they constantly update their offerings as new vulnerabilities are identified, but all HTML or HTML5 websites still render just fine.

The concept of letting the monolithic systems of record like ERP do what they are good at doing, and using an agile no code platform to handle the customization’s required over and above what the ERP system offers, in a fraction of the time and cost, makes perfect sense. The business will get the customization’s much faster, and IT will avoid the need for time consuming, and expensive upgrades.

The ClaySys AppForms platform was envisioned, designed and developed to address exactly the kind of scenarios that i have highlighted in this post.

Creating Customer Details List Using AppForms

Overview

Customer List is used to display the details of the various customers. Customer details include Name, Address, Phone number and Customer id. In the basic form details of 6 customers gets displayed. On increasing the number of customer, more forms will be repeated so as to include details of more customers.

ReportTemplate1

DataStructure in SharePoint
Lists Used

List Name Functionality
CustomerList Details of the customer are stored in this list.

List Details
CustomerList

Column Name Data Type
CustomID Single line of text
Name Single line of text
FirstAddress Single line of text
SecondAddress Single line of text
Phone Single line of text

Creating and Configuring the Forms
List of Forms used

Form Name Functionality
MasterForm · MasterForm contains an external form which is used to store the form to be repeated.

· It also contains a search control used to fill all details of the customer with the Customer List.

RepeaterForm · RepeaterForm contains 6 Border controls.

· Each border control contains 5 labels for displaying 5 fields(Name,Address,City,Phone number,Customer Id)

The order of creation of forms would be RepeaterForm and then the MasterForm. This is because RepeaterForm is configured in the external form used in MasterForm and this form is made to repeat in the MasterForm as required. The best approach would be to complete the form design of all forms before starting on the rules.

Form Design- MasterForm

  • Create a New Form in the CustomerList Folder and open it for editing.
  • Click anywhere on the form to get the form properties loaded in the Properties window. Change the Name of the form to MasterForm. Set the Width of the form to 1200 and Height to 1000.Tick Auto Height in order to adjust the height of the form with respect to the controls in the form.

ReportTemplate2

  • Drag a label to the center of the form, in first row and name it CustomerList
  • Drag an External Form in the next row and name it “extCustomer
  • Click on the external form. In the properties window displayed on the right select the Navigate URL by clicking the button shown below.

ReportTemplate3

  • From the pop screen select the form which has to be loaded in the external form. Here it is Repeater Form.Then click add.

ReportTemplate4

  • Drag a search control and name it “SrcMaster”.
  • Name can be given to the controls by clicking on it and editing theProperties window “displayed on the right side.

Data Source Setting in MasterForm
For the grid:

  • Click on grid to get the Properties window for the search Grid. In the properties window select SharePoint from the Drop down for DataSource.

ReportTemplate5

  • Click on the grid to get the popup menu, choose DataSource tab and click on New DataSource Configuration.

ReportTemplate6

  • A New Popup window opens showing the Available lists in SharePoint. Choose CustomerList from the given set of lists and click Next.

ReportTemplate7

  • Select the Result columns that are to be displayed on the grid.Click Next.

ReportTemplate8

  • Enter the selection criteria as shown below.
  • ID NotEquals “0”

ReportTemplate9

  • Click Next until you reach the Search Result Configuration screen. The columns you had chosen would be shown there,
  • You can modify the Column Header to give a user friendly name to the column.

ReportTemplate10

  • Click Finish

Form Design-Repeater Form

  • Create a New Form in the Customer List Folder and open it for editing.
  • Click anywhere on the form to get the form properties loaded in the Properties window.
  • Change the Name of the form to RepeaterForm. Set the Width of the form to 1200 and Height to 1000.
  • Tick Auto Height in order to adjust the height of the form with respect to the controls in the form.
  • RepeaterForm contains 6 Border controls. Border and background color for each border can be set in the properties window.

ReportTemplate11

  • Set Each border control contains 5 labels for displaying 5 fields(Name,Address,City,Phone number,Customer Id)

 ReportTemplate12


Adding Rules to the form
Rules of MasterForm are given below.

Sl.no Rule Name Trigger Functionality
1. FormLoad FormLoad Fills the search control with all data from customer list.

Runs the Repeater rule.

2. Repeater No Trigger Checks if the total row count of search is more than 6

If total row count is more than 6, the Repeater form is made to repeat (total row count/6) times.

Then the variables VarInitial, VarGrid, VarAdGrid and VarSetGrid are set to value 1.

Runs the “SetFirstGridvalues “rule and “AdditionalGridvalues” rule.

If total row count is less than 6, Set variable VarInitial and VarGrid value to 1 and

Runs“SetFirstGridvalues “rule

3. SetFirstGridvalues No Trigger Checks if the VarGrid value is less than or equal to 6 and VarInitial is less than the total row count of search.

If the condition is true name is set to label controls within the border through (VLabelName=lblHeader+VarGrid) rule.

VLabelName is the variable which is used to temporarily store the label control name.

Next using SetFormValue rule label controls within the border in Repeater form are assigned values form search control. (Name, address, etc.).

Next the value of VarInitial variable and VarGrid variable is incremented by 1.

Again run the same “SetFirstGridvalues” rule.

This loop runs till all the fields in the basic Repeater form get filled with data from the search.

4. AdditionalGridvalues No Trigger Initially checks if the VarAdGrid value is less than or equal to (TotalRowCount/6).

VarAdGrid variable is used to get the count of repeater forms.

Next if the above condition is satisfied, label controls in the repeater form are given name and the values are assigned just as in the “SetFirstGridvalues” rule.

VarSetGrid variable is used to set name for labels.

Each time all the controls within the repeater form gets filled VarAdGrid value gets incremented by 1.

This rule works as long as the VarAdGrid value is less than or equal to the number of required repeater forms.

Rule: FormLoad

ReportTemplate13


Rule: Repeater

ReportTemplate14
Rule:
SetFirstGridvalues

ReportTemplate15
Rule: AdditionalGridvalues

ReportTemplate16
How to use the list template


Uploading List Templates

List templates that were downloaded to a file on the file system can be uploaded to the list template gallery. To perform the following steps, you must have Read permission to the folder or network share that contains the list template file. Before uploading the list template, it should be added to the list template gallery of the root site. Following steps will explain about how to add the list template in to the list template gallery.

  • On the Site Actions menu, click ‘Site Settings’.

img1

  • In the Galleries column, click List templates. This option appears only to users who have the Manage Lists permission. Site owners have this permission by default.

img2

  • The List Template Gallery page appears. Select Files and click ‘Upload Document’.

img3

  • Either type the path or file name (including the file extension) of the list template that you want to upload, or click ‘Browse’ to select the file. Choose whether to overwrite the existing files. By default, the ‘Overwrite existing files’ check box is selected.

img4

  • Click ‘OK’ to choose the file.
  • A pop-up appears to edit the name, title and description of the list template.

img5

  • Click ‘Save’ to include the list template into the list template gallery.
  • Once the list template is added to the list template gallery, we can create a new list using the list template uploaded. Following steps explains how to create a new list using list template.
  • From the Site Actions drop-down menu in the top right, select ‘Site Contents’ of your site.

img6

  • Click ‘add an app’

img7

  • Find the list template that was uploaded.

img8

  • Click on the list template to use for this site

img9

  • Pick a name for the new list. We can add this app multiple times with a unique name.

img10

  • Click on the ‘Create’ button. A list has now been created using the list template.
  • Similarly create all other lists using list template.

Import Tenant

Following steps will explain about tenant import.

  • Open the ‘Backup and Restore’ option in AppForms in the destination site and click on the ‘import site’ tab.

CustomerList_Tenant_img1

  • Select the backup file we had saved from the source site.
  • Once the file is selected, click on the load button.

CustomerList_Tenant_img2

  • This will show you the different sites that were exported from the source site. If there are more than one site content saved, then you can map each site in backup file to different sites in the current site. Select the required site content that needs to be restored and select the destination site in the current site as shown below. Once we are done with the backup mapping, click on the next button to proceed with the import.

CustomerList_Tenant_img3

  • Now we will have to remap the sites we had used in the source website to the actual site in the target site. The drop down will show you the sites/sub sites to help you with the data source mapping. Click ‘Next’ to continue.

CustomerList_Tenant_img4

  • Click ‘Import’ to continue.
  • This will import all the site content we had backed up from the source site and we are ready to work with the forms in the current site.

CustomerList_Tenant_img5


 Create a WebPart Page

Forms can be embedded on any SharePoint page by using the ClaySys AppForms Web Part, to create a webpart page, follow these steps:

  • Click on Site Settings Wheel in the upper right corner of your site and then select “Site Contents Page”.

CustomerList_Webpart_img1

  • Select “Site Pages” or simply pages library on Site Contents Page.

CustomerList_Webpart_img2

  • Click on “New Wiki Page” to add new site page.

CustomerList_Webpart_img3

  • Give the New page name into the pop-up window and click ‘Create’ to add new page.

CustomerList_Webpart_img4

  • To add a new web part, click on the ‘Insert’ tab and then click on the ‘WebPart’ button. Then select ClaySys -> ClaySys HTML WebPart.

CustomerList_Webpart_img5

  • Click ‘Add’ button to add the WebPart.
  • Click on the ‘edit the Webpart’ link to edit the page.

CustomerList_Webpart_img6

  • A new pop-up window appears and here we can configure the ClaySys AppForms by clicking on the ‘Configure’ button.

CustomerList_Webpart_img7

  • Pop-up appears with listed published forms. We can select the appropriate form by click on the form and add the form by clicking on the ‘Select’ button.

CustomerList_Webpart_img8

  • Once the configuration is finished, click on the ‘Apply’ button to see the changes. Click ‘OK’ to continue.

CustomerList_Webpart_img10

CustomerList_Webpart_img9

  • Click ‘Save’ button to save the changes.

CustomerList_Webpart_img11

  • Below figure shows the form after WebPart configuration.

CustomerList_Webpart_img12

Creating Web Mail Using AppForms

Design Document for WebMail

Introduction
Webmail is web-based email accounts. These are usually free email accounts that are operated from a website. Webmail allows the users to access their emails as long as they have access to an Internet connection and a web browser. The purpose of this document is to be a reference for any person wishing to implement the Webmail Template using the ClaySys AppForms or any person interested in how to configure the AppForms to create a web mail Template. Here is an image what the webmail template dashboard we are going to be designing looks like.
Image
On the webmail Dashboard following functionalities are being added:

  • Inbox: Allows you to view the received mails in inbox.
  • Send Items: Allows you to view the mails you have sent.
  • Drafts: Allows you to view the mails you have saved as draft.
  • Compose Mail: Allows you to write a mail. On clicking the following icon we can compose a mail: Here is the image of what the compose mail screen looks like:

Image
On compose mail screen following functionality is added:

  • Address Book: On clicking ‘AddressBook’ button following popup will appear in which you can select the recipient address and click ‘OK ‘ button .The selected recipient address will be added to the ‘To’ address textbox in the compose mail screen.

Image

  • Send Button: It is used for sending mails.

After filling the mail body, subject and ‘To’ Address you can click on the Send Button for sending mail.
image

  • Pre-Requisite: SMTP should be configured with the particular SharePoint version for sending the mail.
  • SaveAsDraft: This button allows you to save a mail as draft.

Image
On ‘AddressBook’ pop-up following functionality is added:

  • AddNew: On clicking ‘AddNew’ button following popup will appear in which you can Add a new mail ID to your AddressBook.

Image
Creating the Form

Steps to create a new form
Folders are used to store and organize forms that have a logical association or relationship. To create a new form click ‘New Folder’ button on the toolbar of the designer.

  • On clicking the New Folder option, it will create a new folder and the name will be in the edit mode. You can type in the new name for the folder.

Image

  • Then click on the ‘New Form’ link on the toolbar. Give an appropriate name for the form. Click ‘Save Form’ to save the form.

Image

  • You can drag and drop controls format the styles easily. ‘Check-In Form’ to save the changes and publish to get the completed form for the end user to use. A form must be checked-out to make modifications while all aspects of the form can be examined while checked-in.

Image
Following are the controls we used here in designing the above Webmail dashboard form:

  • External Form Control
  • TreeView
  • Combo Box
  • Image Buttons

Similarly we can create all other forms required for the webmail template. Following are the forms required:

  • Webmail dashboard (as the image shown above).
  • Compose mail (Screen where user can write a mail).

Image

  • frmMails (This form contains a search which shows all the mail items as a list).

Image

  • MailView (This form is designed to show each mail details using label controls).

Image

  • Address ( This form is the pop up shown when we click on the Address button in webmail dashboard).

Image

  • frmAddNewAdresses (This form is to add new mail ID to the Address book).

Image
Steps for Configuring search Control
Here are the steps for configuring Search control referring to the form ‘frmMails’.

  • From the ‘Toolbox’ at right side of the window , drag and drop the search control, which comes under the ‘Data’. Enter the name for Search control .

Image

  • On Clicking the search control , a pop up appears click on ‘DataSource’.

Image

  • Click on ‘New DataSource Configuration’.

Image

  •  Select the List from the available list and click ‘Next’ button as shown in the image.

Image

  • Select the Result columns Which you want to show in the search and click ‘Next’ button.

Image

  • Give the condition for the Selection of values in the search as shown in the image. And click ‘Next’ button.

Image

  • Here you can specify the column header, width of each column , the order in which each column should appear in search and other similar settings of columns. And click ‘Finish’ button.

Image
Steps for External Data sources Configuration
Here are the steps for configuring External Data source referring to the form ‘frmAddNewAdresses’.

  • Click on ‘DataSource’ and then click on ‘Create DataSource’ as shown in the image.

Image

  • Enter the name for the DataSource ,Select the ‘DataSource Type’ and click ‘OK’ button. As shown in the image.

Image

  •  Select the List from the available list and click ‘Next’ button.

Image

  • Select the command as ‘Insert’ or ‘select’ as your requirement and click ‘Add’ button.

Image

  • Enter the Command Title and enter the mapping values as shown in the image and click ‘OK’ button.

Image

  • Click ‘Finish’ button . Thus a new external data source has been created.

Image
Rules Configuration
Rules in each form are being explained below. Initially to create a rule you need to click on ‘Create Rule’ and enter a name for the new rule.
Image
Also you can add trigger to the rule by selecting the triggers as shown in the image below.
Image
Rules in “WebmailDashboard” Form:

Rule No.

Rule Name

 Trigger

  Functionality

1

ComboMail

imgbtnWebMail

The visibility of combobox is set to true and “[Select]” is removed from the combobox.

2

Visiblility

cmbWebMail

After Selecting a value in the combobox , it should not be seen so on cmbWebMail trigger  the visibility of combobox is set to false.

3

On_TreeView

hdnSelectedItem

On clicking each items on the TreeView , corresponding mails should be loaded in the External form. The external form used is “extMail”. While clicking on the TreeView the hidden control “hdnSelectedItem” will get the selected item of the tree and using ‘setform’ rule this value is passed  to the hidden control “hdnStatus” in the form “frmMails” in the external form.

4

On_ComposeBtn

imgbtnComposeMail

On clicking the image button for compose mail, the form “ComposeMail” is loaded in the external form.

5

ViewMail

hdnMailViewID

On getting values in the hidden control “hdnMailViewID” we use the rule to load the form “MailView” in the external form and pass the value of hidden control “hdnID” to the hidden control “hdnMailViewID” in the form “MailView”.

6

On_Formload

FormLoad

On formload external form is loaded with the form “frmMails”. And temporary variable ‘vTemp’ is set to zero.

7

SelectedItem_Value

tvWebMail

On clicking TreeView control its selected item value is passed to the hidden control “hdnSelectedItem”.

8

Print

imgbtnPrint

To print the page on clicking the image button of print.

9

SetMailToValue

hdnMailTo

Rule to pass the value from the current form control “hdnMailTo” to the control “txtTo” in “MailView” which is loaded in the external form.

Rule 1: ComboMail
Image
Rule 2: Visiblility
Image
Rule 3: On_TreeView
Image
Rule 4: On_ComposeBtn
Image
Rule 5: ViewMail
Image
Rule 6: On_Formload
Image
Rule 7: SelectedItem_Value
Image
Rule 8: Print
Image
Rule 9: SetMailToValue
Image

  • Rules in “Address” Form:

Rule No.

Rule Name

 Trigger

  Functionality

1

On_Formload

FormLoad

FillDataSync(srcAddressBook) is the rule to fill the search control named srcAddressBook.

2

On_OkBtn

btnOK

RunRule(On_srcSddressBook) and value is returned to hidden control “hdnMailTo”. The function to trim “,” at the end of “hdnMailTo” is written. Then  value of “hdnMailTo” is passed to the hidden control “hdnMailTo” in the “WebmailDashboard” form. And this popup is closed.

3

On_CancelBtn

btnCancel

On clicking Cancel button the tab is closed.

4

On_srcSddressBook

RunRule

Loop is written to get the MailID from each row of the search to hidden control “hdnMailTo”. The total row count of the search is initially stored in to the variable “VRowCount”. This rule is called from the rule ”On_OkBtn”.


Rule 1: OnFormLoad

Image
Rule 2: On_OkBtn
Image
Rule 3: On_CancelBtn
Image
Rule 4: On_srcSddressBook
Image
Image
Above two images are the part of a single rule named ” On_srcSddressBook”. The sub rule named “EachRow” is shown in second image.

Rules in “frmAddNewAddress” Form:

Rule No.

Rule Name

 Trigger

  Functionality

1

OnSubmitBtn

btnSubmit

Rule for Executing the “Insert” command. And if  you want to maintain the fileUpload name you can store it in the hidden control “hdnFupName”.

2

On_ExecuteComplete

Execute Complete

Only after the successfull insertion of mail ID in the list , message box is to be shown and Popup window is to be closed.

Rule 1: OnSubmitBtn
Image
Rule 2: On_ExecuteComplete
Image
Rules in “frmMails” Form:

Rule No.

Rule Name

 Trigger

  Functionality

1

On_Formload

FormLoad

The value of  hidden control “hdnStatus” is set to Recieved.

2

FillSearch

hdnStatus

On getting value in the “hdnStatus” the search is to be filled based  to the value in the “hdnStatus”.

3

ValueSet

hdnMailID

The value in the “hdnMailID” is passed to “hdnMailViewID” in the form “WebmailDashboard”.

Rule 1: On_Formload
Image

Rule 2: FillSearch
Image

Rule 3: ValueSet

ImageRules in “MailView” Form:

Rule No.

Rule Name

 Trigger

  Functionality

1

Select

hdnID

Execute the “select” command from list and shows the details of a mail.

2

Send

btnSendMail

Functionality for sending mail

3

SaveAsDraft

btnSave

Functionality for saving mail as draft.

4

On_hdnStatus

hdnStatus

Checks whether the mail is a draft . if it is then only subform containing the send button etc. Should be visible.

Rule 1: Select
Image
Rule 2: Send
Image
Rule 3: SaveAsDraft
Image
Rule 4: On_hdnStatus

Image

  • Rules in “ComposeMail” Form:

Rule No.

Rule Name

 Trigger

  Functionality

1

setMailTo

hdnCmpMailTo

Setting the value of hidden control “hdnCmpMailTo” to the textbox “txtTo”. This include the mail ID that we have selected from the Address book.

2

SendMail

btnSendMail

Functionality for sending mail

3

SaveAsDraft

btnSave

Functionality for saving mail as draft.

Rule 1: setMailTo
Image
Rule 2: SendMail
Image
Rule 3: SaveAsDraft
Image

How To Use This Template

Steps To Upload list Template

  • on the right corner of the window click on settings.

ImageImage

  • Click on ‘Site settings’ from the drop down menu , then we can see the following window appearing.

Image

  • Click on ‘List template’ option as shown in the above image. And we can see ‘List Template Gallery’. Click on ‘Files’ at the leftmost corner as shown in the following image.

Image

  • Click on ‘Upload Document’.

Image

  • Following Pop up will appear where we can browse a list template stored in our computer and click ‘OK’ button.

Image

  • Following Pop up will appear where we can change the name of the List Template and enter the Description as required and click on ‘Save button’.

Image

  • Now go to the Required sub site, click ‘Settings’ on the right corner (as done in step ‘a’). Then click on ‘Site Contents’. Following Screen appears in which click on ‘add an app’.

Image

  • Following screen will appear where we can type the uploaded template name and click search.

Image

  • Then you can see the Uploaded template ,Click on it .

Image

  • On clicking it ,we will get following Pop up . Enter the name for the List template and click ‘Create’ button.

Image
Steps to Upload Tenant

  • Click on the “Back Up and Restore” on the left side of the AppForm Designer window. Then click on ‘Import Site’ -> Browse the Tenant and click Load.

Image

  • Select the ‘Zip File’ and ‘Site Name’ and click ‘Next’.

Image

  • Click ‘Next’ button.

Image

  • Click on ’Import’ button . Once it done you are free to work with the form in the new site.

Image
Step to Create a Web Part Page

Here are the steps for configuring External Data source referring to the form ‘frmAddNewAdresses’.

  • Click on Site Settings Wheel in the upper right corner of your site and then select “Site Contents Page”.

Image

  • select site pages or simply pages library on site content page.

Image

  • Click on “New Wiki Page” to add new site page.

Image

  •  Give the New page name into the pop-up window and click ‘Create’ to add new page.

Image

  • To add a new web part, click on the ‘Insert’ tab and then click on the ‘Web Part’ button. Then select ClaySys -> ClaySys HTML Web Part.

Image

  • Click ‘Add’ button to add the Web Part. Click on the ‘edit the Web part’ link to edit the page.

Image

  • A new pop-up window appears and here we can configure the ClaySys AppForms by clicking on the ‘Configure’ button.

Image

  •  Pop-up appears with listed published forms. We can select the appropriate form by click on the form and add the form by clicking on the ‘Select’ button.

Image

  • Once the configuration is finished, click on the ‘Apply’ button to see the changes. Click ‘OK’ button.

Image

  • Now you can see the web part page you just created, as shown in the following image. Click ‘Save’ button to save the changes.

Image

Metadata Driven Architecture For Application Development

The metadata-driven development model for building Enterprise Applications is an architecture that primarily enables the creation of ‘Futureproof’ business applications. What makes this possible is the approach where all the design elements of a web application, including the form interface, fields, tables, grids, tabs, controls, layout, business rules etc, are defined in metadata like XML or JSON. You then have a runtime rendering engine or application browser engine that consumes this metadata and renders the applications User Interface dynamically.

This approach or architecture for building enterprise web applications is very mature today, and cloud based application hosting vendors likes SalesForce.com have their cloud architecture based on such metadata driven models, which you can review here. Platform companies like Microsoft have also been proposing such Metadata driven architecture patterns for developing Enterprise Scale web applications for a long time now, which you are review in this Microsoft article.

The ClaySys AppForms development platform was envisioned and designed from its very inception, to be based on a metadata driven architecture. The schematic below highlights the key benefits when leveraging the metadata driven model for creating an application development platform like ClaySys AppForms.

ClaySys

The key advantages of this architecture as highlighted above are explained in more detail below;

No Compilation Required

In this approach when you design an application artifact like a Form, everything you layout in the designer is generating its related metadata, and at the end of a design cycle, there is a metadata file in XML or JSON that is generated, which contains the definition of everything designed. So by no compilation, what we mean here is that any functionality designed can be immediately previewed and/or published to make it available to the end users or testers.

Changes can be reviewed immediately

Since the design process in interactive and WYSIWYG, every action or change by the designer can be immediately previewed or tested, without needing any compilation or deployment process. And the review can also be done before saving or publishing the changes, which makes it an interactive development environment, for designers to create functionality in an iterative manner.

Version control with easy rollback

Since every published artifact for the web application being designed in a metadata file, every time any changes are made, the historic versions of the metadata files are maintained. This enables easy version control and rollback when necessary. What this mean is that every time a change is made to a Form or any artifact of an application, the prior version that existed is archived. So as and when you need to rollback to the prior version, it can be achieved through a single click of a button.

Define granular permissions and access control

Since the ClaySys AppForms platform was designed to create Enterprise scale applications, the functionality for defining User Access permissions and setting access controls to granular elements of an application are supported. You can set access control to the individual screens or forms of an application, with Create/Read/Update/Delete (CRUD) permissions set at the form or screen level, or you can go deeper and set permissions to the individual form elements itself, like fields, buttons or other controls.

Any datasource can be added

The ClaySys AppForms product is designed to enable creating the entire front end of a web application, including its forms, business logic or rules within forms or across forms, and the connection of the individual forms to their datasources. A Datasource is simply the end point from where the forms are reading the data or writing back the data. Today, with the metadata architecture, we support the front end forms connecting to and working with SQL Server, Oracle, Web Services, RESTful Services, SQL Azure, Azure Table, SharePoint, Office365 amongst others. So you can literally create a single form, and have it connect to multiple datasources to meet your functional requirement.

Futureproofing

What makes the metadata driven model create future proof applications is the basis for the core benefits of this architecture. Typically a metadata driven application platform like ClaySys AppForms has the Designer that generates the XML or JSON metadata, and then there is a Rendering Engine or Application Browser that consumes the metadata and renders the User Interface and working application. As the Designer and Rendering Engine are upgraded to newer versions, backward compatibility is maintained with the metadata supported by prior versions, so all future versions of such products can continue to render functionality created by prior versions of the product. A good similar example is Microsoft Excel, where each configured Excel spreadsheet is maintained as an OpenXML file, and the Excel runtime renders the OpenXML into the functioning Excel spreadsheet. You would have noticed that every time you upgrade Excel to its latest version, or old Excel files created in historic versions of Excel simply continue to work.

No Source-code dependencies

In the traditional application development model, for example when developing in C# or VB, in Microsoft Visual Studio, you first code your application, and then Visual Studio compiles your source code into the executable. Your sourcecode also has a dependency on the .Net Framework that it was written against, which means that you maintain such an application, you have to ensure that you are always working with the most current sourcecode, and every time Microsoft upgrades the .Net framework, you have to go and rewire your code to work with the latest .Net Framework. In the metadata driven world, the metadata created in the actual input to the rendering engine, so there are no abstracted source code or intermediary layers.

Approximately 6x to 8x faster to create applications

The benefit of the metadata driven architecture is that a lot of the deep internal plumbing that makes a web application work are abstracted away by the Designer Tool. The Designer uses a Declarative approach towards enabling configuration of the application being created. This approach significantly improves the productivity of the application developer or creator, as they can create functionality 6x to 8x faster than it would have taken them to create the same functionality in the traditional coding paradigm using C# for example.

Multi-tenancy offers consolidation of apps on a single shared infrastructure

The metadata driven model for building applications allows an Enterprise to deploy multiple applications on the same hosting infrastructure easily. Since multiple applications are sharing the same Designer and Rendering Engine, the only difference is the metadata that is created unique for each application. So a common server farm and database layer can be used to deploy a metadata driven platform like ClaySys AppForms, after which multiple individual and independent web applications can be deployed on the same shared infrastructure.

Lower skills required

In the metadata driven application development model, the designer is working at a higher level of abstraction and does not need to understand low level programming language syntax, semantics or patterns, which makes it significantly less complex to understand. Therefore users will non-technical or non-programmer skills can work on creating functionality or applications using metadata driven platforms like ClaySys AppForms.

So in conclusion, if a metadata driven platform meets the functional capabilities of the envisioned business application, it is clearly the way to go, to create a business application that is required to exist for the long term.

Employee Management Using SharePoint List

Overview

This document provides the details for creating forms through ClaySys Appforms to manage employee details stored in a SharePoint List. Employee Details are displayed in a grid format using Search grid as well as in detailed format using form DataSource. Clicking on Select button in the grid displays the details of the employee below the grid. Clicking on Edit button in the grid opens a popup window where all Employee Details can be edited and saved back to the list. A new employee can be added using the same form and inserted into the list. Buttons are provided to filter the grid based on Job Status – Salaried/Commission/Contract.

Employee2

Data Structure in SharePoint
Lists Used

List Name Functionality
ClsysTemplt_Employee Stores Employee Details
ClsysTemp_JobType Stores Job Type – Salaried/Contract etc. Related to Employee Details table through JobTypeId

List Details
Employees List

Column Name Data Type
EmployeeId Number
FirstName Single line of text
LastName Single line of text
Designation Single line of text
BirthDate Date and Time
HireDate Single line of text
Address Single line of text
Phone Single line of text
EmailId Single line of text
JobTypeId Single line of text
Attachments From Default Columns of SharePoint List

JobType

Column Name Data Type
JobTypeId Number
JobType Single line of text

Creating and Configuring the Forms

List of Forms used

Form Name Functionality
MainForm Has set of buttons for filtering the grid and other data operations. Has an ExternalForm Control which loads Employee Details form
EmployeeDetails Shows List of all employees in a grid format with details of each employee listed below the grid.
EditEmployee Used for updating Employee Details or Adding New Employee Details

The order of creation of forms would be EditEmployee, EmployeeDetails, and then MainForm. This is because some of the features like edit click on the search grid of EmployeeDetails is configured to open EditEmployee form and New button click from Mainform also opens the EditEmployee form. The best approach would be to complete the form design of all forms before starting on the rules.

Form Design – Main Form

  1. Create a New Form in the Employees Folder and open it for editing.
  2. Click anywhere on the form to get the form properties loaded in the Properties window. Change the Name of the form to Main Form. Set the Width of the form to 1200 and Height to 1000. EmployeeListImage2
  3. From the Standard tab of the toolbox on the left drag an Image control and place it in the first row, first column. Set the control name as ImgLogo and set the width to 210 and height to 69. EmployeeListImage3
  4. In the columns adjacent to the Image buttons, drag and drop 1 buttons from the Toolbox. Set the control name to btnAddnewemployee.
  5. Click the cell right beneath New and in the properties of Selected Cell Style set Column Span to 12.  EmployeeListImage5
  6. From Toolbox-> Group, choose External Form and drop it into the above cell.
  7. Set the properties of the External Form as shown here.  Employee7
  8. To set the NavigateURL, click on the ellipsis to open the dialogbox given below.  Unselect the Expand All checkbox so that only the folder names are displayed. Choose the EmployeeDetails form and click on the Add Button. Click OK.   Employee8
  9. From ToolBox -> Group, select SubForm and drop it in the cell below Image Logo. Set the properties as given below.   Employee9
  10. Onto the subform, add a label for Job Status and four buttons for filtering the Employee Details grid based on the job status. Set the properties as shown below.   Employee10
  11. Add a subform in the cell adjacent to the last button in the top row and set its Visibility to false by unchecking the checkbox Visible in the Properties window.  Add a textbox to the subform and name it hdntxtJobTypeIdMain. The value of this will be used for filtering the grid in the EmployeeDetails form.   Employee11

Rules for MainForm

Rule No Rule Name Trigger Functionality
1 Load_AllJobs btnAllJobs Triggers  the change event for the hidden textbox hdntxtJobTypeIdMain, which sets an external form value in EmployeeDetails Form to filter the data in the grid based on Job Type.
2 Load_SalariedJobs btnSalariedJobs Same as above.
3 Load_CommissionJobs btnCommissionJobs Same as above.
4 Load_ContractJobs btnContractJobs Same as above.
5 Set_ExternalFormJobTypeId hdntxtJobTypeIdMain Set the Value of the control hdntxtJobTypeId in EmployeeDetails form to the hidden text form value in the Main form which was set in the above rules.
6 Call_NewEmployeeForm btnNew Load the form EditEmployee to add new employee details.


Set value of hdntxtEmpIdDetails in EditEmployee form to 0.

Rule 1: Load_AllJobs
employee12

Rule 2: Load_SalariedJobs
Employee13

Rule 3: Load_CommisionJobs
employee14

Rule4: Load_ContractJobs
employee15

Rule  5: Set_ExternalFormJobTypeId
employee19

Rule 6: Call_NewEmployeeForm
Employee17

Form Design – EmployeeDetails

  1. Create a NewForm in the folder containing the Main Form. Open the form for edit and set the form properties as given below.   EmployeeListImage12
  2. Click on the first cell and set Column Span to 12. Add a Search grid from Toolbox ->Data to this cell and set the properties as given below.  EmployeeListImage13

Click on the cell right beneath the datagrid and set column span to 12. We will copy the first grid here once it is fully configured. Two grids are used because for SharePoint data the filtering of data in the grid will throw an error when the form is loaded first without a value for the search criteria. So the first grid- used during form load- shows all data; and the second grid is shown when data is to be filtered  based on button click from MainForm.

Displaying Employee Details for the row selected in the grid.

  1. Set the Column span of the cell below second grid to 4 and add a label called lblEmpName. Similarly Add a label beneath it and name it lblDesignation.
  2. For the cell beneath this, set the column span to 3 and add an Image control from Toolbox->Standard. St the properties as shown below.   EmployeeListImage14
  3. Add a subform to the cell to the right of the image control and add label controls as shown below. Name the subform as subfrmDetails, and name the labels for Address, Phone and Email appropriately.   EmployeeListImage15
  4. In the cell to the right of this add another subform to hold the hidden controls used in the form. Name this as subfrmHiddenCtrls. Add six textboxes and name them as given here.   EmployeeListImage16

Configuring the Datasources for all the controls.

  1. Click on grid1 to get the Properties window for the search Grid. In the properties window select SharePoint from the Dropdown for DataSourceEmployeeListImage17
  2. Click on the grid to get the popup menu, choose DataSources tab and click on New DataSource Configuration.

EmployeeListImage18

  1. A new Popup window opens showing the Available lists in SharePoint. Choose your Employee table from the list and click Next.   EmployeeListImage19
  2. Select the Result columns that are to be displayed on the grid, make sure you include the EmployeeId column. Click Next.   EmployeeListImage20
  3. Click Next until you reach the Search Result Configuration screen. The columns you had chosen would be shown there,
    a.You can modify the Column Header to give a user friendly name to the column.
    b.If EmployeeID column is to be hidden, click on the checkbox to Hide it.
    c.For Date columns change the default Type chosen as DateTime to Date if only date is to be displayed.   EmployeeListImage21
  4. We need to create two composite columns now, to show the edit and select buttons for each row.  In the Add Composite Column section give Column Header as Edit, Result Column as Composite Column and click on the Add Column button. Repeat the same for creating Select button.  EmployeeListImage22
  5. To configure the Action for new composite column, click on the Configure Column button.  EmployeeListImage23
  6. In Configure Column Links, choose Link Button for Column Type.  You can choose a Link Button image from existing images.  EmployeeListImage24
  7. Choosing Link Button opens another section below, where you can choose the form to navigate to when the button is clicked.

a. Enter the folder name where the form is present and search to get that folder alone.
b. Choose the form to be opened, in this case the EditEmployee form. Choosing this form makes this available in the Form Name drop down below.   EmployeeListImage25
c. Choose the field to be mapped in the EditEmployee form from the Field Name drop down. In this case txtEmpId.
d. In the Result Field choose EmployeeId.
e. Click the + button to add this form to the box below.
f. Click Ok.   EmployeeListImage26

8. In a similar Manner Configure the LinkButton for Select Column, but since we do not navigate to another form;
a. Choose the same form EmployeeDetails from the list of forms. EmployeeListImage27
b. Choose the hidden Control hdntxtEmpId from the Fields dropdown.
c. Choose EmployeeId for the Result field.
d. Add the form with the + button.
e. Click OkEmployeeListImage28

9. Change the Column display Order to show Edit and Select buttons at the start of the row by setting the order as 2 and 3 for Edit and Select buttons respectively. Change the order for columns starting from FirstName onwards to be displayed after the Link buttons.   EmployeeListImage29
10.Click on Finish button, to come out of the Configure Search Grid option.
11.Preview the form to make sure the link buttons are configured and data is getting loaded into the grid.   EmployeeListImage30

Configuring the second Search Grid

  1. Right click on the first grid, Copy it and paste into the cell right underneath it, the column span of which was set to 12 earlier.   EmployeeListImage31
  2. In the properties window, change the second Search grid name to SrchEmpByJobType, since this grid will show the employee list filtered based on the Job Type.
  3. Click on the Grid choose the DataSources tab and you’ll notice that it shows Edit DataSource Configuration, since the datasource configuration of the first grid has been copied here.   EmployeeListImage32

Setting the DataSource for the controls displaying Employee Details.

  1. In the DataSources tab of the form, click on Create DataSource.  EmployeeListImage33 
  2. Give DataSource Name as dsEmpDetails, choose SharePoint as the DataSource Type and click Ok.  EmployeeListImage34
  3. Choose the Employee table from the list and click Next.  EmployeeListImage35
  4. In Commands dropdown, default will be Select, click on Add button.  EmployeeListImage36
  5. In the query criteria mapping choose EmployeeId Equals hdntxtEmpId.   EmployeeListImage37
  6. In Query Value Mapping section, we need to map the result fields to the respective controls on the form. Since we need to Display FirstName and LastName together, map these to two hidden textboxes and then in FormLoad and hdntxtEmpId change add rule to assign the value of lblEmpName as hdntxtFirstName + hdntxtLastName. EmployeeListImage38
  7. Map Attachments column of Employee List to the imagecontrol (imgEmpPic here) on the form.   EmployeeListImage39
  8. Click Finish to get back to the Commands Configured part and click on Add Trigger.  EmployeeListImage40
  9. Select FormLoad and hdntxtEmpId as the triggers and click on Create Rule. This would set textchange in hdntxtEmpId and form load events as the trigger for loading the DataSource dsEmpDetails.   EmployeeListImage41

Adding Rules to the form

The rules created during Grid and DataSource configuration would be already added to the Rules Designer. Apart from that, these are the rules to be added to the form.

Rule No. RuleName Trigger Functionality
1 On_FormLoad Form Load Height of second grid is set to zero and first grid to 250. The hdntxtEmpId control value is set to the EmployeeId from the first row, first column of Grid1.
2 Select_EmployeeDetails hdntxtEmpId When a row is selected on the grid, corresponding details like Image, Address etc are displayed in the controls below the grid.
3 Call_EditEmployeeForm hdntxtEmpIdEdit When the Edit button on the grid is clicked, the employeeId of the selected row is set to the hidden text hdntxtEmpIdEdit. This triggers changing the Employee Details below the grid and also brings up a popup window where the Employee Details can be edited. LoadForm function is called on EditEmployee form and SetFormValue function is used to set the value of hdntxtEmpIdDetails in EditEmployee form to the EmployeeId of the selected row.
4 Grid1_ChangeHeaderStyle srchEmpDetails If the default Color of the Header of the search grid2 is to be changed.
5 Grid2_ChangeHeaderStyle srchEmpByJobType If the default Color of the Header of the search grid2 is to be changed.
6 Select_JobType hdntxtJobTypeId Based on the button click on the MainForm for filtering Employees by Job Status, the grid displays are swapped between grid1 and grid2.

Rule 1: On_FormLoad
EmployeeListImage42

Rule 2 : Select_EmployeeDetails
EmployeeListImage43

Rule 3: Call_EditEmployeeForm
EmployeeListImage44

Rule 4: Grid1_ChangeHeaderStyle

EmployeeListImage45

Rule 5: Grid2_ChangeHeaderStyle
EmployeeListImage46

Rule 6: Select_JobType

EmployeeListImage47

Form Design – Edit Employee

  1. Create a NewForm in the Employees Folder and open it for editing.
  2. Click anywhere on the form to get the form properties loaded in the Properties window. Change the Name of the form to EditEmployee. Set the properties of the form as given below. Enable Close Button should be unchecked and IsPopup should be checked.   EmployeeListImage48
  3. Add UI controls to the form as shown in the image below. The controls used are Label, TextBox, DateTimePicker, FileUpload, ComboBox and Buttons all from Toolbox->Standard tab.   employee18
  4. For entering the Address increase the size of the TextBox control and check the AcceptReturn property in the properties window.
  5. For DateTimePicker control, date format can be set from the properties window as shown below.   EmployeeListImage51
  6. Add a subform in cell next to txtAddress and name it as subfrmHdnCtrls. Set the visibility of the form to False by unchecking Visibility in the Properties Window. Add a textbox to the subform and name it hdntxtEmpId.   EmployeeListImage52

Configure DataSource for these controls

  1. In the DataSources tab of the form, click on Create DataSource.   EmployeeListImage53 
  2. Give DataSource Name as dsEmpEdit, choose SharePoint as the DataSource Type and click Ok. EmployeeListImage54
  3. Choose the Employee List and click Next.   EmployeeListImage55
  4. Commands window is opened; by default Select would be chosen in the dropdown. Click Add Button.   EmployeeListImage56
  5. Map the controls on the form to appropriate DataSource column from the list. EmployeeListImage57
  6. Map the Attachments column to the File Upload Control. And in the Query Criteria Mapping, select EmployeeId Equals txtEmpId. Please note that hdntxtEmpId is value is set from the calling form(EmployeeDetails here) and when the form loads, details for that EmployeeId are loaded onto the mapped  controls.   EmployeeListImage58
  7. Click Ok to complete configuring the Select Command. The command configuration window will show that no triggers are associated with the Command.   EmployeeListImage59
  8. Click on Add Trigger and select txtEmpId from the list of controls and click Create Rule. EmployeeListImage60
  9. The command window will show txtEmpId as the associated trigger. EmployeeListImage61
  10. Continue to configure the Insert and Update commands in a similar manner. Just the associated triggers will change to btnInsert and btnUpdate.   EmployeeListImage62 EmployeeListImage63
  11. For configuring the Close button functionality, click on the button and select the Rules tab. Click on Create Rule which will take you to the Rules panel and attach the close button as the trigger for the rule.   EmployeeListImage64
  12. Change the Rule Name to Close_Form. RightClick on the rule name and choose Add Action from the popup. In the Action script write the expression CloseTab().
  13. Couple of checks are added to make sure that a New Employee Record is only inserted not updated and viceversa. In the calling form(MainForm) when New button is clicked, the value passed for hdntxtEmpIdDetails is 0. In the trigger of hdntxtEmpId add a decision to check for this and disable the Update button if true. In case it is greater than 0 disable the Insert button.

Configuring the DataSource for ComboBox – cmbJobType

  1. The dropdown items for the Combobox have to be configured separately through its DataSource property. Click on cmbJobType and select DataSource tab. EmployeeListImage65
  2. Click on New DataSource which opens the below dialogbox. Choose the DataSource as SharePoint.   EmployeeListImage66
  3. Select the JobType Table and click Next. EmployeeListImage67
  4. Click Next in the Criteria Builder window.
  5. In the Next window, select JobTypeId as the Value Member and JobType as the Display Member.   EmployeeListImage68
  6. In the window that comes up next click Add trigger and select hdntxtEmpIdDetails and click create rule. This would close the Add Trigger Window. Click Finish to close the combobox datasource configuration window. EmployeeListImage69

Adding Validation to the Controls

If the Datasource requires that certain fields are mandatory, you can configure the related controls on the form to show an error message if data is not for this field. EditEmployee form has validation configured for all textbox controls.

  1. To configure this first select the control by clicking on it. In the Properties window -> Validation, check IsRequired.   EmployeeListImage70
  2. You can also set regular expression fields to check if it’s a valid EmailId or Phone number etc.   EmployeeListImage71 EmployeeListImage72
  3. When Insert or Update button is pressed on the EditEmployee form, if the required fields are not entered, or the data is not in the expected format an error message is shown to the user as shown below. EmployeeListImage73

Rules for form EditEmployee

No RuleName Trigger Functionality
1 FirstLoad_CheckNewRecord hdntxtEmpIdDetails If the value of hdntxtEmpIdDetails is greater than 0, it is an existing Employee’s record to be loaded. Disable the Insert button and set the value of txtEmpId. If hdntxtEmpIdDetails value is 0 it is a New Record to be added, disable the Update button.


Load JobType dropdown.

2 Load_EmployeeDetails txtEmpId Execute Select on DataSource dsEmpEdit. This rule is automatically created when the datasource is configured. Add a decision to check if txtEmpid > 0 in case it is changed.
3 Update_Record btnUpdate Automatically created when the datasource is configured for Update Command Trigger. Rule Name changed later.
4 Insert_Record btnInsert Automatically created when the datasource is configured for Insert Command Trigger. Rule Name changed later.
5 Close_Form btnClose Close the form.


To be Implemented later: Refresh the EmployeeDetails form if any change has been made.

Rule 1: FirstLoad_CheckNewRecord
employee20

Rule 2: Load_EmployeeDetails
EmployeeListImage75

Rule 3: Update_Record
EmployeeListImage76

Rule 4: Insert_Record
EmployeeListImage77

Rule 5: Close_Form
EmployeeListImage78

How to use this template

a) Uploading List Template

Following lists are using for creating the template form.

  • ClsysTemp_EmpJobType
  • ClSysTmplt_Employee

Please do the following steps for uploading list templates

  • Click on settings  at the right corner of the window
  • Click on ‘Site settings’ from the drop down menu, we can see the following window appearing.   EmployeeListImage80
  • Click on ‘List template’ option as shown in the above image. And we can see ‘List Template Gallery’. Click on ‘Files’ at the left most corner as shown in the following image. EmployeeListImage81
  • Click on ‘Upload Document’   EmployeeListImage82
  • Following Pop-up will appear where we can browse a list template stored in our computer and click ‘OK’ button.   EmployeeListImage83
  • Following pop-up will appear where we can change the name of the List Template and enter the Description as required and click on ‘Save button’.   EmployeeListImage84
  • Now go to the required sub site, click ‘Settings’ on the right corner.  Then click on ‘Site Contents’.  Following Screen appears in which click on ‘add an app’.   EmployeeListImage85
  • Following screen will appear where we can type the uploaded template name and click search.   EmployeeListImage86
  • Then you can see the Uploaded template, Click on it. EmployeeListImage87
  • On clicking it, we will get following Pop up. Enter the name for the List template and click ‘Create’ button.   EmployeeListImage88

b) Uploading Tenant

  • Click on the ‘Backup and Restore’ on the left side of the App form Designer window .Then click on ‘Import Site’ -> Browse the Tenant and click Load. EmployeeListImage89
  • Select the ‘Zip File’ and ‘Site Name’ and click ‘Next’.   EmployeeListImage90
  • Click ‘Next’ button.

EmployeeListImage91

  • Click on ’Import’ button

EmployeeListImage92

  • Backup restored successfully EmployeeListImage93

c)  Create a Web Part Page

Forms can be embedded on any SharePoint page by using the ClaySys AppForms Web Part, to create a web part page, follow these steps:-

  • Click on Site Settings Wheel in the upper right corner of your site and then select “Site Contents Page”.   EmployeeListImage94
  • Select “Site Pages” or simply pages library on Site Contents Page. EmployeeListImage95
  • Click on “New Wiki Page” to add new site page.   EmployeeListImage96
  • Give the New page name into the pop-up window and click ‘Create’ to add new page. EmployeeListImage97
  • To add a new web part, click on the ‘Insert’ tab and then click on the ‘Web Part’ button. Then select Claysys -> Claysys HTML Web Part.
  • Click ‘Add’ button to add the WebPart.  EmployeeListImage98
  • Click on the ‘edit the Webpart’ link to edit the page.   EmployeeListImage99
  • A new pop-up window appears and here we can configure the Claysys Appforms by clicking on the ‘Configure’ button EmployeeListImage100
  • Pop-up appears with listed published forms. We can select the appropriate form by click on the form and add the form by clicking on the ‘Select’ button.   EmployeeListImage101
  • Once the configuration is finished, click on the ‘Apply’ button to see the changes. Click ‘OK’ to continue. EmployeeListImage102
  • Click ‘Save’ button to save the changes.
  • Below figure shows the form after WebPart configuration. Employee2

Create Hotel Booking Platform Using AppForms

Design Document for Hotel Booking

Introduction

Online hotel booking system provides ample tolls that help hoteliers increase their online exposure and drive up revenue. One of the biggest advantages of our booking engine is the filtering of hotels with multiple criteria. The purpose of this document is designed to be a reference for any person wishing to implement or any person interested in the architecture of the controls for the ClaySys AppForms or how to configure the AppForms to create   a hotel booking template. Please find below user view of hotel booking template:-

Dashboard:-
UI
On the Dashboard following functionalities are being added:-

  • Select Location of Hotel
  • Country Automatic generate on the basis of Location
  • Select Check in and Checkout date
  • Select Rooms, Adults and Children

On clicking ‘Search’ button, following screen will be displayed
UI
In Search result form, following functionalities are being added:-
Can search hotels with:-

  • different rate
  • different City and Country

It is designed to guide development and design in ClaySys AppForms, including:-

  • Form design
  • Data Source configuration
  • Rules Configuration
  • Uploading List Template
  • Uploading Tenant
  • Create a new web part page

Create the form

Form Designing

  • Folders are used to store and organize forms that have a logical association or relationship. To create a new form click ‘New Folder’ button on the toolbar of the designer. On clicking the New Folder option, it will create a new folder and the name will be in the edit mode. You can type in the new name for the folder.

image

  • Then click on the ‘New Form’ link on the toolbar. Give an appropriate name for the form. Click ‘Save’ to save the form.

image

  • You can drag and drop controls format the styles easily.

image
‘Check-In Form’ to save the changes and publish to get the completed form for the end user to use. A form must be checked-out to make modifications while all aspects of the form can be examined while checked-in.

image
There are three forms in this template. Named as:-

  • “HotelDashboard”
  • “SearchResult”
  • “HotelDetail”

“HotelDashboard” form contains following controls:-

  • Combo box
  • TextBox
  • DateTimePicker
  • Button

“SearchResult” form contains following controls:-

  • External form
  • Subform
  • Combo box
  • TextBox
  • Button
  • Label

“HotelDetail” form contains following controls:-

  • Image
  • HyperlinkButton
  • Subform
  • Label

Data Source Configuration
Following steps will explain about the Data Source configuration of Combo Box.

  • Click on the Combo Box control and click the Data Sources tab to edit the Data Source.

image

  • A pop-up window appears to select the item source. Select the Item Source as ‘SharePoint’.  From the Data source Wizard, select respective list name and click on ‘Next’ button.

image

  •  While click on Next button getting below screen. Fill any criteria for the combo box.

image

  • While click on Next button getting below screen, we can select value member and display member for the data source

image

  • While click on Next button getting below screen, we can add trigger and comb box sorting order. Click on ‘Finish’ button

image

  •  Following data shows the combo box in preview.

image

  • Data Source operation for ‘Select’ is now defined.

image
image
image
Rules Configuration

  • “HotelDashboard” contains following rules

Rule No

Rule Name

Trigger

Functionality

1

On_FormLoad

FormLoad

Value populated in ‘cmbcity’ and ‘cmbcountry’. Remove default value of ‘cmbRooms’, ‘cmbAdults’ and ‘cmbchild’. Add one day to ‘dtpChkIn’ date control

2

On_cmbCity

CmbCity

Finding Country name and Number of locations

3

ToDateSetting

dtpChkIn

Adding two days to dtpchkIn and set this value to dtpChkOut

4

BtnSearch

btnSearch

If validation success, open resultant form

Rule 1: On_FormLoad
Image1

Rule 2: On_cmbCity

Image2

   Rule 3: ToDateSetting


Image3
Rule 4: BtnSearch

Image4

  • “SearchResult” form contains following rules

Rule No

Rule Name

Trigger

Functionality

1

FormLoad

FormLoad

Loads ‘Hotel Details’ form by using an external form control. Combo boxes are  filling by using Filldata function

2

On_hdnCity

hdnCity

Loads repeating forms based on search criteria

3

SelectRepeat

hdnRepeatLoop

Trigger set to ‘HotelDetail’ form on the basis of Hotel_ID

4

SearchRule

btnApply

Hotel searching based on City and Country

5

RemoveRule


It will remove old repeated forms on the basis of new search criteria

6

RemoveRuleLoop


Part of  Rule No 5

7

On_cmbCity

CmbCity

Country value select on the basis of City combo box

8

SetValueToCountry

hdnSCountry

Part of Rule No 7

9

HomePageNavigation

btnHome

Navigate to Home page

Rule 1: FormLoad

Rule1
Rule 2: On_hdnCity

Rule2

Rule 3: SelectRepeat

Rule3

Rule 4: SearchRule

Rule4
Rule 5: RemoveRule

Rule5
   Rule 6: RemoveRuleLoop

Rule6
   Rule 7: On_cmbCity


Rule7
Rule 8: SetValueToCountry


Rule8

Rule 9: HomePageNavigation

Rule9

  • “HotelDetail” form contains following rules

Rule No

Rule Name

Trigger

Functionality

1

On_hdnID

hdnID

Data populated on the basis of hdnID

2

SetHotelNameTOHyperLink

hdnHotelName

Setting hotel name to Hyperlink control

3

ClearRule

hdnClear

Clearing values on the basis of search result

Rule 1: On_hdnID

Rule

Rule 2: SetHotelNameTOHyperLink

Rule
   Rule 3: ClearRule

Rule
How to use this template

Uploading List Template
Following lists are used for creating the template form.

  • HotelDetail
  • HotelLocation

Please do the following steps for uploading list templates

  • Click on settings  at the right corner of the window

Image

  • Click on ‘Site settings’ from the drop down menu, we can see the following window appearing.

Image

  • Click on ‘List template’ option as shown in the above image. And we can see ‘List Template Gallery’. Click on ‘Files’ at the left most corner as shown in the following image.

Image

  • Click on ‘Upload Document’

Image

  • Following Pop up will appear where we can browse a list template stored in our computer and click ‘OK’ button

Image

  • Following pop up will appear where we can change the name of the List Template and enter the Description as required and click on ‘Save button’.

Image

  • Now go to the required sub site, click ‘Settings’ on the right corner.  Then click on ‘Site Contents’.  Following Screen appears in which click on ‘add an app’.

Image

  • Following screen will appear where we can type the uploaded template name and click search.

Image

  • Then you can see the Uploaded template, Click on it.

Image

  • On clicking it, we will get following Pop up. Enter the name for the List template and click ‘Create’ button

Image
Uploading Tenant

  • Click on the ‘Backup and Restore’ on the left side of the App form Designer window.Then click on ‘Import Site’ -> Browse the Tenant and click Load.

Image

  • Select the ‘Zip File’ and ‘Site Name’ and click ‘Next’

Image

  • Click ‘Next’ button

Image

  • Click on ’Import’ button

Image

  • Backup re stored successfully

Image
Create a Web Part Page
Forms can be embedded on any SharePoint page by using the ClaySys AppForms Web Part, to create a web part page, follow these steps:-

  • Click on Site Settings Wheel in the upper right corner of your site and then select “Site Contents Page”.

Image

  • Select “Site Pages” or simply pages library on Site Contents Page.

Image

  • Click on “New Wiki Page” to add new site page.

Image

  • Give the New page name into the pop-up window and click ‘Create’ to add new page

Image

  • To add a new web part, click on the ‘Insert’ tab and then click on the ‘Web Part’ button. Then select ClaySys -> ClaySys HTML Web Part.

Image

  • Click ‘Add’ button to add the WebPart.
  • Click on the ‘edit the WebPart’ link to edit the page.

Image

  • A new pop-up window appears and here we can configure the ClaySys AppForms by clicking on the ‘Configure’ button

Image

  • Pop-up appears with listed published forms. We can select the appropriate form by clicking on the form and add the form by clicking on the ‘Select’ button.

Image

  • Once the configuration is finished, click on the ‘Apply’ button to see the changes. Click ‘OK’ to continue.

Image

  • Click ‘Save’ button to save the changes.

Image

  • Below figure shows the form after WebPart configuration.

Image