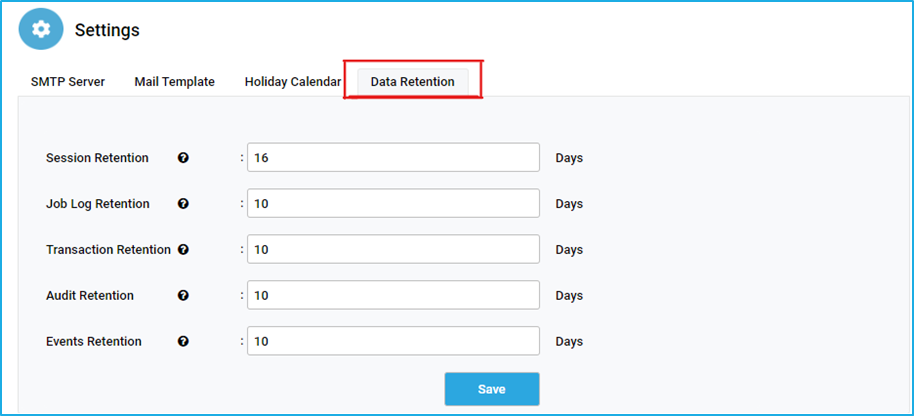
When the data storage becomes too large in the database, data retention helps to delete the old data from the database, which will free some space. Earlier, scripts had to be executed manually to clear the log space but now, Log Retention is used for this purpose. There is an option to preserve the logs related to sessions, jobs, transactions, audits, and events for a certain number of days. Note: On hovering the mouse over the question mark near those retentions, the user can view which tables in the database will be affected. The number of days for which the data needs to be retained can be provided in the text boxes corresponding to each retention. Example: If the number of days is provided as 15, then all the data except for the last 15 days will be deleted from the corresponding tables in the database.
Session Retention: specify the total number of days to retain the Session logs. The following database tables will be affected post that period: robot.Robot_Sessions, robot.MachineSessions.
Job Log Retention: specify the total number of days to retain the Job logs. The following database tables will be affected post that period: robot.Job, robot.JobLog, robot.Exception.
Transaction Retention: specify the total number of days to retain the Transaction logs. The following database tables will be affected post that period: robot.RobotTransactions.
Audit Retention: specify the total number of days to retain the Audit logs. The following database tables will be affected post that period: robot.RobotAudit, robot.MachineAudit.
Events Retention: specify the total number of days to retain the Events logs. The following database tables will be affected post that period: robot.RobotEvents, robot.MachineEvents.
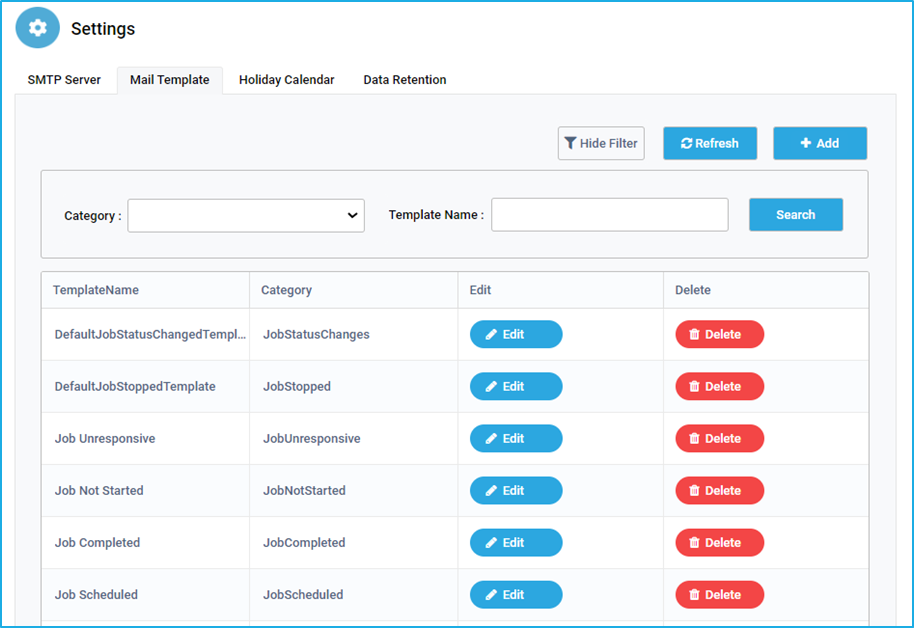
In the Mail Template tab, users will be able to see all default templates of the mail notification alerts for each event that takes place pertaining to robots, machines, jobs, queues and triggers. Apart from the default template, the user has the option to create a custom template by clicking on the ADD button.
This tab displays the TemplateName and Category for the created templates. The user has to click on the ‘Edit’ button next to the respective template name if the user wants to alter the Template name, Category, subject and body of the email. The ‘Delete’ option is also available if a specific template is no longer needed.
The “Show Filter” button helps to filter the mail templates based on the Category and Template Name. The “Search” button can be clicked after entering the required data in the respective field(s). The “Refresh” button helps to reload the window so that user can view the latest details.
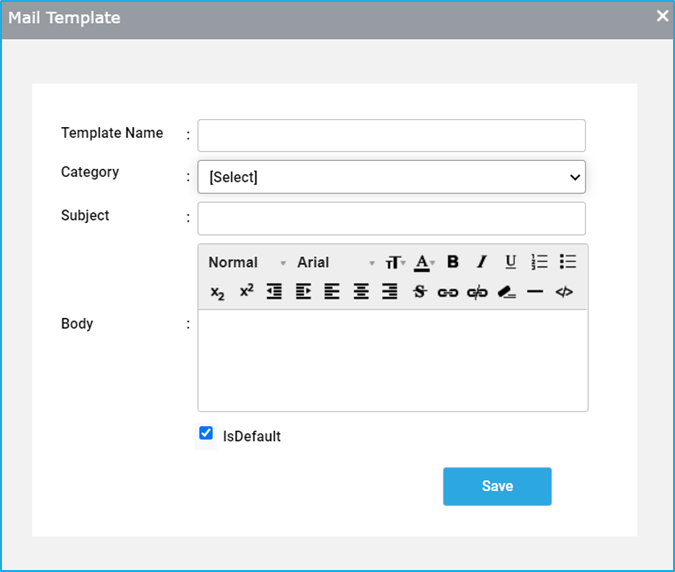
Adding a new Mail Template:
Apart from the default template, the user has the option to create a custom mail template.
Steps to create a Mail Template in the Bot Manager:
Click on the ‘+Add’ button to create a new mail template.
In a new window that will appear, provide input to the mandatory fields such as Template name, Category, Subject and Body that need to be filled out depending on the alert type.
If the “IsDefault” toggle button is enabled, then the default mail template would be the custom template created by the user.
Editing/Deleting an Existing Template
The user has to click on the ‘Edit’ button next to the respective template name if the user wants to alter the Template name, Category, subject and body of the email. The delete option is also available if a specific template is no longer needed.
Customizing the Mail template
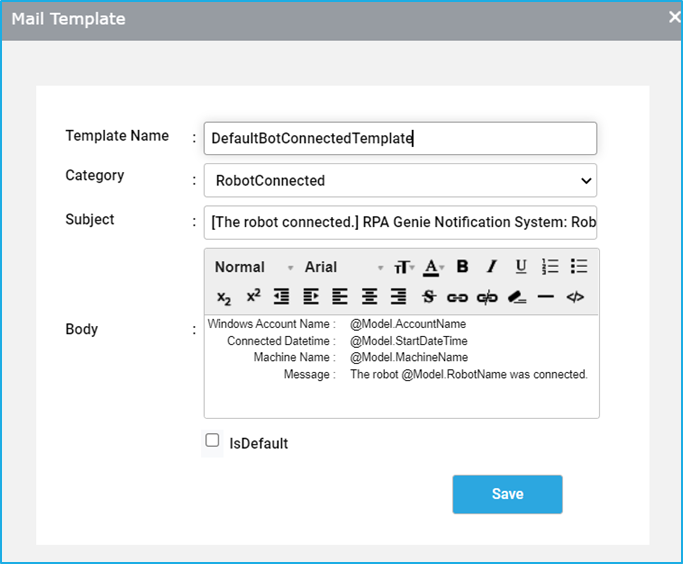
While customizing the Mail template user can give a meaningful template name and a subject line. The user can customize the subject line of the notification mail by using the BOT manager notification template. When it comes to the body of the mail, user needs to follow the below given formats in order to fetch the ROBOT, QUEUE, MACHINE and JOB details
The format for creating the body is @Model.[Model Variable].
Category indicates the specific alert type for which the notification mail has to be sent.
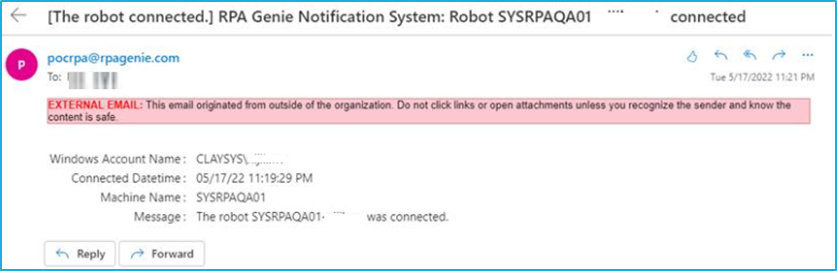
Example: The body template for the category of ROBOTConnected.
Please note: Model variable name can be taken from the below table.
Below is an example of BODY template for category ROBOTConnected.
Windows Account Name: @Model.AccountName Connected Date&Time: @Model.StartDateTime Machine Name: @Model.MachineName Message: The Robot @Model.RobotName was connected.
Screenshot of rendered mail body
BOT Manager Notification Template
Refer to the below provided tables for the available categories and Model variable name which can be used in mail templates:
Machine
Categories: MachineConnected, MachineDisconnected
Model Variable
Description
Machinename
The Name of the Machine
StartDateTime
Agent Service start Date and Time.
EndDateTime
Agent Service end Date and Time.
Robot
Categories: RobotConnected, RobotDisconnected
Model Variables
Description
AccountName
Account Name of robot session.
StartDateTime
The robot session’s start date and time.
EndDateTime
The robot session’s end date and time, only if Robot is disconnected.
BMT Settings allows users to modify the default settings as per their preferences pertaining to the configuration of mail settings, customization of mail templates/holiday calendars, and retention of data for the specified duration. This functionality is split into four separate tabs under the BMT settings in the Bot Manager:
SMTP server: Enables email alerts requiring users to configure server details and test the setup.
Mail Template: Allows users to use default mail templates or add/edit customized templates for various events.
Holiday Calendar: Allows users to add/edit holiday calendars to ensure triggers do not execute on specified holidays.
Data Retention: Allows users to manage the retention period of logs to free up database space.
There is a history tab in the source control panel, where-in the user will be able to view the complete history of all the changes that have been made to any of the processes. A user can select any item under the history list, to view and compare the changes that the user had made to a particular process before and after the check-in of the same.
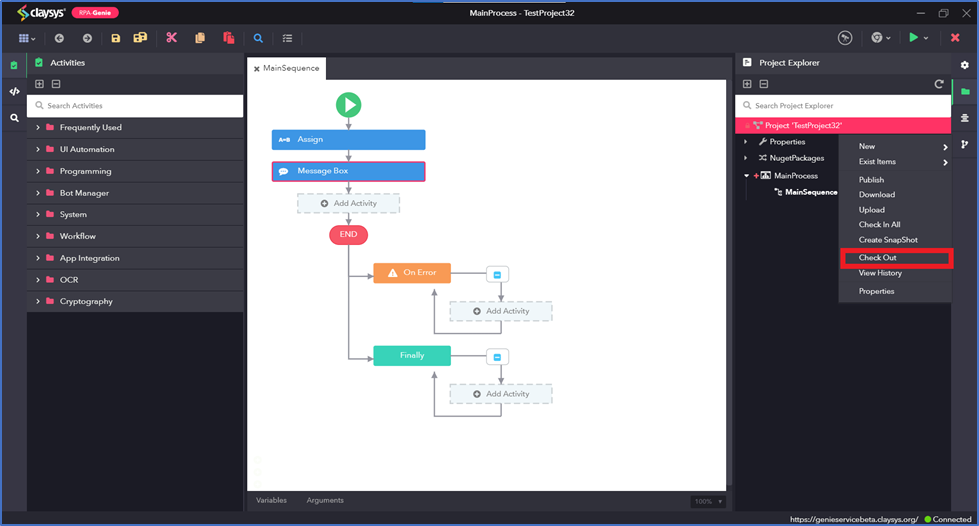
In order to compare two different versions of the same process, go to Project Explorer, right-click on the process and select the View History option. Then, a new History window opens up where user can select any two preferred versions that are required to make the comparison.
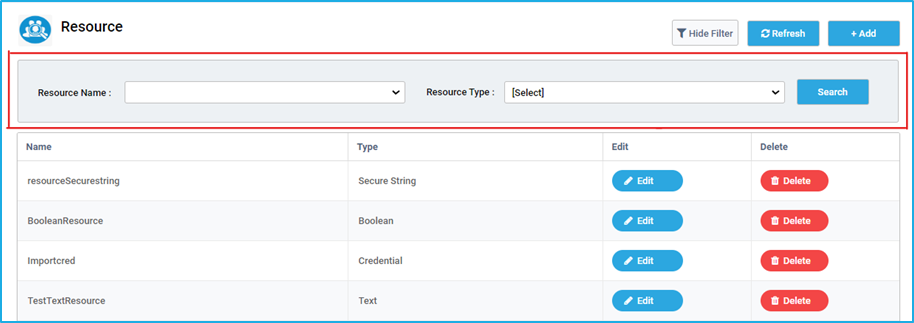
The “Show Filter” button helps to filter the resource based on the Resource Name and Resource Type. The “Search” button can be clicked after entering the required data in the respective field(s).
The “Refresh” button adjacent to the ‘Show Filter’ button, helps to reload the Resource tab so that users can see the latest resource details.
Clicking on the “Add” button in the resources tab.
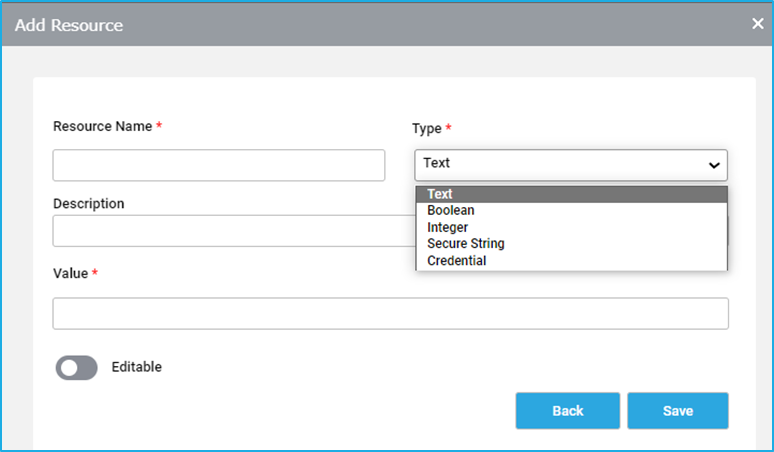
An ‘Add Resource’ window will appear where the following details need to be specified:
Resource Name: Provide an appropriate name to the resource. It can be any combination of characters, digits, or underscores. However, the name should not begin with a number and there shouldn’t be any spaces between the characters.
Type: Select the resource value’s type using the Type dropdown. Five different types of resource values can be selected:
Text: store strings in text format.
Boolean: Stores true or false values.
Integer: exclusively stores whole numbers.
Secure String: Save data of string type which will be stored in an encrypted format.
Credential: Stores sensitive data such as username and password.
Description: Provide a description of the resource in this field. However, it is an optional field.
Value: Provide the resource value in accordance with the type of the resource.
Editable: If the ‘editable’ toggle button is enabled then, the user can update this resource using the activities available in the RPA Genie Studio.
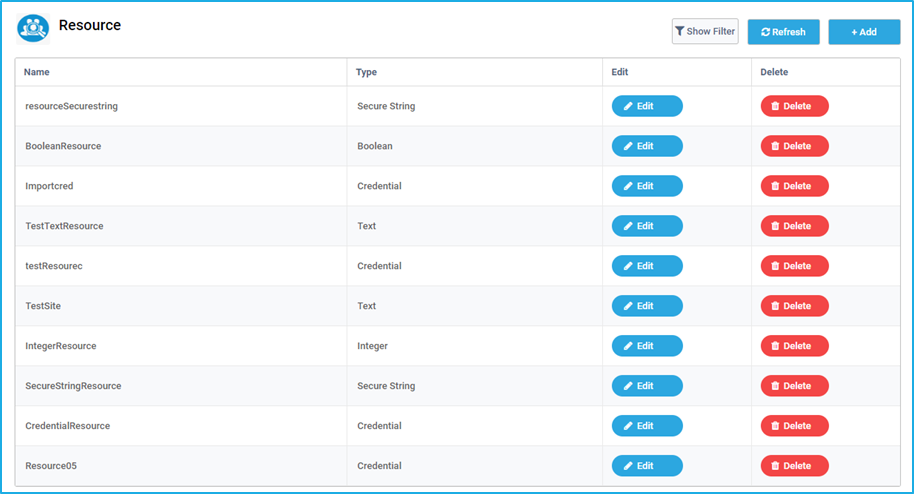
The Resource tab in the bot manager enables users to create, store and maintain certain data in the form of shared variables of various data types such as Text, Boolean, Integer, Secure String and credential. These resources can be accessed through RPA Genie Studio and can be used in various automation projects. This feature acts as an asset management tool.
In the Resources tab, there is a table that displays the name and the type of the Resource that is created. There is an edit button that can be used to amend the previously created Resource. There is a delete button where the user will be able to delete a particular resource. The “Add” button allows to create a new resource.
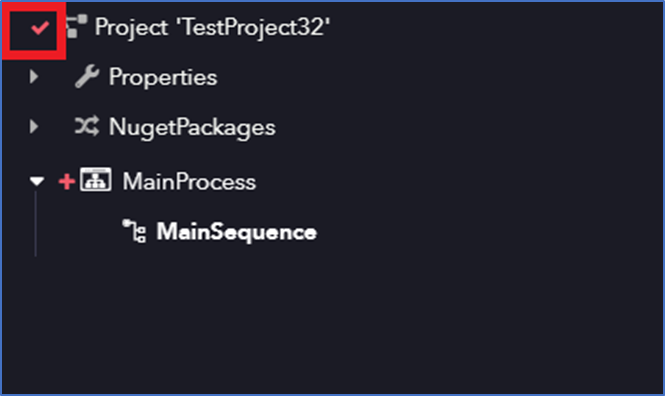
Green icon beside a process in the source control indicates that a process that has been newly created is ready to be checked in.
Orange icon beside a process in the source control indicates that modifications had been made to an existing process and is ready to be checked in.
Red Icon beside a process in the source control indicates that a checked-in process is ready to be deleted and must be selected from the source control in order to completely remove that process from the project.
The user has to check in a process after making the required changes to the process, so that other users will be able to check out that particular checked-in process to make further modifications to the same.
N.B. – In the “Project Explorer”, a lock symbol will appear beside the process that had been checked-in.