Holiday Calendar

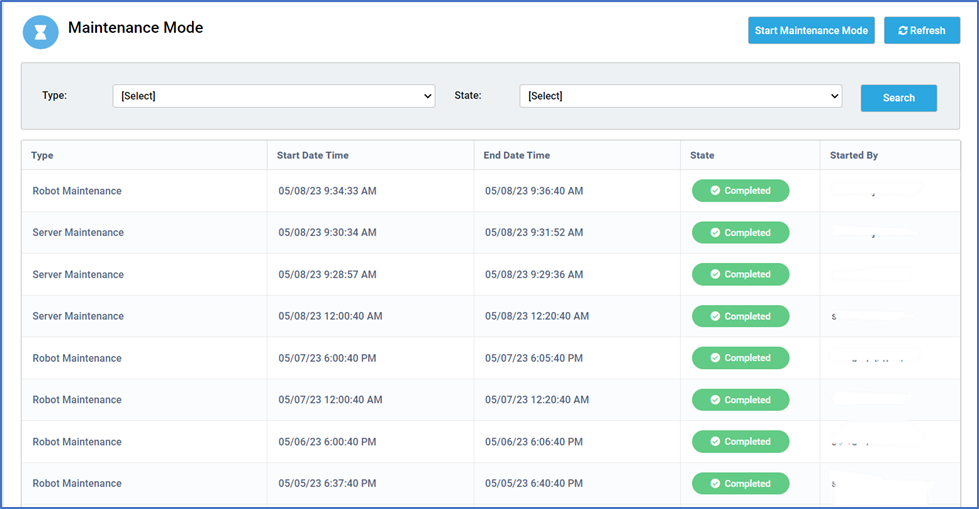
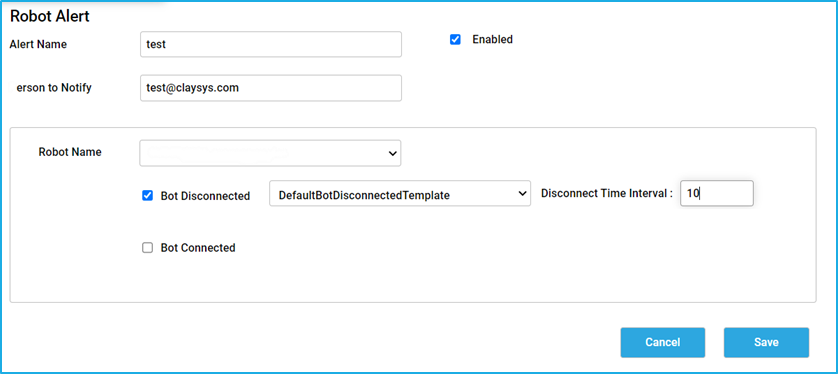
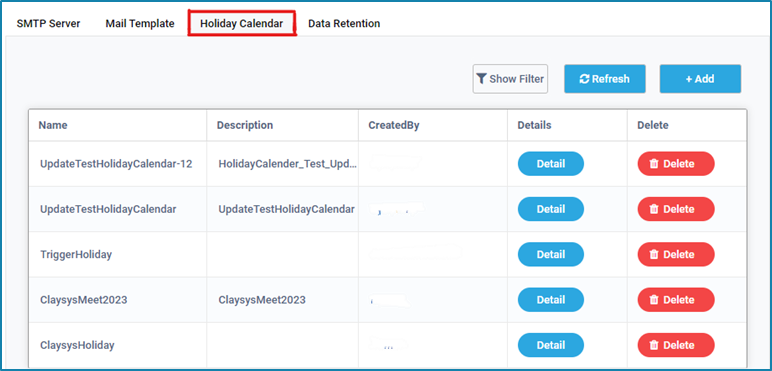
In the Holiday Calendar tab, the user has the option to create a custom calendar where a specific holiday can be added. The holiday calendar comes into the role when there is a need to exclude trigger execution on a particular day. Using the Holiday Calendar feature, the user has the option not to execute a trigger on selected days. The required calendar can be selected while creating a trigger so that the trigger does not execute on the holidays mentioned in the calendar.

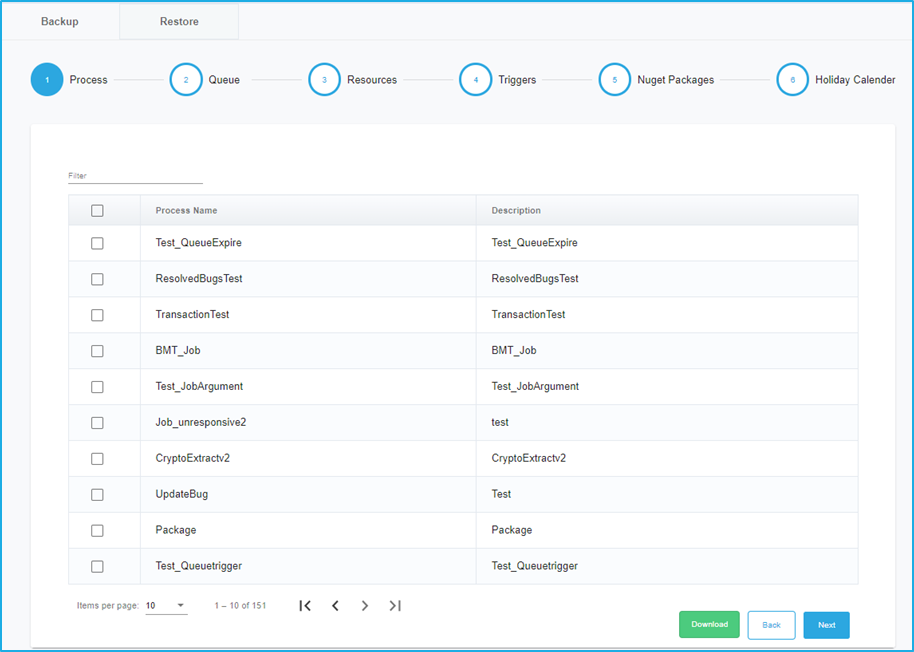
Steps to create a calendar in the Bot Manager:

  • Click on ‘+Add’ button.
  • Provide a valid calendar name and description in the popup window that will appear and Click on ‘Save’
  • Next, to add the date to the calendar, click ‘Details’ against the newly created calendar name.
  • Customize the date and other details in the popup window that will appear and Click on ‘Save’

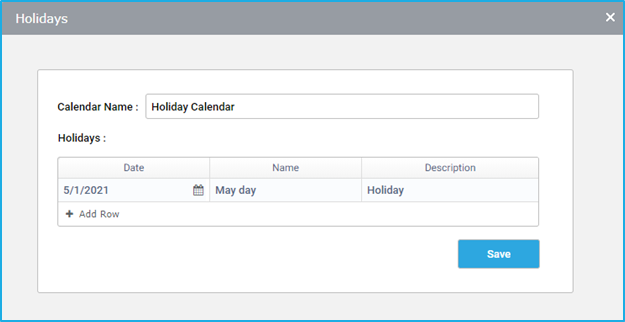
Note: For adding/removing a holiday from the calendar, use the ‘+/-‘ option by hovering over it.

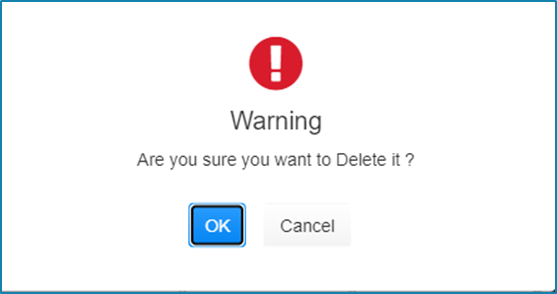
  On clicking the ‘delete’ button for a specific Holiday Calendar, a validation box with a warning will appear allowing the user to either confirm the deletion by selecting the “OK” option or to cancel it.

Audit Details

This is a tab where information about all other Bot Manager tabs is available. In this tab, the user can Inspect and review the changes performed in the Bot Manager. This feature ensures a high level of transparency, allowing all users to see exactly what has been altered and by whom. Hence, it helps to prevent unauthorized or unintended changes.

The Audit Details section in the Bot Manager displays a Service Audit table consisting of details such as Type, Action, Description, Action By, Action Time and view.

  • The ‘Type’ column represents the features in the Bot Manager in which the user has performed an action such as BMT settings, security, Packages, Processes, Queues, Triggers, etc.
  • The ‘Action’ column indicates the actions performed by the such as Created, Updated and Deleted.
  • The ‘Description’ column provides the short description of the event based on the type.
  • The ‘Action By’ column displays the user name of the person who has performed a particular action.
  • The ‘Action Date’ column shows the date on which the action was carried out.
  • In order to view what is the exact action/event that has occurred in terms of creation, updation and deletion for a particular feature, the user needs to click on the ‘View’ button. It will then be redirected to a window called “History Data” where all the details regarding that particular type of action can be viewed.
  • Example: History Data for the type “Queue”

The “Show Filter” button helps to filter the service audit details based on the Type, Action, Action By and Action Date.

The “Refresh” button present here, helps to reload the page so that user can see the latest service audit details.

Maintenance Mode

  • Maintenance Mode can be found inside the “BMT Settings” dropdown menu.  This feature enables users to take the Robot and Server offline. It provides an option to temporarily stop all the activities occurring either in the Robot or the Bot Manager Server for the purpose of Maintenance.
  • The Maintenance Mode tab displays a table showing details such as Type, Start Date Time, End Date Time, State and Started By.
  • The Maintenance Modes that are created can be filtered based on the Type and State.

  • There are two different types of Maintenance Mode:
    • Robot Maintenance: All Robots connected to a particular machine will undergo maintenance.
    • Server Maintenance.: This will temporarily bring down the specific Bot Manager environment and no activities can be performed

  • Maintenance mode has three main states:
    • Initialized – This state specifies that the maintenance has been started in a particular machine or server.
    • In-Maintenance – The status of the machine/server will be shown as “In-Maintenance” if a particular machine/server has been selected to undergo maintenance.
    • Completed – This state specifies that the maintenance has been completed in a machine or server.

  • The “Refresh” button which is present, helps to reload the page so that user can see the latest created Maintenance Mode details.

Steps to start maintenance mode:

  • Click on the “Start Maintenance Mode” button.
  • In the new window that will appear, select either Robot Maintenance or Server Maintenance as per the requirement for the maintenance.

Server Maintenance

  • If the “Server Maintenance” option is selected then, enter the amount of time needed for server maintenance in the ‘Expire Time’ field
  • Click on the “Start” button.

A message will be displayed as shown below:

Note: The “Stop Maintenance” option displayed in the above image will only be available to users with Admin privileges.

Robot Maintenance

  • If the “Robot Maintenance” option is selected then, select the machine(s) under the ‘Machine Name’ field and enter the amount of time needed for robot maintenance in the ‘Expire Time’ field.
  • Click on the “Start” button.

As the Maintenance Mode is initiated, it displays the state as ‘In-Maintenance’. Once, the Expire Time is elapsed and the maintenance for that machine is over, the ‘In-Maintenance’ state will change to ‘Completed’.

Note: The user will not be able to start any job through a robot that is connected to a machine while it is in Maintenance Mode. Also, no user can halt the robot maintenance. Robots will normally be brought back to a functional state after the ‘expire time’ has elapsed i.e. after the maintenance is finished.

Adding a Trigger Alert

Triggers can be used to execute unattended automation in a predefined manner, which can be managed through the Bot Manager.

Steps to add a trigger alert:

  • Configure the common fields such as the ‘Alert Name’, ‘Person to Notify’ and ‘Enabled’ checkbox.
  • Select the Trigger name using the dropdown list for which the Alert has to be assigned.   
  • After selecting the trigger name, the user has only one option for setting up the alert when the trigger is disabled.  Select this alert type and then select the template name using the dropdown next to it.
    • Trigger Disabled – This alert notification will be sent whenever the recurring time trigger gets auto-disabled if the job gets faulted due to the same exception after reaching the count specified in the ‘job failure monitor’ field while configuring the time trigger. 
  • Click on the ‘Save’ button to add the Trigger Alert. 

Adding a Robot Alert

A robot is defined as a software entity that executes automation developed within the RPA Genie Studio. The Robot Alert type will help to monitor the connection made to the Bot Manager and the notification will be sent when the robot is disconnected or connected. 

Steps to add a robot alert:

  • Configure the common fields such as the ‘Alert Name’, ‘Person to Notify’ and ‘Enabled’ checkbox.
  • Select the Robot name using the dropdown list.  
  • After selecting the Robot name, the user has two options for Machine Alerts. Select the appropriate alert type and then select the template name using the dropdown next to it.  
    • Bot Disconnected – This alert notification will be triggered when the bot is disconnected from the Bot Manager.  However, the user has to specify the disconnect time interval (in Minutes), so that the notification mail will be sent to the email ID’s based on the specified time interval. 
    • Bot Connected – This alert notification will be triggered when the bot is connected to the Bot Manager.   
  • Click on the ‘Save’ button to add the Robot Alert. 

Adding a Machine Alert

The machine is the physical or virtual environment in which the robot operates. The Machine Alert type will help to monitor the agent service connection, and the notification will be sent when the machine is disconnected or connected.  

Steps to add a machine alert:

  • Configure the common fields such as the ‘Alert Name’, ‘Person to Notify’ and ‘Enabled’ checkbox.
  • Select the machine name using the dropdown list.  
  • After selecting the Machine name, the user has two options for Machine Alerts. Select the appropriate alert type and then select the template name using the dropdown next to it.  
    • Machine Connected – This alert notification will be triggered when the Agent service is connected.
    • Machine Disconnected – This alert notification will be triggered when the Agent service is disconnected.
  • Click on the ‘Save’ button to add the Machine Alert  

Add an Alert

To create a new Alert, the ‘add’ button must be clicked. It will open another window where the user can select among the five different alert types.

Common fields for alert configuration

On the Alert configuration window, there will be fields that are common and applicable while configuring any type of alert. They are listed below:

  • Alert Name: User can provide an appropriate name of their choice for any alert.
  • Enabled: The Enabled check-box can be checked by the user to make the Alert active.
  • Person to Notify: The email ID of the person to whom the alert has to be sent can be specified. Multiple email IDs can also be provided in this field. In case multiple users need to be notified, each email ID has to be separated by Comma (,)

Manage Alerts

The Manage Alerts feature of the Bot Manager is very essential for configuring various types of alerts to ensure effective monitoring. This feature allows users to create new alerts and edit or delete the existing Alerts. This feature supports the setup of alerts within the Bot Manager for machines, robots, jobs, queues, and triggers. By utilizing this functionality, users can receive timely notifications about significant events, allowing for prompt action and enhanced oversight of automated processes.

To access the ‘Manage Alerts’ tab, the user has to select the ‘Manage Alert’ option under the BMT settings drop-down. This tab displays the Alert details table consisting of the created Alert names, Category and the email ID of the users who need to be notified. The enable column indicates if the particular alert is active or not using the Boolean values true or false. To edit an existing alert, the ‘Edit’ option against the alert name can be clicked. Then a wizard will appear where the user can customize this particular alert details. Lastly, if the alert is no longer needed for monitoring purposes, the Delete button for a specific alert can be clicked. 

This tab also allows filtering of the alerts based on the Category and Alert Name. The “Search” button can be clicked after entering the required data in the respective field(s). 

The “Refresh” button helps to reload the manage alerts tab so that users can view the latest alert details.

Import Export

The import-export feature allows users to keep a backup of certain data such as the Process, Queue, Resources, Triggers, NuGet Packages and Holiday Calendar from a particular Bot Manager environment. It also lets the user upload and restore the data that was backed up previously from one Bot Manager environment to another.
To access the Import Export window, the user has to select the Import Export under the Bot Manager settings. This functionality is split into two separate tabs under the Bot Manager:       

  1. Backup
  2. Restore

The Backup tab functions as the export feature while the Restore tab serves as the import feature.

Backup

In the “Backup” tab, the user can export Process, Queue, Resources, Triggers, NuGet Packages, and Holiday Calendar that have been previously created in the Bot Manager. To store the data as a backup, the user can navigate through the lists and select the required data using the checkbox (for example – specific process, particular resource, etc.). Once the data that needs to be backed up is selected, the preview button at the bottom can be clicked. Finally, the download option will be visible in the preview window.

Restore

The data that has been backed up and stored locally in the system can be uploaded and restored. Under the ‘Restore’ tab, the user can import Processes, Queues, Resources, Triggers, NuGet Packages and Holiday Calendars to the separate BMT environment as per the requirement. This can be performed by clicking on the “Browse” button and selecting the file to upload from the user’s local machine.