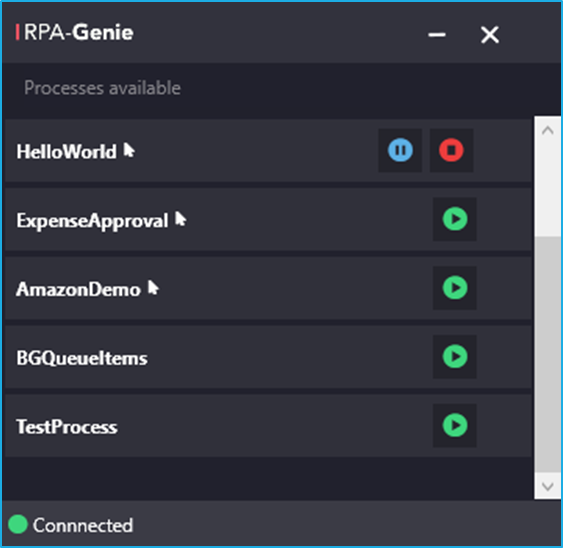
Packages that are installed via Agent or BOT Manager on the Robot are called processes. All the existing processes for your bot will be listed in the system tray on clicking the Agent icon. To update a process with a new package or to install a new process you can use the Agent or BOT Manager.
To start a process, click the play button. While the execution of a process, you will be able to pause or stop the Bot. (Screenshot below).
You will see a mouse icon next to each of the process names. Process name with the Mouse arrow indicates that it uses UI Automation. Also, you will be able to see the status as connected with a green icon as shown below in the screenshot which means the Agent is connected to the BOT manager successfully.
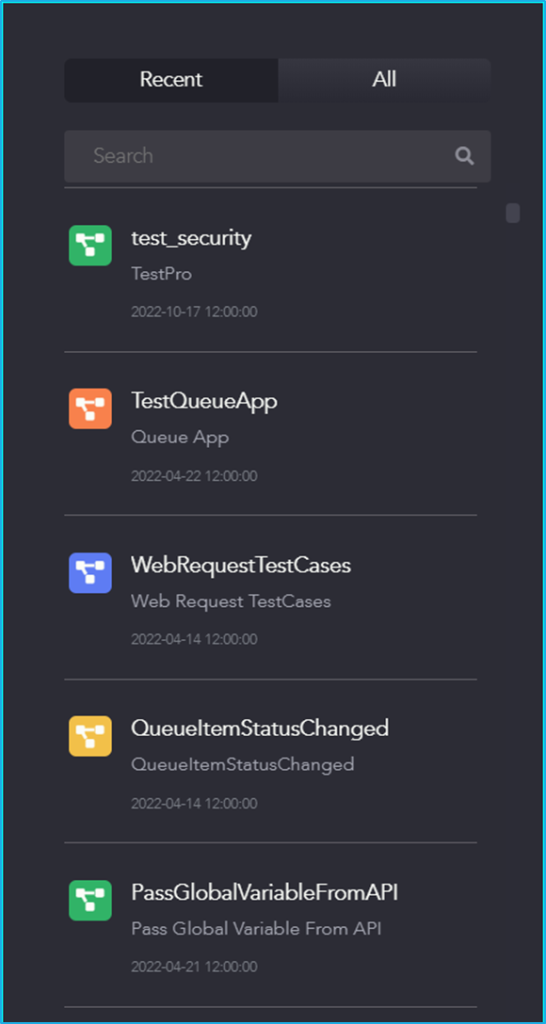
The Right panel of the Genie Studio consists of the ‘Recent’ and ‘All’ tabs. The ‘search’ icon is also available where the users can search for a specific project by providing the project’s name in the Search box.
If the user clicks on ‘Recent’, then they can find all the projects which they and other users have created recently. By selecting ‘All’, the user can find all of the user’s projects which are connected to that particular service URL based on the alphabetical order.
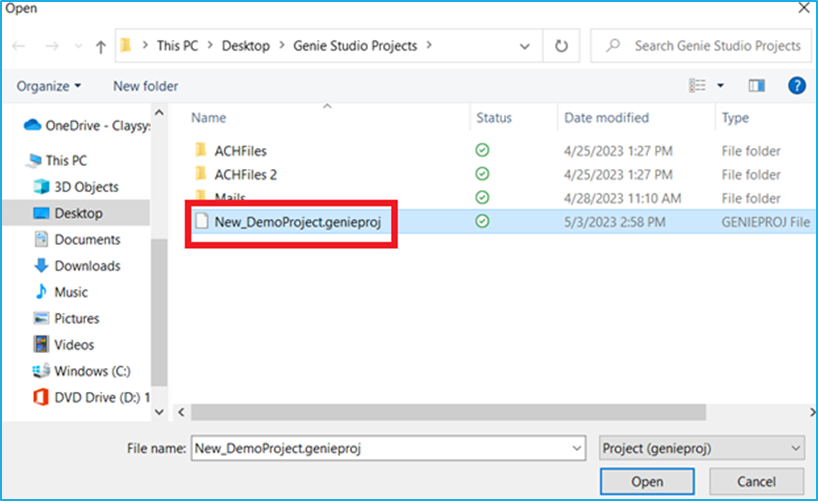
Through the Import project option, if a file is saved in the system with the ‘ .genieproj’ extension, then that particular file can be imported into the Genie Studio as a Project.
A library project can be created where the same set of activities need to be used repeatedly in various projects. Once the library project is created, it can be reused in any other preferred projects.
The library project is a ‘.nupkg’ file package with multiple reusable components that can be used in a workflow.
Once that library project is present in the bot manager, it can be reused in any other new/existing projects simply by installing it using the NuGet package option in the Project Explorer and finally invoking the library project using the invoke process activity.
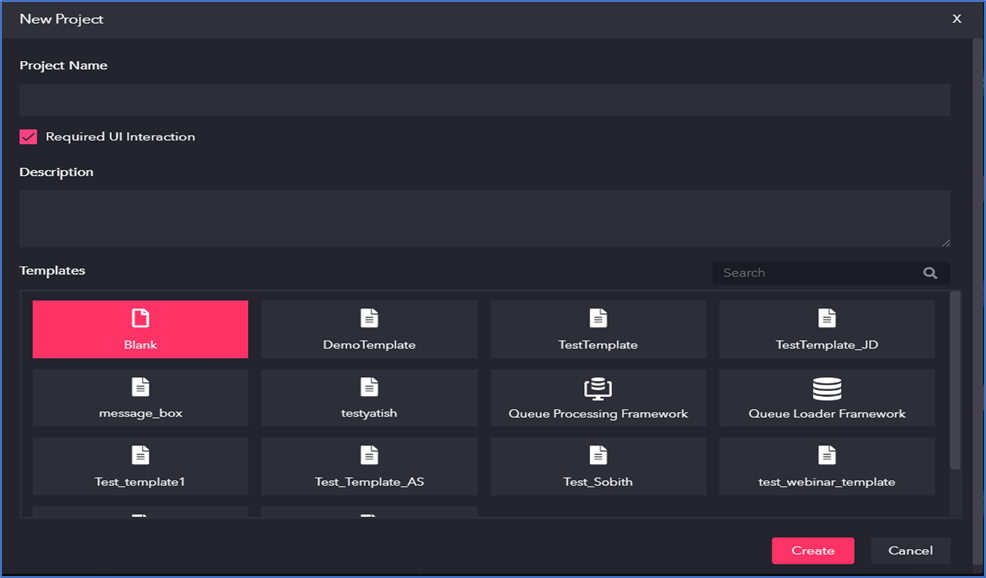
If the ‘Required UI Interaction’ is ticked, it will be similar to the UI process in which all the UI activities will be available. However, if it is unticked, it will be similar to the background process.
A process can be created where user interaction is not required. n this type of project, multiple background processes can be run simultaneously.These processes will run in the background where no user interaction is required. Since it is a background process, user will not find any UI related activities in this type of project.
Example 1: – if there is a need to convert a word file in the folder to a pdf format every day then, a background process can be created for this, and the user need not go to the folder and manually convert it all day.
Example 2: – Outlook mail automation, where an automatic reply can be sent each time a mail with a particular subject has been received.
These examples can be considered as a background process.
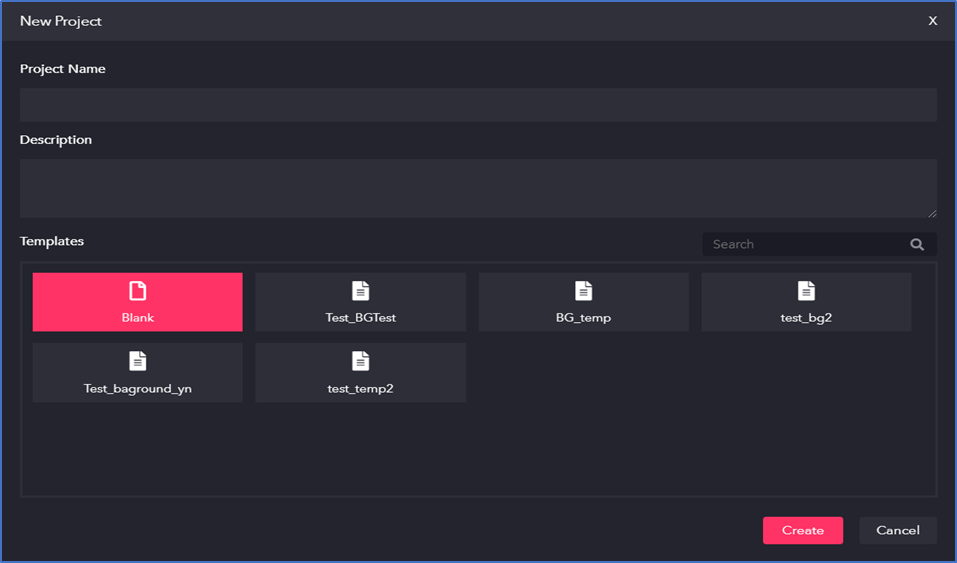
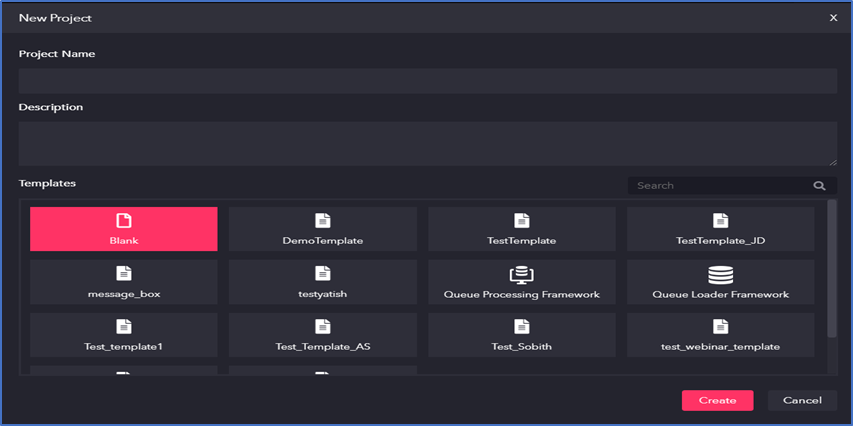
On clicking the “New- Blank project”, a window appears where user need to give the below details.
Project Name: Enter a suitable name for the automation project which best describes the kind of automation that will be created.
Description: Provide a brief description of this Project.
Template: Select a suitable project template that is available. Ideally for a fresh project, a blank template can be selected.
Create: Click on the “Create” button to create a new project. If the project already exists, a message pops up stating that a specified project already exists.
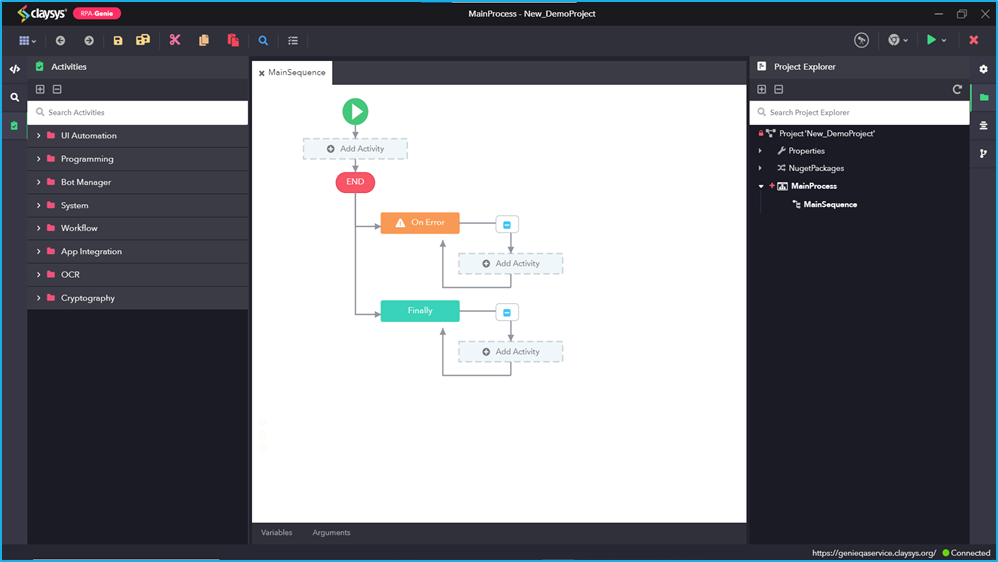
On selecting the New – Blank Project option, UI process will be created. More than 180 activities can be found in this type of project. Here, it is possible to find activities through which users can interact with the process during its execution. Please note that for this type of project, only one UI process can be run at a particular time.
For example: – Under the activities panel, there is a UI Automation section which consists of several activities that allow users to perform end-to-end web automation.
The steps below will provide a clear understanding of how to add a new user to the BOT Manager. To access the features of the BOT Manager, a user must first be added by the admin.
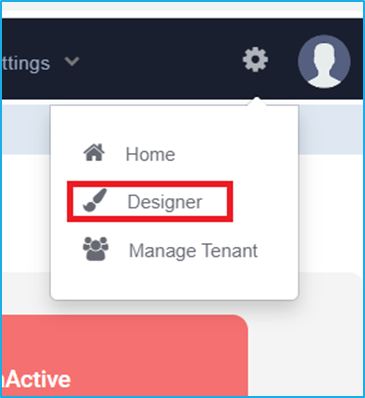
Open BOT Manager and click on the Settings icon and then select the ‘Designer’ option.
Once the Designer option is clicked, it will redirect to the AppForm designer window.
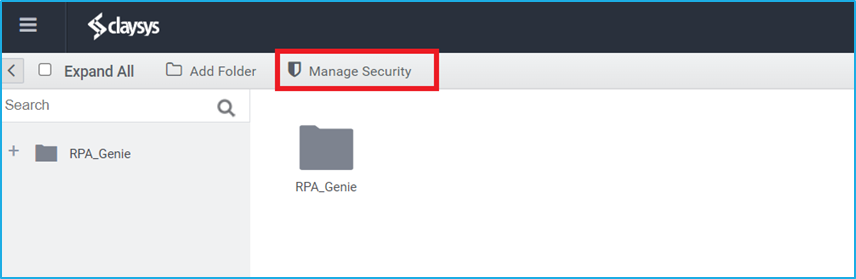
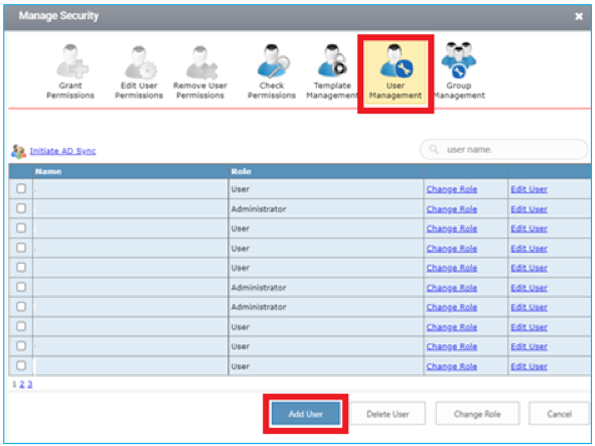
Click on the ‘Manage Security’ tab located at the top left of the window.
The ‘Manage Security’ Wizard will be displayed after clicking on the ‘Manage Security’ tab.
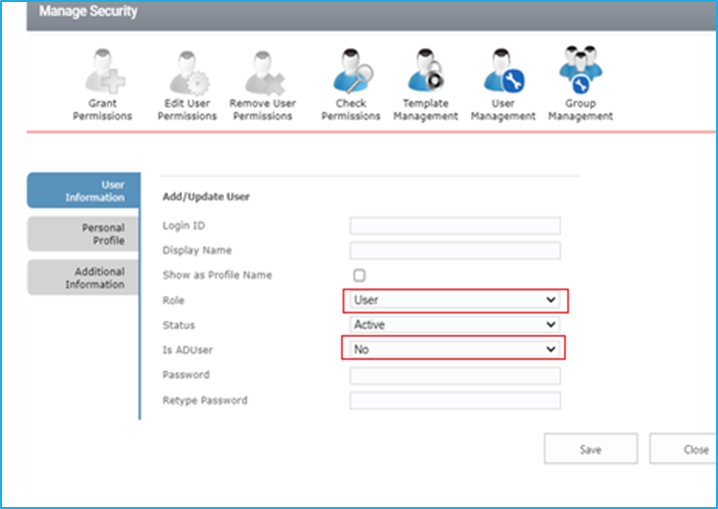
From the Available options, click on the ‘User Management’ icon and then click on the ‘Add User’ at the bottom of the ‘Manage Security’ window.
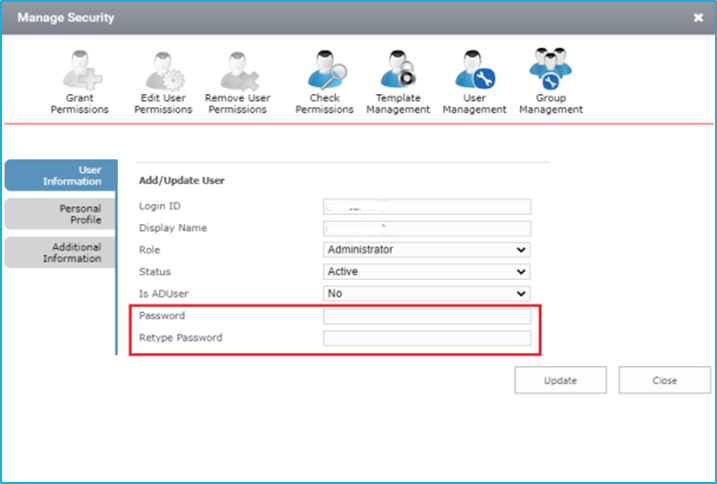
Provide the required user details, select an appropriate role, create a password, and finally click the ‘Save’ button.
When adding a new user, the ‘Is ADUser’ field will display a dropdown with options to select. Selecting ‘Yes’ allows the user to log in via Windows authentication, eliminating the need for a separate password. Selecting ‘No’ means the user will log in via Forms authentication, requiring the creation of a password.
Select the appropriate role among the list that will be displayed when adding a new user.
Default Roles
Permission
User
This role has limited permissions in the BOT Manager. It can only access the home page and the workflow dashboard, where the forms are hosted.
Administrator
This role has full permissions in the BOT Manager.
Designer
This role can view the designer and the home page, but has no access to ‘Security,’ ‘Navigation Settings,’ and ‘Manage Tenant’.
Limited Access
The user will have Designer privileges but will not have access to the workflow feature.
After completing the steps, a new user will be added, and the details will be displayed in the list of users in the Bot Manager.
Provide the user Permission
The steps below will provide a clear understanding of how to provide permission to the new user in the BOT Manager.
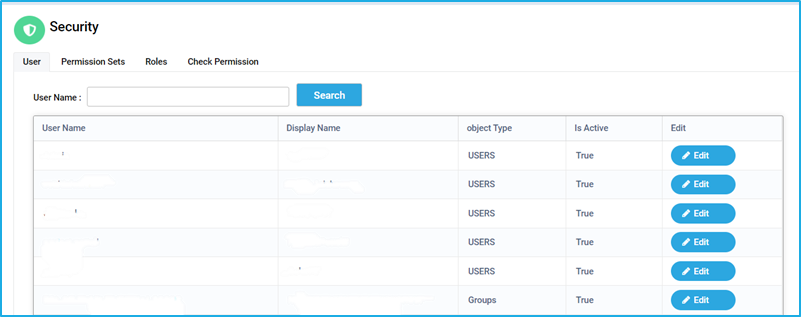
To set the permissions, navigate to the Security tab in BOT Manager
Click on the ‘Edit’ button next to the user under the ‘User’ tab.
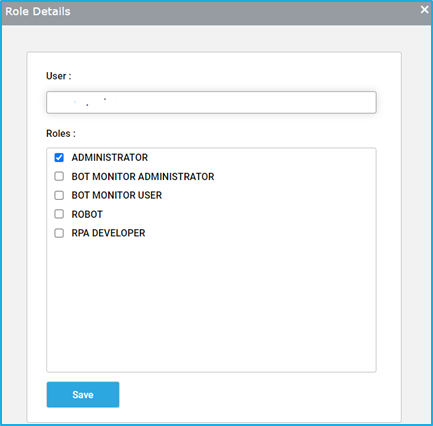
Note: A user without any roles does not have access to any resource.
Select the appropriate role(s) to be assigned to the user. Next, click on the ‘Save’ button to grant permissions to the user.
Note: Only authorized users or admins can add roles and manage permissions for users.
To know more about the default roles, refer to the ‘Roles’ section under Security.
Change a user password
The admin is authorized to change the passwords of all users who are logging in through Forms authentication. Whereas, the password will be automatically updated for the Windows authenticated users when it is changed in the active directory.
The steps provided below will help to change passwords only for the Forms Authentication users:
Open BOT Manager and click on the Settings icon and then select the ‘Designer’ option.
Once the Designer option is clicked, it will redirect to the AppForm designer window.
Click on the ‘Manage Security’ tab located at the top left of the window.
The ‘Manage Security’ Wizard will be displayed after clicking on the ‘Manage Security’ tab.
From the Available options, click on the ‘User Management’ icon to view the list of active users.
Find the user for whom the password needs to be changed, and click ‘Edit User’ next to the username.
On the user information form that will appear, enter the new password in the ‘Password’ and ‘Retype Password’ fields. Then, click on the ‘Update’ button.
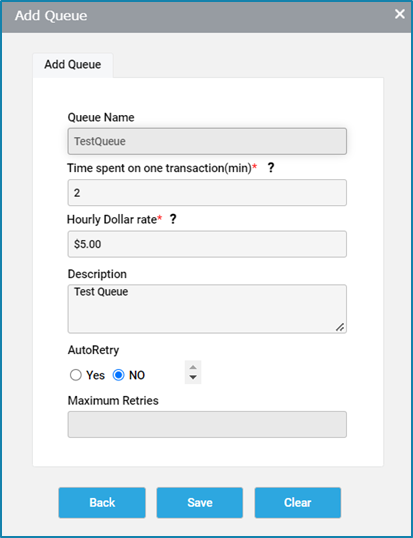
An ‘Add Queue’ wizard will appear where the following details need to be specified:
Queue Name: Specify a name for the queue. Time spent on one transaction(min): Mention the time (in minutes) taken to process one transaction, if it was to be done manually. Hourly Dollar rate: Mention the amount of dollars that is being spent on an hourly basis to process a transaction manually. Description: Provide a description of the queue.AutoRetry: The user is allowed to select the ‘Yes’ or ‘No’ option. If ’Yes’ is selected, then the user should specify the maximum number of times it should retry to process the queue item, in case an error has occurred while processing a particular queue item.
Maximum Retries: The count for maximum retries must be specified to re-attempt the process.
Click on the ‘Save’ Button.
Note: On clicking the ‘Edit’ button for a particular queue, a wizard will appear, where the user can amend all the details of the queue specified while creating it, except for the queue name.
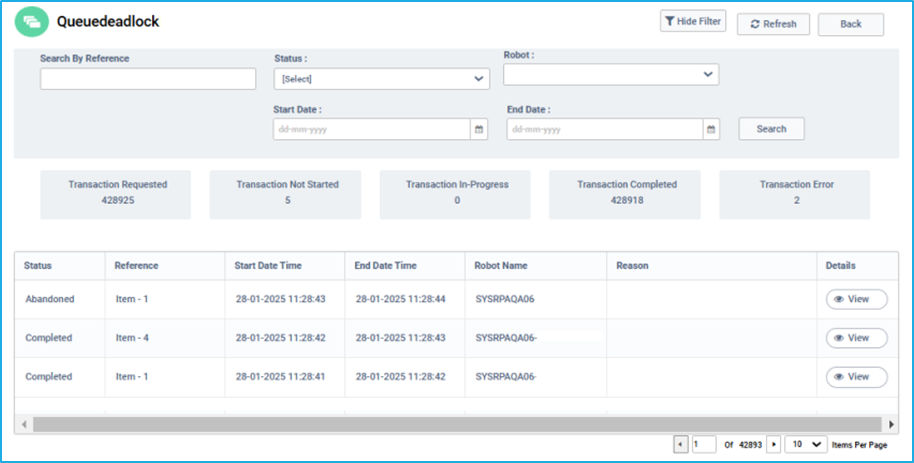
On clicking the ‘view’ button of a particular queue in the transaction column, it will redirect to a new window displaying all the details of that queue as follows:
Status: It displays the status of the queue items. The queue item can be in one of the states given below:
New: The status will be shown as ‘New’ when items are added to the queue using the Add transaction activity in RPA Genie Studio.
In Progress: The status will be shown as ‘In-Progress’ when the queue items are returned from the queue for further processing by using the ’Get Queue Item’ activity in RPA Genie Studio.
Failed: The status will be shown as ‘Failed’ when the queue item does not meet any business or application requirements as per the project and the transaction fails.
Completed: The status will be shown as ‘Completed’ when the queue items are processed successfully.
Abandoned: The status will be changed to ‘Abandoned’ when the queue items remain in an ’In-Progress’ state for a day (24 hours) without being processed.
Reference: While adding items to the queue, a unique value for a queue item needs to be provided which can be used as a reference later to view the details of a particular queue item.
Start Date Time: It displays the date and time at which the processing of a queue item has begun.
End date Time: It displays the date and time at which the processing of a queue item has ended.
Robot Name: It displays the name of the robot which was used to process the queue item.
Reason: If the status of any queue item is failed, then the reason will be displayed in the reason column.
Details: On clicking the ‘Details’ button of a queue item, it will redirect to a new window with two tabs:
Details: The detailed information about a queue item such as the status, Start DateTime, End DateTime, Exception message (if any), Error type, and activities that were used for processing a particular queue item will be displayed in this tab.
Events: This tab displays all the events that have occurred to a particular queue item. For example: if a new item is added to the queue, then the DateTime, the user who added it, and the action taken by the user will be displayed. Next, if the same queue item is being processed, then the details of the ‘In-Progress’ event will be displayed.