Queues

The Queues tab in the bot manager enables users to create large automation projects underlined by complex logic. A Queue acts as a storage bucket where a large amount of data can be stored and accessed in a first-in-first-out (FIFO) manner. Once the queue is created, multiple Bots will be able to work on the same by specifying the queue name in the project.

When a queue is created in the BOT Manager, it will be empty initially. Users can populate the queue by adding new items to it. These items can be retrieved from the queue and processed. After processing, the status of each of the queue items can be updated accordingly. This can be performed using the activities available in the RPA Genie Studio.

The following studio activities are used with Queues:

  • Add Transaction Items
  • Get Queue Items
  • Update Transaction Progress
  • Update Transaction Status
  • Delete Queue Items
  • Get Queue Items details
  • Get Transaction Items details
  • Start Transaction

During a queue-based process, users can check the status of a specific queue item to see which item is currently being processed, the number of pending items in the queue, and the count of items that have been abandoned or failed during processing.

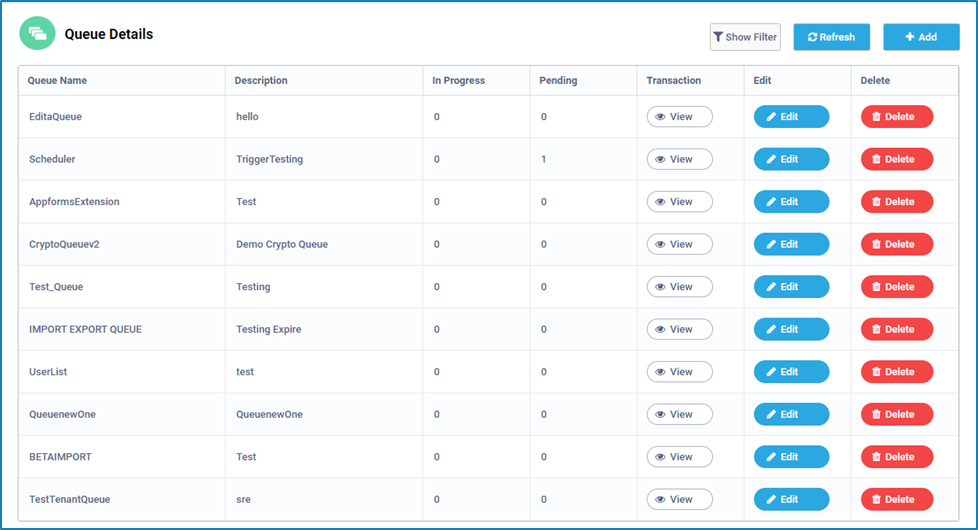
On the landing page of Queues, there is a Queue Details table that displays the names of the queues and the descriptions that were provided while creating the queues.

While a queue-based process is being run, the In-Progress column for the selected queue will be shown as 1, since a particular queue item is currently being processed. The In-progress column is dependent on the next column (i.e. Pending column). The pending column shows the number of queue items of a particular queue that are yet to be processed.

Under the Transaction column, there is a ‘view’ option that shows the details about the queue item transaction. Also, there is an option available to edit or delete the existing queue. The “Add” button allows to create a new queue.

Server Maintenance

Maintenance mode provides an option for the user to either stop all the activities in the Bot Manager (Server Maintenance) or down all the robots connected to a machine(s) for maintenance (Machine Maintenance).

An icon labeled “Server Maintenance” can be found inside the Trigger. On clicking that, the user will be navigated to the “Add Maintenance Mode Trigger” window. Several fields can be found in this window such as Name, Schedule Type, Maintenance For, Frequency and Daily Frequency.

  • Name: Provide a name for the maintenance mode trigger.
  • Schedule Type: “Recurring” is the only default value available for this field.
  • Maintenance For: The user can select whether they will be performing Server Maintenance or Machine maintenance through this field. This feature will move the Robot or Server to an offline state based on the frequency set while creating the trigger for Maintenance.
    • Machine Maintenance: All robots connected to the particular machine will undergo maintenance.
    • Server Maintenance: This will temporarily bring down the specific Bot Manager environment and no activities can be performed.
  • Frequency: There are two options for configuring this field:
    • The “Occurs” dropdown menu, from which the user can specify whether the maintenance should happen Daily, Weekly or Monthly.
    • The “Recurs Every” option is used to specify the interval at which the Maintenance trigger should be executed based on the selected option (daily, weekly or monthly).
    • Note: Refer to the Time scheduler to understand the configuration of the frequency field.
  • Daily Frequency: This field has three options.
    • The “Starting at” option signifies the time at which the trigger should start.
    • The “Expiry Time” indicates the end time of the maintenance activity.
    • User can either “Stop” the maintenance or make a “Request” to stop the Maintenance through the “Stop Request Type” field.
    • Note: The “Enabled” check box must be selected for the Maintenance Trigger to run; otherwise, the maintenance activity will not begin to execute.

Queue Scheduler

Queue scheduler can be used if a user needs to trigger a process when items are added to a particular Queue. On clicking the ‘Queue Scheduler’ option, it takes the user to a window where they need to fill out the necessary details as follows:

  • Trigger Name: Provide a name for the trigger that is to be created.
  • Queue: Using the drop-down, select the queue in which new queue items will be added.
  • Process: Using the drop-down, select the process that needs to be triggered once the queue item(s) gets added to the queue.
  • Robot Allocation: In the Robot Allocation, there are two options:
    • Dynamic: On selecting the dynamic option, then the process will be triggered based on the availability of the bots.
    • Static: On selecting the static option, specify one or more robots that will be used to trigger the process using the dropdown.
  • Priority: Using the drop-down, set the priority of the job to either High, Medium or Low.
  • Expire Time: This field is used to terminate the Job which is not running and is in the Scheduled State after the specified time.
  • Calendar: Select any holidays that were created previously. The Calendar field can be used to manage the trigger on the selected holidays. 
  • Maximum Jobs Allowed: Specify the maximum number of jobs that will be created when a certain number of queue items are added to the queue.     
  • Maximum Job QueueItem Allowed: Specify the number of Queue Items that should be allowed in order to create a particular job.

Time Scheduler

A Time Scheduler is used when a job needs to be triggered based on a specified date and time. On clicking the ‘Time Scheduler’ option, it takes the user to a window where they need to fill out the necessary details regarding the Date, Time and Frequency of the trigger based on their requirement. 

  • Name: The name for the trigger that is to be created can be provided.
  • Process Name: Select or search for the process that needs to be triggered using the drop-down.
  • Calendar: Using the Calendar drop down, select holidays that were created previously. This can be useful to manage the trigger on the selected holidays.
  • Robot Name: Select one or more robots which is used to execute the process using the dropdown.
  • Priority: The priority of the job can be set to either High, Medium or Low using a dropdown.
  • Enabled: The ‘Enabled’ checkbox determines the status of the trigger. If it is ticked, the trigger will get executed.
  • Prevent Parallel Job Creation: If this checkbox is ticked then, it will avoid another job with the same process name and robot to be scheduled until the execution of the ongoing job has been completed.
  • Schedule Type: Using this dropdown, the user can select the schedule type of the process. It is a plan for the execution of a trigger. Users can either select the “Recurring” or the “One Time” option. 
    1. Recurring: Recurring trigger occurs periodically or repeatedly. If the user selects Recurring, then they need to provide the frequency, daily frequency, duration and job failure monitor option for that particular trigger.
      • Frequency: Select the frequency of execution occurrence from the drop-down list given below:
        1. Daily triggers which will be executed based on the specified number of days.
          • Recurs every- Specify the frequency of the days for which the trigger should be executed. 
        2. Weekly triggers will be executed based on the specified number of weeks.
          • Recurs every- Specify the frequency of the weeks for which the trigger should be executed. 
          • Select the days for which the triggers need to be executed
        3. Monthly trigger is performed in a scheduled manner in the specified months. Two options are available: 
          • A trigger can be executed on a particular day of the month either every month or at certain intervals of months.
          • A trigger can be executed on a particular day of the month based on a specified interval of the day of the week. This trigger can be set for every month or at certain intervals of months.
      • Daily Frequency: Specify the regular frequency of a trigger. There are two options:  “occurs every” and “occurs once”.
        1. Occurs Once At- If the trigger needs to be executed once, then the time as to when it should occur should be specified. If the ‘Ending at’ checkbox is ticked, the ‘stop request type’ option will be available to either stop or request to stop the trigger.
          • On selecting the “Stop” option, the process will be immediately terminated without completing the active transaction.
          • On selecting the “Request” option, the process will stop. In addition to that, the running transaction will get processed and all subsequent transactions will not execute, which will cause the job to halt eventually.
        2. Occurs Every- If the trigger needs to be executed at certain time intervals on a day repeatedly, then we must specify the time intervals (hours/minutes/seconds) along with the start and end time. If the ‘End Job Execution After the Specified End time’ checkbox is ticked, the ‘stop request type’ option will be available to either stop or request to stop the trigger.
          • On selecting the “Stop” option, the process will be immediately terminated without completing the active transaction.
          • On selecting the “Request” option, the process will stop. In addition to that, the running transaction will get processed and all subsequent transactions will not execute, which will cause the job to halt eventually.
        3. Duration: It determines for how long the trigger should continue to run.
          • Start Date: The date on which the trigger starts executing. 
          • End Date: The date on which the trigger stops.
          • No End Date: Indicates that triggers are capable of running continuously without an end date. 
          • Expire Time: The Time at which the trigger should stop executing and end the trigger.
        4. Advance: It allows the user to monitor the trigger by using the below option:
          • Job Failure Monitor – If this checkbox is ticked then, the user must specify the job failure count for which the trigger will try to execute the job. Trigger will be automatically disabled if a job is unable to execute even after the last attempt, provided the error message for the errored jobs remains the same.

2. One Time: The trigger will be executed only once according to the specified date and time.

  • Date: Specify the date on which the trigger should be executed.
  • Start at: Specify the time at which the trigger needs to be executed.
  • Expire Time: Specify the time at which the trigger should stop executing and end the trigger.
  • If the ‘Ending at’ checkbox is ticked, the ‘stop request type’ option will be available where to either stop or request to stop the trigger.
    • On selecting the “Stop” option, the process will be immediately terminated without completing the active transaction.
    • On selecting the “Request” option, the process will stop. In addition to that, the running transaction will get processed and all subsequent transactions will not execute, which will cause the Job to halt eventually

Adding a new Trigger

To create a new trigger, click on the ‘Add’ button in the triggers tab and then select the desired trigger type.

There are three types of triggers:

  • Time Scheduler: This is used when a user wants to trigger a job based on date and time.
  • Queue Scheduler: This is used when a user has a process that needs to be triggered each time an item or items get added to a particular queue. 
  • Server Maintenance: This can be used to trigger Maintenance mode which provides an option to stop all the activity in the Genie Server or Robot Machine. This can be helpful when a user needs to down the machine for maintenance.

Triggers

Triggers are used to perform activities in a predefined manner to execute Jobs or perform Maintenance. With the help of Triggers, Jobs can be executed either at specified time intervals (Time Scheduler) or each time new items get added to the specified queue (Queue Scheduler).

In the Triggers tab, users can generate new and manage existing triggers. The table displays the trigger names of all the triggers that are created. The ‘Requested Datetime’ column displays the date and time when it was last scheduled. The next column ‘Enabled’ indicates the status of the trigger (true or false). It also displays the trigger type (Time Scheduler, Queue Scheduler or Maintenance Mode Trigger). The ‘History’ column provides details about all the scheduled triggers such as the robot name, process name, start date time, end date time, status and scheduler Date Time. The table also contains the ‘Edit’ and ‘Delete’ buttons where users can edit or delete the trigger as per the requirements.


Show Filter

Using the ‘Show filter’ option, the user can filter Processes based on the package name.

The ‘Refresh’ button adjacent to the Show Filter button helps to reload the processes tab.

Add Process

Steps to add a package as a process in Bot Manager:

  • Click on the ‘Add’ option in the ‘Processes’ tab.
  • The ‘Add Process’ window will appear allowing users to select the Package (which is the published process) as per the requirement from the Package dropdown menu. Next, select the version available for that particular package using the Version dropdown menu. 
  • Then click on ’Save’. 

This process will now be available to all the users in the processes tab of the BOT Manager. It will also be reflected in the Agent/Co-pilot tray, through which the user can start the job by clicking on the play button. Additionally, the user can also start the process as a Job under the Jobs tab of the Bot Manager.

Managing Version

The version of a process can be managed using the ‘View’ button. Users can update or roll back the process by changing the version. 

  • On clicking the ‘View’ button, a ‘Versions’ wizard will be displayed which lays out all the available versions of a particular process.
  • It consists of a feature called Auto-update, which ensures that the process version gets updated automatically each time a new version of the project is published in Studio.
  • Select the desired version and click on Update. Now the version will get updated for the specified process.