Main Process

The Main Process can be used to invoke multiple sequences that were created previously within a project. If the user needs to perform an extensive automation/process, a separate sequence can be created for each of the tasks. There can be multiple sequences within the same process depending upon the requirement. Similar to sequences, multiple processes can also be created under a particular project. A collection of these sequences is known as a process and a collection of processes is known as a Project. 

For better clarification, refer to the example given below which includes basic tasks to be performed in the automation.  

  • Task 1: Open Amazon.in Browser 
  • Task 2: Login with credential 
  • Task 3: Order a Phone 
  • Task 4: Enter the details  
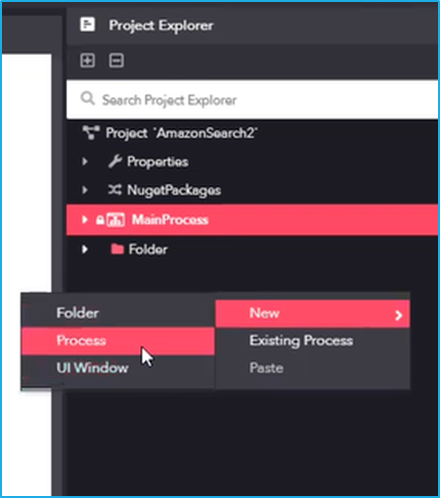
Create a process

To create a process under a project, right-click on the project name. Next, hover the mouse over the ‘New’ option in the menu and select the ‘Process’ option.

The created processes can be renamed based on the automation requirement. To rename a particular process, right-click on it and select the ‘Rename’ option. (For the above example, the user can rename the processes as Login, OrderCreation, etc.) 

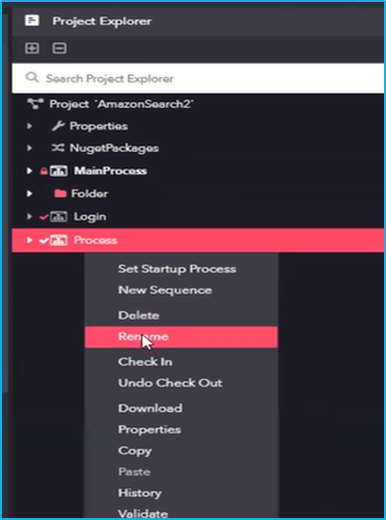
N.B. – Follow the same step to create a separate process for each of the task mentioned in the above example.   

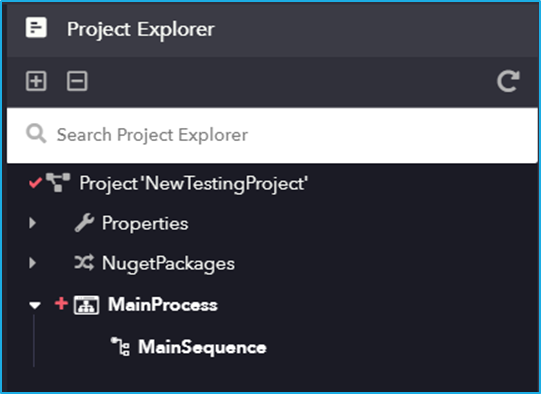
Startup Sequence/Process

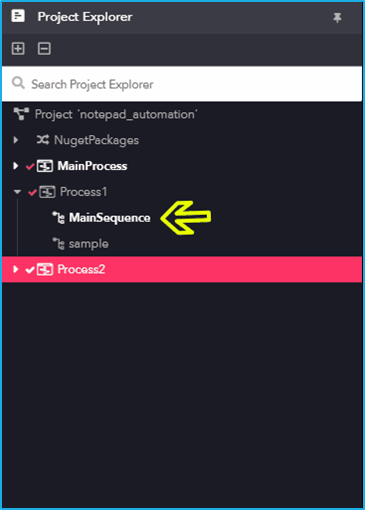
The startup sequence is the sequence that gets executed initially when a process is run, by default. In any project, it is easy to identify the Start-up sequence within a process as the sequence name is highlighted. However, any sequence in the process can be marked as a Start-up sequence.  

Similarly, any process in the project can be marked as a Start-up Process. The startup process executes the start-up sequence under it, by default once the project is run by clicking the play button. 

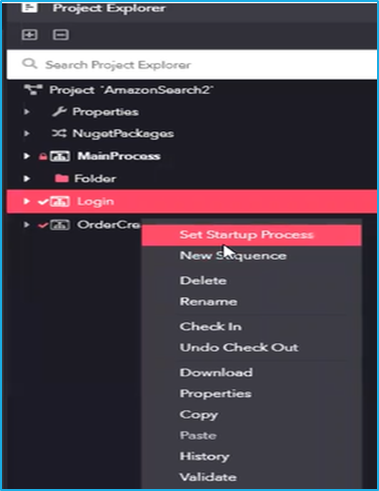
Set Startup Process & Set Startup Sequence

  • To set a process as a startup process, right-click on a particular process in the project and then select the ‘Set Start-up Process’ option.  
  • To set a sequence as a start-up sequence, right-click on a particular sequence in the process and then select the ‘Set Start-up Sequence’ option. 

Project Properties

There are two types of settings available under a project. On double clicking the ‘Properties’ option in the Project Explorer panel, a project settings window will appear. It is also possible to view a ‘Settings’ option on expanding the properties tab. On double clicking the settings options, it will redirect to another window where user will be able to add settings as per their requirement.  

Project Settings

Following are the four tabs available in Project settings:

  1. General Settings
  2. Global Variable
  3. Assemblies
  4. UI Automation settings

General settings

In ‘General Settings’ tab, the project name, title and description can be altered. It also allows users to add an image for the created project which can be uploaded in the ‘Icon’ field and can be viewed in the RPA Genie co-pilot. In the ‘Activity Idle Timeout’ field, set the time in minutes. A particular activity will move to an unresponsive state if that activity does not execute within the time that has been specified in the ‘Activity Idle Timeout’ Field.

Global Variable

In the case of creating variables for a project, they can be used only within the scope of a sequence in a process. However, in ‘Global Variables’ tab, variables of any value type can be created which can be used throughout the project.  

Assemblies

In ‘Assemblies’ tab, the multiple external DLL (Dynamic Link Library) which are not available in RPA genie can be injected or added.

UI Automation settings

In the ‘UI Automation Settings’ tab, the timings for delay after, delay before and timeout can be set. The activities related to UI Automation will execute as per the specified time. These settings are applicable to all the activities inside UI automation. 

New Settings under properties  

In the ‘Settings’ window, any data type which can be reused across the entire project can be added. By clicking the ‘Add Settings’ button, a custom setting can be added and a value can be assigned to it, which can be used as a constant setting throughout the project. 

Project Explorer

Users must always begin with a project when they start working with RPA Genie. A project contains all the sequences and files required to perform an automation. A project can also contain processes and the files can be arranged into separate folders.
When a project is executed, the robot invokes the process which is set as the Start-up process for that particular project. 

The Project explorer has three main features: –

  1. Project Properties
  2. NuGet Packages
  3. Main Process

Variables and Arguments

Variables are similar to arguments but are scoped to a certain sequence. Variables of a process can be managed from the Variables panel.

The variables panel lists down all the variables that are created in a process. It also displays the corresponding data type, direction and the default value that is assigned to each variable.

Creating a Variable

Variable can be created either by adding it directly from the variables panel or by using the available expression editor in any property of an activity. 

Using Variable Panel

Variables can be added in the variable panel by clicking the ‘Add Variable’ button. Default value can be set for the variable by double clicking on the ‘DefaultValue’ field for a particular variable.

A particular variable can be renamed by clicking on it and amending the name of the variable. If a variable is renamed, it will be reflected wherever that particular variable is used.

A variable’s Data type can be changed by selecting the preferred Data Type from the dropdown list under the column –Type in the variables panel. The default type of a variable when it gets created is String.

To delete a variable, right-click on the particular variable in the variables panel and select the delete option.

Using Expression Editor

An expression is a combination of functions, constant, operators and operands that can be used to perform calculations, manipulate variables and concatenate strings to return a value while being parsed.  

In the expression editor, an expression can either be typed manually or the required functions, operators and operands can be selected using the expression editor.

Click on the expression editor and press control + k to create a variable. Then, a Set variable field is displayed. The type will be auto-generated depending on the selected property field.

  • To save the variable, press enter. The created variable will be visible in the variables panel.
  • To cancel creation of the variable, press esc.

Creating an Argument

Arguments are similar to variables but are scoped to a particular process. That is, an argument can be accessed or modified within any sequence inside a process.

Arguments of a process can be managed from the Arguments panel. The arguments panel lists down all the arguments that are created in a process. It also displays the corresponding data type, direction and the default value that is assigned to each argument.

Create an Argument

To create an argument, click on the ‘Add Argument’ button at the bottom of the Arguments panel. Default value can be set for an argument by double clicking on the ‘DefaultValue’ field for a particular argument. 

Rename an Argument

An argument can be renamed by clicking on a particular argument and amending the name of the argument. 

An Argument’s Data type can be changed by selecting the preferred Data Type from the dropdown list under the column –Type in the Arguments panel.

Delete an Argument

To delete an argument, right-click on the particular argument in the Arguments panel and select the delete option.  Deleting the argument will not remove any activities or sequences using that particular argument.

Note: Ensure that the argument/variable is no longer used in any of the sequences before deleting it to avoid errors while executing the project.  

Activity – OCR

The OCR (Optical Character Recognition) includes activities for extracting text from images or scanned documents. It includes functionalities like Create Tesseract OCR, OCR – Find Element, OCR – Get Text, and OCR Click Text, enabling automation to recognize and interact with text-based content in images and UI elements.

The OCR category has the following sub activities:

Create Tesseract OCR: This activity creates an instance of Tesseract OCR Engine for use in an OCR-based activity.

Options Properties:

  • Language: The language to be used for text recognition.
  • Whitelist: List of characters to be whitelisted for recognition.

Engine Properties:

  • OCREngine: Creates Instance of OCR Engine. This field supports only OCREngine variable.

OCR- Find Element: This activity searches for a given text within the bounds of a specified element and returns the corresponding element.

Engine Properties:

  • OCREngine: Instance of an OCR engine to be used. By default, OCR Engine is Tesseract.

Options Properties:

  • Element: This field supports only Ul element variable returned by another activity.
  • Text: Text to be searched.

Output Properties:

  • Bounding Element: Element variable where the corresponding UI Element is found.

OCR: Get Text- This activity processes an image or an element with OCR Engine and returns all the identified text.

Engine Properties:

  • OCREngine: Instance of an OCR engine to be used. By default, the OCR Engine is Tesseract.

Target Properties:

  • Element: This field supports only Ul element variable returned by another activity.
  • BoundingBox: Bounding rectangle in pixels relative to the UIElement.
  • Image: An existing image to extract text from. This field supports only Image variables.

Output Properties:

  • Text: String extracted from an indicated Ul element.

OCR- Click Text: This activity searches and clicks on the element with the given text in a window. 

Engine Properties:

  • OCREngine: Instance of an OCR engine to be used. By default, the OCR Engine is Tesseract.

Element Properties:

  • Element: This field supports only the Ul element variable returned by another activity.

Options Properties:

  • Mouse Button: Specifies the mouse button to be used for the click action (left or right).
  • Text: Unique text that needs to be clicked from the specified element.
  • CursorPosition: Specifies the displacement of the cursor position relative to the option selected in the position field.

Downloading a Package

Package can be migrated from one environment to another and it is possible to download any specific version.

Steps to download a package from the Bot Manager:

  • Click the View button against the package that is to be downloaded.
  • Select the version and then click on the download link next to it.

Activity – Cryptography

It includes activities for securing and managing sensitive data. It includes functionalities such as Encrypt Text to protect information and Decrypt Text to retrieve original data, ensuring secure communication and data handling within automation workflows.

The Cryptography category has the following sub activities:

Decrypt Text: This activity can be used to decode a string.

Input Properties:

  • CipherText: The encrypted text that needs to be decrypted.
  • Salt: Creates a unique password even in an instance where two users choose the same password.

Output Properties:

  • Result: A string variable that stores the decrypted text.

Encrypt Text: This activity converts a given string value to an encoded text format for preventing unauthorized access.

Input Properties:

  • InputText: The text that you want to encrypt.
  • Salt: Creates a unique password even in an instance where two users choose the same password.

Output Properties:

  • Result: A string variable that stores the encrypted text.

Uploading a Package

Steps to upload a package in Bot Manager:

  1. Click on the Upload Package button at the top.
  2. Next, select the required file saved in the local system by clicking on the Browse button. After selecting the file, click on the Upload button.
  3. Now, the package will be displayed in this tab and made available for all users.

The main benefit of using this feature is that the project need not be created from scratch and published if the user is working in a different environment.

Show Filter

Using the ‘Show filter’ option, the user can filter Packages based on the package name. 

The ‘Refresh’ button adjacent to the ‘Show Filter’ button helps to reload the packages tab with the latest details.