Variables and Arguments

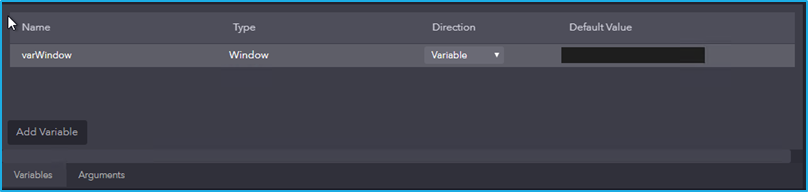
Variables are similar to arguments but are scoped to a certain sequence. Variables of a process can be managed from the Variables panel.

The variables panel lists down all the variables that are created in a process. It also displays the corresponding data type, direction and the default value that is assigned to each variable.

Creating a Variable

Variable can be created either by adding it directly from the variables panel or by using the available expression editor in any property of an activity. 

Using Variable Panel

Variables can be added in the variable panel by clicking the ‘Add Variable’ button. Default value can be set for the variable by double clicking on the ‘DefaultValue’ field for a particular variable.

A particular variable can be renamed by clicking on it and amending the name of the variable. If a variable is renamed, it will be reflected wherever that particular variable is used.

A variable’s Data type can be changed by selecting the preferred Data Type from the dropdown list under the column –Type in the variables panel. The default type of a variable when it gets created is String.

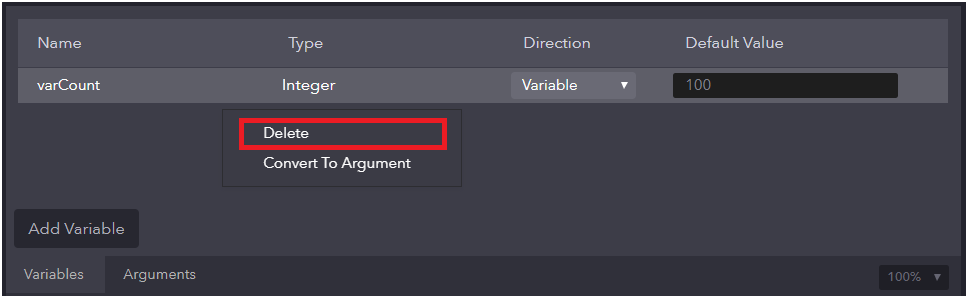
To delete a variable, right-click on the particular variable in the variables panel and select the delete option.

Using Expression Editor

An expression is a combination of functions, constant, operators and operands that can be used to perform calculations, manipulate variables and concatenate strings to return a value while being parsed.  

In the expression editor, an expression can either be typed manually or the required functions, operators and operands can be selected using the expression editor.

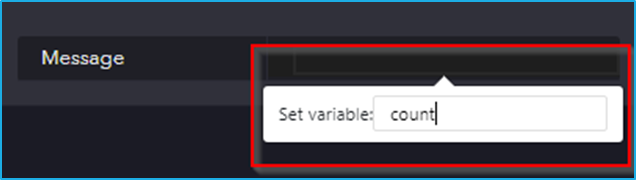
Click on the expression editor and press control + k to create a variable. Then, a Set variable field is displayed. The type will be auto-generated depending on the selected property field.

  • To save the variable, press enter. The created variable will be visible in the variables panel.
  • To cancel creation of the variable, press esc.

Creating an Argument

Arguments are similar to variables but are scoped to a particular process. That is, an argument can be accessed or modified within any sequence inside a process.

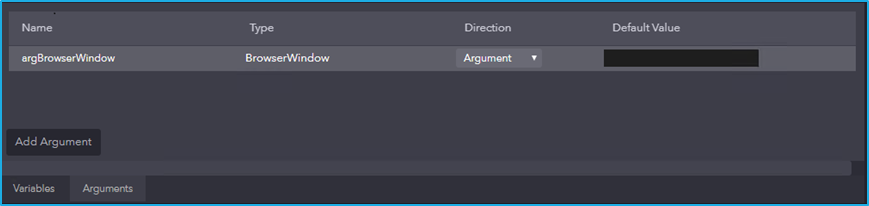
Arguments of a process can be managed from the Arguments panel. The arguments panel lists down all the arguments that are created in a process. It also displays the corresponding data type, direction and the default value that is assigned to each argument.

Create an Argument

To create an argument, click on the ‘Add Argument’ button at the bottom of the Arguments panel. Default value can be set for an argument by double clicking on the ‘DefaultValue’ field for a particular argument. 

Rename an Argument

An argument can be renamed by clicking on a particular argument and amending the name of the argument. 

An Argument’s Data type can be changed by selecting the preferred Data Type from the dropdown list under the column –Type in the Arguments panel.
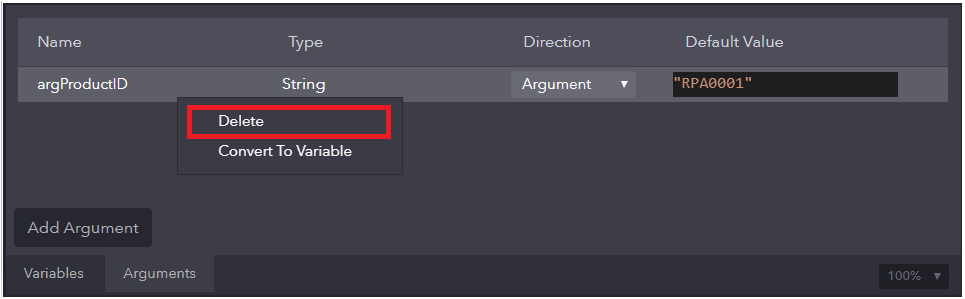
Delete an Argument

To delete an argument, right-click on the particular argument in the Arguments panel and select the delete option.  Deleting the argument will not remove any activities or sequences using that particular argument.

Note: Ensure that the argument/variable is no longer used in any of the sequences before deleting it to avoid errors while executing the project.  

Activity – OCR

The OCR (Optical Character Recognition) includes activities for extracting text from images or scanned documents. It includes functionalities like Create Tesseract OCR, OCR – Find Element, OCR – Get Text, and OCR Click Text, enabling automation to recognize and interact with text-based content in images and UI elements.

The OCR category has the following sub activities:

Create Tesseract OCR: This activity creates an instance of Tesseract OCR Engine for use in an OCR-based activity.

Options Properties:

  • Language: The language to be used for text recognition.
  • Whitelist: List of characters to be whitelisted for recognition.

Engine Properties:

  • OCREngine: Creates Instance of OCR Engine. This field supports only OCREngine variable.

OCR- Find Element: This activity searches for a given text within the bounds of a specified element and returns the corresponding element.

Engine Properties:

  • OCREngine: Instance of an OCR engine to be used. By default, OCR Engine is Tesseract.

Options Properties:

  • Element: This field supports only Ul element variable returned by another activity.
  • Text: Text to be searched.

Output Properties:

  • Bounding Element: Element variable where the corresponding UI Element is found.

OCR: Get Text- This activity processes an image or an element with OCR Engine and returns all the identified text.

Engine Properties:

  • OCREngine: Instance of an OCR engine to be used. By default, the OCR Engine is Tesseract.

Target Properties:

  • Element: This field supports only Ul element variable returned by another activity.
  • BoundingBox: Bounding rectangle in pixels relative to the UIElement.
  • Image: An existing image to extract text from. This field supports only Image variables.

Output Properties:

  • Text: String extracted from an indicated Ul element.

OCR- Click Text: This activity searches and clicks on the element with the given text in a window. 

Engine Properties:

  • OCREngine: Instance of an OCR engine to be used. By default, the OCR Engine is Tesseract.

Element Properties:

  • Element: This field supports only the Ul element variable returned by another activity.

Options Properties:

  • Mouse Button: Specifies the mouse button to be used for the click action (left or right).
  • Text: Unique text that needs to be clicked from the specified element.
  • CursorPosition: Specifies the displacement of the cursor position relative to the option selected in the position field.

Activity – Cryptography

It includes activities for securing and managing sensitive data. It includes functionalities such as Encrypt Text to protect information and Decrypt Text to retrieve original data, ensuring secure communication and data handling within automation workflows.

The Cryptography category has the following sub activities:

Decrypt Text: This activity can be used to decode a string.

Input Properties:

  • CipherText: The encrypted text that needs to be decrypted.
  • Salt: Creates a unique password even in an instance where two users choose the same password.

Output Properties:

  • Result: A string variable that stores the decrypted text.

Encrypt Text: This activity converts a given string value to an encoded text format for preventing unauthorized access.

Input Properties:

  • InputText: The text that you want to encrypt.
  • Salt: Creates a unique password even in an instance where two users choose the same password.

Output Properties:

  • Result: A string variable that stores the encrypted text.

Uploading a Package

Steps to upload a package in Bot Manager:

  1. Click on the Upload Package button at the top.
  2. Next, select the required file saved in the local system by clicking on the Browse button. After selecting the file, click on the Upload button.
  3. Now, the package will be displayed in this tab and made available for all users.

The main benefit of using this feature is that the project need not be created from scratch and published if the user is working in a different environment.

Sub Activity – Mail

It includes activities for sending, receiving, and managing emails, enabling automation to interact with email services for tasks such as composing, reading, and organizing messages.

The Mail category has the following sub activities:

Types of Robot

Robots can work in different modes, either autonomously (unattended) or in collaboration with human users (attended).

  • Attended BOT – Attended BOTs are the BOTs that are ready and activated by a person whenever they are needed to execute the process. These Robots need human supervision.  
  • Unattended BOT – Unattended BOTs are the BOTs that will operate on a pre-set schedule or as a trigger by logic in the process flow. These Robots don’t need to be supervised by humans.  

Stop Jobs

The “Stop Jobs” button present on the ‘Robot Job’ window helps to stop the selected jobs which are in the running and scheduled state. 

  • After clicking this button, the user will be taken to the “Stop Job” window, where they can locate their Processes, Machine, or Robots in which the job has to be stopped. Also, the “Refresh” button helps to refresh the window.
  • Select the method for stopping the Robot using the “Stop Request Type” option box.
    • Stop: In case of running job, if the user selects the “Stop” option, all the selected Jobs will be terminated immediately without completing the active transaction.
    • Request: If the user selects the “Request” option, all the selected Jobs will stop only after completing the active transaction i.e. the running transaction will get processed and all subsequent transactions will not execute, which will cause the job to be halted eventually.
  • Finally, click the “Stop” button at the bottom of the window after choosing an option from the “Stop Select Type” to stop the selected Jobs.

Note: If the selected jobs which are in the running state are stopped, the status will change to stopped. Whereas, if the selected jobs which are in the scheduled state are stopped, the status changes to cancelled.

Activity – App Integration

It includes activities for automating tasks by integrating with email systems, Excel files for data manipulation, and databases for managing data operations.

Activity – Workflow

The Workflow includes essential activities that helps manage the execution flow of an automation process. It provides tools to control logic, debug, and modularize workflows efficiently. These activities are crucial for designing structured, scalable, and error-handling-enabled automation solutions.