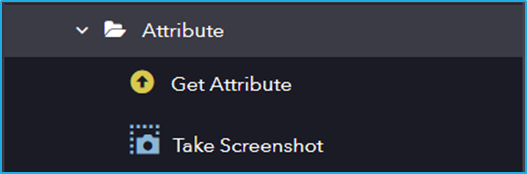
The Attribute subfolder under UI Automation contains activities related to extracting properties of UI elements. It includes actions like Get Attribute (retrieves a specific attribute) and Take Screenshot (captures an image of the UI element).
The Attribute category has the following sub activities:
Get Attribute: This activity retrieves the value of a specific attribute of a UI element.
Input Properties:
AttributeName: Name of the attribute that is to be retrieved.
Output Properties:
Value: String variable that stores the retrieved value.
Take Screenshot: This activity is used to capture the screenshot of a specified UI element.
Output Properties:
Image: Image variable of the resultant screenshot.
Steps to download a NuGet package from the Bot Manager:
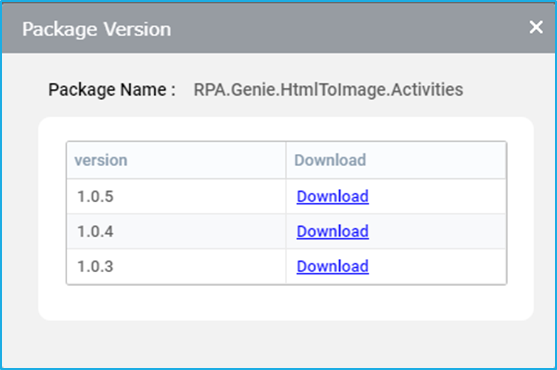
Click on the ‘View’ button in the ‘Details’ column against the NuGet package that is to be downloaded
The ‘Package Version’ window will appear displaying the NuGet package name along with its available versions and a link for downloading the specific version of the NuGet Package.
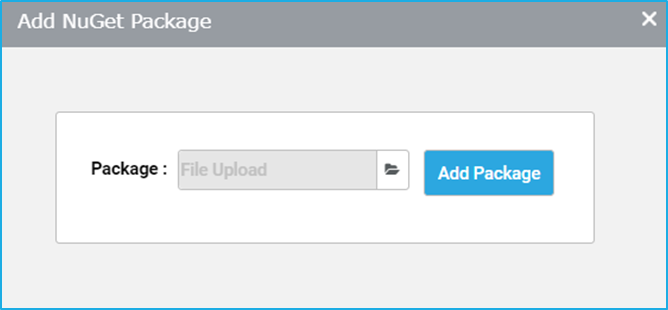
In the NuGet Packages tab, click on the ‘Add Package’ button.
The ‘Add NuGet Package’ window will appear where the user can provide the file path or select the file from the browser window by clicking on the ‘Browse’ button.
Click on the ‘Add Package’ button to upload the NuGet package.
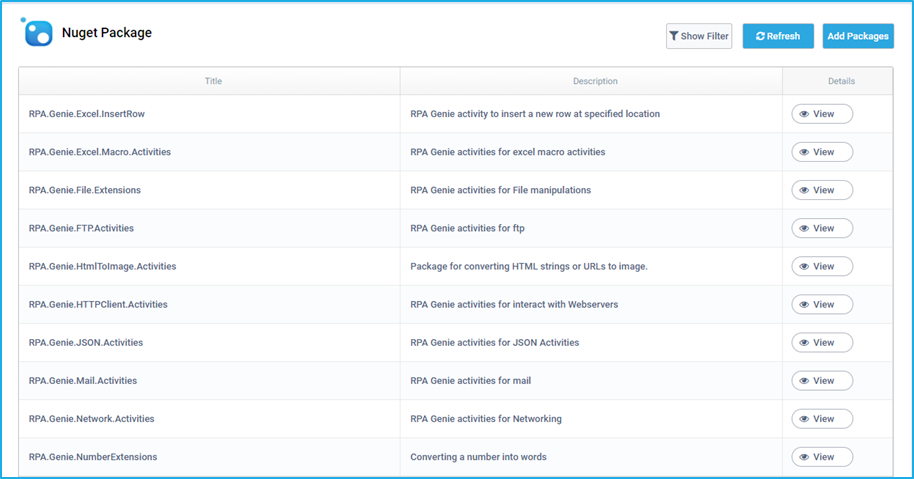
The packages tab consists of a sub-section called the NuGet-package which is a package manager designed to enable developers to write and share NuGet files containing reusable activities, which can then be accessed from Genie Studio for running an automation. For certain automation, users may have specific requirements while developing the projects in Studio. Therefore, to make use of the additional custom activities users can navigate to the NuGet Packages window in Genie Studio.
Note:The extension of a NuGet package is “.nupkg”
The NuGet packages tab can be used to add NuGet files that can be accessed later from the Genie studio. This tab lists the names of the NuGet packages with their descriptions and versions. It also provides the filter, download and upload options.
Note: Once a library project has been created and published through Studio, it is reflected in the NuGet Packages tab. This library project can be used within any other project by downloading from the NuGet Packages window in Studio. Similar to packages, users can also directly download any version of a particular NuGet package by clicking on the ‘view’ button.
Project templates can help to speed up the design process. Users can also design and publish custom templates that can be used in their future projects.
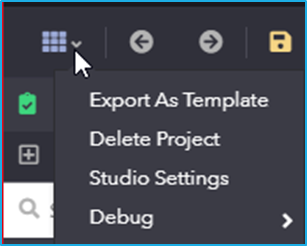
Exporting a Project as a Template
A test automation project can be exported as a Template, which will be available in the template tab. The Export as Template option in the project menu can be used to export a project as a template which will include all the process lists, NuGet packages etc.
Note: Unsaved changes are not reflected while creating templates.
To create a template:
Select Export as Template by clicking on options at the top left.
Give a template name and a description to identify the templates.
Click on the Save button to create the Template. After saving, a new template gets created and will be available in the template list tab.
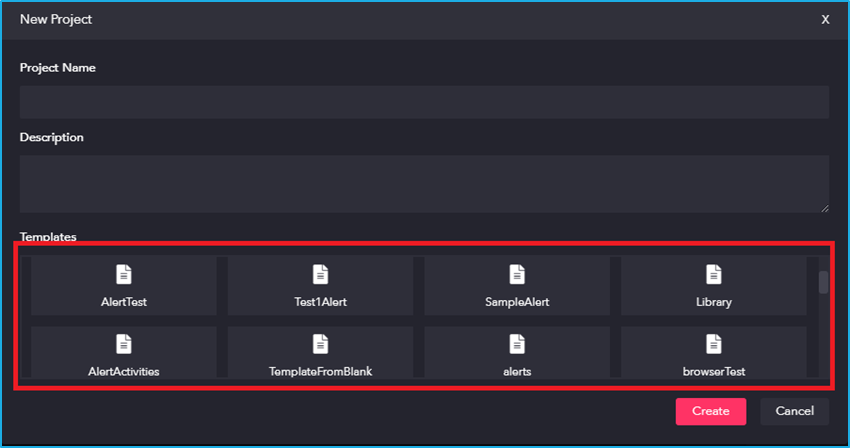
To create a project with a template:
Click on the New-Blank project option to create a project.
Provide a Project Name and a suitable Description for the new project.
Select a Template from the available templates displayed in the Template list tab in order to create a project using the templates. However, if no template has been selected, a blank project gets created.
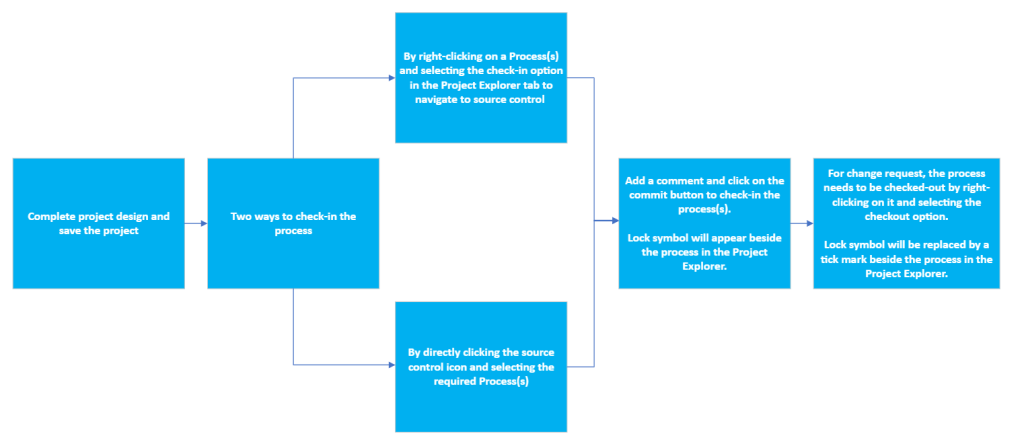
Whenever a project has been modified by a user and the same project has been checked in after the modification, the changes that the user had made will be reflected in the source control panel as a history.
The source control feature allows users to collaborate with multiple users using the default Genie Source Control Integration while developing large projects.
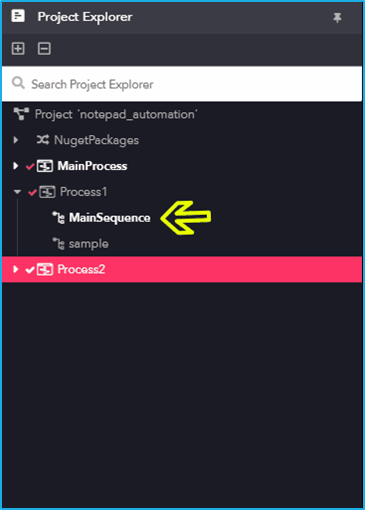
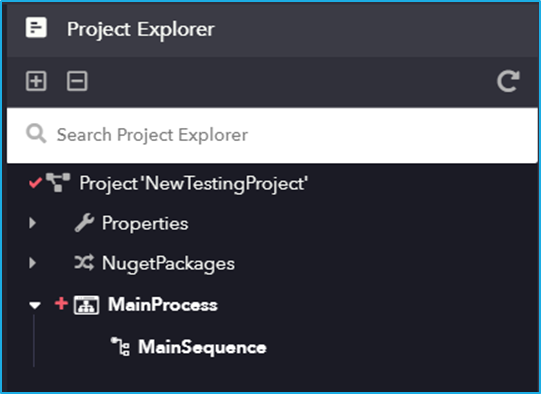
The Main Process can be used to invoke multiple sequences that were created previously within a project. If the user needs to perform an extensive automation/process, a separate sequence can be created for each of the tasks. There can be multiple sequences within the same process depending upon the requirement. Similar to sequences, multiple processes can also be created under a particular project. A collection of these sequences is known as a process and a collection of processes is known as a Project.
For better clarification, refer to the example given below which includes basic tasks to be performed in the automation.
Task 1: Open Amazon.in Browser
Task 2: Login with credential
Task 3: Order a Phone
Task 4: Enter the details
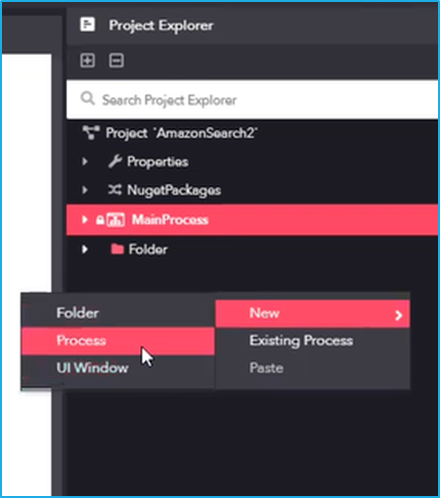
Create a process
To create a process under a project, right-click on the project name. Next, hover the mouse over the ‘New’ option in the menu and select the ‘Process’ option.
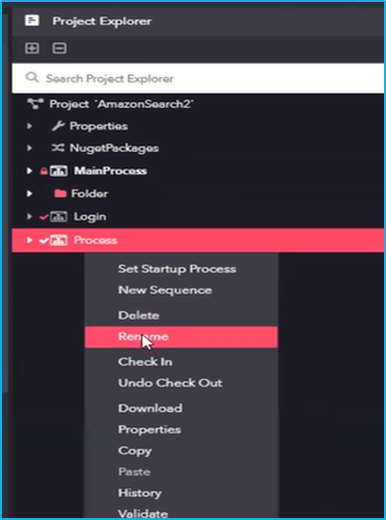
The created processes can be renamed based on the automation requirement. To rename a particular process, right-click on it and select the ‘Rename’ option. (For the above example, the user can rename the processes as Login, OrderCreation, etc.)
N.B. – Follow the same step to create a separate process for each of the task mentioned in the above example.
Startup Sequence/Process
The startup sequence is the sequence that gets executed initially when a process is run, by default. In any project, it is easy to identify the Start-up sequence within a process as the sequence name is highlighted. However, any sequence in the process can be marked as a Start-up sequence.
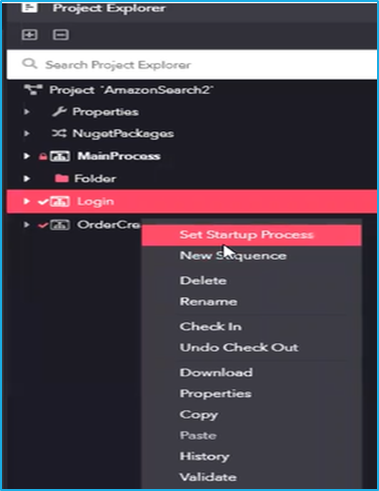
Similarly, any process in the project can be marked as a Start-up Process. The startup process executes the start-up sequence under it, by default once the project is run by clicking the play button.
Set Startup Process & Set Startup Sequence
To set a process as a startup process, right-click on a particular process in the project and then select the ‘Set Start-up Process’ option.
To set a sequence as a start-up sequence, right-click on a particular sequence in the process and then select the ‘Set Start-up Sequence’ option.
There are two types of settings available under a project. On double clicking the ‘Properties’ option in the Project Explorer panel, a project settings window will appear. It is also possible to view a ‘Settings’ option on expanding the properties tab. On double clicking the settings options, it will redirect to another window where user will be able to add settings as per their requirement.
Project Settings
Following are the four tabs available in Project settings:
General Settings
Global Variable
Assemblies
UI Automation settings
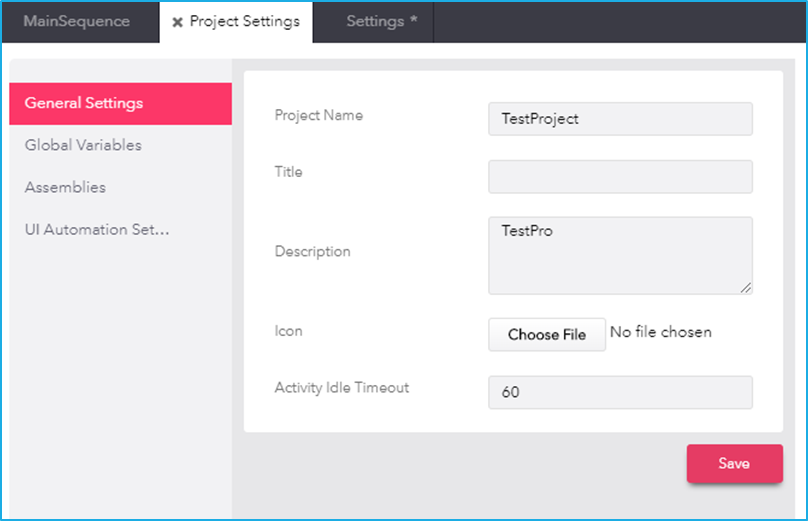
General settings
In ‘General Settings’ tab, the project name, title and description can be altered. It also allows users to add an image for the created project which can be uploaded in the ‘Icon’ field and can be viewed in the RPA Genie co-pilot. In the ‘Activity Idle Timeout’ field, set the time in minutes. A particular activity will move to an unresponsive state if that activity does not execute within the time that has been specified in the ‘Activity Idle Timeout’ Field.
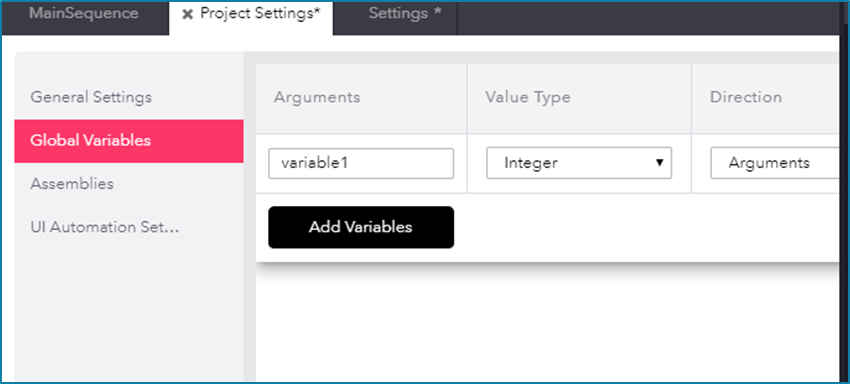
Global Variable
In the case of creating variables for a project, they can be used only within the scope of a sequence in a process. However, in ‘Global Variables’ tab, variables of any value type can be created which can be used throughout the project.
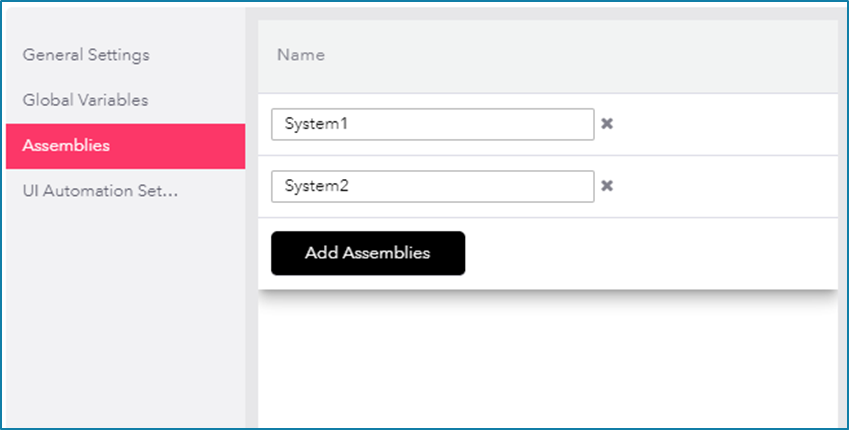
Assemblies
In ‘Assemblies’ tab, the multiple external DLL (Dynamic Link Library) which are not available in RPA genie can be injected or added.
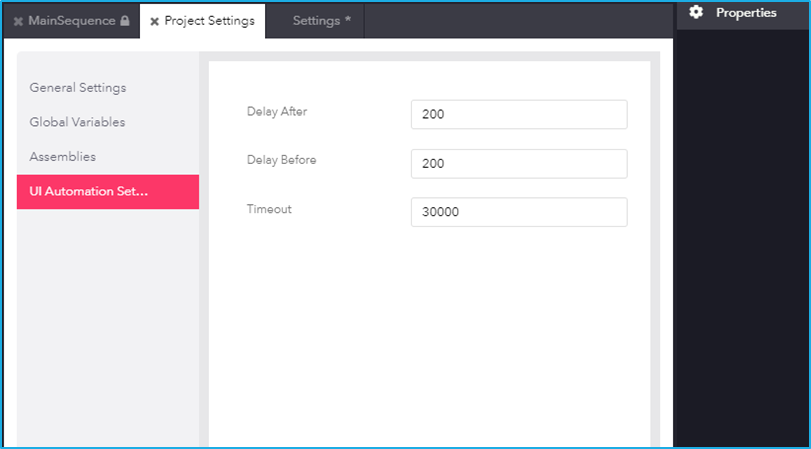
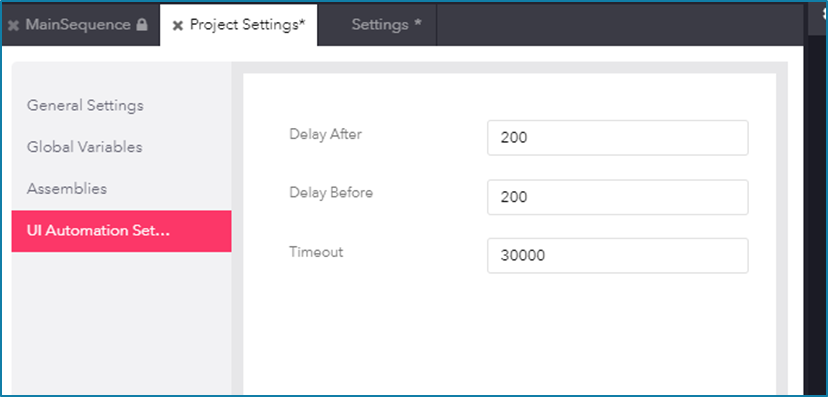
UI Automation settings
In the ‘UI Automation Settings’ tab, the timings for delay after, delay before and timeout can be set. The activities related to UI Automation will execute as per the specified time. These settings are applicable to all the activities inside UI automation.
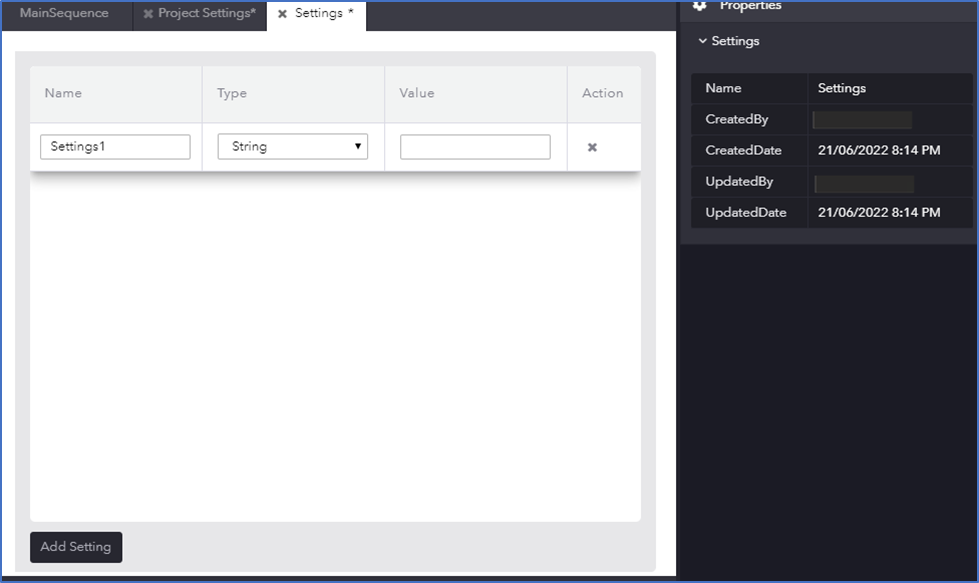
New Settings under properties
In the ‘Settings’ window, any data type which can be reused across the entire project can be added. By clicking the ‘Add Settings’ button, a custom setting can be added and a value can be assigned to it, which can be used as a constant setting throughout the project.
Users must always begin with a project when they start working with RPA Genie. A project contains all the sequences and files required to perform an automation. A project can also contain processes and the files can be arranged into separate folders. When a project is executed, the robot invokes the process which is set as the Start-up process for that particular project.