Security

Security is a service that provides the BOT Manager and Studio with centralized authentication and control of access. Its purpose is to provide the Studio and BOT Manager with user authorization. i.e. It authorizes the users to access specific tabs such as dashboard, Jobs, Robots, Queues, etc. in BMT and Studio projects.

There are four tabs under Security:

  • User: The Users tab shows the list of the available users.
  • Permission Set:  In the Permission Set tab, authorized users/admins can provide or restrict access for users to certain projects in Studio, various processes, and queues available in the BOT Manager.
  • Roles: In the Roles tab, roles are created which determine user access privileges to use certain features of the Studio and BOT Manager. Authorized users or admins can assign or edit roles for each user.
  • Check Permission: The Check Permission tab can be used to check the permission set and role permissions provided for a user.

Demo Project using Cryptography Activities

The URL of the demo project is given below where users can learn about these activities in a better manner. 

Steps:

  1. Encode a particular text using the “Encrypt Text” activity. 
  2. Decode the text using the “Decrypt Text” activity. 
Activities Used“Encrypt Text, Write Text File, Decrypt Text, Message Box”
Video Linkhttps://www.youtube.com/watch?v=GdgV-skFUmA&list=PLwFA5laAhcEJ7sVztHRNXDdXffy2odMvv&index=13

Note: These activities are used to securely share sensitive information, such as a password, between users to prevent unauthorized access to sensitive data

Demo Project using Mail Activities (Part 1)

The URL of the demo project is given below where users can learn about these activities in a better manner. 

Steps:

  1. Send an Outlook mail using the “Send Outlook Mail Message” activity. 
  2. Retrieve the most recent mail in the inbox using “Get Outlook Mail Message” activity which will be stored in a mail list variable. 
  3. To access the mail stored in the list variable, select the 0th index of the mail list and assign it to a variable of MailMessage type. 
  4. Display the mail’s details, such as subject or body, using a message box. 
  5. Move a mail from the Inbox folder to a separate test folder created in Outlook. 
  6. Save an attachment from a mail to a local folder. 
Activities Used“Send Outlook Mail Message, Get Outlook Mail Message, Decision, Assign, Message Box, Save Attachments, Move Outlook Mail Message”
Video Link https://www.youtube.com/watch?v=WtX88gD08Ok&list=PLwFA5laAhcEJ7sVztHRNXDdXffy2odMvv&index=11

Sub Activity – SMTP

SMTP includes activities for sending emails via the Simple Mail Transfer Protocol (SMTP), enabling automation to send messages through external email servers.

The SMTP category has the following sub activities:

Send SMTP Mail Messages: This activity is used to send and forward mail by using the SMTP Protocol.

Attachments Properties:

  • Attachments: Specify the file you want to attach to the email.

Authentication Properties:

  • Email: Specify the email account used to send the email.
  • Password: Specify the password for the email account used to send the email.

Host Properties:

  • Server: Specify the SMTP server address used to send the email.
  • Port: Specify the port number used for the SMTP server connection.

Email Properties:

  • Body: Enter the body content of the email message you want to send.
  • Subject: Enter the subject line of the email message you want to send.
  • IsBodyHtml: Select this option if the body of the email message is in HTML format.
  • MailMessage: The MailMessage object that contains the email to be forwarded.

Receiver Properties:

  • To: Enter the email addresses of the primary recipients. You can specify multiple addresses separated by commas.
  • Bcc: Enter the hidden recipients of the email message.
  • Cc: Enter the email addresses of recipients to receive a copy of the email.

Sender Properties:

  • From: Enter the sender’s email address.

Save Attachments: This activity is used to send and forward mail by using the SMTP Protocol.

Input Properties:

  • FolderPath: Specify the folder path where the attachments will be saved.
  • Message: Specify the MailMessage object that contains the attachments to be saved.

Output Properties:

  • Attachments Properties: Stores the retrieved attachment that is saved to the specified folder.

Sub Activity – Outlook

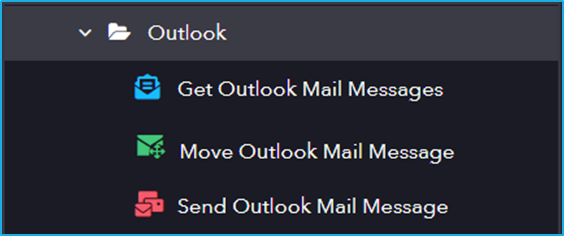
It includes activities for sending, receiving, and managing emails, enabling automation to interact with email services for tasks such as composing, reading, and organizing messages.

The Outlook category has the following sub activities:

Get Outlook Mail Messages: This activity is used to retrieve emails from Outlook.

Input Properties:

  • Account: Enter the email ID of the account from which you want to retrieve the mail messages.
  • MailFolder: Enter the name of the folder from which the specified mails are to be retrieved.

Options Properties:

  • Filter: Specify a filter string to narrow down the messages to be retrieved.
  • MarkAsRead: Select this checkbox to mark the retrieved messages as read.
  • OnlyUnreadMessages: Select this checkbox to retrieve only unread messages.
  • NewestFirst: Select this checkbox to retrieve the newest messages first.
  • Top: Specify the number of messages to retrieve from the top of the list.

Output Properties:

  • Messages: Stores the retrieved emails as a collection of MailMessage objects.

Move Outlook Mail Message: This activity moves Outlook mail to a specified folder.

Input Properties:

  • Account: Specify the mail ID of the account from which messages are to be moved.
  • MailFolder: Specify the name of the folder to which the emails should be moved.
  • MailMessage: Specify the MailMessage object that you want to move.

Send Outlook Mail Message: This activity allows the users to send and forward mail from a specified Outlook account.

Attachments Properties:

  • Attachments: Specify one or more file paths of attachments to be included in the email, in the form of an Array.

Email Properties:

  • Body: Enter the body content of the email message to be sent.
  • Subject: Enter the subject line of the email message to be sent.
  • IsBodyHtml: Select this option if the body of the email message is in HTML format.
  • MailMessage: The MailMessage object that contains the email to be forwarded.

Receiver Properties:

  • To: Provide the email addresses of the primary recipients as a single string, with multiple addresses separated by semicolons.
  • Bcc: Enter the hidden recipients of the email message.
  • Cc: Enter the email addresses of recipients to receive a copy of the email.

Input Properties:

  • Account: Specify the email ID of the account from which the message should be sent.
  • SendOnBehalfOfName: Specify the email address on whose behalf the email is sent.

Demo Project using Excel Activities (Part 2)

The URL of the demo project is given below where users can learn about these activities in a better manner. 

Steps:

  1. Read the data from an Excel file using the “Read Range” activity. 
  2. Preview the DataTable obtained from the “Read Range” activity using the “Preview DataTable” activity. 
  3. Read the value of a specific cell from the Excel file using the “Read Cell” activity. 
  4. Display the cell value in a message box. 
Activities Used“Open Excel Application, Read Range, Preview DataTable, Read Cell, Message Box”
Video Linkhttps://www.youtube.com/watch?v=9WJlwFEH5iQ&list=PLwFA5laAhcEJ7sVztHRNXDdXffy2odMvv&index=11&t=2s

Demo Project using Excel Activities (Part 1)

The URL of the demo project is given below where users can learn about these activities in a better manner. 

Steps:

  1. Create a test Excel file on the desktop. 
  2. Open the website – ‘https://crypto.com/price/‘ which consists of different cryptocurrencies and their details in a table format. 
  3. Extract the table from the website using the “Extract Data Table” activity and assign it to a variable of DataTable type. 
  4. Open the previously created Excel file using the “Open Excel Application” activity. 
  5. Create a new sheet in the Excel file using the “Set Active Sheet” activity. 
  6. Write the extracted DataTable to the Excel file using the “Write Range” activity. 
  7. Write a value to a specific cell in the Excel file. 
  8. Remove the data from the Excel file using the “Delete Range” activity. 
Activities Used“Get Window, Extract DataTable, Open Excel Application, Set Active Sheet, Write Range, Write Cell, Delete Range, Close Workbook”
Video Link https://www.youtube.com/watch?v=EWod0PCLywI&list=PLwFA5laAhcEJ7sVztHRNXDdXffy2odMvv&index=9&t=11s

Sub Activity – Excel

Excel includes activities for interacting with Excel files, allowing automation to read, write, and manipulate data within spreadsheets.

The Excel category has the following sub activities:

Close Workbook: This activity can be used to close an open Excel workbook.

Input Properties:

  • Workbook: Specify the Workbook to close. Only ExcelWorkbook variables are supported.

Delete Range: This activity allows the users to delete a specified range of cells in an Excel workbook

Input Properties:

  • Workbook: Provide the Workbook from which the range should be deleted.
  • Range: Specify the range to delete. Only string values are supported.
  • ShiftOption: Specify the direction to shift the cells in the deleted range.

Open Excel Application: This activity allows the user to open an Excel file of a specified path.

Input Properties:

  • WorkbookPath: Enter the path of the Excel workbook you want to open.
  • CreateNewFile: Select the checkbox to create a new Excel file in the specified location.
  • Visible: Select the checkbox to open the specified Excel file in the foreground. If not selected, all actions will be performed in the background.
  • AutoSave: If selected, the Excel file will be saved automatically.
  • Workbook Framework: Click the drop-down menu to choose the workbook type to create, based on the selected category.

Output Properties:

  • WorkbookWindow: Stores the entire information from the specified Excel file in an ExcelWorkbook variable.

Read Cell: This activity allows the user to read cell from Excel Workbook.

Input Properties:

  • Workbook: The ExcelWorkbook variable can be obtained from the Open Excel Application activity.
  • Cell: Specify the cell to read from the Excel file.

Output Properties:

  • Result: Stores the value retrieved from the specified Excel cell.

Read Range: This activity reads the value of a specified range of cells from an Excel file.

Input Properties:

  • Workbook: The ExcelWorkbook variable can be obtained from the Open Excel Application activity.
  • Range: Enter the range you want to read from the Excel file.
  • Include Header: Select this checkbox to include the column headers with the specified range.

Output Properties:

  • Result: Stores the extracted data from the specified Excel range in a DataTable variable.

Set Active Sheet: This activity can be used to create a new sheet or set an Excel spreadsheet as active to perform some operations.

Input Properties:

  • Workbook: The ExcelWorkbook variable can be obtained from the Open Excel Application activity.
  • SheetName: Specify the sheet name that should be set as the active sheet.
  • CreateNew: Select this checkbox to create a new sheet in the specified Excel file.

Write Cell: This activity is used to write a value into a specified cell in the Excel Workbook.

Input Properties:

  • Workbook: The ExcelWorkbook variable can be obtained from the Open Excel Application activity.
  • Cell: Specify the cell to write to. If the cell already contains data, it will be overwritten.
  • Value: Enter the value to be written in the specified cell.

Write Range: This activity writes the data from a datatable variable into a specific range of cells in an Excel workbook.

Input Properties:

  • Workbook: The ExcelWorkbook variable can be obtained from the Open Excel Application activity.
  • Range: Enter the range you want to read from the Excel file.
  • Data: Enter the starting cell of the range where the data should be written.
  • Include Header: Select this checkbox to include the column headers with the specified range.