Adding a Trigger Alert

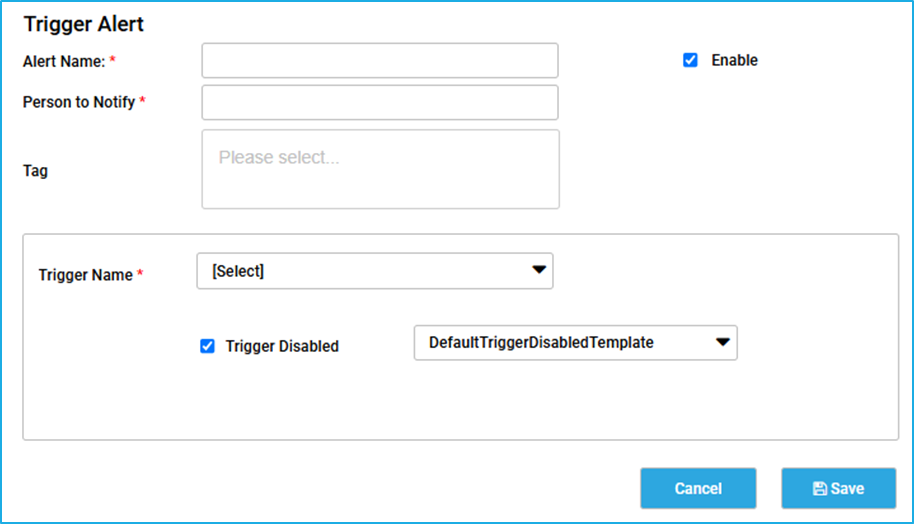
Triggers can be used to execute unattended automation in a predefined manner, which can be managed through the Bot Manager.

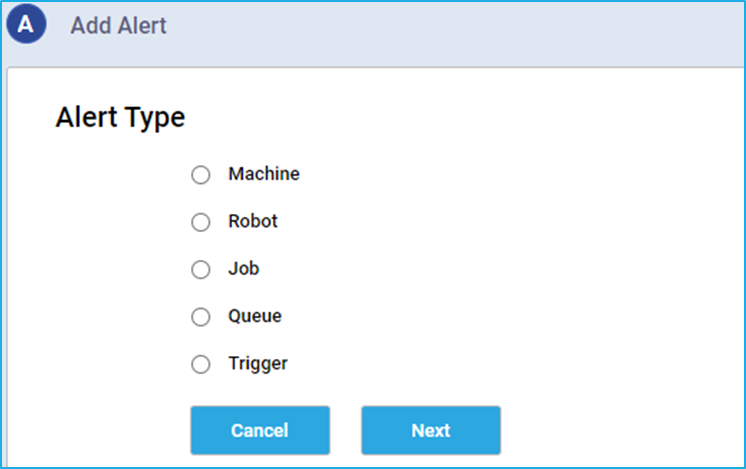
Steps to add a trigger alert:

  • Configure the common fields such as the ‘Alert Name’, ‘Person to Notify’ and ‘Enabled’ checkbox and Tags.
  • Select the Trigger name using the dropdown list for which the Alert has to be assigned.   
  • After selecting the trigger name, the user has only one option for setting up the alert when the trigger is disabled.  Select this alert type and then select the template name using the dropdown next to it.  
    • Trigger Disabled – This alert notification will be sent whenever the recurring time trigger gets auto-disabled if the job gets faulted due to the same exception after reaching the count specified in the ‘job failure monitor’ field while configuring the time trigger. 
  • Click on the ‘Save’ button to add the Trigger Alert. 

Adding a Queue Alert

Queue is a storage bucket where a large amount of data can be stored and accessed in a First-In-First-Out (FIFO) pattern. Users can populate an initially empty queue in BOT Manager, retrieve and process items from it, and update the status of each item after processing using RPA Genie Studio activities. 

Steps to add a queue alert:

  • Configure the common fields such as the ‘Alert Name’, ‘Person to Notify’ and ‘Enabled’ checkbox and Tags.
  • Select the Queue name using the dropdown list to which the alert has to be assigned.  
  • After selecting the queue name, the user has four options for setting up the queue Alert such as Queue Item added, Queue Item Abandoned, Queue item failed and Queue item completed. Select the appropriate alert type and then select the template name using the dropdown next to it.  
    • Queue Item Added – This alert notification will be sent when a new item is added to a particular queue. 
    • Queue Item Abandoned – This alert notification will be sent when the status of a particular queue Item is not updated and the queue item state changes to abandoned.
    •  Queue Item Failed – This alert notification will be sent when a particular queue item has failed due to any business/application errors.
    • Queue Item Completed – This alert notification will be sent once the processing of a particular queue item has been completed successfully. 
  • Click on the ‘Save’ button to add the Queue Alert.

Adding a Job Alert

Job represents the actual execution instance of an automation process. A job can be in various states such as scheduled, Running, Completed, Error, etc. indicating its current status and outcome.   

Steps to add a job alert:

  • Configure the common fields such as the ‘Alert Name’, ‘Person to Notify’ and ‘Enabled’ checkbox and Tags.
  • Select the Process name using the dropdown list for which the alert has to be assigned. 
  • After selecting the Process name, the user has seven options for job alerts. Notification can be sent for events such as Job Scheduled, Job Started, Job Not Started, Job Unresponsive, Job Completed, Job Faulted and Job Cancelled.  Select the appropriate alert type and then select the template name using the dropdown next to it.  
    • Job Scheduled – This alert notification will be sent whenever the job is scheduled on a particular robot at the specified Date and Time.
    • Job Started – This alert notification will be sent when the job has started to execute and the status of the job changes to running. It will provide the details about exactly when the job started to execute.   
    • Job Not Started – This alert notification will be sent only if the job has not started. This is based on the specified time interval to check whether the job has started or not.  
    • Job Unresponsive – This alert notification will be sent at any stage when a job becomes unresponsive to a particular robot.  
    • Job Completed – This alert notification will be sent on successful completion of the job. It will provide the details about the Start Time and End Time of the completed Job.  
    • Job Faulted – This alert notification will be sent whenever an error has occurred during the execution of a job and the status of the job changes to ‘faulted’. 
    • Job Cancelled – This alert notification will be sent whenever the scheduled job has been stopped, and the job status changes to ‘cancelled’. 
  • Click on the ‘Save’ button to add the Job Alert.

Adding a Robot Alert

A robot is defined as a software entity that executes automation developed within the RPA Genie Studio. The Robot Alert type will help to monitor the connection made to the Bot Manager and the notification will be sent when the robot is disconnected or connected. 

Steps to add a robot alert:

  • Configure the common fields such as the ‘Alert Name’, ‘Person to Notify’ and ‘Enabled’ checkbox and Tags.
  • Select the Robot name using the dropdown list.  
  • After selecting the Robot name, the user has two options for Machine Alerts. Select the appropriate alert type and then select the template name using the dropdown next to it.  
    • Bot Disconnected – This alert notification will be triggered when the bot is disconnected from the Bot Manager.
    • Bot Connected – This alert notification will be triggered when the bot is connected to the Bot Manager.   
  • Click on the ‘Save’ button to add the Robot Alert. 

Note: Robot alert will trigger only for attended automation.

Adding a Machine Alert

The machine is the physical or virtual environment in which the robot operates. The Machine Alert type will help to monitor the agent service connection and the notification will be sent when the machine is disconnected or connected.  

Steps to add a machine alert

  • Configure the common fields such as the ‘Alert Name’, ‘Person to Notify’, ‘Enabled’ checkbox and Tags.
  • Select the machine name using the dropdown list.  
  • After selecting the Machine name, the user has two options for Machine Alerts. Select the appropriate alert type and then select the template name using the dropdown next to it. 
    • Machine Connected – This alert notification will be triggered when the Agent service is connected.
    • Machine Disconnected – This alert notification will be triggered when the Agent service is disconnected.
  • Click on the ‘Save’ button to add the Machine Alert  

Add an Alert

To create a new Alert, the ‘add’ button must be clicked. It will open another window where the user can select among the five different alert types.

Common fields for alert configuration

On the Alert configuration window, there will be fields that are common and applicable while configuring any type of alert. They are listed below:

  • Alert Name: User can provide an appropriate name of their choice for any alert.
  • Enabled: The Enabled check-box can be checked by the user to make the Alert active.
  • Person to Notify: The email ID of the person to whom the alert has to be sent can be specified. Multiple email IDs can also be provided in this field. In case multiple users need to be notified, each email ID has to be separated by Comma (,)
  • Tags: The user can enter a relevant tag name for easy filtering in Bot Manager. (Optional)

Manage Alerts

The Manage Alerts feature of the Bot Manager is very essential for configuring various types of alerts to ensure effective monitoring. This feature allows users to create new alerts and edit or delete the existing Alerts. This feature supports the setup of alerts within the Bot Manager for machines, robots, jobs, queues, and triggers. By utilizing this functionality, users can receive timely notifications about significant events, allowing for prompt action and enhanced oversight of automated processes.

To access the ‘Manage Alerts’ tab, the user has to select the ‘Manage Alert’ option under the BMT settings drop-down. This tab displays the Alert details table consisting of the created Alert names, Category and the email ID of the users who need to be notified. The enable column indicates if the particular alert is active or not using the Boolean values true or false. To edit an existing alert, the ‘Edit’ option against the alert name can be clicked. Then a wizard will appear where the user can customize the alerting details. Lastly, if the alert is no longer needed for monitoring purposes, the Delete button for a specific alert can be clicked. A validation box with a warning will appear allowing the user to either confirm the deletion by selecting the “OK” option or to cancel it.

Import Export

The import-export feature allows users to keep a backup of certain data such as the Process, Queue, Resources, Triggers, NuGet Packages and Holiday Calendar from a particular Bot Manager environment. It also lets the user upload and restore the data that was backed up previously from one Bot Manager environment to another.

To access the Import Export window, the user has to select the Import Export under the Bot Manager settings. This functionality is split into two separate tabs under the Bot Manager:                                 

  1. Backup
  2. Restore.

The Backup tab functions as the export feature while the Restore tab serves as the import feature.

Backup

In the “Backup” tab, the user can export Process, Queue, Resources, Triggers, NuGet Packages, and Holiday Calendar that have been previously created in the Bot Manager. To store the data as a backup, the user can navigate through the lists and select the required data using the checkbox (for example – specific process, particular resource, etc.).  Once the data that needs to be backed up is selected, the preview button at the bottom can be clicked. Finally, the download option will be visible in the preview window.

Restore

The data that has been backed up and stored locally in the system can be uploaded and restored. Under the ‘Restore’ tab, the user can import Processes, Queues, Resources, Triggers, NuGet Packages and Holiday Calendars to the separate BMT environment as per the requirement. This can be performed by clicking on the “Browse” button and selecting the file to upload from the user’s local machine.

Data Retention

When the data storage becomes too large in the database, data retention helps to delete the old data from the database, which will free some space. Earlier, scripts had to be executed manually to clear the log space but now, Log Retention is used for this purpose.

There is an option to preserve the logs related to sessions, jobs, transactions, audits, and events for a certain number of days.
Note: On hovering the mouse over the question mark near those retentions, the user can view which tables in the database will be affected.


The number of days for which the data needs to be retained can be provided in the text boxes corresponding to each retention.
Example: If the number of days is provided as 15, then all the data except for the last 15 days will be deleted from the corresponding tables in the database.

  • Session Retention – specify the total number of days to retain the Session logs. The following database tables will be affected post that period: robot.Robot_Sessions, robot.MachineSessions.
  • Job Log Retention – specify the total number of days to retain the Job logs. The following database tables will be affected post that period: robot.Job, robot.JobLog, robot.Exception.
  • Transaction Retention – specify the total number of days to retain the Transaction logs. The following database tables will be affected post that period: robot.RobotTransactions.
  • Audit Retention – specify the total number of days to retain the Audit logs. The following database tables will be affected post that period: robot.RobotAudit, robot.MachineAudit, General.ServiceAudit.
  • Events Retention – specify the total number of days to retain the Events logs. The following database tables will be affected post that period: robot.RobotEvents, robot.MachineEvents.