The Project Snapshot feature of RPA Genie serves as a virtual snapshot of the entire automation project and provides users with the capability to capture both the source code and the comprehensive history of their project during the publishing process. This feature facilitates users to maintain a detailed record of all the changes made in the project.
Project Snapshot Capabilities
The capabilities of the project snapshot are listed as follows:
Source Code Capture: RPA Genie’s Source Code Capture goes beyond typical version control. It precisely captures the codebase during project publication, ensuring users can easily refer back to specific versions for a secure and controlled development environment. This mechanism preserves source code integrity, making it an integral part of Project Snapshot for confident analysis, recreation, or reverting to prior states.
History Logging: RPA Genie’s Project Snapshot history logging feature provides a chronological record of changes made throughout the development lifecycle, offering users transparency into the evolution of the automation project. This functionality documents every change, update, or modification made to the automation project. This includes details such as user contributions, timestamped edits, and version comparisons. With this granular history, users gain insights into the project’s progression, facilitating efficient collaboration and troubleshooting.
Snapshot Creation and Utilization
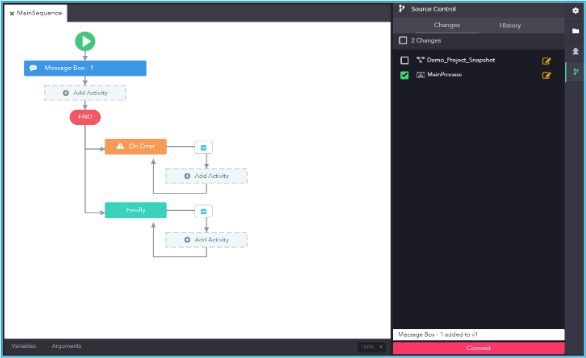
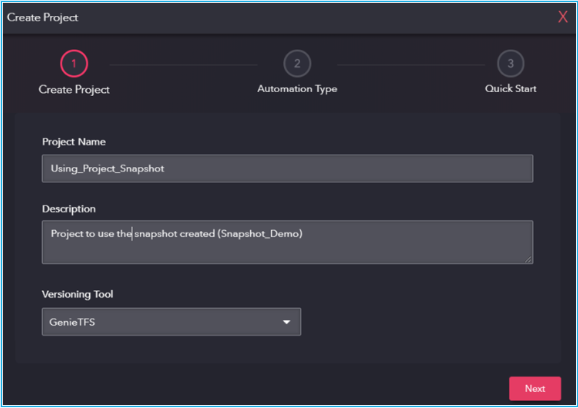
Creating a snapshot captures a project’s state at a specific version, allowing easy reference and rollback to specific point when needed. Follow the steps provided below to create a Project Snapshot:
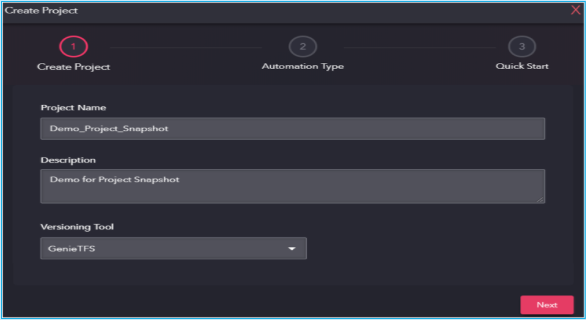
Open a new blank project by providing a suitable project name and description. Select ‘GenieTFS’ as the versioning tool.
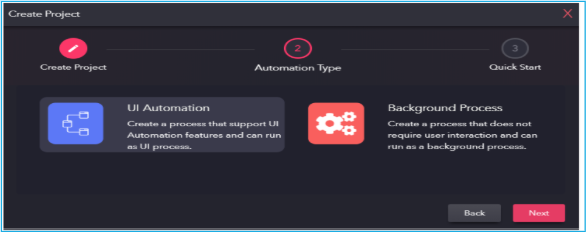
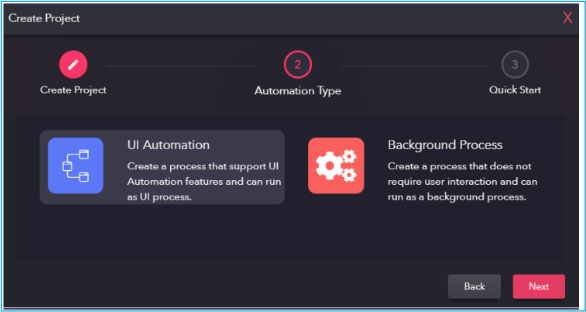
Select Automation Type and click ‘Next’.
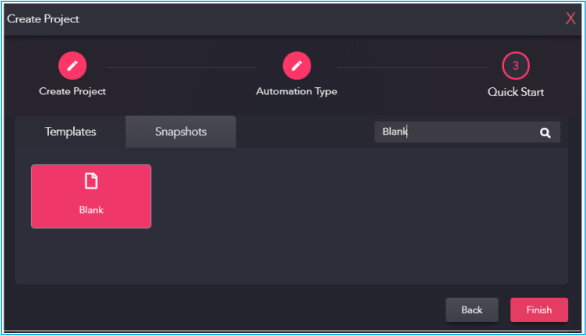
In the Templates tab, select the blank template and click the ‘Finish’ button.
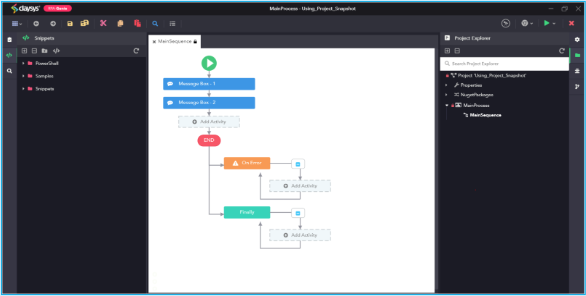
In the designer pane, add a Message Box activity. Set ‘Message Box -1’ as the label and ‘Version 1’ as the message, then save the changes.
Right-click on the project name in the Project Explorer. Select ‘Check-in All’ option to go to the source control panel.
Add a comment (e.g., “version1”) and click ‘Commit’.
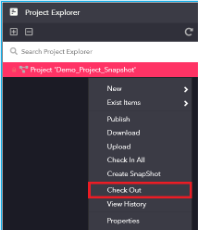
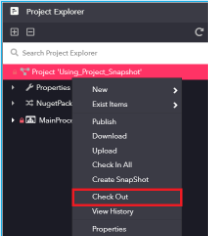
Right-click the project name again in the project explorer and select ‘Check-out’ to make new changes.
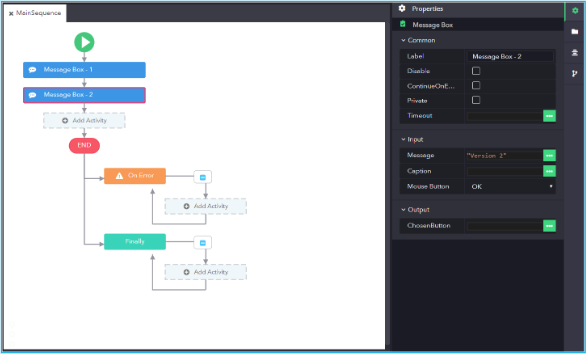
Add another Message Box activity in the designer pane. Label it ‘Message Box -2’ and set the message to ‘Version 2.’ Save the changes.
Repeat the check-in process by right-clicking the project name, selecting ‘Check-in All,’ adding a comment (e.g., “version2”), and clicking ‘Commit’.
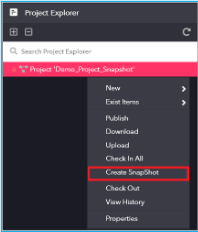
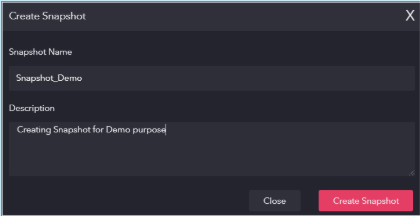
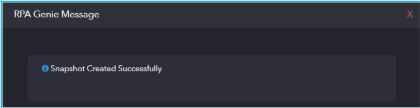
Right-click the project name, select ‘Create Snapshot’ option to create the project snapshot.
In the ‘Create Snapshot’ window, enter a snapshot name and description. The message “Snapshot Created Successfully” will pop-up after clicking the ‘Create Snapshot’ option.
Utilizing the created Project Snapshot
Using a snapshot quickly restores a project to a prior version, making it easy to review, modify, or revert changes without recreating the work. Follow the steps provided below to use the Project Snapshot created in the previous project:
Open a new blank project by providing a suitable project name and description. Select ‘GenieTFS’ as the versioning tool.
Select Automation Type and click ‘Next’.
In the Snapshots tab, select the previously created snapshot and then click ‘Finish’.
Next, view the workflow of the snapshot that was created previously. The project will open with the latest version displaying the activities added (i.e. both Message Boxes) added in versions 1 and versions 2 respectively.
Right-click the project name in the project explorer and select ‘Check-out.
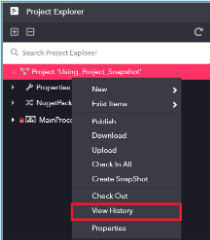
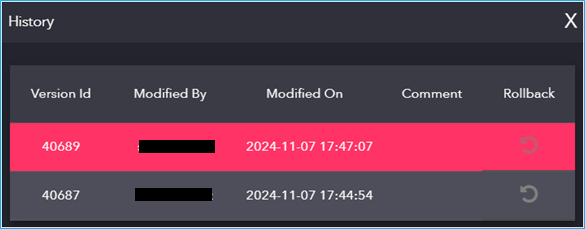
To view the project version history, right-click the project name and select ‘View History’ option.
In the History window, the details such as the Version ID, Modified By, Modified On, Comment, and Rollback options can be reviewed. It also allows users to revert to any previous version of the project snapshot.
PIP mode allows the user to run and test automation workflows in an isolated desktop environment, simulating a separate machine. This enables the user to continue using the main desktop without interruptions, making it useful for RPA developers testing and debugging workflows. Ideally, there are two ways to enable PIP mode. The first method is during installation, where a checkbox is provided to enable the child session. If it is not enabled during installation, the second method is to open PIP in Admin mode.
Using Studio Installer File
Steps:
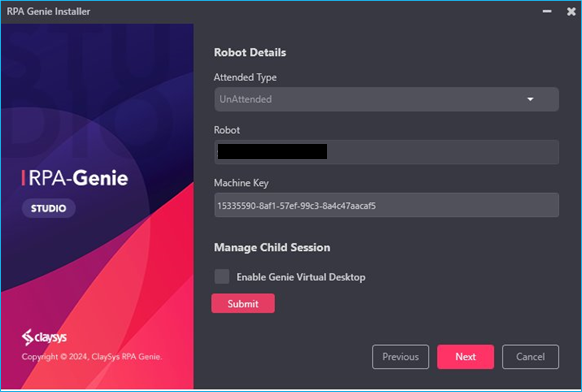
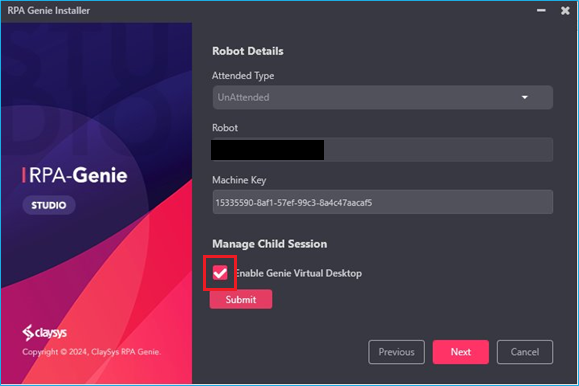
During the installation of version 8, the Robot Details window appears with a heading called Manage Child Session.
Tick the checkbox under Manage Child Session to enable Genie Virtual Desktop.
Click Submit to proceed.
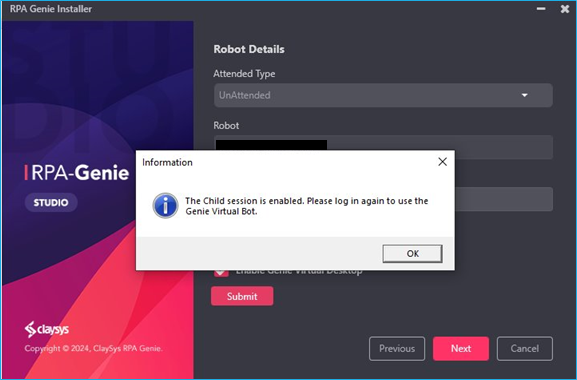
A popup will appear; click ok to log in again and enable the child session, then finish the installation.
Note: Properly signing out and signing back into the machine enhances the effectiveness of PIP mode.
Opening PIP in Admin Mode
Steps:
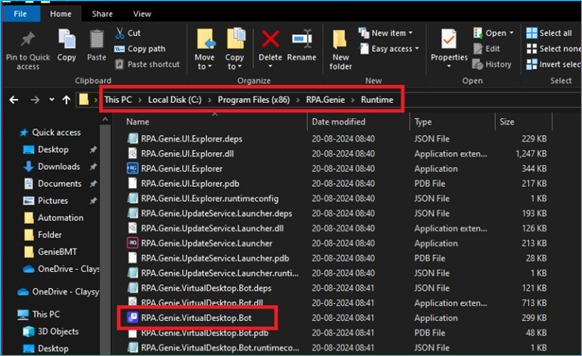
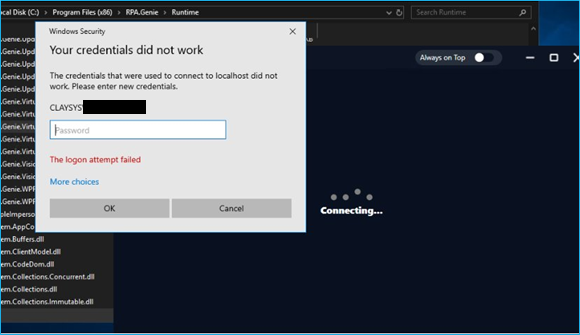
Navigate to C:\RPA.Genie\Runtime on local system.
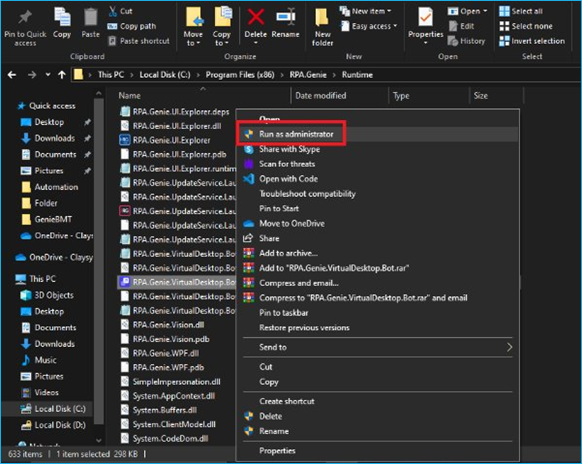
Right-click on RPA.Genie.VirtualDesktop.Bot.
Select Run as Administrator from the menu.
Enter the required credentials when prompted.
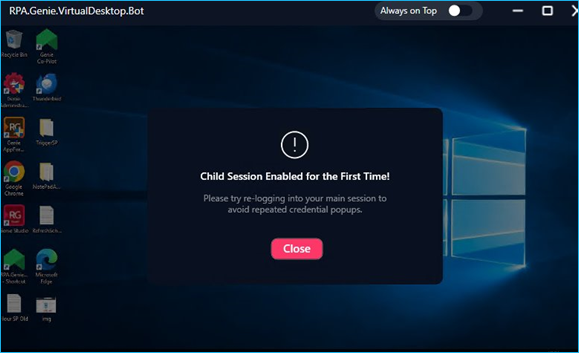
A popup will confirm that the child session is enabled for the first time.
Note: Properly signing out and signing back into the machine enhances the effectiveness of PIP mode.
Advantages of PIP Mode
Parallel Execution: Allows attended bots to work on one desktop session while the user continues working in another.
Improved User Experience: Eliminates the common problem of bots interrupting users during automation.
Better Testing and Debugging: Developers can test how a process behaves in a separate session without logging off their own desktop.
Secure Environment: Runs in an isolated session, helping reduce the risk of sensitive data being manipulated during automation.
Increased Productivity: Multitasking becomes more efficient when automation doesn’t require full user interaction or session control.
How to run a project in PIP mode?
Steps:
Create a project in the studio and publish it.
Ensure that the Published Project is listed as a Package under the “Packages Tab”.
Add the required package as a process by selecting the appropriate package name and version.
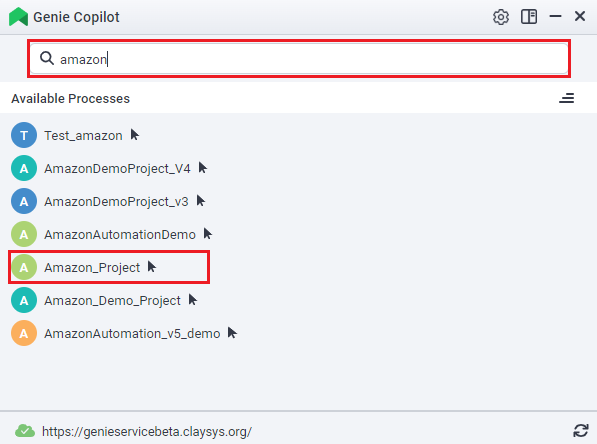
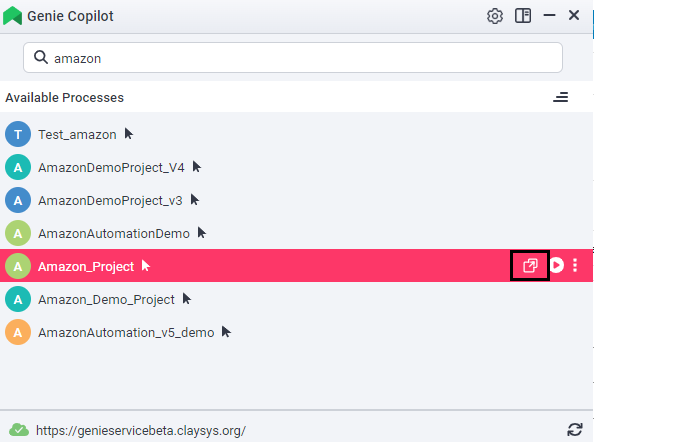
Open the Co-pilot and search for the added project.
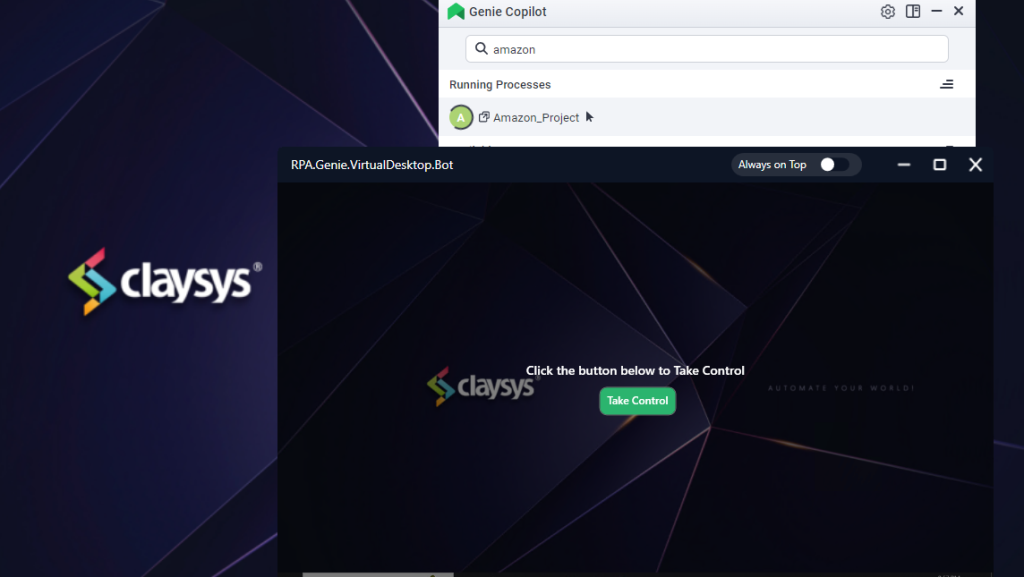
Hover on the Project, and the user can see the PIP mode icon.
Click on the PIP mode icon then the user can see a virtual desktop showing on their machine.
Note: The user can take control of the virtual desktop by clicking the Take Control button displayed within the virtual desktop.
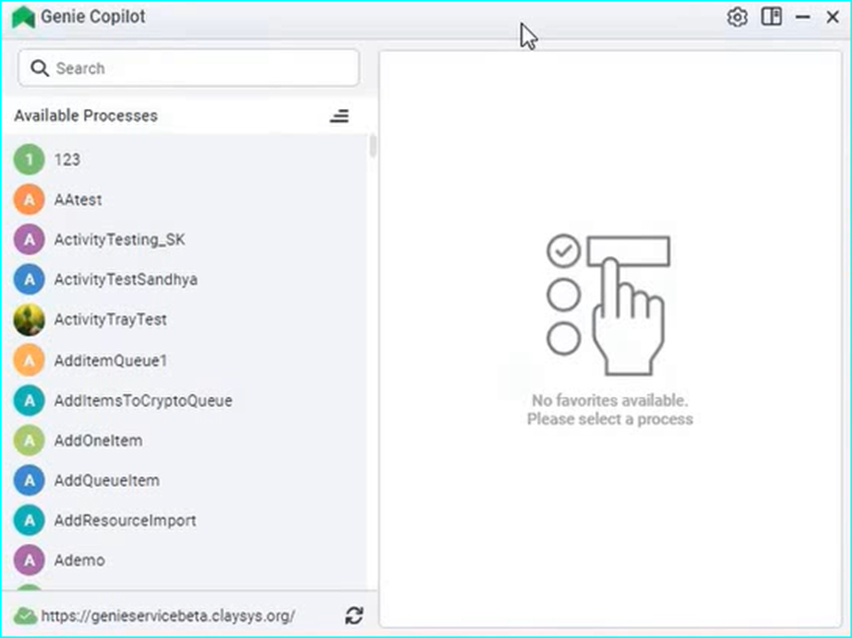
RPA Genie Co-Pilot is an enhanced version of the RPA Genie Agent. Even though the functionality is the same as that of the Agent, Co-Pilot consists of some additional features.
Major features of the Co-Pilot are as follows:
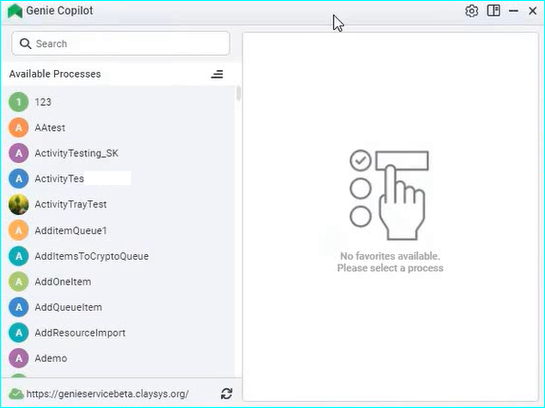
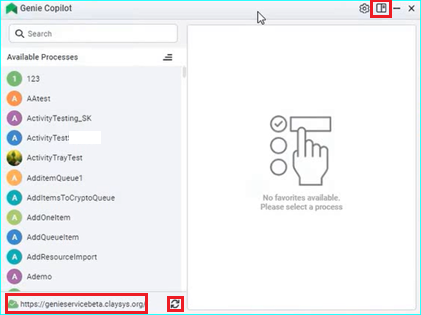
Dashboard displays the list of all available processes that were created and published via RPA Genie Studio. There are two options to sort this list by clicking on the three lines next to ‘Available Processes:
Sort by alphabetical manner (A-Z and Z-A).
Sort by date of creation.
Dashboard has a search option, where users can find a particular process they wish to execute.
From the dashboard, the listed processes can be managed (started, paused and stopped). To initiate a process, click on the play button. While the process is being executed, you will be able to pause or stop the process.
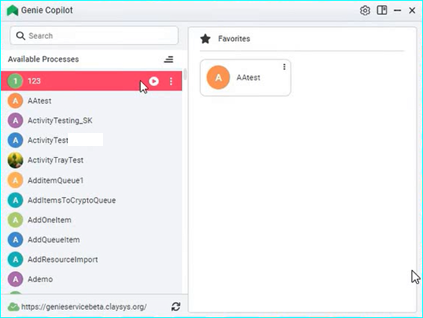
Users are allowed to add or remove processes as favorites by clicking on the three dots. After adding as favorite, the process will appear in the favorites window. The user will be able to start/pause/stop execution from here. The process can also be removed from the favorites window with the help of favorite settings.
Users have the option to add images for each process and can configure the title of the process which can be added in the project property settings at the time of publishing a project using the studio. This will make it more convenient for the user to select and run the required process.
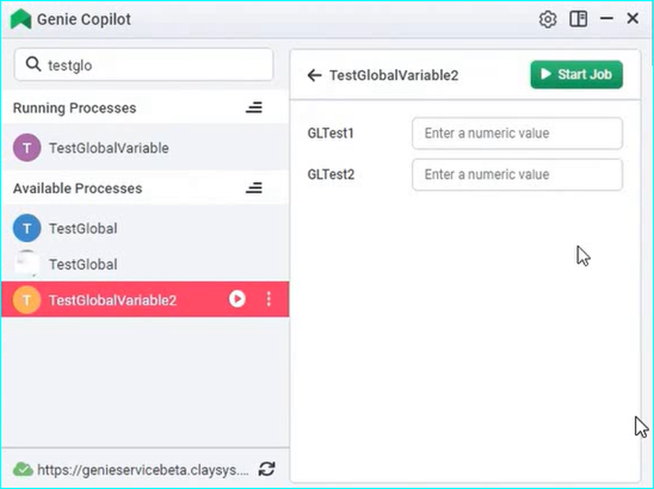
If any of the automation processes are using global variables, prompting for user input, it will get reflected on the co-pilot dashboard where the user will be able to provide the input.
Note: The global variable only supports string, whole number and Boolean types. It will only get reflected in the co-pilot if the direction of the global variable is set as ‘In’ in the Genie Studio project.
At the bottom, dashboard shows the Genie service URL to which it is connected. If connected, it will be indicated with green tick else if it is offline, it will be indicated as a red cross sign.
At the bottom, there is an option to refresh the co-pilot. It will help re-load all the available processes as well as the favorites window.
At the top right, next to the settings icon, the user can change the grid/view of the Co-Pilot dashboard such that available processes will be shown either in the left panel or in the entire window by collapsing the favorites section.
When Co-Pilot is offline due to lack of internet connectivity or a disconnected VPN, it displays the status: SE_Disconnected -Unable to connect to the service. During this time, a ‘Take Offline’ button is available. Clicking this button allows users to access and execute their projects offline within Co-Pilot.
Once connectivity is restored and the service becomes operational, users receive a notification: “Server is now online. The service URL is now accessible. Would you like to switch back to online mode?” The user can then choose to proceed by clicking ‘Yes’ or remain in offline mode by selecting ‘No’.
This feature ensures a smooth transition between offline and online modes.
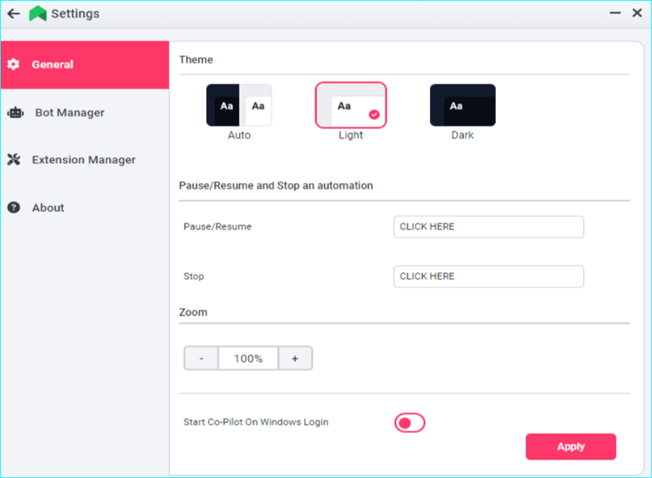
By using the settings window, the user may change the copilot preferences to improve the experience. Under general settings, it is possible to change the theme (Auto, dark and light mode), able to zoom in/out, able to pause/resume/stop any automation by stating the key condition and enable automatic start of co-pilot upon windows login. Users may save these preferences by clicking on the apply button.
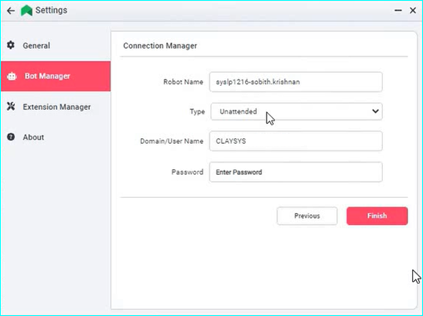
By using the settings window, the user has the ability to connect or disconnect from the BOT using the bot manager tab. Here, the service URL, robot name, type (Attended/Unattended), domain/user name and password can be configured to make the connection possible.
In the Bot Monitoring Tool, AppForms utilizes the Forms Authentication method for user authentication. This approach grants access to both Active Directory (AD) Users and custom users within the site. The AD Users are individuals listed in the active directory, whereas custom users are individuals whom an admin user can create within the site. To grant access, users must be added to the AppForms Site through the security module.
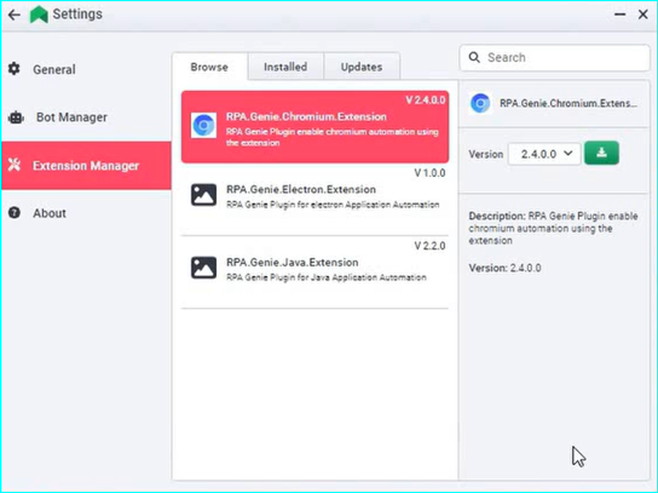
By using the settings window, the user can manage various plugins by using the extension manager. Users will be able to browse various extensions, see the previously installed extensions as well as check for any updates. The plugin details such as the description and version number will be displayed. Users will have to manage extensions manually based on the versions that users prefer to download and use.
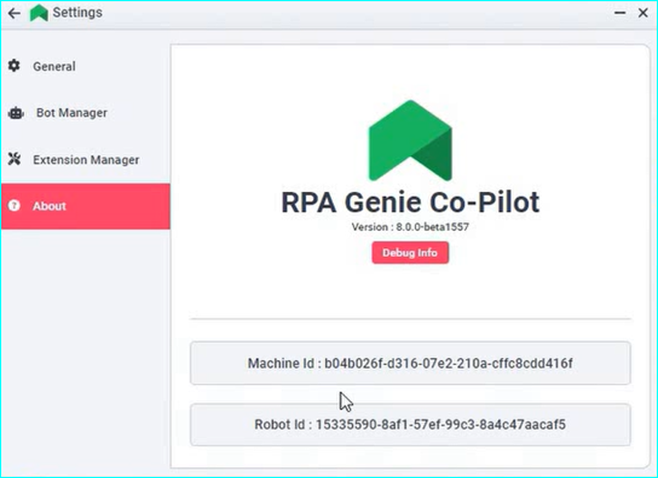
The user can access the “About” window to learn more about RPA.Genie.Co-Pilot V2. The installed version number, Machine ID and Robot ID can be viewed from here. More details regarding the configurations can be accessed by clicking the ‘Debug Info’ option.
The RPA Genie Co-Pilot is a taskbar application to enhance user experience. The interface can be customized as per the user’s preferences. This tool can also act as a personal digital assistant. All the attended automation’s can be easily accessed, managed, and run. Co-Pilot is the host that helps execute the automation that we have created using the RPA Genie Studio. An enhanced version of the RPA Genie Agent is the RPA Genie Co-Pilot. Even while Co-Pilot has the same capabilities as the Agent, it also has some extra features.
The below image depicts the new UI designed for Co-Pilot V2:
Note: We can run multiple background processes at the same time, but we cannot run multiple UI processes. Only one UI process will be performed at a time.
The Cryptography section of the RPA Genie Administrative Console Portal provides a simple interface for encrypting or decrypting text using selectable algorithms and modes.
Algorithms: It is used to select the encryption/decryption method. There are two options: Default (RPA Genie) and BMT (AppForms)
Modes: It is used to select operation type. There are two options: Encrypt and Decrypt.
Enter Salt: Specify additional value added to strengthen the encryption/decryption.
Enter Plain or Encrypted Text: This field allows users to input the plain text (for encryption) or paste the encrypted text (for decryption). Click ‘Convert’ button to process.
Result Text: This field displays the final encrypted or decrypted result.
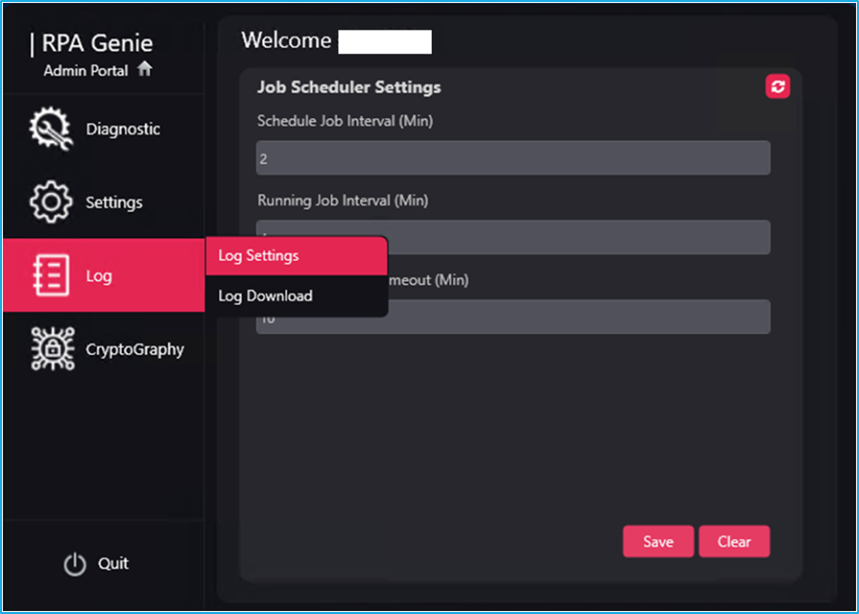
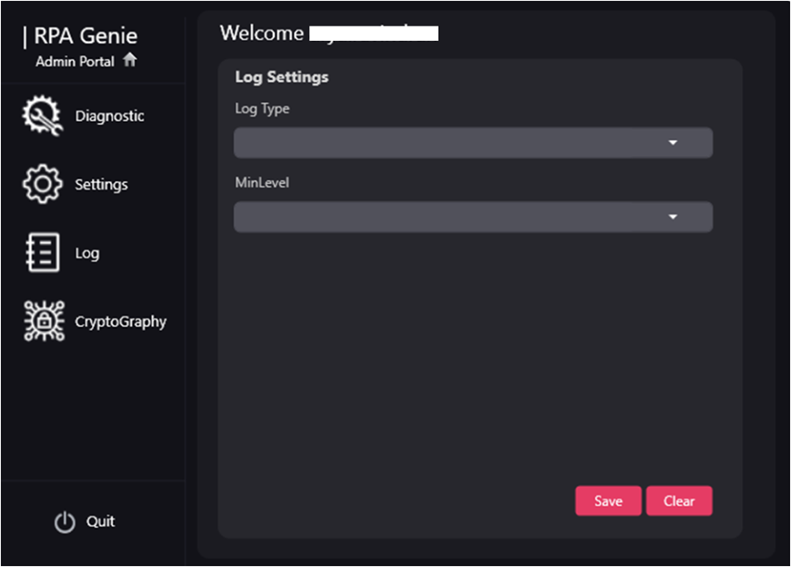
In the Log page, users can configure settings related to logging. Logging is the process of recording events, actions, or messages that occur within the Admin Console. Logs are useful for debugging, monitoring, and analyzing the behavior of the application. By clicking on the “Log” button, users will be navigated to the “Log Settings” and “Log Download” window.
Log Settings
Log Type: Logs can be categorized in various ways based on the nature of the information they capture. Following are the common types of logs:
EventLog:These logs capture events or incidents that occur within a system. Examples include login attempts, system startups and shutdowns, security events, and application-specific events.
File:File logs record activities related to file and directory operations. This includes creating, modifying, deleting files, and other file system-level events.
MinLevel: In this field, users will be able to specify the minimum log level that should be recorded or displayed. Log levels are used to categorize log messages based on their severity or importance. Log messages with a severity level equal to or higher than the specified minimum level will be captured or displayed, while messages with a lower severity will be ignored.
Trace: The lowest level of severity, typically used for very detailed debugging information. Messages at this level provide fine-grained details about the application’s behavior.
Debug: Used for debugging information. Debug messages are slightly less detailed than trace messages but are still intended for debugging and development purposes.
Error: Indicates that an error or exception occurred during the application’s execution. Error messages are used to capture and report problems that need immediate attention.
Info: Informational messages that indicate the normal operation of the application. These messages are typically used to capture important events or milestones in the application’s execution.
Warn: Warnings represent potential issues or non-critical problems. They indicate that something unexpected happened or that there may be a problem that should be investigated.
Fatal: The most severe log level, used to indicate critical errors that usually lead to the application’s termination. Fatal messages are reserved for the most severe issues.
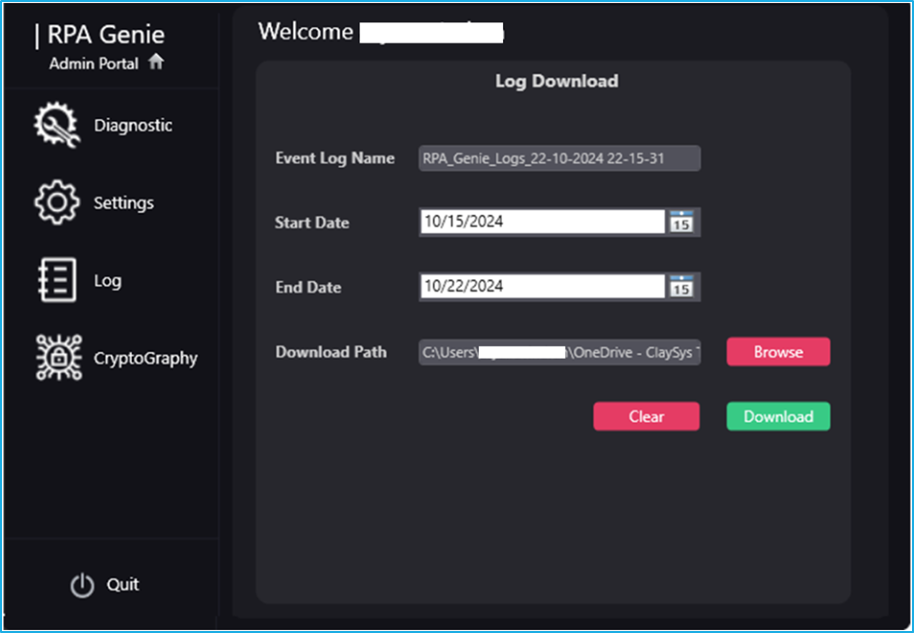
Log Download
Event Log Name: This field refers to the specific log or set of logs that the user would want to download. In a system or application, there could be multiple logs capturing different types of events or activities (e.g., security logs, application logs, system logs). The “Event Log Name” allows the user to select the specific log or category of logs that they are interested in.
Start Date: This field indicates the beginning date and time from which the user would want to include the log entries in the download. It helps the user to narrow down the range of logs they are interested in. Only log entries recorded on or after the specified start date will be included in the Download.
End Date: Similar to the “Start Date” field, the “End Date” field allows the user to set the date and time up to which they want to include the log entries in the download. Log entries recorded on or before the specified end date will be included.
Download Path: This field specifies the location or path where the downloaded log file will be saved on the local system. It could be a directory or folder path where the user wants to store the log file. This is the location on the computer where the downloaded logs will be stored for further analysis or archiving
The “Clear” button will remove all the details filled in the respective fields and the “Download” button will download the file in a “.evtx” file format.
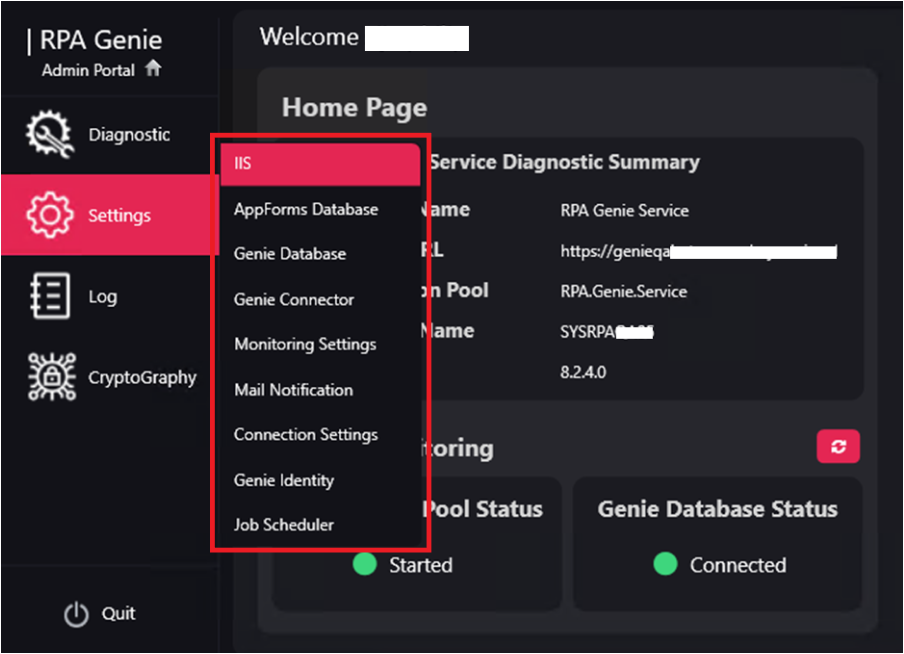
User can access a list of options in the RPA Genie Admin Console by clicking on the “Settings” tab, as illustrated in the image below.
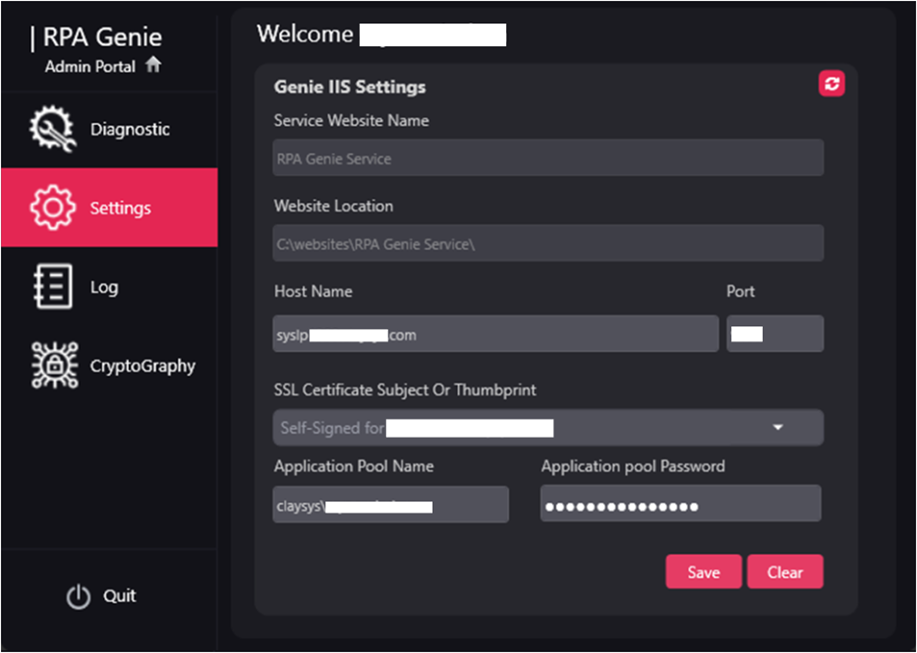
IIS
IIS, or Internet Information Services, is a web server software by Microsoft that is used for Windows servers. It is utilized to host and manage websites, web applications, and services.
From the IIS window of RPA Genie Admin Console, users can configure the following fields:
Service Website Name: The website name of the RPA Genie Service will be displayed in this field.
Website Location: The location of the RPA Genie service that is installed on youruser’s machine will be displayed in the Website Location field.
Host Name & Port: The hostname and port number of the RPA Genie Service can be visible in this field.
SSL Certificate Subject or Thumbprint: In the SSL Certificate dropdown list, the user can see all the available certificates in the user Domain and also can bind any of the certificates with the IIS Settings of RPA Genie Service.
Application Pool Name: This field is often set as ‘Server-name/Username’ to identify which user or service account is running the application on that server.
Application pool password: It’s the password for the identity (user account) under which the application pool runs.
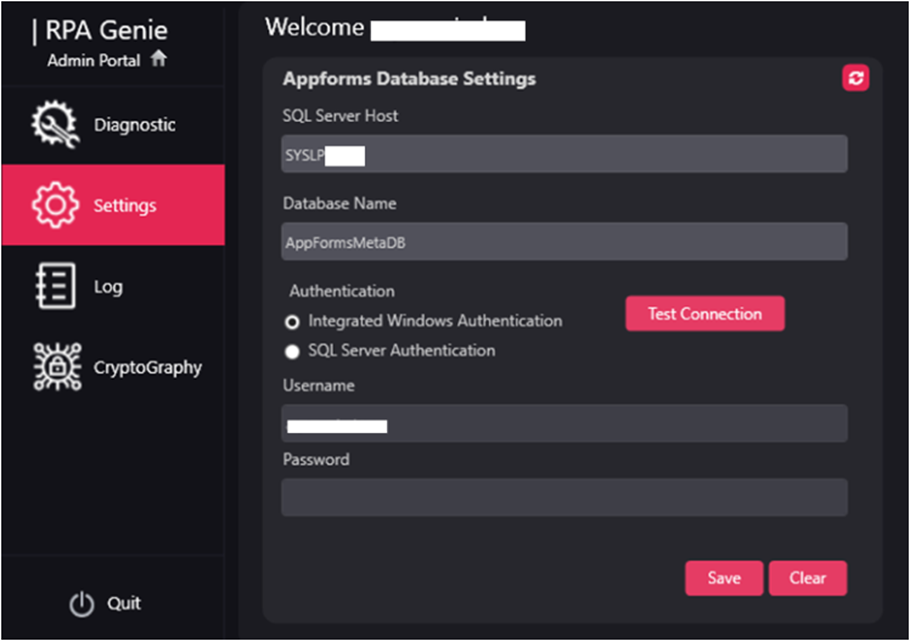
AppForms Database
Authentication methods are stored and managed centrally in the AppForms DataBase. It enables the users to securely store and access authentication information, such as usernames and passwords, which can be used to confirm the legitimacy of users accessing applications or systems while improving security and access control.
The following fields of the AppForms Database window are editable by the users:
SQL Server Host: The AppForms Database SQL Server Host of the AppForms Service will be shown in the SQL Server Host field.
Database Name: The AppForms Database Name of the AppForms Service will be shown in the Database Name field.
Authentication: In this field, the user can select between Integrated Windows Authentication (which uses the Windows login credentials) and SQL Server Authentication (which requires a SQL username and password). A Test Connection button is available to verify the database connection when using Integrated Windows Authentication. Test Connection button is not applicable when using SQL Server Authentication.
Username: The Username of the user connected to the AppForms Database can be seen in the Username field.
Password: The user’s password connected to the Appforms Database will be shown in a masked format in this field.
Note: The Username and Password fields are disabled when Windows Authentication is selected and become editable only when SQL Server Authentication is chosen.
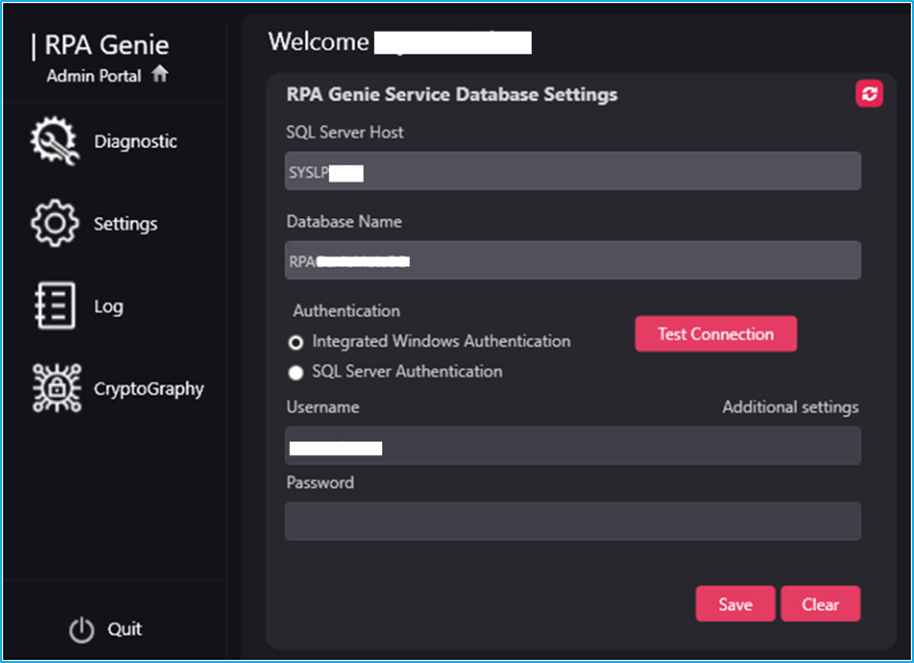
Genie Database
The Genie Database acts as a comprehensive storage system for storing all metadata associated with a particular application or system. For effective data management, retrieval, and manipulation for various processes and functionalities, it preserves key information about data structures, configurations, and relationships within the application.
The following fields of the Genie Database window are editable by the users:
SQL Server Host: The Genie Database SQL Server Host of the RPA Genie Service will be shown in the SQL Server Host field.
Database Name: The Genie Database Name of the RPA Genie Service will be shown in the Database Name field.
Authentication: In this field, the user can select between Integrated Windows Authentication (which uses the Windows login credentials) and SQL Server Authentication (which requires a SQL username and password). A Test Connection button is available to verify the database connection when using Integrated Windows Authentication. Test Connection button is not applicable when using SQL Server Authentication
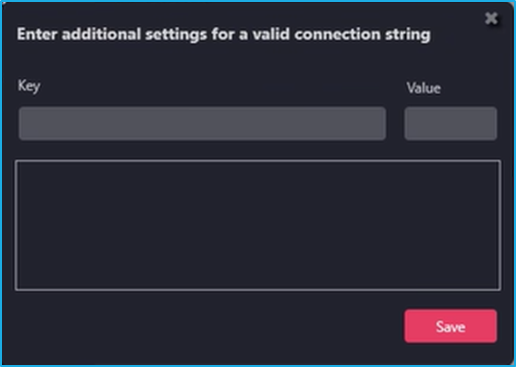
Additional Settings: By clicking on the additional settings, the user will be able to add additional properties to the connection string in the form of a Key value pair.
Username: The Username of the user connected to the Genie Database can be seen in the Username field.
Password: The user’s password connected to the Genie Database will be shown in a masked format in this field.
Note: The Username and Password fields are disabled when Windows Authentication is selected and become editable only when SQL Server Authentication is chosen.
Additional Settings Wizard:
Genie Connector
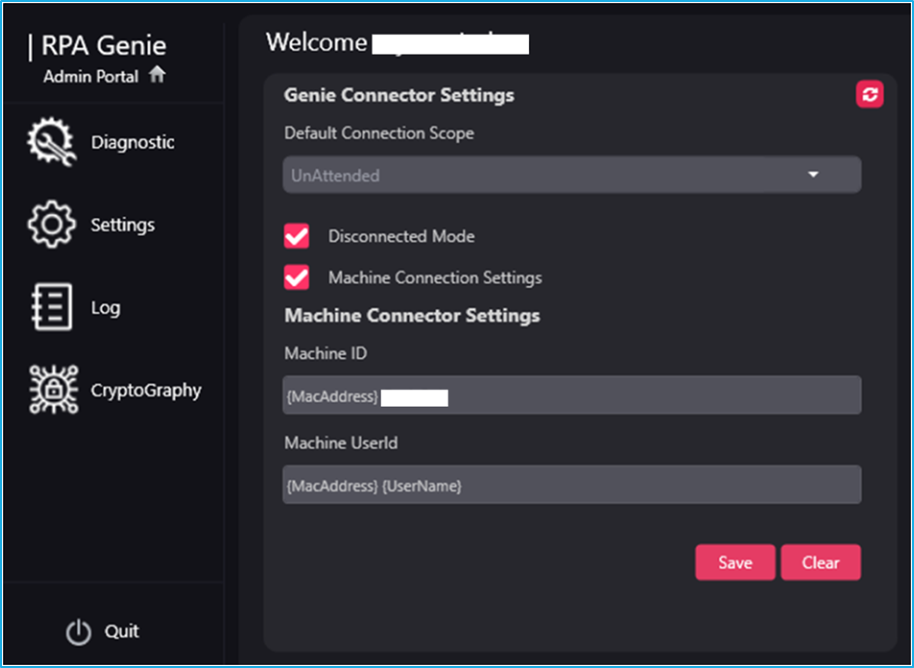
The Genie Connector Settings provides a unified interface to configure how RPA bots connect and operate across machines. It allows users to define the bot’s connection scope, enable offline access through Disconnected Mode, and set up Machine Connection Settings. These settings include a unique Machine ID to identify each device and a Machine UserId that combines the machine address with the username, ensuring accurate mapping, secure communication, and efficient automation across both attended and unattended environments.
The following fields of the Genie Connector Settings window are editable by the users:
Default Connection Scope: Bots are classified as Attended or Unattended based on whether they require user interaction (Attended) or can run automatically in the background (Unattended).
Disconnect Mode: When this checkbox is selected, it enables offline access when the RPA service is stopped. This allows CoPilot to display the Offline button after a short delay.
Machine connection settings: When this checkbox is enabled, it allows the user to input a unique Machine ID and Machine UserId for accurate bot-to-device mapping.
Machine ID: A machine ID is a unique code or a number assigned to a computer or device, serving as a unique identifier for the system.
Machine UserId: This field creates an individual identifier for a particular computer or device by combining the machine name and username, which are separated by a hyphen.
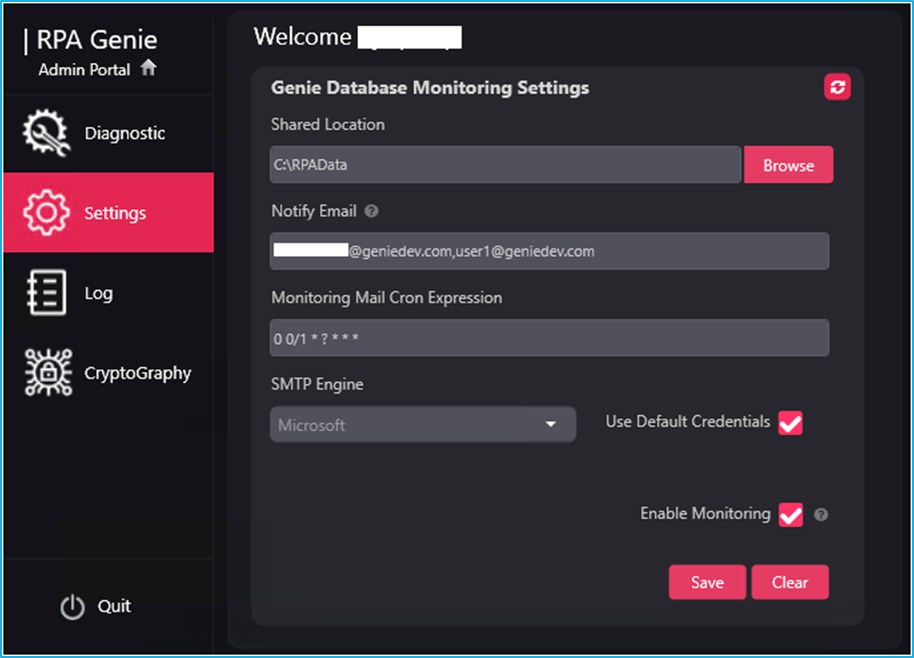
Monitoring Settings
Users will be able to configure Shared Location and Notify Email options in the Monitoring Settings window.
Shared Location: This field indicates the same shared place from which the installation bundle, packages, and extensions can be accessed. Also, the user will be able to browse to change the shared location path and configure it to a different location, so that all the files will be accessible from that configured location.
Notify Email: In the Notify Email field, users can provide the Email ID to which the notification has to be sent. Users can also give multiple Email IDs separated by a comma.
SMTP Engine: This field allows users to select their mail notification engine, which can either be Microsoft or MailKit for accessing their emails using the dropdown menu.
Use Default Credentials: Select thecheckbox to enable the use of system default credentials for mail access.
Enable Monitoring: Select the checkbox for enabling genie Database Monitoring.
Monitoring Job Cron Expression: A cron expression is a string representing a schedule in the form of fields, separated by spaces. Each field represents a unit of time, such as minutes, hours, days, and so on. Cron expressions are commonly used in job scheduling to define when a job should run. A monitoring job cron expression typically specifies the schedule for monitoring tasks or jobs.
A cron expression consists of five or six fields, representing the following:
Minute (0 – 59): The minute at which the job should run.
Hour (0 – 23): The hour at which the job should run.
Day of the month (1 – 31): The day of the month on which the job should run.
Month (1 – 12 or JAN-DEC): The month in which the job should run.
Day of the week (0 – 6 or SUN-SAT): The day of the week on which the job should run.
Year (optional): An optional field for specifying the year.
Field Name
Mandatory
Allowed Values
Allowed Special Characters
Minutes
Yes
0 – 59
, – * /
Hours
Yes
0 – 23
, – * /
Day of month
Yes
1 – 31
, – * ? / L W
Month
Yes
1 – 12 (representing Jan – Dec), JAN – DEC (case-insensitive)
, – * /
Day of week
Yes
0 – 6, 7 (representing Sun-Sat and Sun again), SUN – SAT (case-insensitive)
, – * ? / L #
Year
No
empty or 1970-2099
, – * /
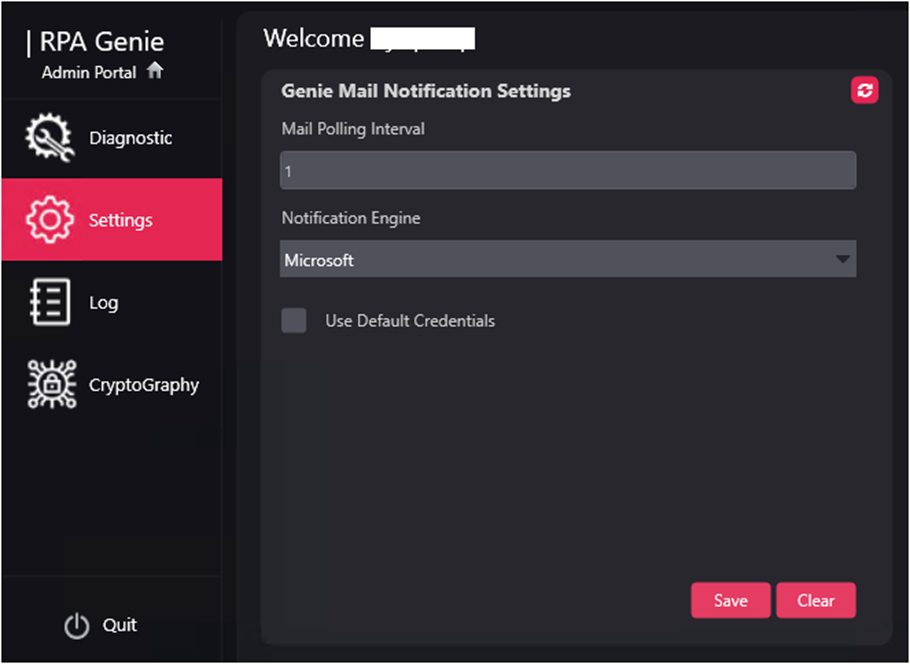
Mail Notification
The Genie Mail Notification Settings window is used to customize email-related settings. The email polling behavior and the preferred engine for handling mail notifications can be configured.
Mail Polling Interval: This field allows users to specify the time interval (in minutes) to receive mails from BMT alert.
Notification Engine: Users have the option to choose their mail notification engine, which can either be Microsoft or MailKit, from a dropdown menu for accessing their emails.
Use Default Credentials: If this checkbox is checked, then the default credentials will be used to send the mail through the Microsoft server. If it is unchecked, then the mail is sent with the respective SMTP credentials provided in Bot Manager. This is only applicable to Microsoft SMTP Server.
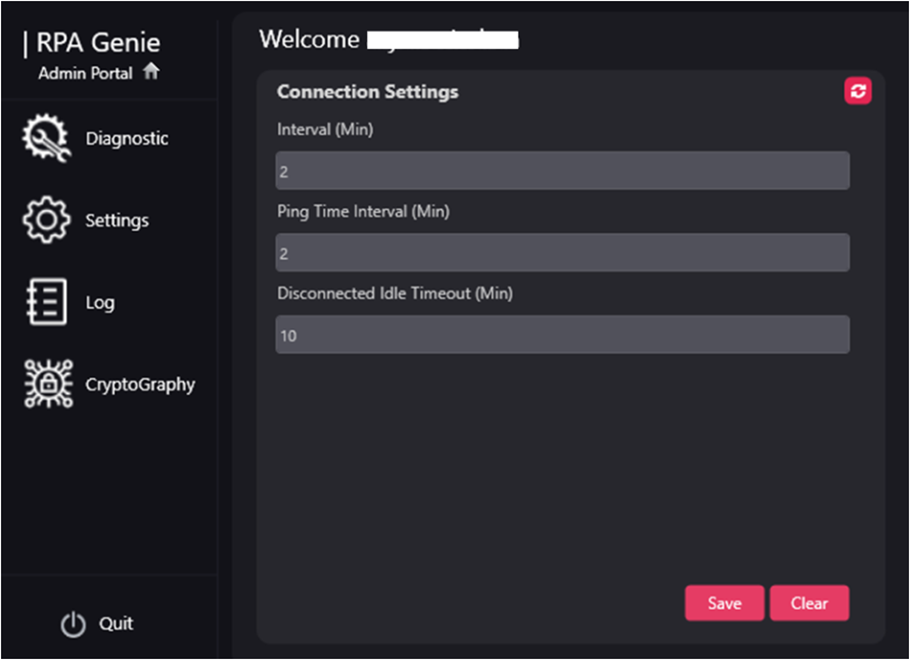
Connection Settings
The Connection Settings window allows users to configure how frequently their robot or machine communicates with the RPA Genie Service. These settings help ensure consistent connectivity and timely status updates.
The Connection settings window enables the user to customize the following fields:
Interval (Min): This field specifies the frequency or time interval (in minutes) at which a robot/machine establishes a connection with the Service URL.
Ping Time Interval (Min): The frequency or time interval (in minutes) at which a service notifies the user whether or not a robot/machine is still connected to the service URL.
Disconnected Idle Timeout (Min): The time limit/interval (in minutes) up to which the robot/machine tries to re-establish the connection with the RPA Genie Service. After the specified time limit the status of the robot/machine will change to disconnected.
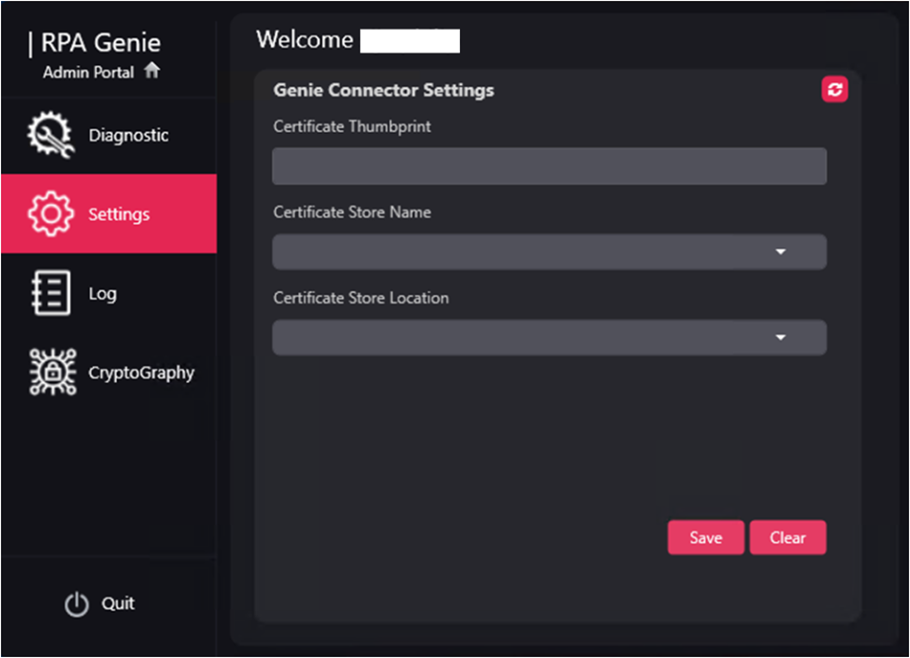
Genie Identity
The Genie Identity section under Settings allows users to configure certificate details required for secure connection and authentication through the Genie Connector.
Following are the fields that the user can edit in the Genie Identity window:
Certificate Thumbprint: This field allows the user to enter the unique identifier of the certificate to be used.
Certificate Store Name: This field allows the user to select the store where the certificate is located using options such as AddressBook, AuthRoot, CertificateAuthority, Disallowed, My, Root, TrustedPeople, and TrustedPublisher from the dropdown.
Certificate Store Location: This field allows the user to select the location scope for the certificate store using options such as CurrentUser or LocalMachine from the dropdown.
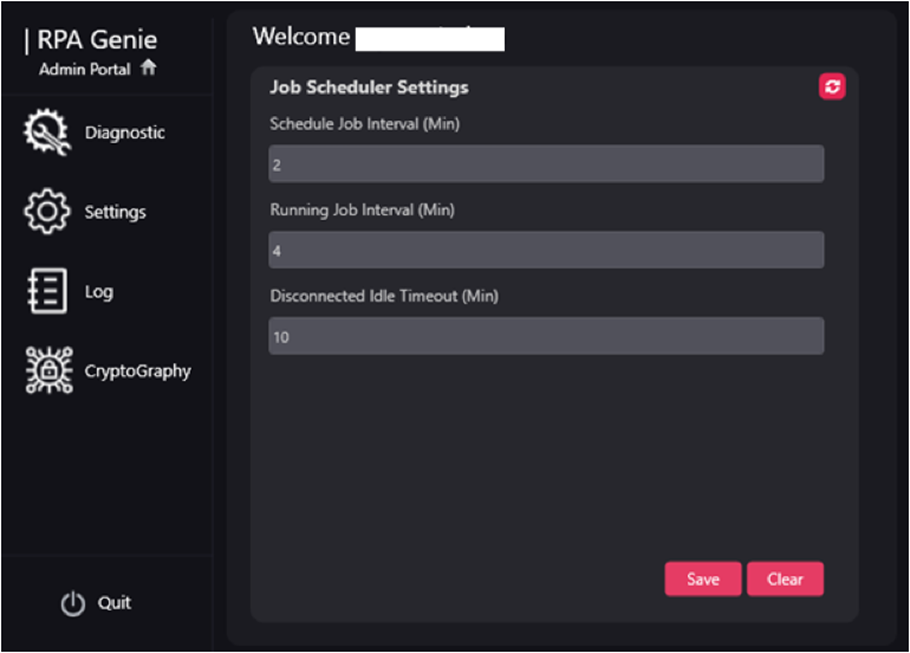
Job Scheduler
A job scheduler automates job execution by defining how often specific jobs will be running, their active execution intervals, and the maximum idle time before termination.
Following are the fields that the user can edit in the Job Scheduler window:
Schedule Job Interval (Min): The time duration or frequency (in minutes) can be configured in this field to run a specific job or task automatically in a scheduled manner.
Running Job Interval (Min): The Running Job Interval specifies the time interval or frequency (in minutes) at which a job or process is actively running or executing.
Disconnected Idle Timeout (Min): In this field, user can specify the maximum period of inactivity allowed for a job to remain disconnected (not actively processing) before it is terminated or marked as inactive by the scheduler.
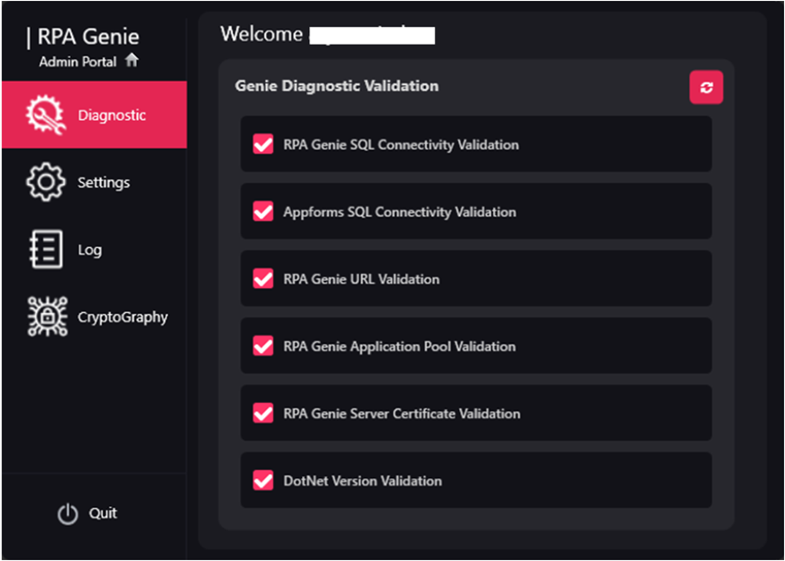
The user will be redirected to the Genie Diagnostic Validation when they click on the “Diagnostic” section of the RPA Genie Admin Console, where six primary validations are listed, as follows:
RPA Genie SQL Connectivity Validation
AppForms SQL Connectivity Validation
RPA Genie URL validation
RPA Genie Application Pool Validation
RPA Genie Server Certificate Validation
DotNet Version Validator
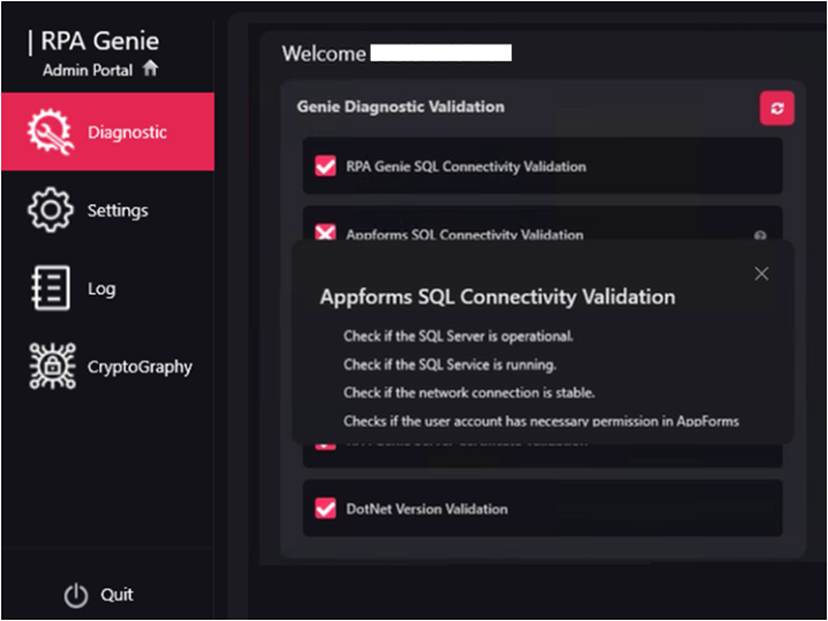
The tick mark next to each validation indicates that no validation errors have been detected. However, if any of the validations has a cross mark next to it, then the user can check the error details by clicking on the corresponding question mark icon, which will open a wizard that would suggest the possible resolutions for the validation error, as illustrated below:
As shown in the above image, an error occurred when RPA Genie SQL Connectivity was being validated. On clicking the icon, a pop-up wizard displayed the list of all possible solutions.
The following list of potential fixes is provided for each validation in case of an unsuccessful validation:
RPA Genie SQL Connectivity Validation
Check if the SQL Server is Operational.
Check if the SQL Service is Running.
Check if the network connection is stable.
AppForms SQL Connectivity Validation
Check if the SQL Server is Operational.
Check if the SQL Service is Running.
Check if the network connection is stable.
RPA Genie URL validation
Check if the RPA Genie Service site is running.
RPA Genie Application Pool Validation
Check if the RPA Genie Application Pool is running.
Check and validate the RPA Genie Application Pool User Credentials.
RPA Genie Server Certificate Validation
Check if the Certificate bound with the Genie Service is Valid.
Check if the Certificate is Expired.
DotNet Version Validator
Check if the dot net core version is updated or not.
The RPA Genie Administrative Console is a diagnostic tool that can assess functionality, guide users about the status of a particular functionality, and let users review and modify the settings that regulate the way RPA Genie Service operates. It will be installed at the same time as the RPA Genie service and will be available on the Genie Server.
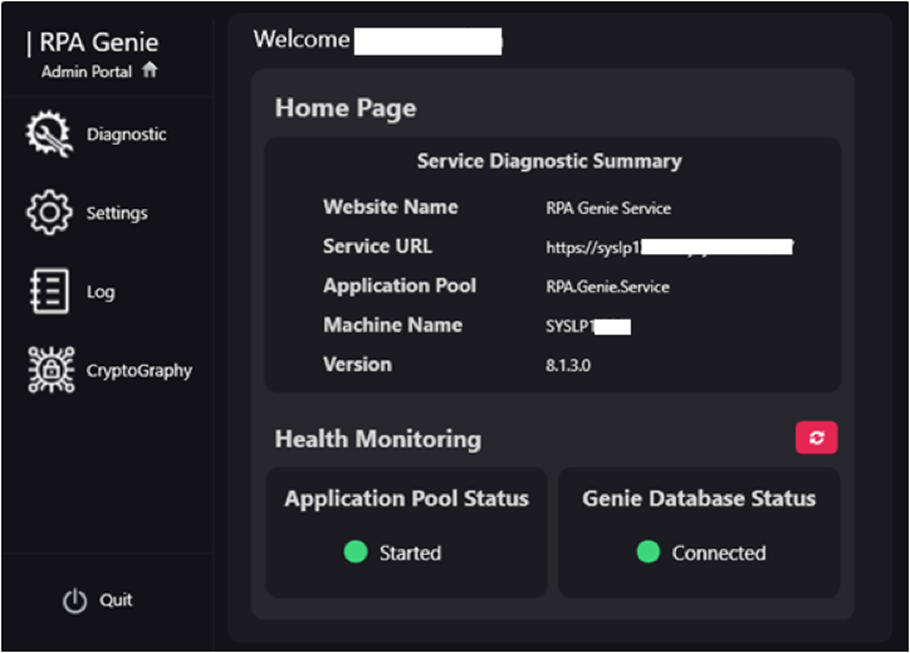
Welcome Page
In the “Home Page” of the RPA Genie Admin Console, the users will be able toview the Service Diagnostic Summary and Health Monitoring status.
The “Service Diagnostic Summary” section includes the following fields:
Website Name: This field displays the Website name of the RPA Genie Service.
Service URL: This field displays the Service URL of the RPA Genie Service.
Application Pool: This field shows the Application Pool name of the RPA Genie Service.
Machine Name: This field will display the user machine name where the RPA Genie Service is deployed.
Version: This field displays the currently installed version of the RPA Genie Service.
The “Health Monitoring” section includes the following fields:
Application Pool Status: The Application Pool Status for the RPA Genie Service will indicate whether the Application pool has Started or Stopped.
Genie Database Status: The user can check the status of the connection between RPA Genie Service and the Genie Database (i.e., Connected or Disconnected) through this field.