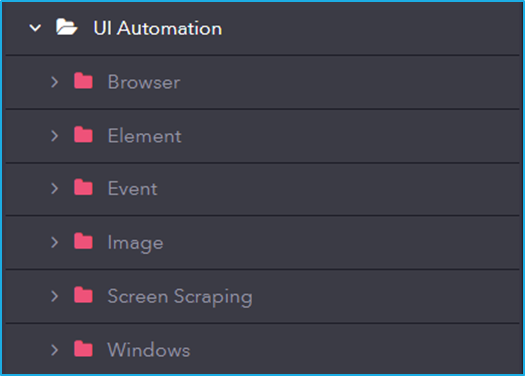
UI automation includes activities for interacting with user interface elements, such as clicking buttons, entering text, extracting data, and automating web or desktop applications.
Here are some common properties typically found under the UI Automation section:
Element Properties:
Element: This field supports only the UI Element variable returned by another activity.
Repository Element/UI Element: Element from the available UI Windows in the current project or a library project.
Selector: String of code that uniquely identifies a specific UI element on a webpage or application.
There are some common properties which are included in certain activites under UI Automation such as:
BoundingBox: Bounding Rectangle in pixels relative to the UI Element.
UpLevels: UI hierarchy to find the ancestor.
Post Validation:
The four types of post-validations are as follows:
Element Appear: Checks if the element has appeared after the current UI activity has performed its designated action.
Element Vanish: Checks if the element has vanished after the current UI activity has performed its designated action.
Text Changed: Checks if the text on the website matches the one provided by the user after the current UI activity has performed its designated action.
Text: Input the text that needs to be validated.
Property Changed: Checks if the value corresponding to the property name on the website matches the one provided by the user after the current UI activity has performed its designated action.
PropertyName: The property name of the indicated UI element.
Value: Input the value that needs to be validated.
Element Type: This is a common UI element property present in all four types of post-validations mentioned above.
Target Element: Performs validation on the same UI Element which was indicated during the initial configuration of the Element fields in the current UI activity.
Custom: Allows the users to provide different configurations for a specific UI Element from the one provided in the current UI activity.
Element: This field supports only the UI Element variable returned by another activity.
UI Element: Element from the available UI Windows in the current project or a library project.
Selector: String of code that uniquely identifies a specific UI element on a webpage or application.
Timeout: Predefined interval of time passed without a certain event occurring.
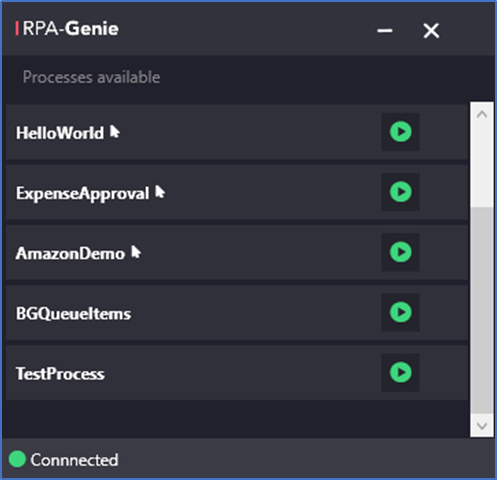
The Genie studio includes Genie activities, which helps in creating an easy automation process. Genie Activities are the steps or actions which can be carried out on an application.
Using ‘workflow designer’, a sequence can be created which is the combination of multiple built-in activities. RPA Genie Studio has a number of native activities.
For example, if the user wants to click a button in an application, the ‘Click’ activity can be used. The ‘Click’ activity can be configured to specify which UI Element in the application needs to be clicked. Another example is typing into a text box. For this, ‘Send Keys’ activity can be used. This activity helps to configure in which field the user wants to send keys to and what keys/characters need to be typed in.
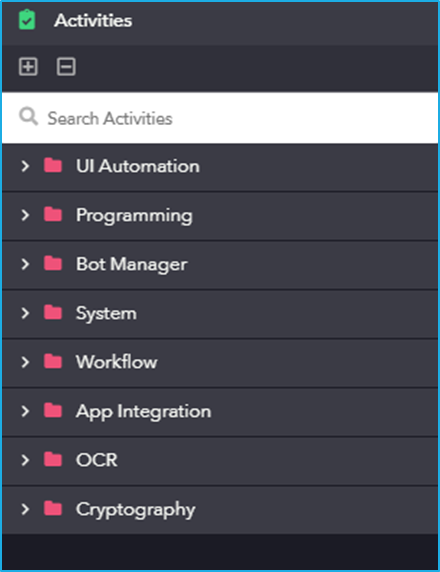
Screenshot of Activity pane
The Activities Panel lists different categories of activities. These activities can be used for creating web UI automation, data manipulation, integrating processes with Database and Excel applications, working with local files/folder and desktop applications, etc.
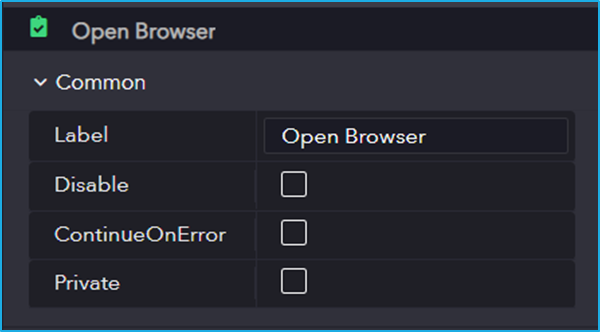
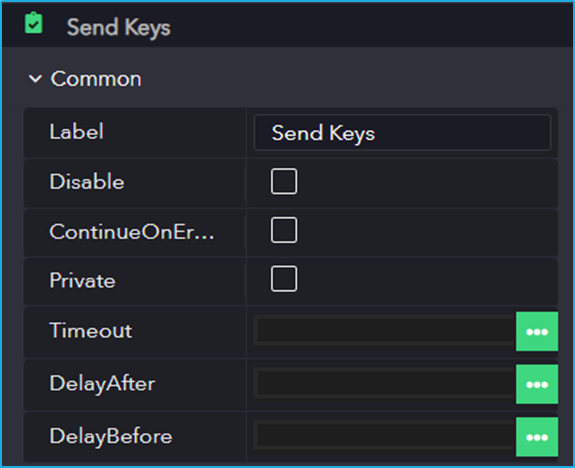
Common Properties of Genie Activities
Most of Genie Activities has the following common properties:
Label – In this field, the user can provide a unique name to distinguish this particular activity from others.
Disable – If this checkbox is checked then, then the corresponding activity will not get executed when the process is running.
ContinueOnError – If this checkbox is checked then, even if the activity that is currently being executed encounters some error, the remaining activities will continue to execute without the error message being displayed.
Private – If this checkbox is checked then, the log for the corresponding activity will not be shown in the Bot Manager.
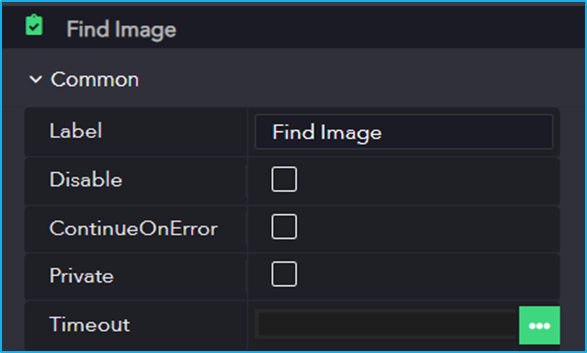
There are some extra properties which are not common to all Genie activities in the “Common” section such as “Timeout, Delay After, Delay Before”.
Timeout – Fixed amount of time elapsed without a particular event happening.
Delay After – Delay time after executing the activity.
Delay Before – Delay time before executing the activity.
The properties in the “Common” section can contain around three to seven fields depending on the activity as shown below:
The above sections can now be understood in detail:
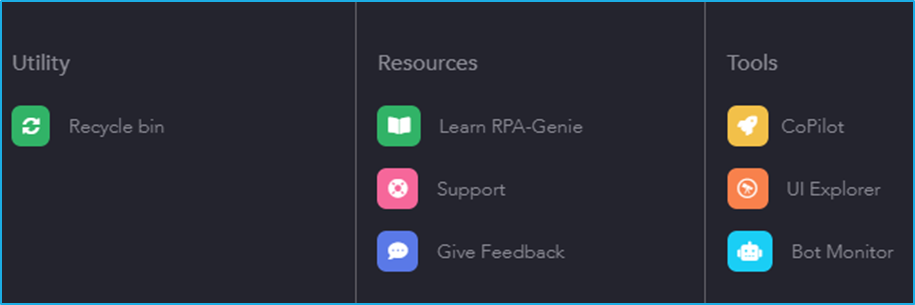
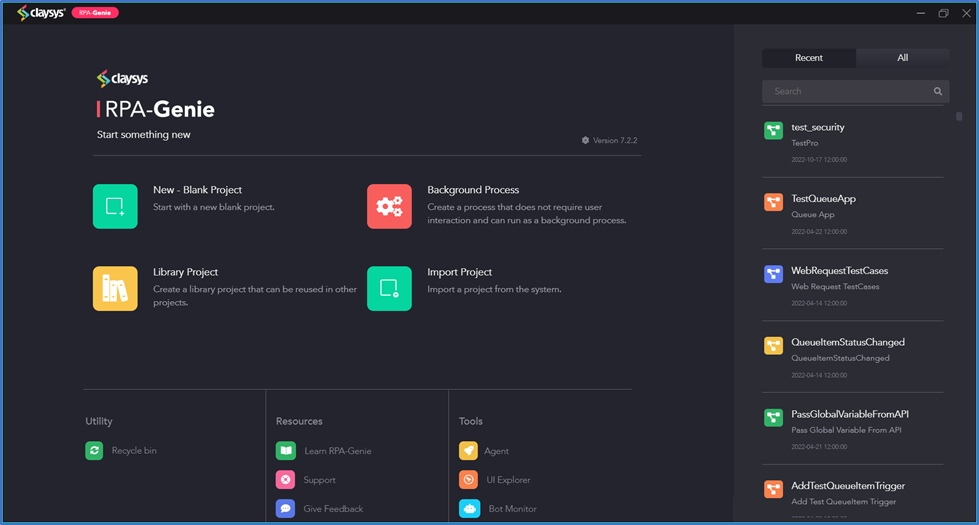
Utility
The utility section consists of a Recycle Bin icon.
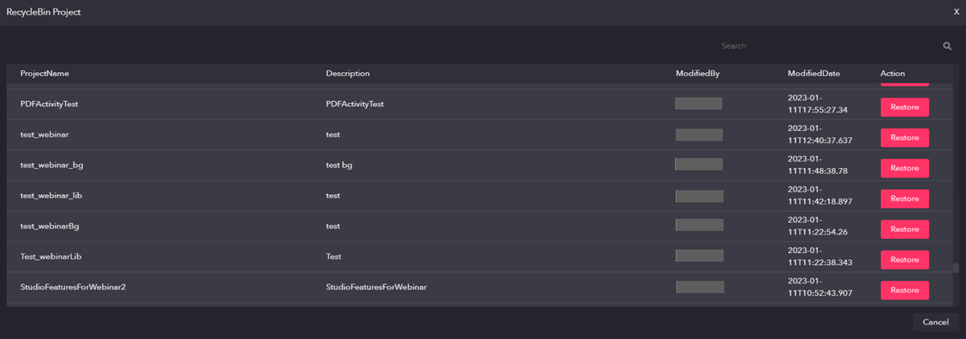
Recycle Bin
This feature contains all the projects that have been deleted by any of the users. Also, there is a restore option in the ‘Action’ column using which the user can restore the deleted projects as per the requirement.
Resources
The resources section has the following icons:
Learn RPA-Genie
On clicking the ‘Learn RPA-Genie’ icon, it will navigate the user to an online documentation where the user will be able to gather in-depth knowledge about RPA Genie.
Support
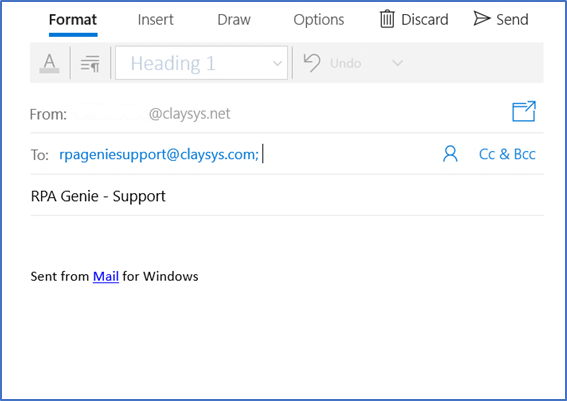
If the user needs any kind of support regarding RPA Genie, an email can be sent to the Support Team by clicking on the “Support” icon. The user will be able to see a mail window in which the ‘From’ and ‘To’ addresses and also the subject (i.e., RPA Genie – Support) will be already mentioned as shown in the above image. User can specify their concerns or issues anytime via the mail.
Give Feedback
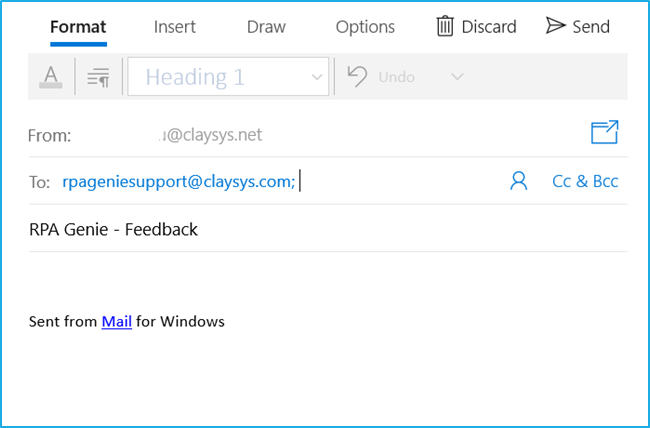
Users can also convey their valuable feedback by clicking on the “Give Feedback” icon which will be redirected to a mail window. In this window ‘From’ and ‘To’ addresses and also the subject (i.e., RPA Genie – Support) will be auto-populated as shown in the above image.
Tools
The tools section has the following icons:
Agent
Through Agent, the user can manage processes, register and connect the robot to BOT Manager. The Agent will be accessible from the System Tray. Upon right-clicking on the agent icon in the System Tray, a menu with options for Settings, Packages and Exit will appear.
Users can start, pause and stop processes from the Agent. Users can register a bot using the agent. Once registered, the bot will be automatically connect to BOT Manager
N.B. – Ensure agent service is in running state in the Services application.
Bot Monitor
The Bot Monitor will redirect the user to the Bot Manager to which the RPA Genie Studio is connected.
RPA Genie Studio is a visual designer that is used to create or configure automation processes on Windows applications or web applications. The components that revolve around the Genie Studio are BOTs and BOT Managers. Using Genie Studio, users can design a process automation, run the automation and deploy it to the local system or to the Bot Manager. The studio has many enterprise features that help the users to create automation with ease like debugging, exception handling, logging and collaboration.
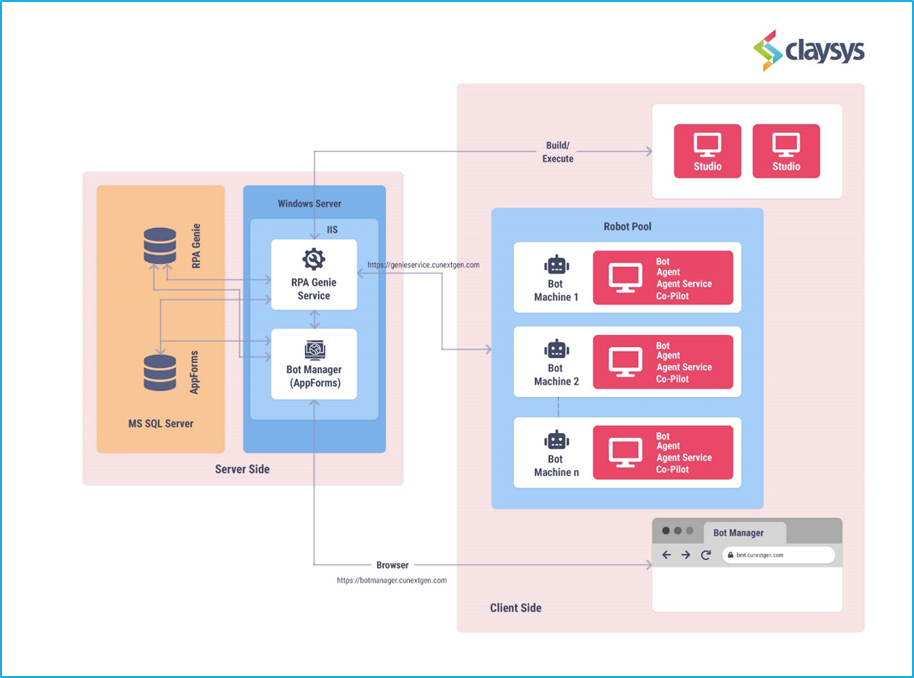
The architecture of RPA Genie can be categorized into two parts. One is the Server side and the other one is the Client side.
Server side
The Server side consists of a Database server and a Windows server.
Database Server:The RPA Genie database and the AppForms database will reside in the database server. The RPA Genie database is responsible for storing all the metadata related to automation, while the AppForms database contains information pertinent to the Bot Manager.
Windows Server: The RPA Genie service and the Bot Managerwill be hosted on the Windows server. The RPA Genie service will establish communication between the bots and the database server. Bot Manager interacts with the RPA Genie database to access automation metadata and communicates with the RPA Genie Service through APIs. Users can access Bot Manager using a browser, similar to how you access any other web application.
Client side
The Client layer consists of RPA Genie client applications used for developing and running applications. RPA Genie Studio must be installed on machines dedicated to creating automation and configurations. All configured automation metadata is stored in the RPA Genie Database via the RPA Genie Service. The number of machines with Studio installed can be increased based on the parallel development needs for various use cases.
Subsequently, the deployed automation can be executed on bot machines as two different types: attended automation and unattended automation. The number of bot machines can be scaled according to specific use cases. These bot machines communicate with the RPA Genie Service in the Server layer through APIs.
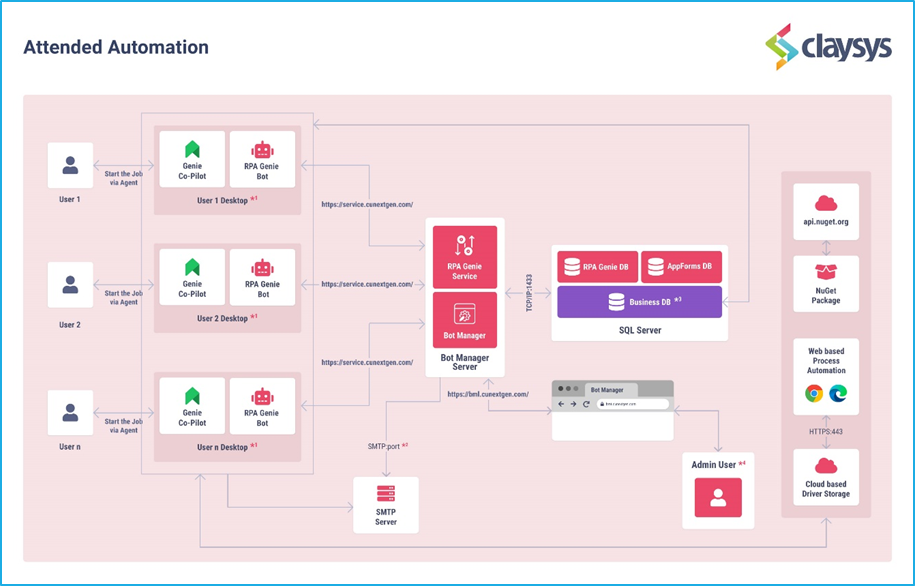
[Attended Bot]: Attended Bots are the Bots that are ready and activated by a person whenever they are needed to execute a process. These bots need human supervision. This automation will be running on the same session in which the user is logged in.
[Unattended Bot]: Unattended Bots are the Bots that will operate on a pre-set schedule or as a trigger using logic in the process flow. These bots don’t need to be supervised by humans. This automation will be running under Remote Desktop Protocol sessions (RDP) based on the user that is configured for the bots in the bot manager.
NB: In both the Attended and Unattended Bot, The Bot manager applicationand Bot manager service are installed on the application server. This server will establish communication with the SQL Server via the default TCP/IP port 1433. The Bot Manager can be accessed using the URL that is configured at the time of installation.
*1 Bot users: If the system is a Windows desktop, only one user can log in at a time. However, on a Windows server, up to two users can log in concurrently. For terminal servers, Multiple bot sessions can be allowed concurrently. For automation requirements, it’s essential to whitelist specific URLs for downloading Chrome Driver, NuGet packages, and Edge Driver on Bot machines. This ensures seamless integration and access to necessary resources.
*2 SMTP: Depending on the SMTP server configuration, the SMTP port could be set to 25, 465, 587, or 2525. It’s crucial to whitelist at least one of these ports based on the server configuration to ensure proper communication and delivery of emails. This is optional based on process requirements.
*3 Business DB: Business DB access for Bot machine users is optional based on automation requirements. The Business Database serves the specific purpose of maintaining data separately for individual processes. Each automation has the option to utilize its own Business DB, ensuring separate data storage and management.
*4 Admin user: Users such as IT team and process contributors may manually initiate RDP sessions for purposes such as updating products and debugging.
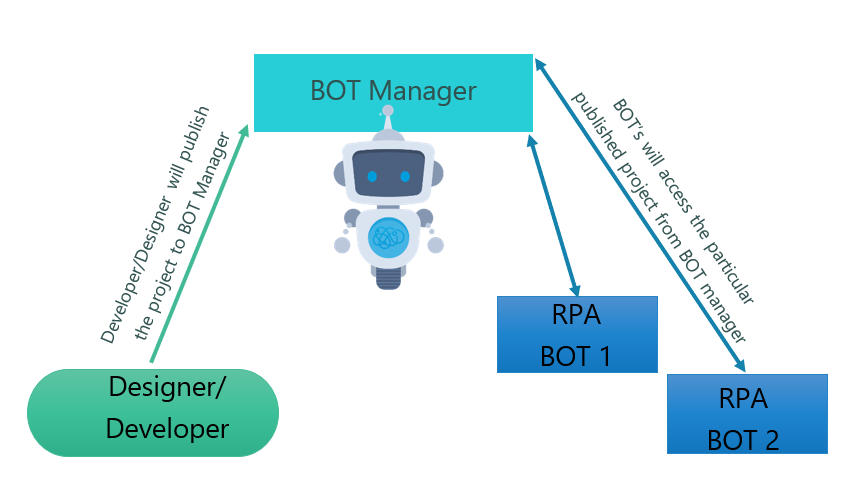
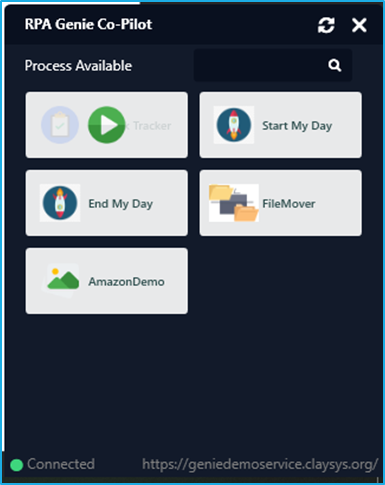
In the attended Bot workflow, the Bots are installed on the user’s desktop, allowing users to initiate attended automation directly through the Co-Pilot from the system tray.
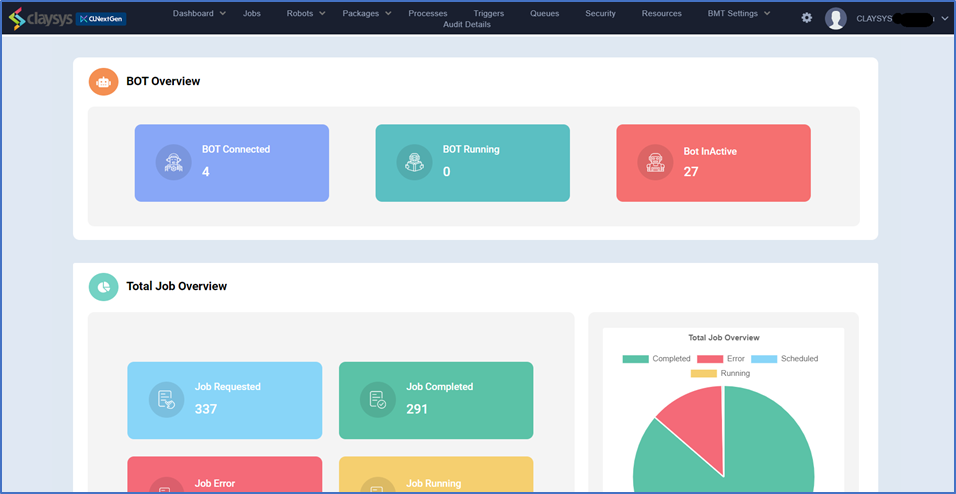
The Bot Manager serves as a valuable tool for administrative users to publish the automation that is subsequently accessible to all users for execution. Additionally, it also helps in monitoring and tracing all the automation that has been executed.
The Bot Manager service serves as a communicator between each individual bot and the Bot Manager application. This service is responsible for retrieving automation information and recording automation logs, which are then written to the Bot Manager.
SMTP Server
RPA Genie provides a notification alert feature enabling email notifications for various workflow actions. This functionality relies on an SMTP server to send email messages. Access should be granted from the Bot Manager Server to the SMTP server on the configured port (e.g., 25, 587, etc.). To enable bots to send SMTP emails to users based on specific process requirements, access to the SMTP server must be allowed for the designated bot machines.
Web-based Automation & NuGet Packages
For every version of Chrome and Edge, we require the respective WebDriver to be downloaded and utilized. As this is an automated process, we only need to whitelist URLs related to the WebDriver dependencies. In addition to this when utilizing NuGet packages, if a package includes secondary dependencies, whitelisting the secondary source URL enables the Genie bot to autonomously resolve these dependencies.
Note: These URL’s has to be Whitelisted in RPA Genie Application level. Failure to whitelist these URLs will necessitate the manual download of all drivers and NuGet dependencies to ensure smooth automation execution.
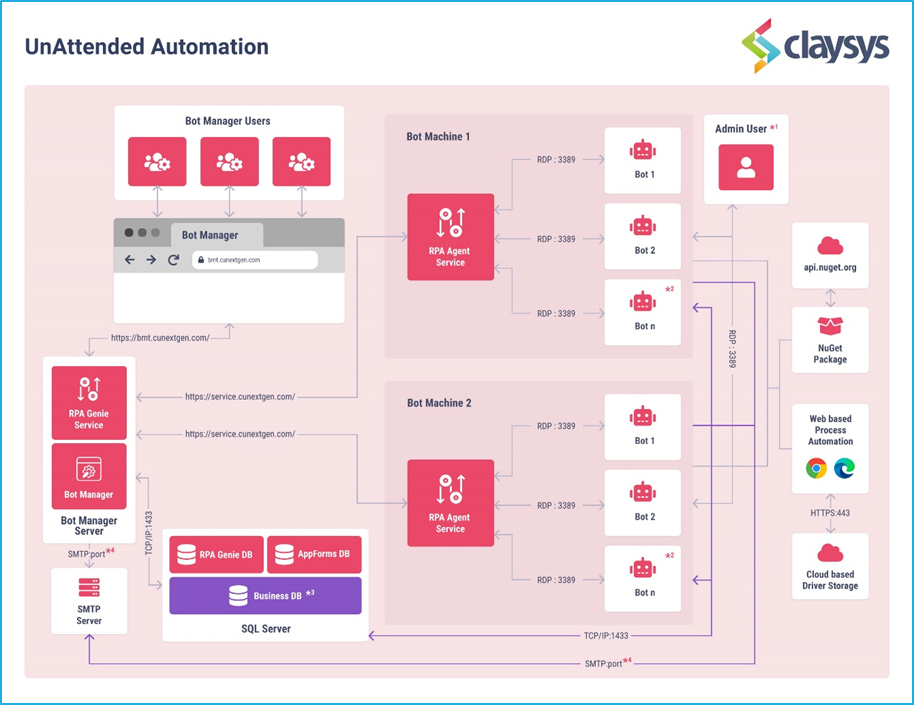
Unattended Bot Dataflow
*1 Admin user: Users such as IT team and process contributors may manually initiate RDP sessions for purposes such as updating products and debugging.
*2 Bot users: If the system is a Windows desktop, only one user can log in at a time. However, on a Windows server, up to two users can log in concurrently. For terminal servers, Multiple bot sessions can be allowed concurrently. For automation requirements, it’s essential to whitelist specific URLs for downloading Chrome Driver, NuGet packages, and Edge Driver on Bot machines. This ensures seamless integration and access to necessary resources.
*3 Business DB: Business DB access for Bot machine users is optional based on automation requirements. The Business Database serves the specific purpose of maintaining data separately for individual processes. Each automation has the option to utilize its own Business DB, ensuring separate data storage and management.
*4 SMTP: Depending on the SMTP server configuration, the SMTP port could be set to 25, 465, 587, or 2525. It’s crucial to whitelist at least one of these ports based on the server configuration to ensure proper communication and delivery of emails. This is optional based on process requirements.
Bot Machines
In specific environments, there can be numerous bot machines, each with the capability to execute individual automation simultaneously. Additionally, these bot machines can accommodate multiple user instances or user sessions from which the bots can initiate automation. The number of bot machines can be decided as per the requirements.
Bot Manager Server
The unattended bots can be triggered with the help of the Scheduler and Start Job option that is available in the Bot Manager. Once the Job is triggered from any of the above two methods, the request will be sent to the RPA Genie Agent Service with the help of the service URL which is configured at the time of Package installation. [Example URL given the image to access the Bot manager is https://service.cunextgen.com]. Now the connection is established between the RPA Genie service and the RPA Genie Agent Service and the RDP Session with PORT 3389 will be initiated with the requested bot user. Bot admin users can directly RDP to the bot machines whenever required during inactive times/non-productive hours for example, to perform server patching, to do application upgrades, review any issues related to Bots, etc.
Bot manager
This Bot Manager serves as a valuable tool for administrative users to publish the automation that is subsequently accessible to all users for execution. Additionally, it also helps in monitoring and tracing all the automation that has been executed.
The Bot Manager application and Bot Manager service are installed on the Bot Manager server. This server will establish communication with the SQL Server via the default TCP/IP port 1433. The Bot Manager can be accessed using the URL that is configured at the time of installation. [Example URL given in the images below to access the Bot manager is https://bmt.cunextgen.com]
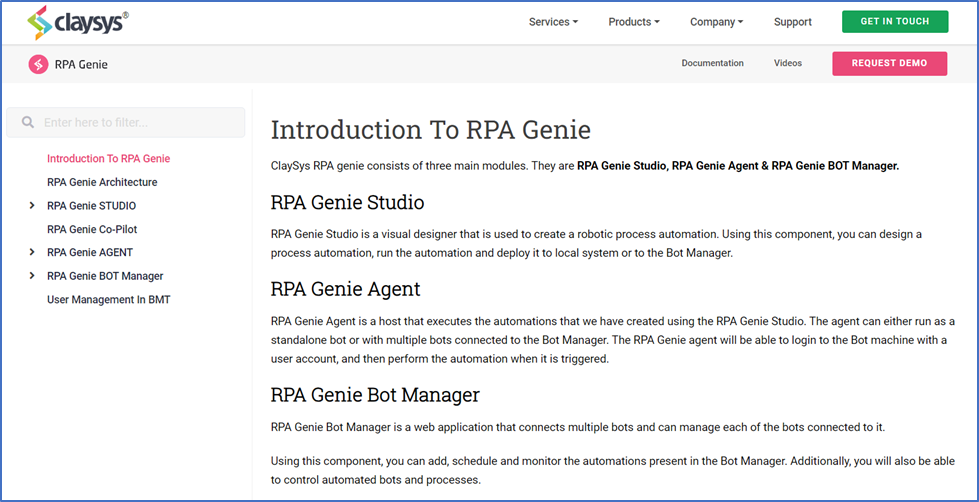
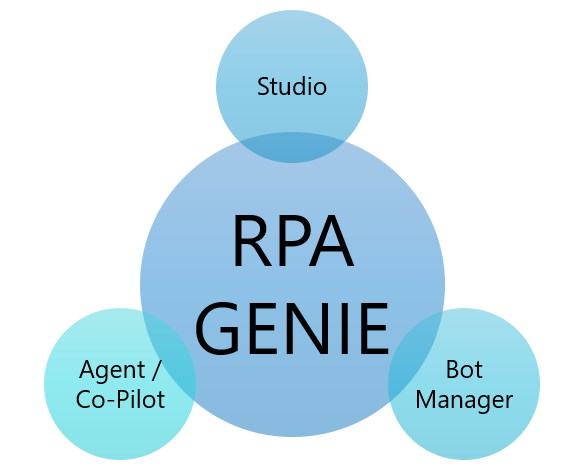
ClaySys RPA Genie consists of three main modules. They are RPA Genie Studio, RPA Genie Agent/Co-pilot & RPA Genie BOT Manager.
RPA Genie Studio
RPA Genie Studio is a visual designer that is used to create a robotic process automation. Using this component, users can design a process automation, run the automation and deploy it to local system or to the Bot Manager.
RPA Genie Agent/Co-Pilot is a host that executes the automations that were created using the RPA Genie Studio. It can either run as a standalone bot or with multiple bots connected to the Bot Manager. It will be able to login to the Bot machine with a user account and then perform the automation when it is triggered.
RPA Genie BOT Manager
RPA Genie Bot Manager is a web application to which multiple bots are connected. Each of the connected bots can be monitored and managed through Bot Manager. Additionally, users can add and schedule automation using these bots.