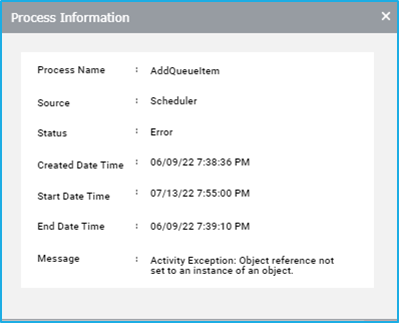
The information column provides a brief description of a particular job such as the process name, source, status, etc. If the status of the Job is shown as Error, the error message will be displayed in this window.
Detailed View
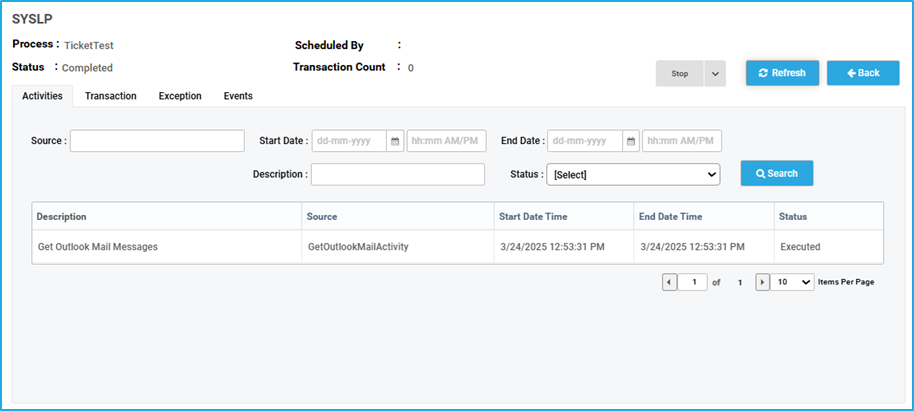
Each job has a View button which displays the detailed view of that Job. On clicking that button, the Bot name, Process, scheduler of the job and the status are displayed at the top.
There are four tabs:
Activities: Each activity that was executed for a particular Job can be seen in the Activities tab
Transaction: If a job that involves a queue consists of queue items that are processed, then the queue item details will be listed in the Transaction tab. It also shows Transaction Countand there is a nested Transaction Refresh Button available on every sub-transaction page.
Exception: If the job gets faulted, then the Exception tab shows the information regarding the source, the type and the exception message of that exception. The detailed information about the exception can be checked by clicking the ‘view’ button next to the Exception.
Events: Using the Event tab, users can filter the events that the job went through during its execution (example: JobStarted). The ‘View’ button will display the History data associated with the event.
Jobs represent the execution of a process. From the Jobs tab, users can manage the jobs, monitor jobs that had been already launched previously, check their statuses and view their activities, transactions and logs.
The jobs tab displays information regarding all the processes that are scheduled, running and those that were run on the registered bots along with their start and end times. The information column adjacent to each entry provides a brief description of a particular job such as the process name, source, status, etc. If the status of the Job is shown as Error, the error message will be displayed in this window.
Bot Management Tool (BMT) in RPA Genie is a centralized platform for managing and monitoring automation bots. It is built on AppForms which is another standalone product of ClaySys. It enables users to control multiple bots, schedule tasks, view job statuses, and track bot performance. With features like bot analytics, alerting, job execution, and resource management, BMT offers comprehensive oversight and control, making it easier to deploy, monitor, and manage automations across an organization.
Fundamental workflow of Bot Manager
Connect to a robot to run an automation
Develop a project and publish it through the RPA Genie Studio.
Access this published project in the Bot Manager in the form of a package.
Select this package based on the required version to add it as a process in the Bot Manager.
Finally, execute an automation project as a job by selecting the robot
Publish a Project to Bot Manager
To publish a project to the BMT in RPA Genie, follow the below provided steps:
Check-in All Processes: Ensure that all processes in the project are checked in within the Project Explorer. This locks the final version for publishing.
Initiate Publish: Right-click on the project name in the Project Explorer and select Publish. This action packages the project into a deployable form.
Configuring Publish Option: RPA Genie will create a package that includes the project’s name, version and release note. These configuration details can be customized.
Deploy to Bot Manager: Once published, the package is deployed to the BMT. Here, the package can be managed, scheduled, and executed by bots through the Bot Manager and Co-pilot.
This allows administrators to manage the project within BMT and monitor its performance during automation.
Run a Project as a Job in Bot Manager
To run a project as a job in the BMT, follow these steps:
Access Packages Tab: Ensure that the Published Project is listed as a Package under the “Packages Tab”.
Add Process: Add the required package as a process by selecting the appropriate package name and version.
Access Jobs Tab: Go to the “Jobs” tab in the BMT interface.
Click the Start Job button, which opens the “Select Process” window.
Choose the desired process from the dropdown list.
Set the job’s priority (High, Medium, or Low).
Select the specific bot(s) required to execute the process.
Confirm selections and click Start.
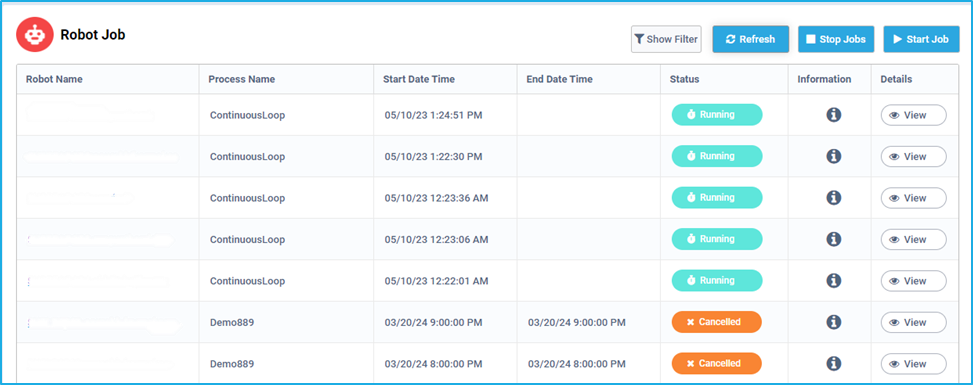
The job will begin running through the selected bot(s) with the status, including start and end times, displayed in the Robot Job List.
Note: The user can monitor job activities, transactions, and logs for the job under the “Jobs” tab.
Tabs in BOT Manager
The following tabs are available in the BOT Manager:
Dashboard: It offers a comprehensive overview of the following:
BOT overview section displaying connected, running, and inactive bots.
Total job overview section includes metrics for job requests, completions, errors, and running jobs.
Process job section displays a bar graph which shows the job status for each created process.
BOT Analytics: This option under the Dashboard tab provides insights into transactions and queue items, estimating dollars and hours saved, with sections for total transaction overview (detailing requested, not started, error, and completed transactions), total BOT transactions, and BOT efficiency, which shows machine utilization and calculates each bot’s efficiency.
Jobs: Jobs represent process executions. Using the Jobs Tab, users can manage and monitor jobs, check their statuses, and view activities, transactions, and logs.
Robots: Using the Robot Tab the user can manage and view the status of the robots that are connected to the BMT. They also have the option to check the event details of any particular robot.
Machine: Users can view, search by name/status, edit details, and see logs for machine events and robot statuses, including connected, disconnected, or maintenance modes.
Packages: The Packages tab stores all published RPA Genie projects for easy access, allowing users to download or upload packages from their local system. These packages must be added as a process to run through the Bot Manager/Co-Pilot.
Nuget Packages: The RPA Genie NuGet Package is a manager for creating and sharing reusable automation activities in Genie Studio. The users can expose necessary properties through the custom package interface in the property pane. The NuGet packages tab allows adding files for later access in Genie Studio.
Processes: In this tab, users can create a process by selecting the required package name and its corresponding version. Once a package has been added as a process user can run it as a job through BMT. This tab displays the process name, current version, available versions, and a deletion option.
Triggers: Triggers execute Jobs at specified intervals using the Time Scheduler or when new queue items are added via the Queue Scheduler, allowing users to manage existing triggers. This tab displays trigger names, requested scheduling times, status (enabled/disabled), trigger type (Time Scheduler, Queue Scheduler, or Maintenance Mode), and a history with details like robot name, process name, and timestamps. Users can also edit or delete triggers as needed.
Queues: This tab allows users to manage the queue created in the BMT. This tab shows the names and descriptions of queues, with the “In-Progress” column indicating the count of queue items that are currently being processed. It also has the “Pending” column showing unprocessed items and the “Error” column indicating items that have failed to process. Users can edit or delete the queue as needed.
Security: Security provides centralized authentication and access control for the BOT Manager and Studio, authorizing users to access specific tabs such as Dashboard, Robot, Process, Packages, and Triggers, and includes four tabs: User, Permission Sets, Roles, and Check Permission.
Resources: A resource is an asset management tool in RPA Genie that enables the creation, storage, and maintenance of data for various projects, representing shared variables or credentials accessible through RPA Genie Studio. This tab displays the resource name and type, along with options to edit or delete resources.
BMT Settings: The BMT Settings enable users to customize the default configurations related to managing log retention, setting up SMTP server details, managing mail templates and holiday calendars. This section includes four tabs: SMTP Server, Mail Template, Holiday Calendar, and Data Retention.
Import Export: The Import Export feature allows users to back up specific data from a particular Bot Manager environment and restore it to another environment. The “Backup” option allows the user to export existing Processes, Queues, Resources, Triggers, NuGet Packages, and Holiday Calendars. Under “Restore,” the user can import these items by clicking the “Browse” button to select a file from the local machine.
Manage Alerts: The Manage Alerts feature helps to set up various types of alerts for monitoring purposes. Five alerts can be configured within the Bot Manager- Machine, Robot, Job, Queue, or Trigger. Each alert can be customized with a name, recipient email(s), and specific status triggers (e.g., Connected/Disconnected for Machine and Robot, Scheduled/Completed for Job, Item statuses for Queue, or Disabled for Trigger).
Tags: Tags feature helps to group similar features in Bot Manager, making search and filtering more efficient. Users can create tags with relevant names and assign them to features like alerts, resources, processes, queues, etc. Each feature has a section to add existing tags, enabling quick filtering. Single or Multiple tags can be added either while creating a specific feature or while editing it.
Maintenance Mode: This feature allows users to take the Machine and Server offline temporarily by halting all activities. In this tab, users can view maintenance statuses by Type (Robot or Server) or State (Completed, Initialized, In-Maintenance).
Audit Details: The Audit Details tab is essential for tracking and reviewing changes performed across all tabs of the Bot Manager. Here, details of any event occurring in BMT are displayed such as Type, Action, Description, Action By, Action Time, and View.
Below mentioned points apply to all the tabs in the BOT Manager:
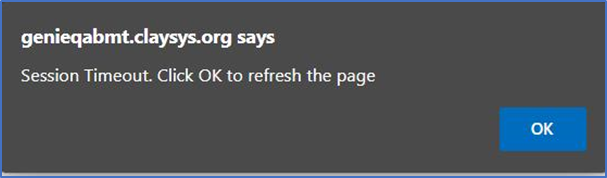
Timeout Popup when the access token is expired
Session timeout happens when a user’s session expires due to inactivity or the predefined time limit has been exceeded. It results in the user being prompted to authenticate again by clicking on the “OK” button before continuing to use the system or application.
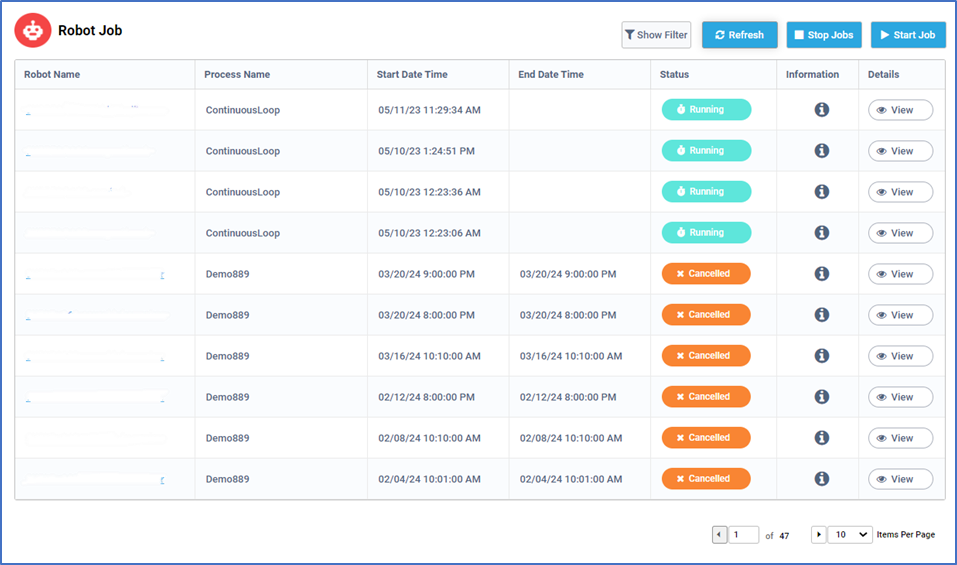
2. Advanced Pagination in all the table views
Advanced Pagination allows users to enter the required page number and rapidly browse to that particular page rather than relying only on the next/previous navigation button.
For Example: To navigate to the 10th page out of the 47 pages, simply type 10 in the box, which will become “10 of 47” and then click on any part of the page. This will redirect to the 10th page without clicking on the next icon subsequently.
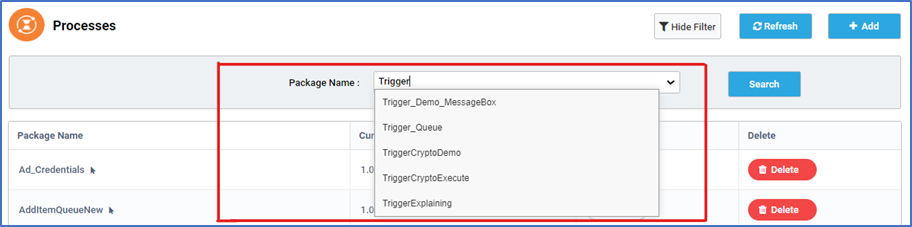
3. Auto-Complete Box in every input field
The combo box’s drop-down functionality has been switched to an auto-complete feature that lets users search for and filter alternatives as they enter, making selection processes more flexible and effective.
By allowing users to rapidly identify and pick particular items from a bigger set of options without having to search through a long dropdown list, the auto-complete box expands the combo box’s functionality.
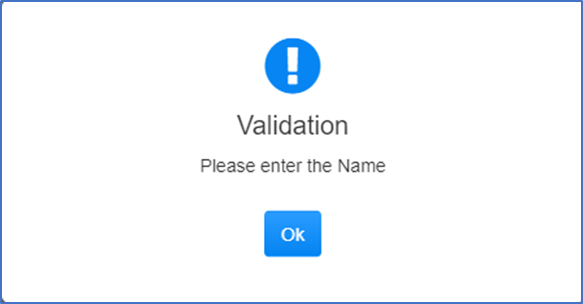
4. Form validation in all available forms
Form Validation is essential when a required field is not entered, a validation message will be displayed to inform the user about the missing information. This message serves as feedback to indicate that the field needs to be filled out before the form can be submitted.
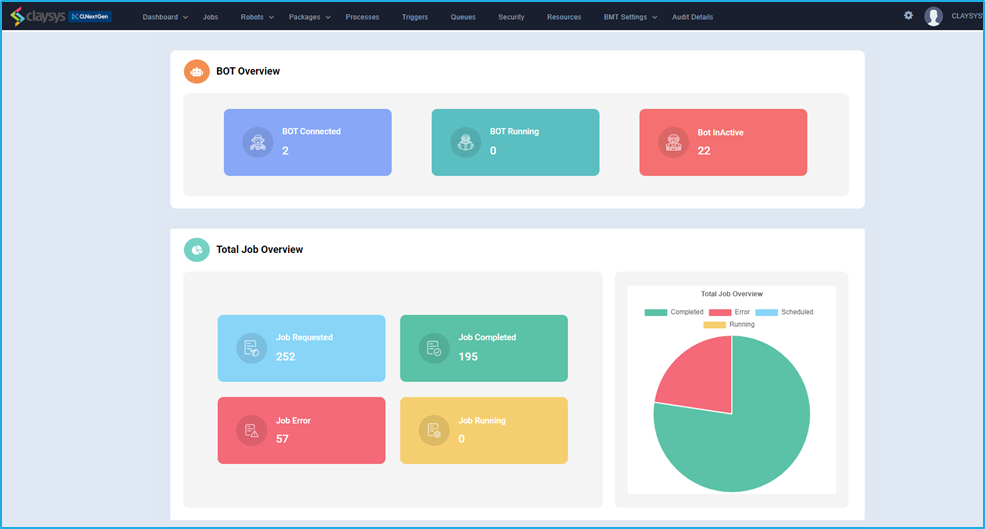
BOT Manager Dashboard
The BOT Manager’s landing page or dashboard, provides an overview of BOT activities and job statistics through various widgets, allowing users to monitor all activities at a glance.
The ‘BOT Overview’ section is the topmost section and it consists of three widgets:
The ‘BOT connected’ widget displays the number of bots that are currently connected.
The ‘BOT Running’ widget shows the number of bots that are currently running.
The ‘BOT Active’ widget displays the number of bots that are active at present.
The ‘Total Job Overview’ section follows right below the Bot Overview section and it consists of four widgets:
The ‘Job Requested’ widget shows the number of jobs requested
The ‘Job Completed’ widget shows the number of jobs completed
The ‘Job Running’ widget shows the total number of jobs that are running at the moment
The ‘Job Error’ widget shows the total number of jobs that have faults in runtime.
The ‘Process job’ section is the last component where a bar graph displays the current job status of each created process.
Windows includes activities for managing application windows. It allows automation to interact with, move, resize, minimize, maximize, and verify window states.
The Windows category has the following sub activities:
Close: This activity closes a specified Window.
Element Properties:
Window: Window variable that holds the window you want.
Get Active Window: This activity helps to retrieve the current active Window and performs multiple actions within it.
Output Properties:
ActiveWindow: Window variable that has found an active window.
Get Position: This activity retrieves the bounding rectangle of a specified UI element.
Window Properties:
Window: The window you want to move or re-size.
Output Properties:
Rectangle: Results in the bounding rectangle of the specified window in screen coordinates.
Get Window: This activity helps the user to get the specified window that is already opened.
Window Properties:
Parent Window: The parent window to start searching form.
Output Properties:
Window: Window variable that has found active window.
Maximize: This activity maximizes the active window.
Window Properties:
Window: A window variable that holds the window you want to maximize.
Minimize: This activity minimizes the window.
Window Properties:
Window: A window variable that holds the window you want to minimize.
Move Window: This activity will change the position and Dimensions of the indicated window.
Element Properties:
Element: This field only supports a UI element variable returned by another activity.
Input Properties:
Height: The new height of the window. Positive and negative numbers are supported.
Width: The new width of the window. Positive and negative numbers are supported.
X-Position: The new X-Position of the window. Positive and negative numbers are supported.
Y-Position: The new Y-Position of the window. Positive and negative numbers are supported.
Window Exists: This activity checks whether a particular window exists or not.
Window Properties:
Parent Window: The parent window to start searching form.
Output Properties:
Exists: It indicates window exists or not.
Window: Window variable that stores the window if window exists.
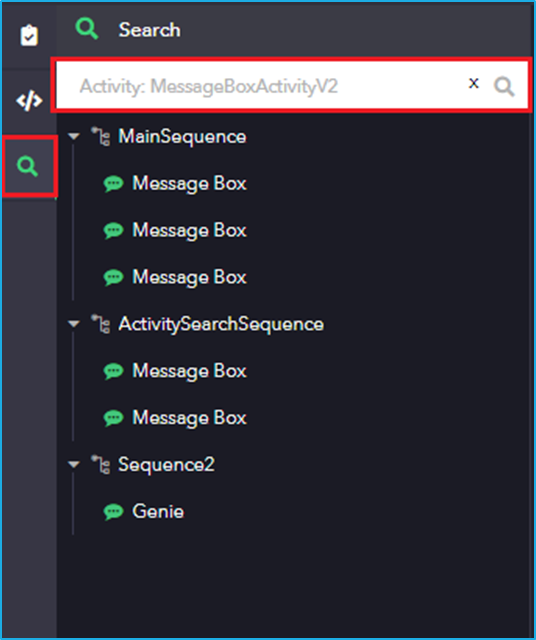
Users can provide the label of an activity to know the occurrence of that specific activity which is used in a project. However, it would not list the activity for which the label has been modified. To improve search functionality, a new feature allows users to search for activities by Activity Name. By typing “Activity:” followed by the activity name in the search box, users can retrieve logs based on activities rather than relying solely on labels.
Note: To understand the actual activity name, right-click on the activity in the project and select the ‘copy’ option. Then, paste the content into a text file and extract the ‘Activity Name’ value.
Eg: Right-click on the Message Box activity in a sequence, copy it and paste it into a notepad. The highlighted in the below image is Activity Name of the Message box.
To improve project management capabilities, RPA Genie Studio incorporates the Genie File System functionality. There are two versioning tools:
Genie TFS for creating a project in the DB
File-System for creating a project in the Local File Directory.
Genie TFS (Team Foundation Server)
This option involves creating a project within a database (DB), similar to a central repository.
Genie TFS allows collaborative development and versioning control with features like check-in, check-out, and version history.
File-System
This option enables users to create a project in the local file directory on their machine.
Since the Source Control tab is not available multiple users cannot work simultaneously on the same project as the such as Check-in, Check-out are not possible in projects created using File-System.
Using File-system, the user can work offline, there is no need to connect to the genie service.
Note:
The project properties and the extension ( .gsproj) for the projects created using any one of the above-mentioned versioning tools are the same.
File-System projects can be included in Genie TFS using the option “Include in Genie TFS” by right-clicking on the project name in the Project Explorer folder to enable collaborative development.
Above is the screenshot of the landing page of RPA Genie Studio. On this page, user will be able to explore the different features in the Studio.
At the center, users will be able to find following main options for creating/importing project:
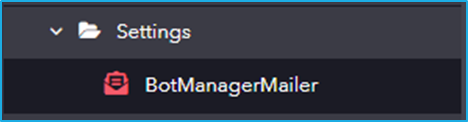
This section contains the activity BotManagerMailer, which can be used for sending mails either via Server or Bot Machine.
The Settings category has the following sub-activity:
BotManagerMailer: This activity is used for sending SMTP mails either from a robot or a server machine.
Input Properties:
ServerType: Specify the type of server (robot or server machine) from which the SMTP email should be sent.
Attachments: Specify one or more file paths of attachments to be included in the email, in the form of an Array.
Note: Currently, attachments are supported only when the server type is set to robot machine.
Email Properties:
Body: Define the email content.
Subject: Specify the email subject.
IsBodyHtml: Indicate whether the email body contains HTML formatting.
MailMessage: Accept an email message object for sending.
Priority: Define the priority level of the email.
Receiver Properties:
To: Provide the email addresses of the primary recipients as a single string, with multiple addresses separated by comma.
Bcc: Enter the hidden recipients of the email message.
Cc: Enter the email addresses of recipients to receive a copy of the email.
Reply-To: Specify the email address to which replies should be redirected.
Sender Properties:
From: Specify the email address that will appear as the primary sender in the recipient’s inbox.
Sender: Specify the email address used to send the email on behalf of another user. When both Sender and From are set, recipients will see the email as “Sender address on behalf of From address”.
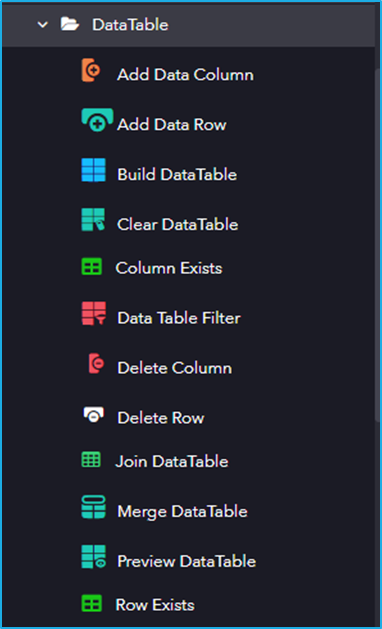
DataTable works with tabular data structures within your automation workflows, providing tools to create, modify, and query DataTables for efficient data handling.
The DataTable category has the following sub activities:
Add Data Column: This activity adds a Column to a specified Data Table.
Input Properties:
Datatable : The DataTable variable to which the user want to add columns.
ColumnName: Specifies the name of the new column to be added.
Add Data Row: This activity adds a Row to a specified Data Table.
Input Properties:
Datatable : The DataTable variable to which you want to add rows.
Items: Specifies an array of new rows to be added to the DataTable.
Build DataTable: This activity Allows users to build and customize a datatable.
Input Properties:
Build: Allows to customize a table.
Output Properties:
Datatable: Stores the added information in the DataTable.
Clear DataTable: This activity clears all the data from a specified DataTable.
Input Properties:
Datatable: The DataTable variable to be cleared.
Column Exists: This activity allows verification of the existence of a specific column in a table data structure during automation execution.
Input Properties:
Datatable: The DataTable variable to check for the column’s existence.
ColumnName: The name of the column to check for existence.
ColumnIndex: The index of the column to be referenced.
Output Properties:
Exists/DoesColumnExist: Indicates whether the column exists.
Data Table Filter: This activity is used to filter a datatable by including/excluding specific rows/columns according to the given rule.
Input Properties:
Options: The Data Table Filter Window allows to customize the table to filter.
Datatable: The DataTable variable to be filtered.
Output Properties:
Datatable: The resulting filtered DataTable variable.
Delete Column: This activity deletes particular columns from a specified datatable.
Input Properties:
Datatable: The DataTable variable from which you want to delete column.
ColumnName: The name of the column to delete.
ColumnIndex: The index of the column to delete.
Delete Row: This activity is used to Delete particular rows from a specified DataTable.
Input Properties:
Datatable: The DataTable variable from which you want to delete row.
RowIndex: The index of the row to delete.
Join DataTable: This activity is used to combine rows from two datatable by using values common to each other, according to a Join rule.
Input Properties:
Join Wizard: Enables joining of two tables.
Output Properties:
Datatable: It stores the two datatable after joining common information in the datatable variable.
Merge DataTable: This activity is used to merge a specified datatable with the current datatable.
InputProperties:
Destination: Specify the DataTable into which the data should be merged.
MissingSchemaAction : Specifies the action to take when merging the two datatables.
Source: The DataTable object to be added to the destination Datatable.
Preview DataTable: This activity lets the user view all the values for all the rows and columns in a DataTable.
InputProperties:
DataTable : A DataTable variable that stores the added information in the Build DataTable window.
Row Exists: This activity allows verification of the existence of a specific row in a table data structure during automation execution.
InputProperties:
Datatable: The DataTable variable to check for the row’s existence
ArrayRow: array of rows to be checked
RowIndex: The index of the row to be referenced.
Output Properties:
Exists/DoesRowExist: Indicates whether the row exists.