Permission Set

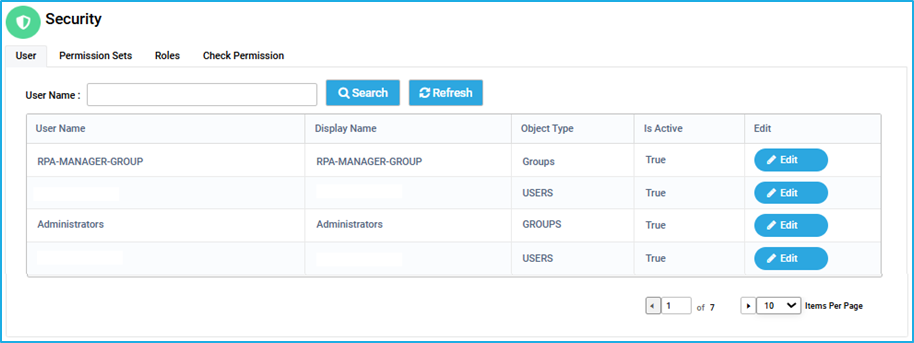
A permission set is a type of authorization that allows the user access. It is a group of settings /permissions that allows the users to access the BOT Manager and Studio. It is also possible to restrict authorization for the users by using permission sets. (For example: A certain requirement may need user to have access to a resource but only to specific fields within that resource in some instances.)

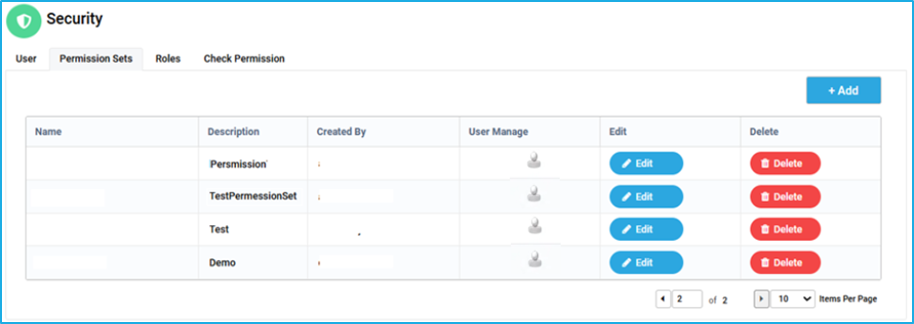
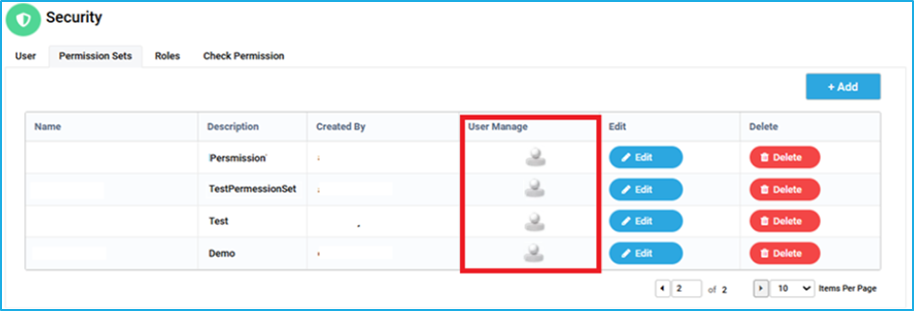
The Permission Set tab displays details such as Name, Description, Created By, User Manage, Edit and Delete Columns.

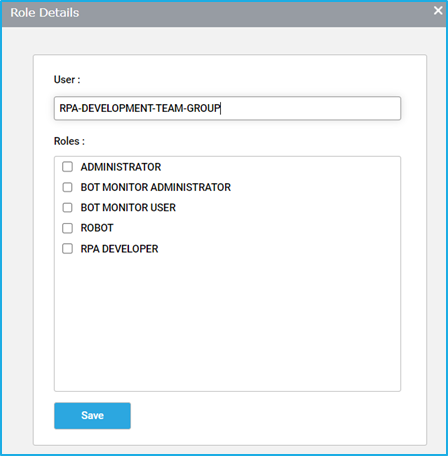
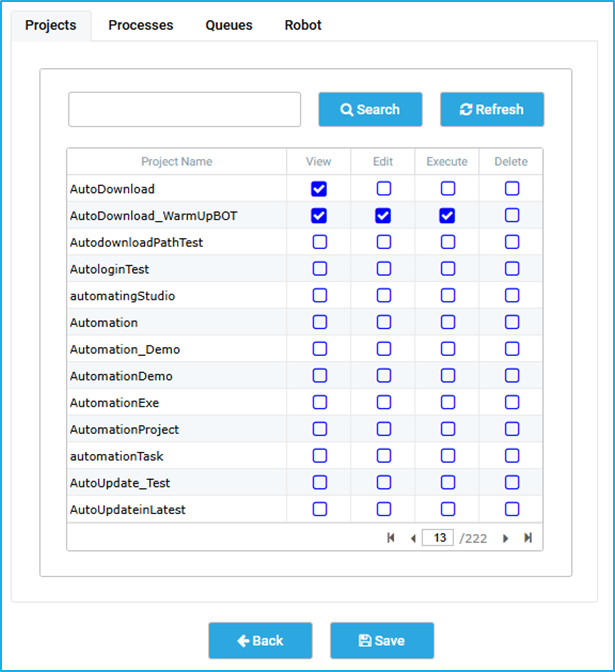
Project, Process, Queue and Robot permissions can be restricted by administrators and authorized users by clicking on the edit button for each name.

Add permission Set

  • Click on the ADD button on the top right. The ‘Add Permission Set’ Popup will appear.
  • Type the Permission name and Description.
  • Click on the Save button.
  • Check the boxes to grant permissions [View, Edit, Execute and Delete] as per the requirement and Click on Save.
  • Now Permission Set will be created and it will be displayed in the Permission Set tab.

Note: By clicking the ‘Edit’ option in the permission set tab, a new window as above will open, where the Projects, Processes, Queues and Robots are listed and the permissions (view/edit/execute/delete) of any of these can be changed by selecting the checkboxes.

After the permission set is created, the required users can be added to it through User Manage.

User Manage

After creating a permission set group and adding permission sets to it, access can be provided to the created permission. It can be a Single User or Multiple Users. On adding the user to a group, the user will have the assigned privileges.

The below image illustrates how to manage users in permission set:

On clicking the ‘User Manage’ icon, the ‘Manage User PermissionSet’ Dialog will open where the user can be added by searching the Name.

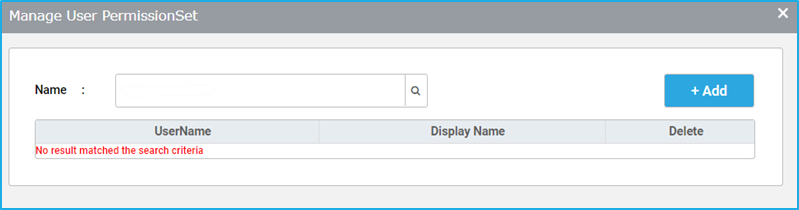
The added UserName gets displayed in the Table. To remove a particular user, click on the ‘Delete’ icon in Delete column.

User

The User Tab displays a list of the available users with their User Name, Display Name, Object Type and Is Active. There is also an Edit option which helps to edit the permission for the users.

The ‘User Name’ displayed is the Login Username of the BMT and it should be different from the Existing Usernames in BMT. It should be Unique to avoid duplicates.

The ‘Object Type’ refers to whether the displayed User Name belongs to Users or Groups. Users Type given to Single User. Groups Type given to Multiple Users.

The ‘Is Active’ Column refers to whether the created user is Active or InActive. If the created user is Active, then only they can Access BMT.

Note: The users can be added by a person who has designer permission. There is a search option through which a specific user can be searched using their usernames and roles can be assigned to them. Refer to ‘Roles’ section under ‘Security’ to see more details about the roles.

The “Refresh” button  helps to reload the window so that the latest users details can be seen.

On clicking the ‘Edit’ button, the ‘Role Details’ window will appear allowing to add one or more role(s) to the user. User Field is not editable, only Roles can be edited in this window.
Note: A user without any roles does not have access to any resource.

Security

Security is a service that provides the BOT Manager and Studio with centralized authentication and control of access. Its purpose is to provide the Studio and BOT Manager with user authorization. i.e. It authorizes the users to access specific tabs such as dashboard, Jobs, Robots, Queues, etc. in BMT and Studio Projects.

There are four tabs under Security:

  • User: The Users tab shows the list of the available users.
  • Permission Set:  In the Permission Set tab, authorized users/admins can provide or restrict access for users to certain projects in Studio, various processes, queues and robots available in the BOT Manager.
  • Roles: In the Roles tab, roles are created which determine user access privileges to use certain features of the Studio and BOT Manager. Authorized users or admins can assign or edit roles for each user.
  • Check Permission: The Check Permission tab can be used to check the permission set and role permissions provided for a user.

Show Filter

The “Show Filter” button helps to filter the queue based on the Queue Name, Description and Tags.

The “Search” button can be clicked after entering the required data in the respective field(s).

The “Refresh” button helps to reload the window so that the latest queue details can be seen in the table.

View

On clicking the ‘view’ button of a particular queue in the Action column, it will redirect to a new window displaying all the details of that queue as follows:

  • Status: It displays the status of the queue items. The queue item can be in one of the states given below: 
    • New: The status will be shown as ‘New’ when items are added to the queue using the Add transaction activity in RPA Genie Studio.
    • In Progress: The status will be shown as ‘In-Progress’ when the queue items are returned from the queue for further processing by using the ’Get Queue Item’ activity in RPA Genie Studio. 
    • Failed: The status will be shown as ‘Failed’ when the queue item does not meet any business or application requirements as per the project and the transaction fails.
    • Completed: The status will be shown as ‘Completed’ when the queue items are processed successfully. 
    • Abandoned: The status will be changed to ‘Abandoned’ when the queue items remain in an ’In-Progress’ state for a day (24 hours) without being processed.
  • Reference: While adding items to the queue, a unique value for a queue item needs to be provided which can be used as a reference later to view the details of a particular queue item. 
  • Start Date Time: It displays the date and time at which the processing of a queue item has begun.
  • End date Time: It displays the date and time at which the processing of a queue item has ended. 
  • Robot Name: It displays the name of the robot which was used to process the queue item.
  • Reason: If the status of any queue item is failed, then the reason will be displayed in the reason column.
  • Delete: It allows the deletion of certain queue items.
  • Details: On clicking the ‘Details’ button of a queue item, it will redirect to a new window with two tabs:
    • Details: The detailed information about a queue item such as the status, Start DateTime, End DateTime, Reason (Exception message if any) and Error type will be displayed in this tab. The ‘view’ option in the Action column will re-direct to another window with four sub-tabs (Activities, Transaction, Exception, Transaction Item) that display the transaction details while processing a particular queue item
    • Events: This tab displays all the events that have occurred to a particular queue item. For example: if a new item is added to the queue, then the DateTime, the user who added it, and the action taken by the user will be displayed. Next, if the same queue item is being processed, then the details of the ‘In-Progress’ event will be displayed. 

Add Queue

Steps to create a queue in Bot Manager:

  • Click on the ’Add’ button in the Queue tab.
  • An Add Queue wizard will appear where the following details need to be specified:
    • Queue Name: Specify a name for the queue. 
    • Time spent on one transaction(min): Mention the time (in minutes) taken to process one transaction, if it was to be done manually. 
    • Hourly Dollar rate: Mention the amount of dollars that is being spent on an hourly basis to process a transaction manually. 
    • Description: Provide a description of the queue.  
    • AutoRetry: The user is allowed to select the ‘Yes’ or ‘No’ option. If ’Yes’ is selected, then the user should specify the maximum number of times it should retry to process the queue item, in case an error has occurred while processing a particular queue item. 
    • Maximum Retries: The count for maximum retries must be specified to re-attempt the process.
    • Tags: Enter a relevant tag name for easy filtering in Bot Manager. (Optional)
  • Click on the ‘Save’ Button.

Note: On clicking the ‘Edit’ button for a particular queue, a wizard will appear, where the user can amend all the details of the queue specified while creating it, except for the queue name. 

Queues

The Queues tab in the bot manager enables users to create large automation projects underlined by complex logic. A Queue acts as a storage bucket where a large amount of data can be stored and accessed in a first-in-first-out (FIFO) manner. Once the queue is created, multiple Bots will be able to work on the same by specifying the queue name in the project.

When a queue is created in the BOT Manager, it will be empty initially. Users can populate the queue by adding new items to it. These items can be retrieved from the queue and processed. After processing, the status of each of the queue items can be updated accordingly. This can be performed using the activities available in the RPA Genie Studio.

The following studio activities are used with Queues:

  • Add Transaction Items
  • Get Queue Items
  • Update Transaction Progress
  • Update Transaction Status
  • Delete Queue Items
  • Get Queue Items details
  • Get Transaction Items details
  • Start Transaction

During a queue-based process, users can check the status of a specific queue item to see which item is currently being processed, the number of pending items in the queue, and the count of items that have been abandoned or failed during processing.

On the landing page of Queues, there is a Queue Details table that displays the names of the queues and the descriptions that were provided while creating the queues.

While a queue-based process is being run, the In-Progress column for the selected queue will be shown as 1, since a particular queue item is currently being processed. The In-progress column is dependent on the next column (i.e. Pending column). The pending column shows the number of queue items of a particular queue that are yet to be processed. The Error column shows the count of queue items of a particular queue that went to either an abandoned or failed state while executing the process.

Under the Action column, there is a ‘view’ option that shows the details about the queue item transaction. Also, there is an option available to edit or delete the existing queue. The “Add” button allows to create a new queue.

Show Filter

Using the ‘Show filter’ option, the user can filter Triggers based on the Trigger name, Trigger type and Tags.

The “Search” button can be clicked after entering the required data in the respective field(s).

The ‘Refresh’ button helps to reload the triggers tab so that the latest details can be seen in the table.

Maintenance Mode Trigger

Maintenance mode provides an option for the user to either stop all the activities in the Bot Manager (Server Maintenance) or down all the robots connected to a machine(s) for maintenance (Machine Maintenance).

An icon labeled “Maintenance Mode Trigger” can be found inside the Trigger. On clicking that, the user will be navigated to the “Add Maintenance Mode Trigger” window. Several fields can be found in this window such as Name, Schedule Type, Maintenance For, Frequency and Daily Frequency.

  • Name: Provide a name for the maintenance mode trigger as per their preference.
  • Schedule Type: “Recurring” is the only default value available for this field.
  • Enabled: The “Enabled” check box must be selected for the Maintenance Trigger to run; otherwise, the maintenance activity will not begin to execute.
  • Refresh Last Scheduled DateTime: This checkbox enables the user to reset the last scheduled date time i.e. change it to null. This can be beneficial if a user wants to run the trigger again.
  • Maintenance For: The user can select whether they will be performing Server Maintenance or Machine maintenance through this field. This feature will move the Robot or Server to an offline state based on the frequency set while creating the trigger for Maintenance.
    • Machine Maintenance: All robots connected to the particular machine will undergo maintenance.
    • Server Maintenance: This will temporarily bring down the specific Bot Manager environment and no activities can be performed.
  • Tags: This field allows to enter a relevant tag name for easy filtering in Bot Manager. (Optional)
  • Frequency: There are two options for configuring this field –
    • The “Occurs” dropdown menu, from which the user can specify whether the maintenance should happen Daily, Weekly or Monthly.
    • The “Recurs Every” option is used to specify the interval at which the Maintenance trigger should be executed based on the selected option (daily, weekly or monthly).
    • Note: Refer to the Time scheduler to understand the configuration of the frequency field.
  • Daily Frequency: This field has three options –
    • The “Starting at” option signifies the time at which the trigger should start.
    • The “Expiry Time” indicates the end time of the maintenance activity.
    • User can either “Stop” the maintenance or make a “Request” to stop the Maintenance through the “Stop Request Type” field.