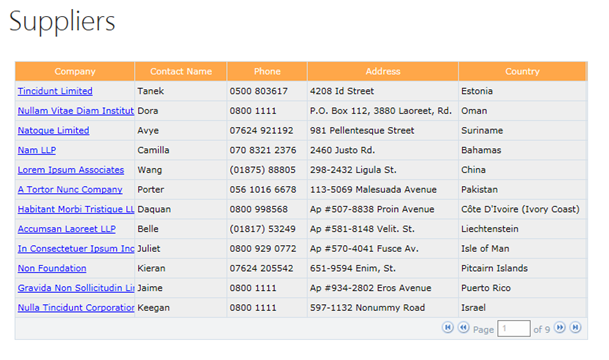
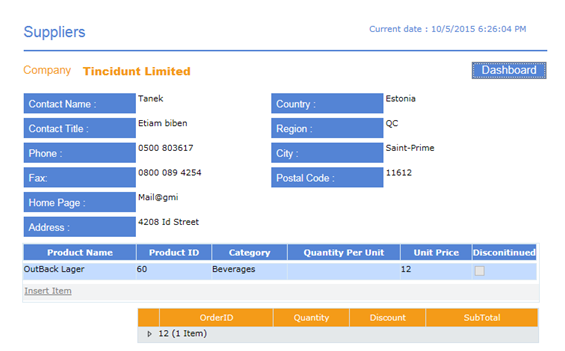
Suppliers contain a dashboard displaying details of various suppliers. This includes fields such as suppliers Contact Name, Company, Phone, Address and Country. On clicking company link a new form gets loaded, where supplier details, product details and order details of that product are displayed. On clicking the link, the Supplier id is passed to the new form which gets loaded. This id helps in the selection of required fields.
- SharePoint 2013
| SharePoint List | |||
|---|---|---|---|
| List Name | Column Name | Data Type | |
| ProductList
Details of all the products are stored in this list. |
ProductName | Single line of text | |
| UnitPrice | Single line of text | ||
| ProductId | Single line of text | ||
| Category | Single line of text | ||
| SupplierID | Number | ||
| IsDiscontinued | Single line of text | ||
| SharePoint List | |||
|---|---|---|---|
| List Name | Column Name | Data Type | |
| OrderedProduct
Details of ordered products are stored within this list. |
OrderID | Single line of text | |
| ProductID | Single line of text | ||
| Quantity | Single line of text | ||
| Discount | Single line of text | ||
| UnitPrice | Single line of text | ||
| SupplierID | Number | ||
| SharePoint List | |||
|---|---|---|---|
| List Name | Column Name | Data Type | |
| SuppliersList
Details of the supplier are stored in this list. |
Company | Single line of text | |
| Contact Name | Single line of text | ||
| Contact Title | Single line of text | ||
| Phone | Single line of text | ||
| Fax | Single line of text | ||
| HomePage | Single line of text | ||
| Address | Single line of text | ||
| Country | Single line of text | ||
| Region | Single line of text | ||
| City | Single line of text | ||
| PostalCode | Single line of text | ||
| List Of Forms Used | ||
|---|---|---|
| Name | Functionality | |
| Repeater Form Form Design Rule Design | Form that gets repeated depending on the number of product. | |
| MasterForm Form Design Rule Design | Form that gets loaded on clicking the Supplier Id link in Dashboard form. | |
| Dashboard Form Design Rule Design | Displays all the supplier details. | |
Create a NewForm in the Suppliers Folder and open it for editing. Click anywhere on the form to get the form properties loaded in the Properties window. Change the Name of the form to RepeaterForm. Set the Width of the form to 1200 and Height to 1000. Add a Subform and name it hdnfrm and set the visibility to false. Add two textboxes into the Subform and name them as hdnPID and hdnID. Drag a DynamicGrid and name it dgProduct. Drag a Search Control and name it srcProduct. Configuring the Dynamic Grid: Click on the grid to get the popup menu.
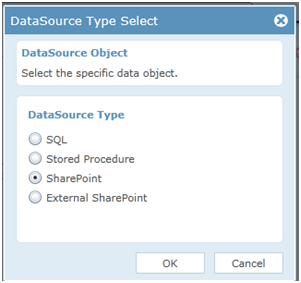
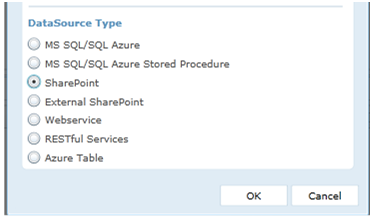
Choose DataSource as SharePoint.
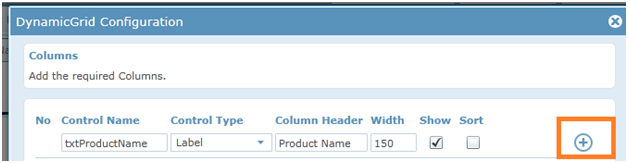
Enter required control name, Select the control type and the column header name. Click (+).
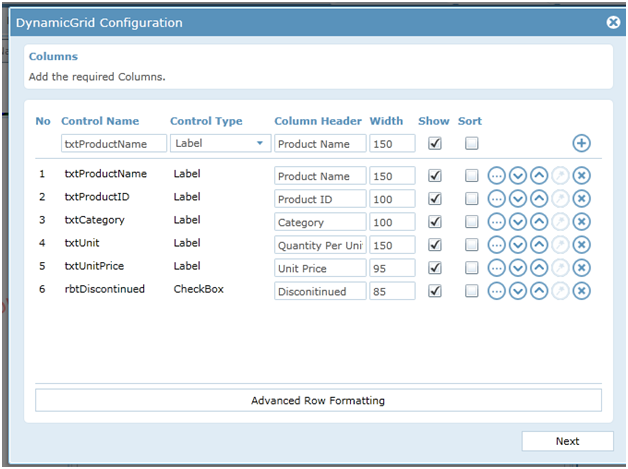
Similarly, add all the required fields and click Next.
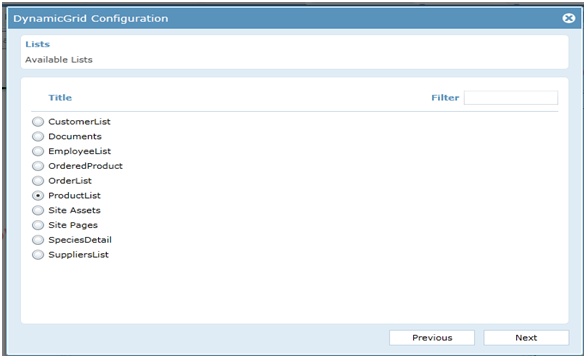
Choose ProductList from the lists and click Next.
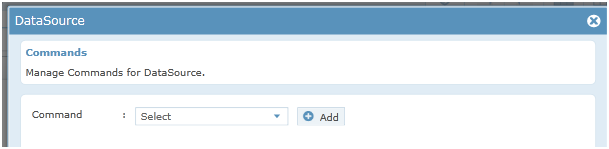
In Commands dropdown, default will be Select. Click on Add button.

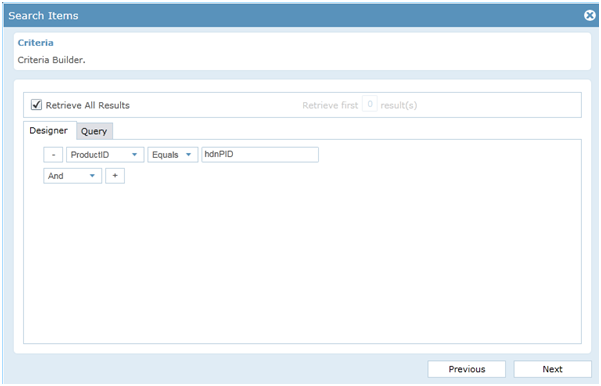
In the query criteria mapping, choose ProductId Equals hdnPID.
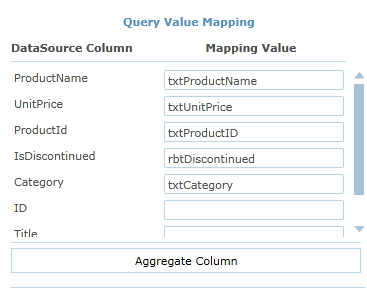
In Query Value Mapping section, map those fields to the respective controls on the form.

Click Finish to get back to the Commands Configured part and click on Add Trigger.
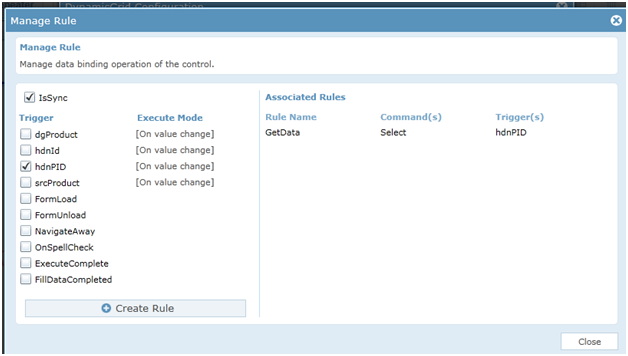
Select hdnPID as the trigger and click on Create Rule. This would set hdnPId events as the trigger for loading the DataSource and thus selects values in all fields with in the Dynamic Grid. Click Close. Click Finish.

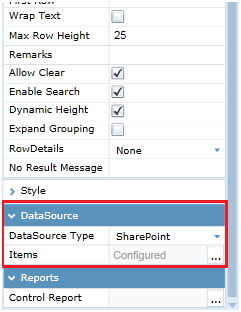
Configuring the Search Grid: 1. Click on grid to get the Properties window for the search Grid. In the properties window, select SharePoint from the Dropdown for DataSource.

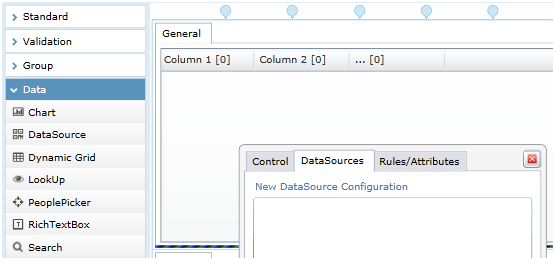
Click on the grid to get the popup menu, choose DataSources tab and click on New DataSource Configuration.
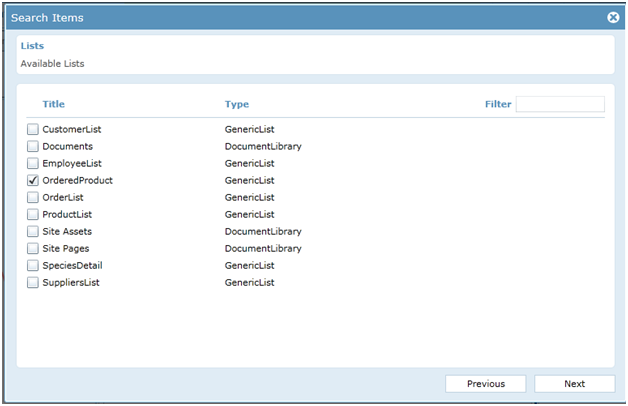
Available lists in SharePoint. Choose OrderedProduct from the given set of lists and click Next.
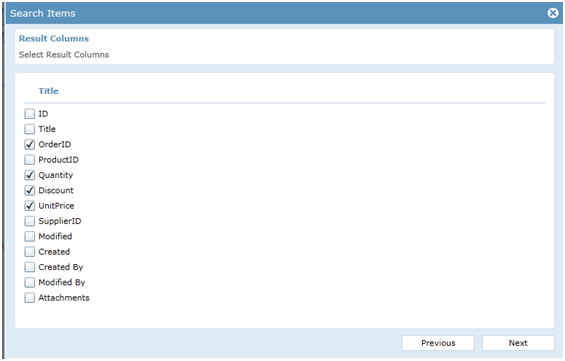
Select the Result columns that are to be displayed on the grid, click Next.
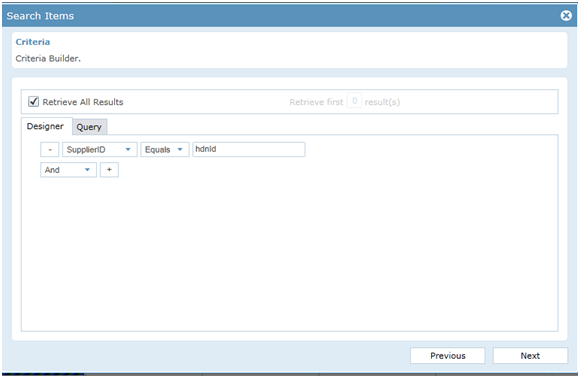
Enter the selection criteria as shown below.
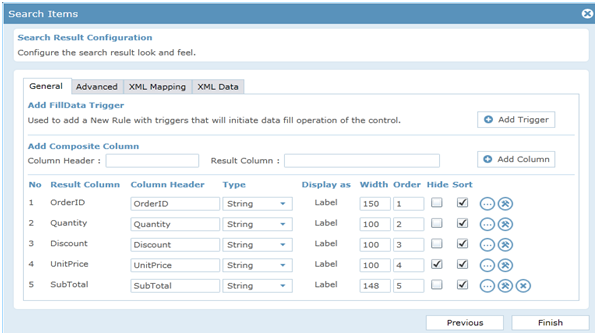
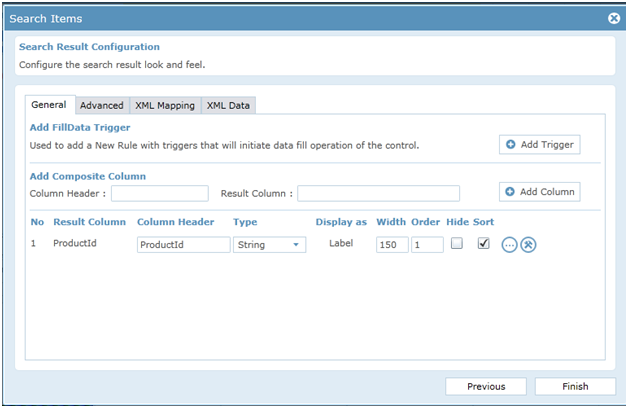
Click Next until you reach the Search Result Configuration screen. The columns you had chosen would be shown there, click finish.
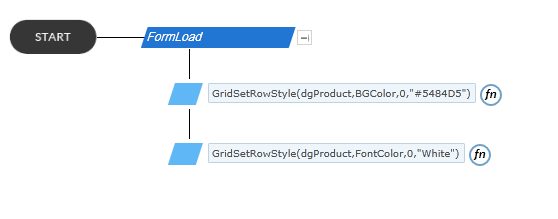
GridSetRowStyle rule is used to set the Background color and font color of Dynamic Grid.
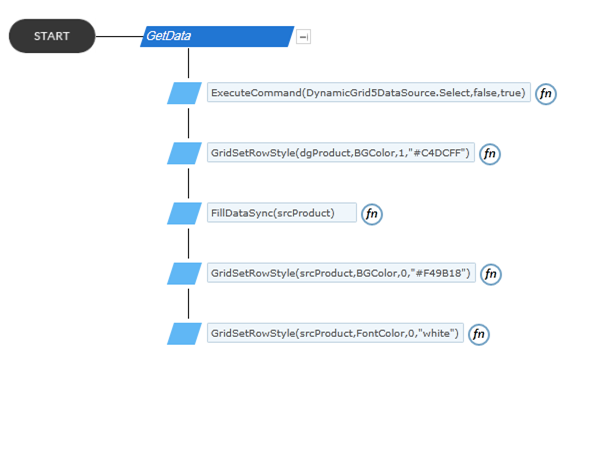
ExecuteCommand (Select) is used to fill the data in the Dynamic Grid control. FillDataSync rule is used to fill the Search control. GridSetRowStyle rule is used to set background color and font color of Search control.

GridSetValue rule is used to do the calculations and set the value in the required column.

Create a NewForm in the Suppliers Folder and open it for editing. Click anywhere on the form to get the form properties loaded in the Properties window. Change the Name of the form to MasterForm. Set the Width of the form to 1200 and Height to 1000. Add a sub form and name it hdnfrm and untick the visibility and add a textbox in the subform and name it as hdnId. Also add a search control in to the sub form and name it as srcProduct. Add labels in the MasterForm in order to select supplier’s details. Add an external form and name it extProducts. Click on the external form. In the properties window displayed on the right select the Navigate URL by clicking the button shown below.
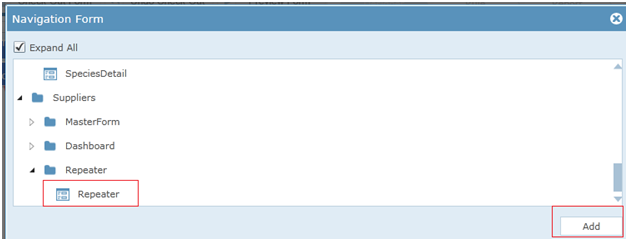
From the popup screen, select the form which has to be loaded in the external form. Here, it is Repeater Form. Then click add.
Configuring the first Search Grid : Add a search control and name it as srcOrder. Click on grid to get the Properties window for the search Grid. In the properties window, select SharePoint from the Drop down for DataSource.

Click on the grid to get the popup menu, choose DataSource tab and click on New DataSource Configuration.
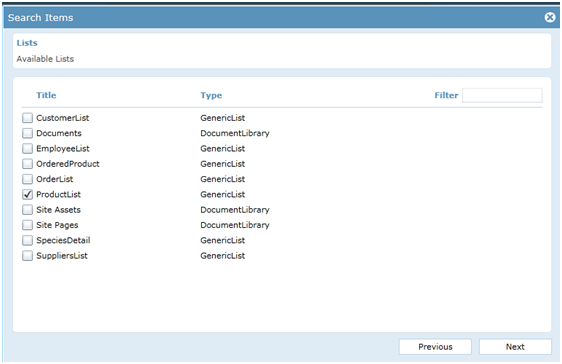
A new Popup window opens showing the Available lists in SharePoint. Choose ProductList from the given set of lists and click Next.
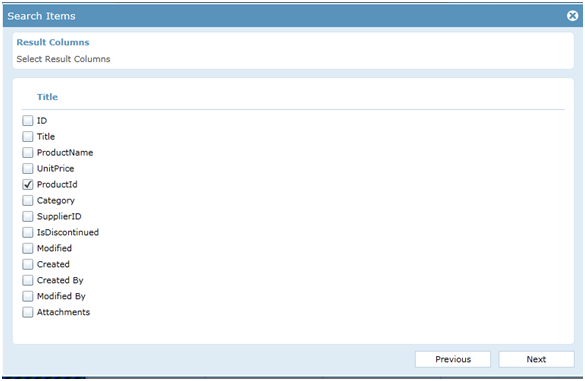
Select the Result columns that are to be displayed on the grid.
Enter the selection criteria as shown below.
Click Next until you reach the Search Result Configuration screen. The columns you had chosen would be shown there, click Finish.
Configuring the MasterForm to select the Supplier details corresponding to the selected supplier Id in Dashboard form. In the DataSource tab of the form, click on Create DataSource.
Give DataSource Name as dsGetData, choose SharePoint as the DataSource Type and click Ok.
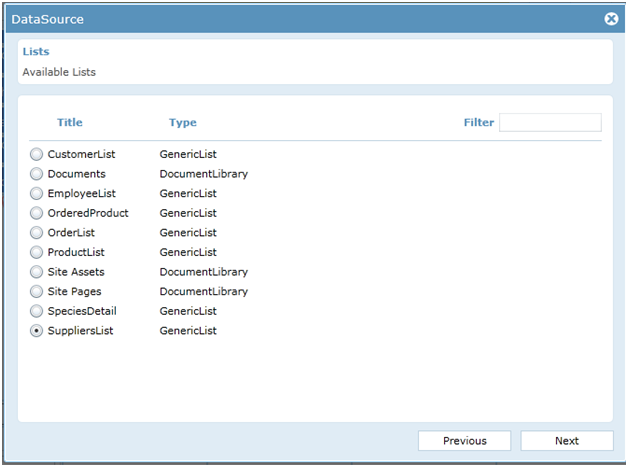
Choose Supplier List from the lists and click Next.

In Commands drop down, default will be select. Click on Add button.

In the query criteria mapping, choose Id Equals hdnId.
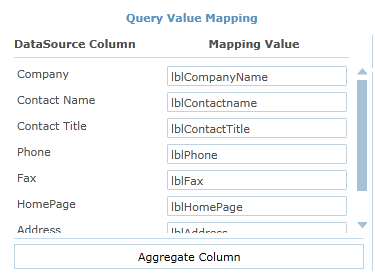
In Query Value Mapping section, map those fields to the respective controls on the form.
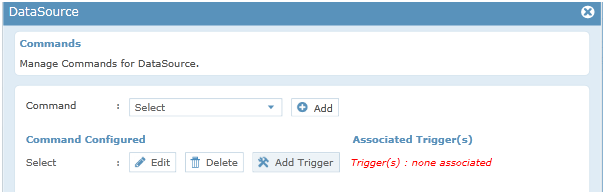
Click Finish to get back to the Commands Configured part and click on Add Trigger.
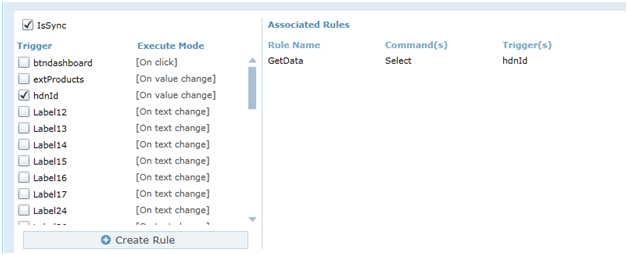
Select hdnId as the triggers and click on Create Rule. This would set hdnId events as the trigger for loading the DataSource and thus will select the supplier details in the respective fields corresponding to Supplier id in “hdnId”. Click Close and Finish.

Sets current date in label using GlobalVariable(Now) rule.
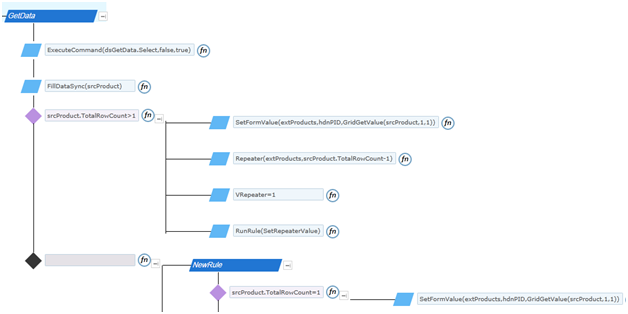
ExecuteCommand(Select) is used to fill the labels with supplier details using the supplier id passed to “hdnId” textbox. Fills the hidden search control with product details of corresponding supplier id. Next action is used to check if the total row count of search is greater than 1. If the condition is satisfied, the repeater form is made to repeat that many times. Also a product id is passed to the Repeater form using SetFormValue rule. A variable VRepeater value is set to 1. Next a “SetRepeterValue” rule is ran.
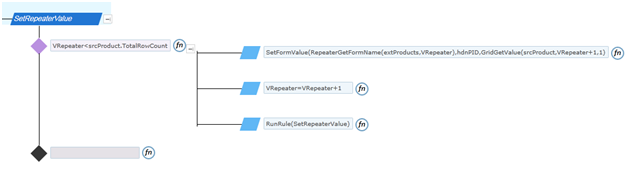
Checks if the VRepeater value is less than the total row count of search, if yes product id value is passed to the repeated form. Next the VRepeater value is incremented by 1. Again the same rule “SetRepeaterValue” is called . This rule works as a loop.
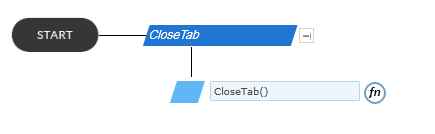
This rule is used to close the current form on clicking the Dashboard button on top- right of the form.
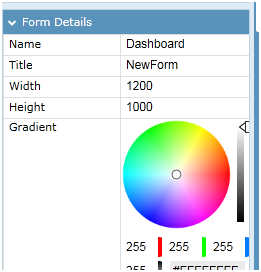
Click anywhere on the form to get the form properties loaded in the Properties window. Change the Name of the form to Dashboard. Set the Width of the form to 1200 and Height to 1000.

For the grid : Click on grid to get the Properties window for the search Grid. In the properties window, select SharePoint from the Dropdown for DataSource.
Click on the grid to get the popup menu, choose Data Source tab and click on New DataSource Configuration.
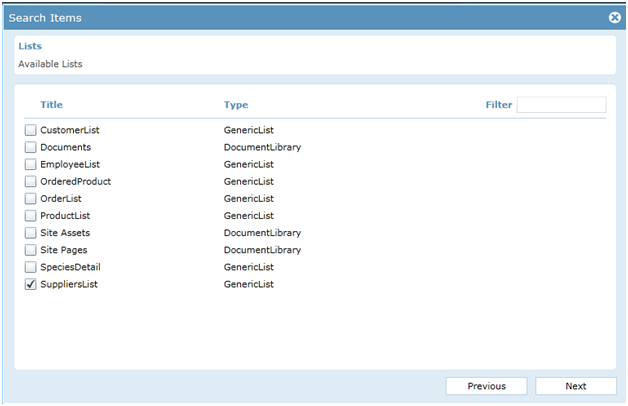
A new Popup window opens showing the available lists in SharePoint. Choose Suppliers List from the given set of lists and click Next.
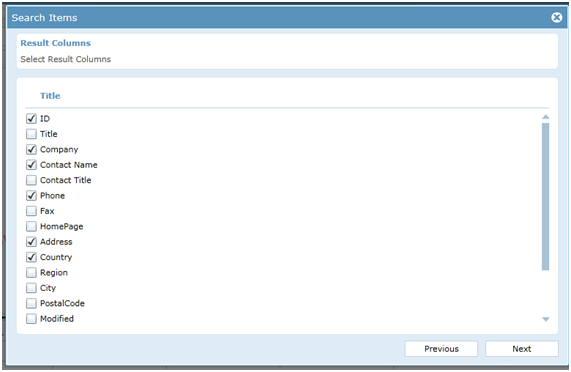
Select the Result columns that are to be displayed on the grid, make sure you include the Id column. Click Next.
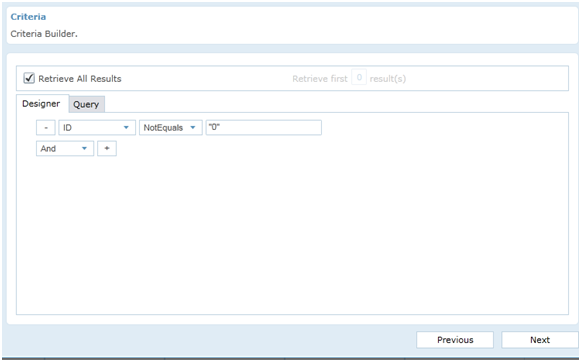
Enter the selection criteria as shown below. ID NotEquals “0”.
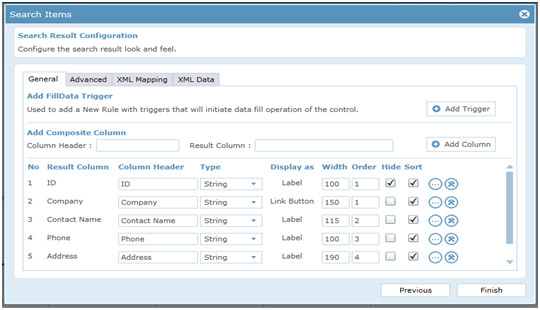
Click Next until you reach the Search Result Configuration screen. The columns you had chosen would be shown there, you can modify the Column Header to give a user friendly name to the column.

In order to change the Company column as link button, click on the Configure Column button.
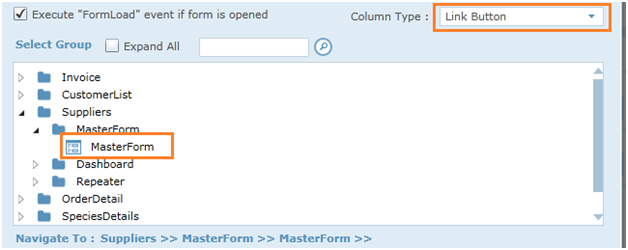
Choosing Link Button opens another section below, where you can choose the form to navigate to when the button is clicked. Enter the folder name where the form is present and search to get that folder alone. Choose the form to be opened, in this case, the Master form. Choosing this form makes this available in the Form Name drop down below.
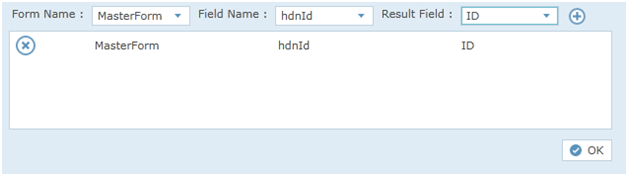
Choose the field to be mapped in the MasterForm from the Field Name dropdown. In this case, hdnId d. In the Result Field choose ID. Click the + button to add this form to the box below. Click Ok and Finish.

Is used to fill the Dashboard search.
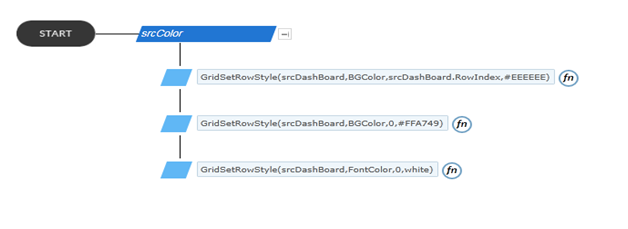
Contains 3 GridSetRowStyle rule. First one is used to set background color for all rows in the search control. Second one is used to set the header background color of the search control. Third one is used to set the header font color of the search control.