
An invoice form is used to display a consolidated list of all orders from the Orders List in a grid format. Clicking on an OrderId brings up a detailed Invoice showing the Order details which includes Shipping Address, Billing Address, Product Details and Total Amount for the Order.
- SharePoint 2010
SharePoint list is used as a DataSource for Invoice. SharePoint lists consist of rows and columns that store data in a similar fashion to a traditional relational database management system such as SQL Server. However, a benefit of lists is that SharePoint includes Web Parts that provide simple methods for managing the data. If the data was stored in a database, it would require custom user interface components to access it and manipulate it. Also, specialized skills are required to design, implement, and maintain a custom database. Another advantage of using lists is that custom workflow and event handlers can easily be registered to them. By default the following columns are available in sharePoint list:
- ID
- Title
- Modified
- Created
- Modified By
- Created By
- Attachments
Apart from these default list columns, user can add more columns depends on requirement.
| SharePoint List | |||
|---|---|---|---|
| List Name | Column Name | Data Type | |
| ProductList
Details of all the products are stored in this list. |
ProductName | Single line of text | |
| UnitPrice | Single line of text | ||
| ProductId | Single line of text | ||
| Category | Single line of text | ||
| SupplierID | Number | ||
| IsDiscontinued | Single line of text | ||
| SharePoint List | |||
|---|---|---|---|
| List Name | Column Name | Data Type | |
| Ordered Product
Details of ordered products are stored within this list. |
OrderID | Single line of text | |
| ProductID | Single line of text | ||
| Quantity | Single line of text | ||
| Discount | Single line of text | ||
| UnitPrice | Single line of text | ||
| SupplierID | Number | ||
| SharePoint List | |||
|---|---|---|---|
| List Name | Column Name | Data Type | |
| Order List
Details of all orders are stored in this list. |
CustomerID | Single line of text | |
| SalesPerson | Single line of text | ||
| OrderDate | Date and Time | ||
| equiredDate | Date and Time | ||
| ShippedDate | Single line of text | ||
| ShipVia | Single line of text | ||
| SharePoint List | |||
|---|---|---|---|
| List Name | Column Name | Data Type | |
| List Name Functionality CustomerList
Details of the customer are stored in this list. |
CustomID | Single line of text | |
| Name | Single line of text | ||
| FirstAddress | Single line of text | ||
| SecondAdress | Single line of text | ||
| Phone | Single line of text | ||
| List Of Forms Used | ||
|---|---|---|
| Name | Functionality | |
| Invoice Form Design Rule Design | Shows the detailed Invoice including shipping and billing address. This form contains two search controls-srcOrder and srcProduct. The first grid shows the Order details as shown in the InvoiceDashboard. The second one shows the product details pertaining to that order. | |
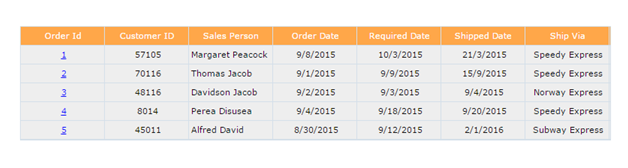
| InvoiceDashboard Form Design Rule Design | Contains a search control which is used to display the details of all the orders. | |

Add a sub form to the bottom of the form and name it hdnSubform. Untick the visibility property of the form. This is to hide the sub form. This form is used to add the hidden controls. Add 3 textboxes and name them as hdntxtOrderId, hdntxtcustomerId and hdntxtOrderProductId.
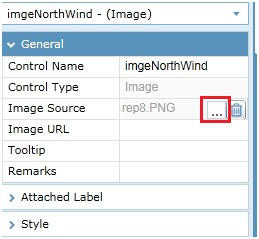
Click on the image control and edit the properties window displayed on the right. Add the desired image by browsing to the Image source by clicking on the button shown below.
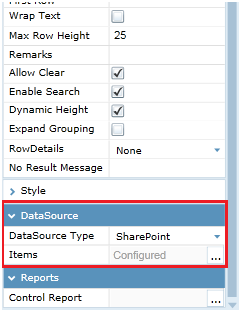
Configuring the first Search Grid: Add a search control and name it as srcOrder. Click on grid to get the Properties window for the Search Grid. In the properties window, select SharePoint from the Dropdown for DataSource.

Click on the grid to get the popup menu, choose DataSources tab and click on New DataSource Configuration.

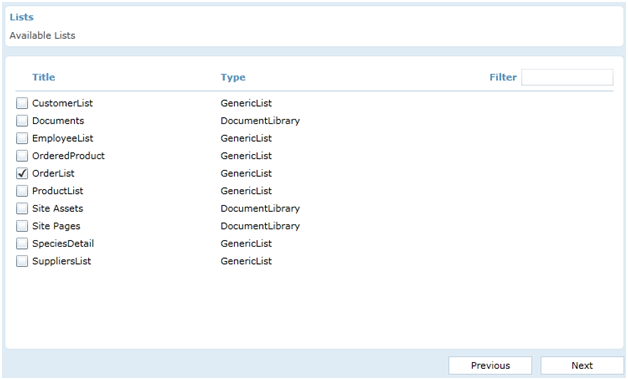
Available lists in SharePoint, choose OrderList from the given set of lists and click Next.
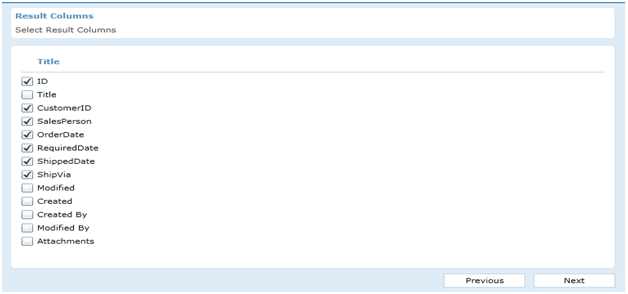
Select the Result columns that are to be displayed on the grid, make sure you include the Id column. Click Next.
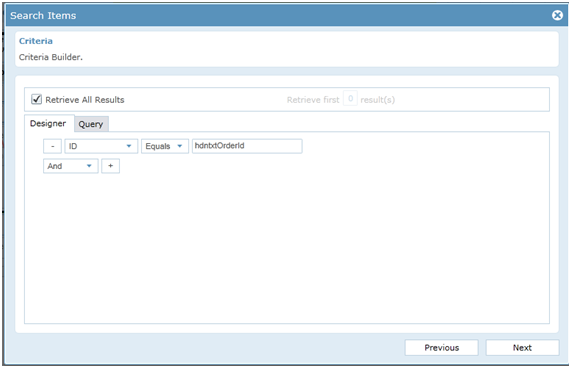
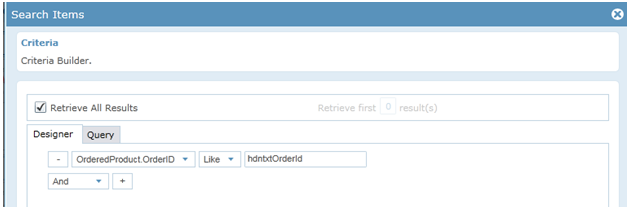
Enter the selection criteria as shown below. Id Equals hdntxtOrderId.

Click Next until you reach the Search Result Configuration screen, the columns you had chosen would be shown there, you can modify the Column Header to give a user friendly name to the column. For Date columns change the default Type chosen as DateTime to Date if only date is to be displayed.

Click on grid to get the Properties window for the search Grid. In the Properties window, select SharePoint from the Dropdown for DataSource.
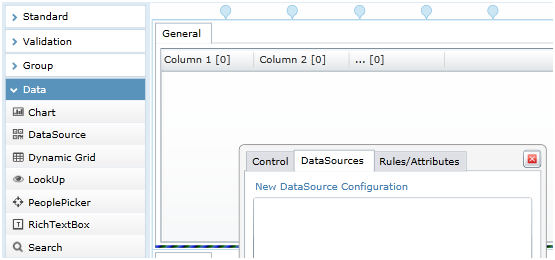
Click on the grid to get the popup menu, choose DataSource tab and click on New DataSource Configuration.
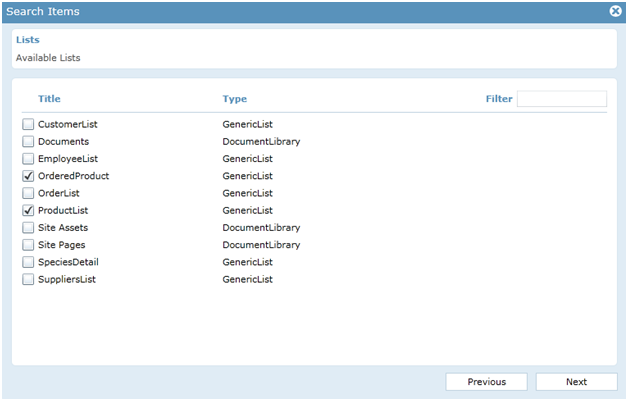
A new popup window opens showing the Available lists in SharePoint. Choose OrderProduct and ProductList from the given set of lists and click Next.

Select the Result columns that are to be displayed on the grid. Then click Next.
Enter the selection criteria as shown below.
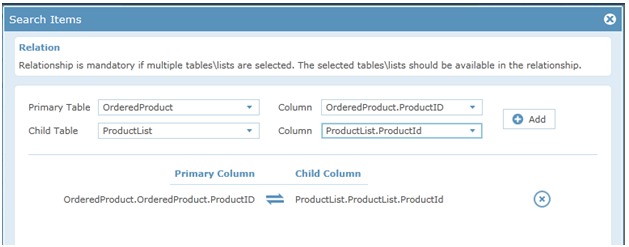
Set the relationship between the two lists by selecting the common column name in Primary and Child table drop down columns as shown below and click (+ Add) button.

Click Next until you reach the Search Result Configuration screen. The columns you had chosen would be shown there, you can modify the Column Header to give a user friendly name to the column.
Click again on Create DataSource.
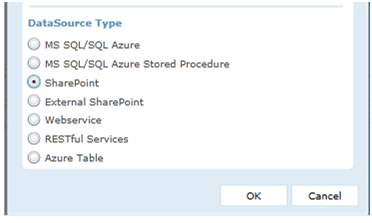
Give DataSource Name as dsSlctNameAdrs, choose SharePoint as the DataSource Type and click Ok.
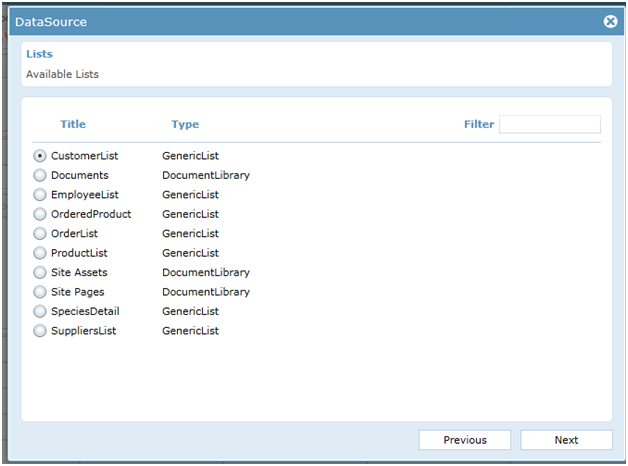
Choose your CustomerList from the list and click Next.
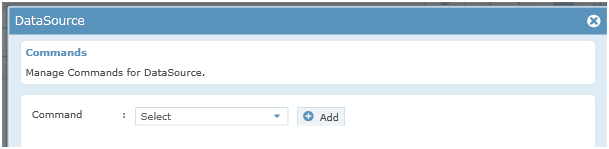
In Commands dropdown, default will be Select, click on Add button.

In the query criteria mapping choose Customer Id Equals hdntxtcustomerId.
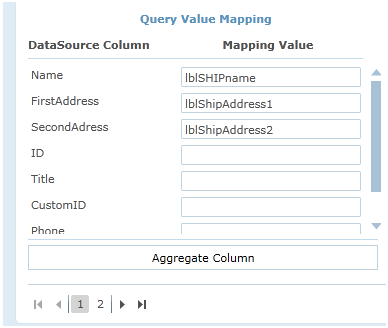
In Query Value Mapping section, we need to map only Name, FirstAddress and SecondAddress.
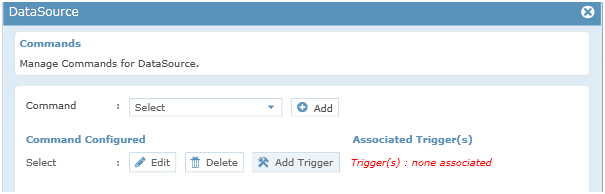
Click Finish to get back to the Commands Configured part and click on Add Trigger.
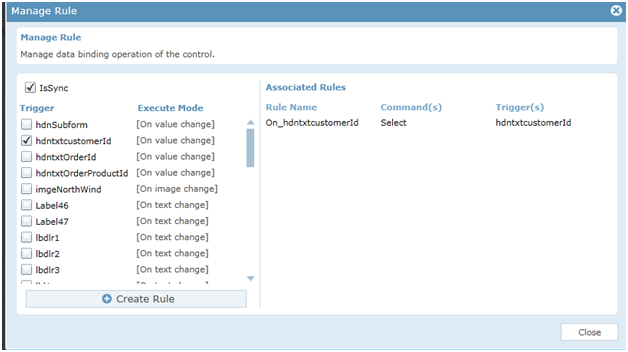
Select hdntxtCustomerId as the trigger and click on Create Rule. This would set hdntxtCustomerId events as the trigger for loading the DataSource. Click Close and Finish.
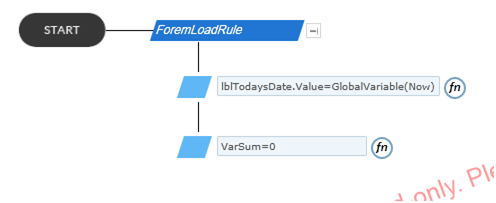
Sets current date in the label on top right through the rule GlobalVariable(Now). A variable VarSum is initialized by setting the value to zero.
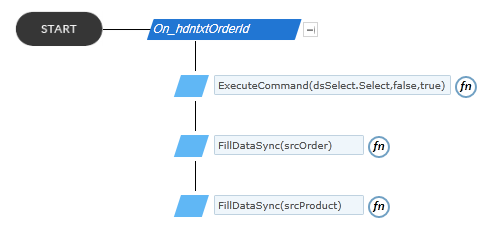
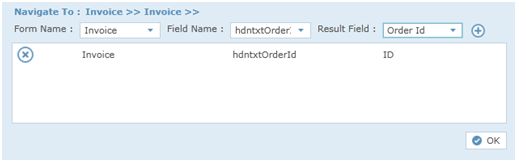
The order id from the InvoiceDashboard form is passed to the hidden textbox named “hdntxtOrderId” in Invoice form. This rule contains all actions that has to take place once the order id value is filled in the hidden text box (hdntxtOrderId). ExecuteCommand(Select) rule is called in order to select the customer id corresponding to the given order id from the Customer List in textbox named“hdntxtcustomerId”. Next two searches SrcProduct and SrcOrder are filled using the order id.
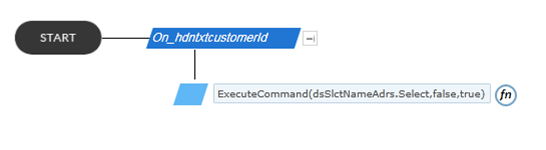
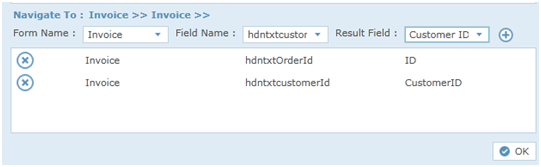
ExecuteCommand(Select) rule is called in order to select customer name and shipping address from the Customer List using the customer id in “hdntxtcustomerId” textbox.
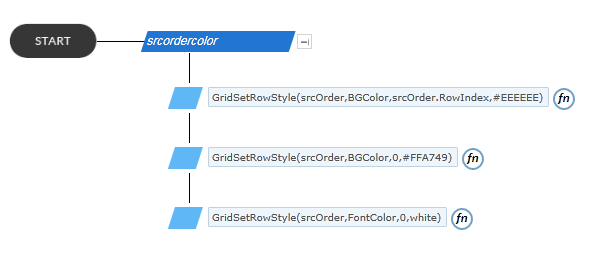
Contains 3 GridSetRowStyle rule. First one is used to set background color for all rows in the srcOrder search. Second one is used to set the header background color of the srcOrder search. Third one is used to set the header font color of the srcOrder search.
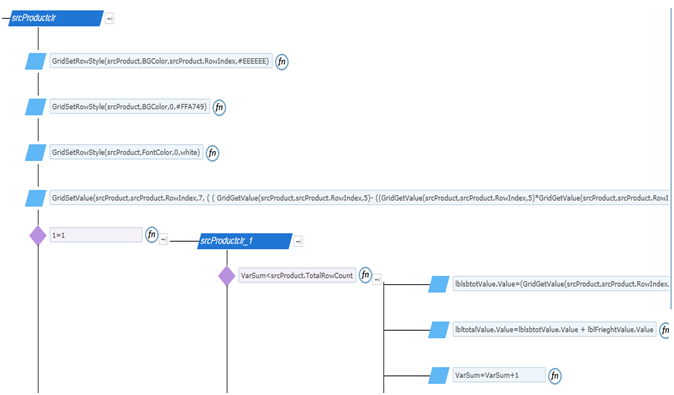
Contains 3 GridSetRowStyle rule. First one is used to set background color for all rows in the srcProduct search. Second one is used to set the header background color of the srcProduct search. Third one is used to set the header font color of the srcProduct search. GridSetValue rule is used to calculate and set the value in the “Extended price” column in Srcproduct search. Next a sub rule named “srcProductclr_1 “will be executed. This rule will work as a loop. This rule initially checks if the value of variable VarSum is less than the total row count of srcProduct search. If the condition is satisfied “Extended Price” value of each row is added and displayed in the SubTotal label displayed at the bottom. Also the subtotal value is added to the freight value and displayed in the total label at the bottom.
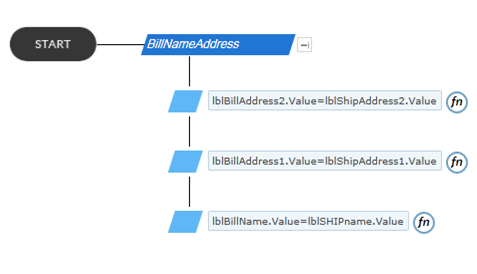
This rule is used to set the same customer address as the billing address.
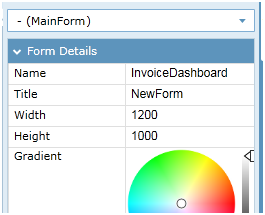
Click anywhere on the form to get the form properties loaded in the Properties window. Change the Name of the form to InvoiceDashboard. Set the Width of the form to 1200 and Height to 1000.
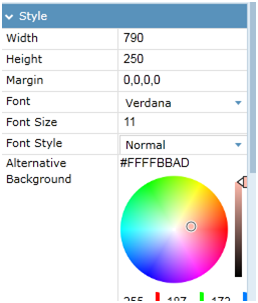
Click on search control and name it as “srcOrderDetails” in properties window on the right. Set width as 790 and height as 250.

Click on grid to get the Properties window for the search Grid. In the properties window, select SharePoint from the Dropdown for DataSource.

Click on the grid to get the popup menu, choose DataSource tab and click on New DataSource Configuration.
Select the Result columns that are to be displayed on the grid, make sure you include the Id column. Click Next.
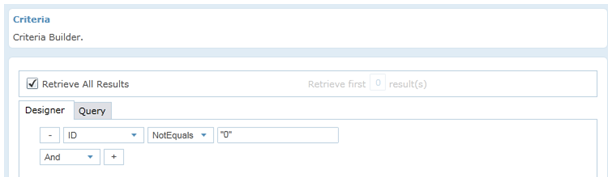
Enter the selection criteria as shown below. ID NotEquals “0”.

Click Next until you reach the Search Result Configuration screen. The columns you had chosen would be shown there,you can modify the Column Header to give a user friendly name to the column. For Date columns change the default type chosen as DateTime to Date if only date is to be displayed.

To change the Order Id column as link button, click on the Configure Column button.
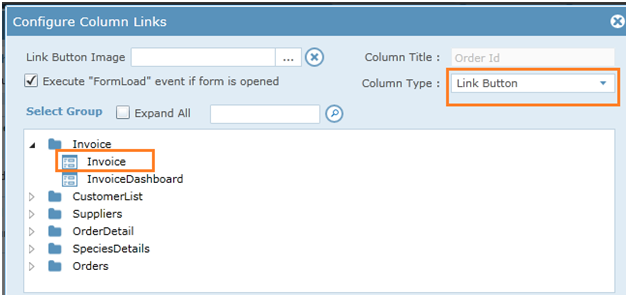
Choosing Link Button opens another section below, where you can choose the form to navigate to when the button is clicked. Enter the folder name where the form is present and search to get that folder alone. Choose the form to be opened, in this case the Invoice form. Choosing this form makes this available in the Form Name drop down below.
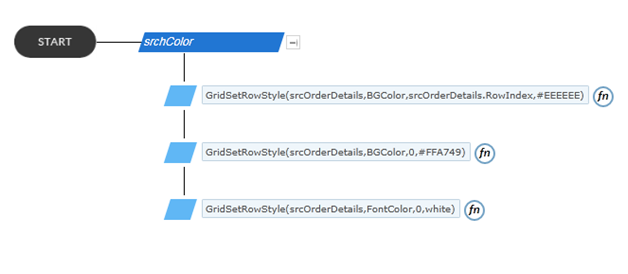
Contains 3 GridSetRowStyle rule. First one is used to set background color for all rows in the search control. Second one is used to set the header background color of the search control. Third one is used to set the header font color of the search control.