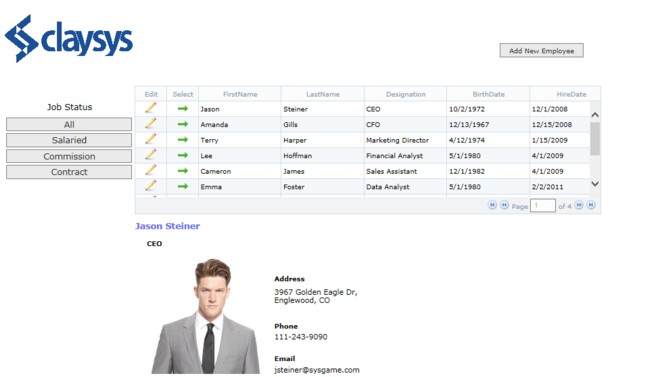
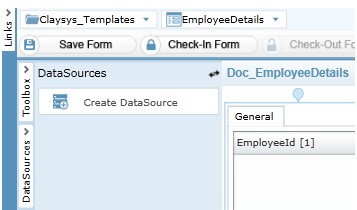
This document provides the details for creating forms through ClaySys Appforms to manage employee details stored in a SharePoint List. Employee Details are displayed in a grid format using Search grid as well as in detailed format using form DataSource. Clicking on Select button in the grid displays the details of the employee below the grid. Clicking on Edit button in the grid opens a popup window where all Employee Details can be edited and saved back to the list. A new employee can be added using the same form and inserted into the list. Buttons are provided to filter the grid based on Job Status – Salaried / Commission / Contract.
- SharePoint 2013
| SharePoint List | |||
|---|---|---|---|
| List Name | Column Name | Data Type | |
| ClsysTemp_EmpJobType
Stores Job Type – Salaried / Contract etc. Related to Employee Details table through JobTypeId |
JobTypeId | Number | |
| JobType | Single line of text | ||
| SharePoint List | |||
|---|---|---|---|
| List Name | Column Name | Data Type | |
| ClSysTmplt_Employee
Stores Employee Details |
EmployeeId | Number | |
| FirstName | Single line of text | ||
| LastName | Single line of text | ||
| Designation | Single line of text | ||
| BirthDate | Date and Time | ||
| HireDate | Single line of text | ||
| Address | Single line of text | ||
| Phone | Single line of text | ||
| EmailId | Single line of text | ||
| JobTypeId | Single line of text | ||
| Attachments | From Default Columns of SharePoint List | ||
| List Of Forms Used | ||
|---|---|---|
| Name | Functionality | |
| MainForm Form Design Rule Design | Has set of buttons for filtering the grid and other data operations. Has an ExternalForm Control which loads Employee Details form | |
| EmployeeDetails Form Design Rule Design | Shows List of all employees in a grid format with details of each employee listed below the grid | |
| EditEmployee Form Design Rule Design | Used for updating Employee Details or adding New Employee Details | |
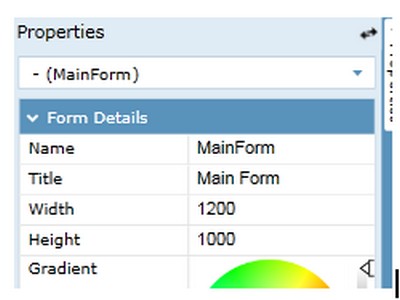
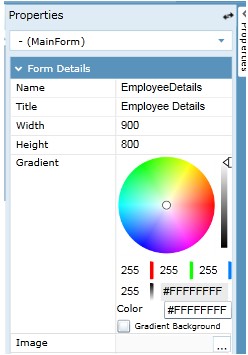
Click anywhere on the form to get the form properties loaded in the Properties window. Change the Name of the form to MainForm. Set the Width of the form to 1200 and Height to 1000.
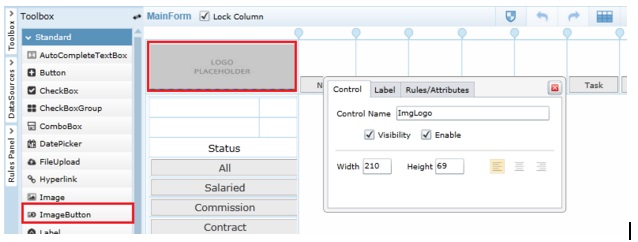
From the Standard tab of the toolbox on the left drag an Image control and place it in the first row, first column. Set the control name as ImgLogo and set the width to 210 and height to 69.
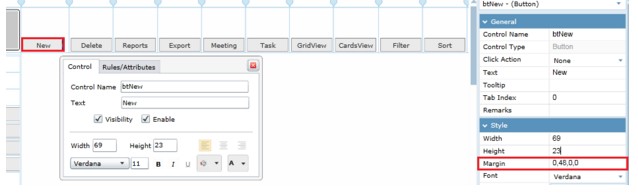
In the columns adjacent to the Image buttons, drag and drop 10 buttons from the Toolbox. Set the control name to btnNew for the first one and Text as New. Set Width as 69 and Height as 23. To align the button with the bottom of the Image, set Margin of btnNew as 0,48,0,0.
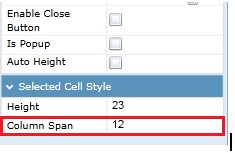
Click the cell right beneath New and in the properties of Selected Cell Style set Column Span to 12.
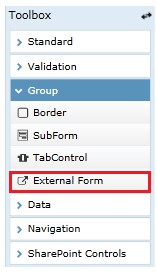
From Toolbox -> Group, choose External Form and drop it into the above cell.
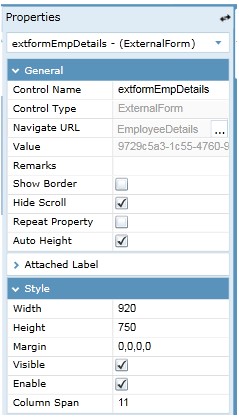
Set the properties of the External Form as shown here.
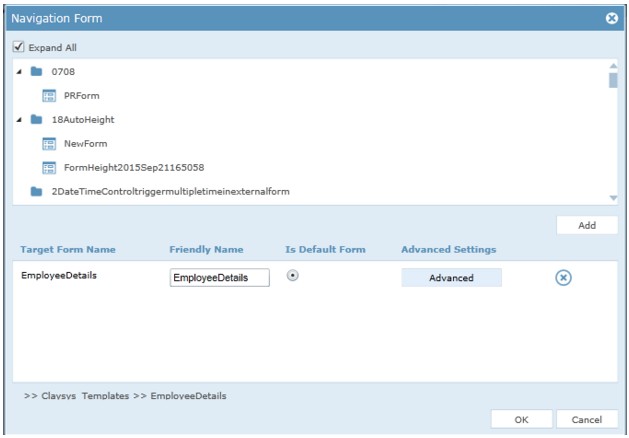
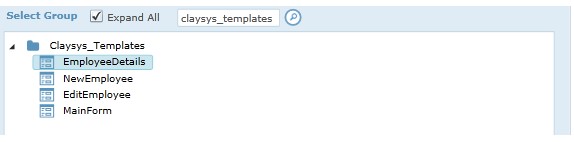
To set the NavigateURL, click on the ellipsis to open the dialog box given below. Unselect the Expand All checkbox so that only the folder names are displayed. Choose the EmployeeDetails form and click on the Add Button. Click OK.

From ToolBox -> Group, select SubForm and drop it in the cell below Image Logo. Set the properties as given below.
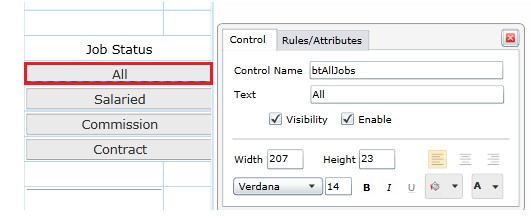
Onto the SubForm, add a label for Job Status and four buttons for filtering the Employee Details grid based on the job status. Set the properties as shown below.
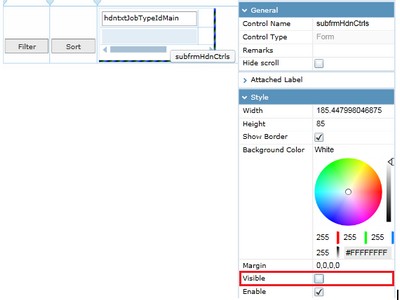
Add a SubForm in the cell adjacent to the last button in the top row and set its Visibility to false by unchecking the checkbox Visible in the Properties window. Add a textbox to the SubForm and name it hdntxtJobTypeIdMain. The value of this will be used for filtering the grid in the EmployeeDetails form.
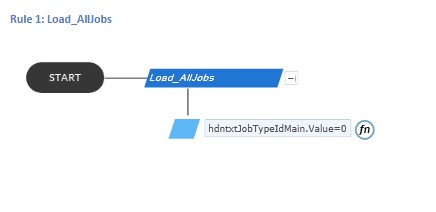
Triggers the change event for the hidden textbox hdntxtJobTypeIdMain, which sets an external form value in EmployeeDetails Form to filter the data in the grid based on Job Type.
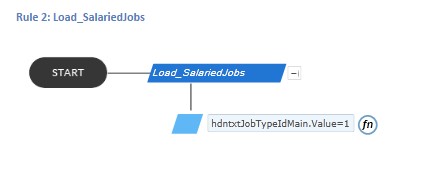
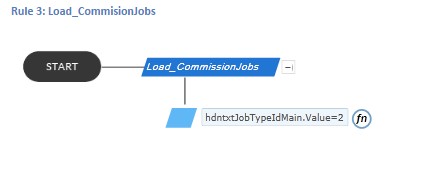
Same as above.
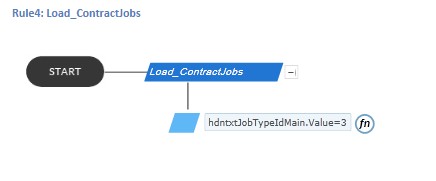
Same as above.
Same as above.
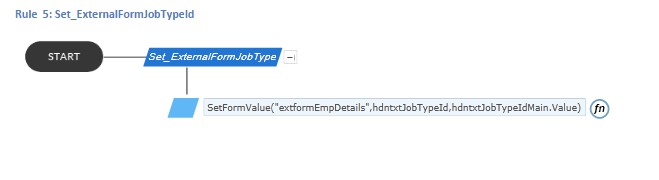
Set the Value of the control hdntxtJobTypeId in EmployeeDetails form to the hidden text form value in the Main form which was set in the above rules.
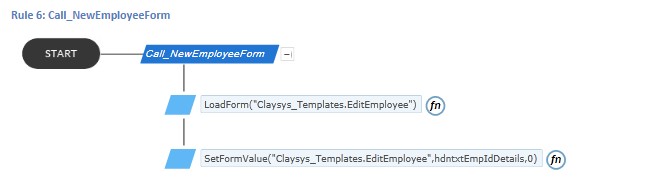
Load the form EditEmployee to add new employee details. Set value of hdntxtEmpIdDetails in EditEmployee form to 0.
Create a NewForm in the folder containing the Main Form. Open the form for edit and set the form properties as given below.

Click on the first cell and set Column Span to 12. Add a Search grid from Toolbox -> Data to this cell and set the properties as given below.
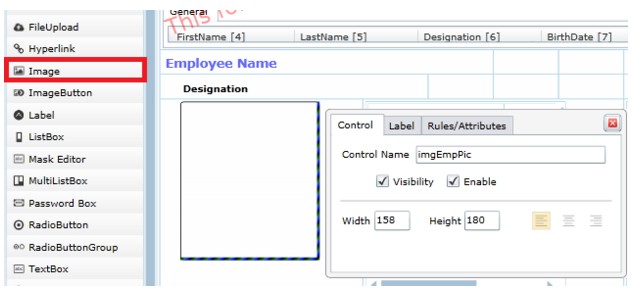
For the cell beneath this, set the column span to 3 and add an Image control from Toolbox -> Standard. Set the properties as shown below.
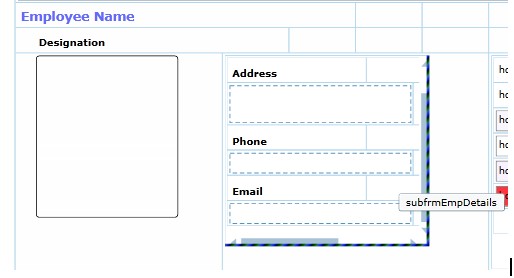
Add a SubForm to the cell to the right of the image control and add label controls as shown below. Name the SubForm as SubFrmDetails, and name the labels for Address, Phone and Email appropriately.
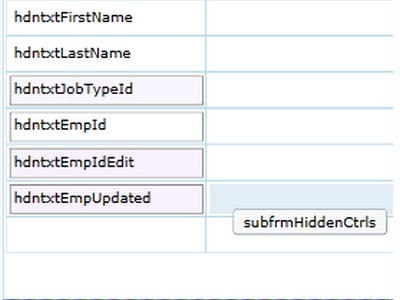
In the cell to the right of this, add another SubForm to hold the hidden controls used in the form. Name this as subfrmHiddenCtrls. Add six textboxes and name them as given here.
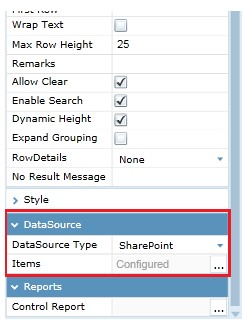
Following are the steps for Configuring the DataSources for all the controls. Click on grid1 to get the Properties window for the search Grid. In the properties window, select SharePoint from the Dropdown for DataSource.
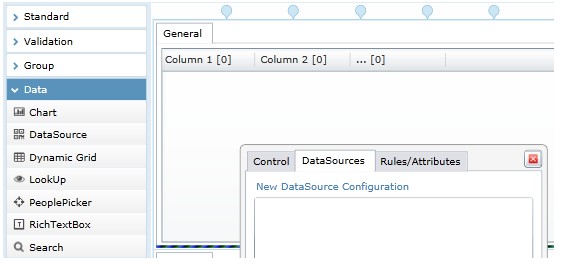
Click on the grid to get the popup menu, choose DataSources tab and click on New DataSource Configuration.
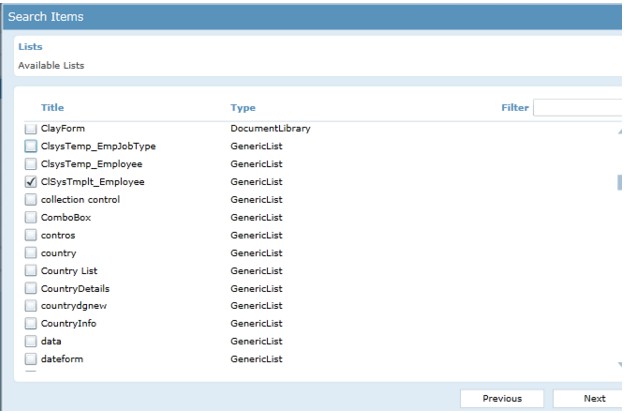
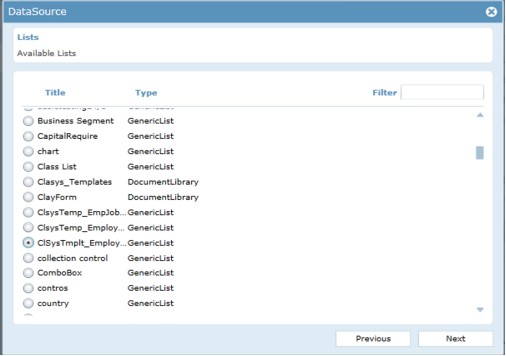
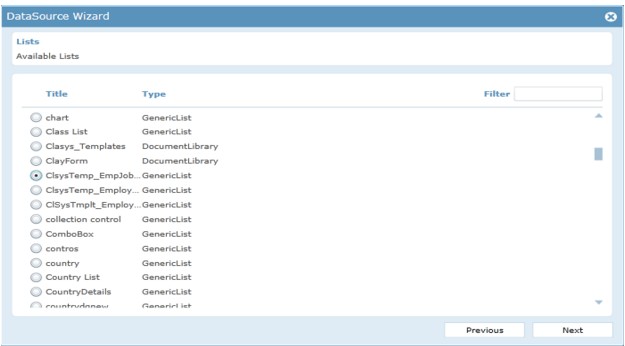
A new Popup window opens showing the Available lists in SharePoint. Choose your Employee table from the list and click Next.
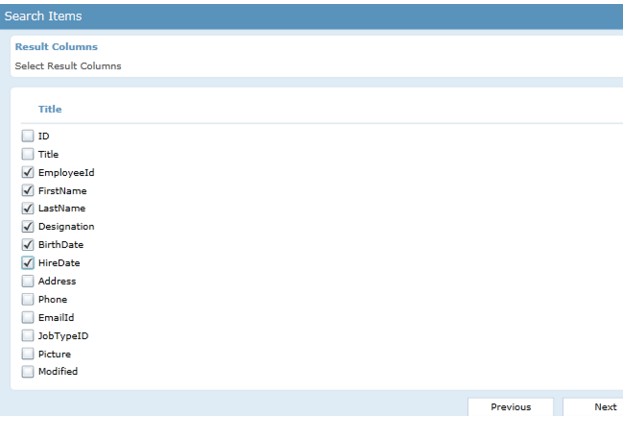
Select the Result columns that are to be displayed on the grid, make sure you include the EmployeeId column. Click Next.
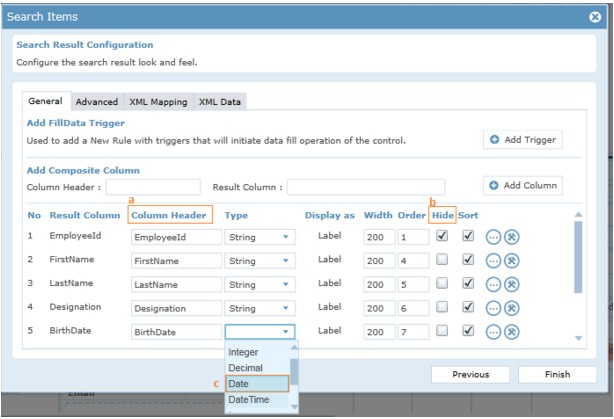
Click Next until you reach the Search Result Configuration screen. The columns you had chosen would be shown there, You can modify the Column Header to give a user friendly name to the column. If EmployeeID column is to be hidden, click on the checkbox to Hide it. For Date columns, change the default Type chosen as DateTime to Date if only date is to be displayed.
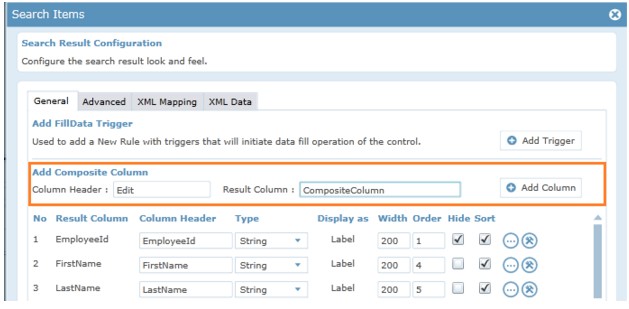
We need to create two composite columns now, to show the edit and select buttons for each row. In the Add Composite Column section, give Column Header as Edit, Result Column as Composite Column and click on the Add Column button. Repeat the same for creating Select button.

To configure the Action for new composite column, click on the Configure Column button.
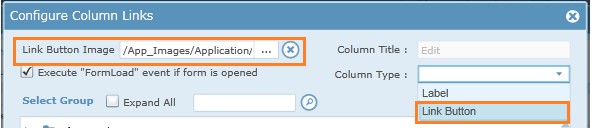
In Configure Column Links, choose Link Button for Column Type. You can choose a Link Button image from existing images.
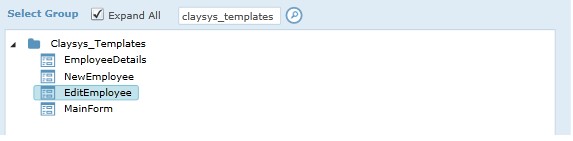
Choosing Link Button opens another section below, where you can choose the form to navigate to when the button is clicked. Enter the folder name where the form is present and search to get that folder alone. Choose the form to be opened, in this case, the EditEmployee form. Choosing this form makes this available in the Form Name drop down below. Choose the field to be mapped in the EditEmployee form from the Field Name drop down. In this case, txtEmpId. In the Result Field, choose EmployeeId. Click the + button to add this form to the box below. Click Ok.
In a similar manner, configure the LinkButton for Select Column but since we do not navigate to another form, choose the same form EmployeeDetails from the list of forms.

Choose the hidden control hdntxtEmpId from the Fields dropdown. Choose EmployeeId for the Result field. Add the form with the + button. Click Ok.

Change the column display Order to show Edit and Select buttons at the start of the row by setting the order as 2 and 3 for Edit and Select buttons respectively. Change the order for columns starting from FirstName onwards to be displayed after the Link buttons.
Preview the form to make sure the link buttons are configured and data is getting loaded into the grid.
Steps for Configuring the second Search Grid.
In the properties window, change the second Search grid name to SrchEmpByJobType, since this grid will show the employee list filtered based on the Job Type. Click on the Grid, choose the DataSources tab and you’ll notice that it shows Edit DataSource Configuration, since the DataSource configuration of the first grid has been copied here.
Steps for Setting the DataSource for the controls displaying Employee Details.
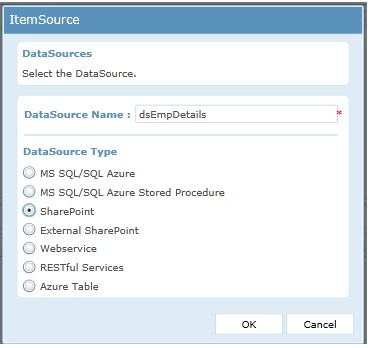
Give DataSource Name as dsEmpDetails, choose SharePoint as the DataSource Type and click Ok.
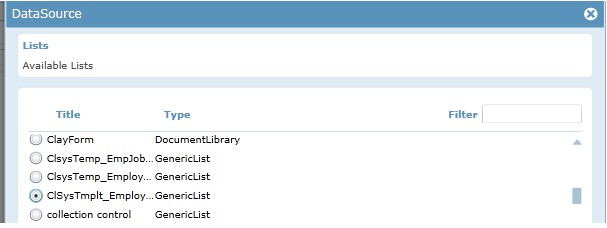
Choose the Employee table from the list and click Next.
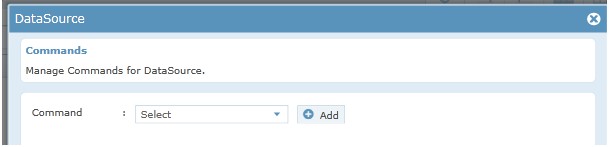
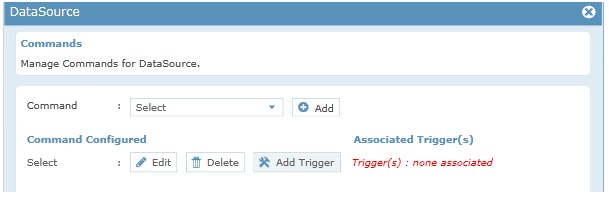
In Commands dropdown, default will be selected. Click on Add button.

In the query criteria mapping, choose EmployeeId equals hdntxtEmpId.
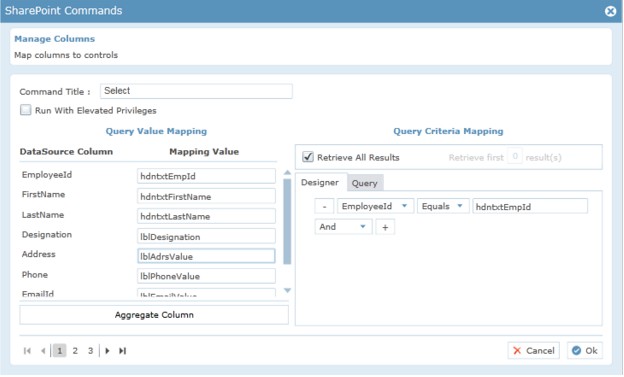
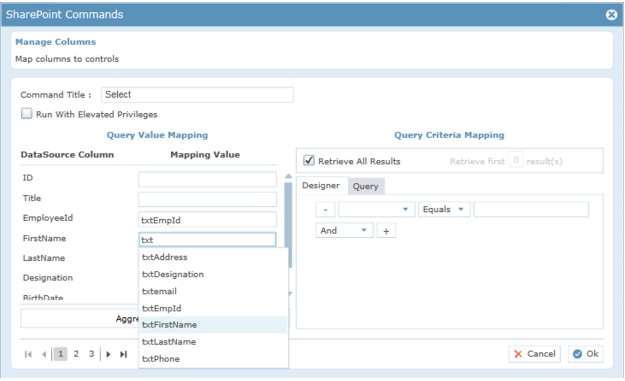
In Query Value Mapping section, we need to map the result fields to the respective controls on the form. Since we need to Display FirstName and LastName together, map these to two hidden textboxes and then in FormLoad and hdntxtEmpId change add rule to assign the value of lblEmpName as hdntxtFirstName + hdntxtLastName.
Map Attachments column of Employee List to the imagecontrol (imgEmpPic here) on the form. Click Finish to get back to the Commands Configured part and click on Add Trigger.
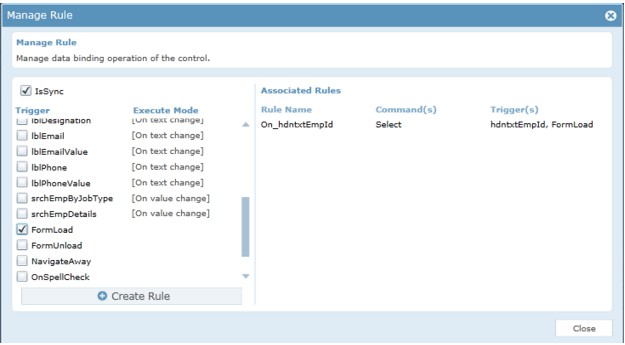
Select FormLoad and hdntxtEmpId as the triggers and click on Create Rule. This would set textchange in hdntxtEmpId and form load events as the trigger for loading the DataSource dsEmpDetails.
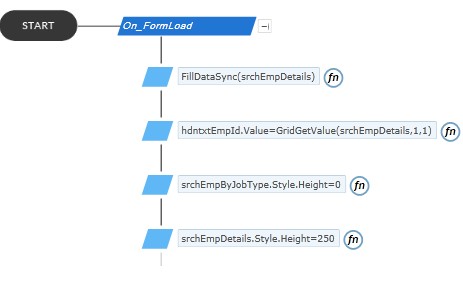
Height of second grid is set to zero and first grid to 250. The hdntxtEmpId control value is set to the EmployeeId from the first row, first column of Grid1.
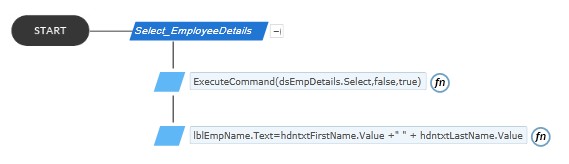
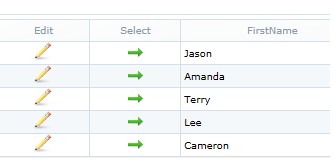
When a row is selected on the grid, corresponding details like Image, Address etc. are displayed in the controls below the grid.
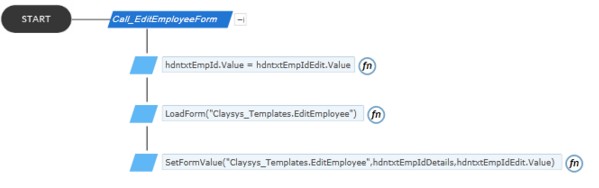
When the Edit button on the grid is clicked, the employeeId of the selected row is set to the hidden text hdntxtEmpIdEdit. This triggers changing the Employee Details below the grid and also brings up a popup window where the Employee Details can be edited. LoadForm function is called on EditEmployee form and SetFormValue function is used to set the value of hdntxtEmpIdDetails in EditEmployee form to the EmployeeId of the selected row.
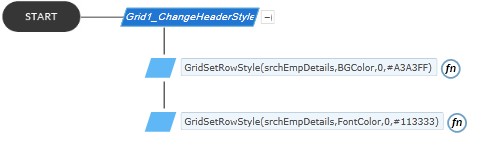
If the default color of the Header of the search grid2 is to be changed.
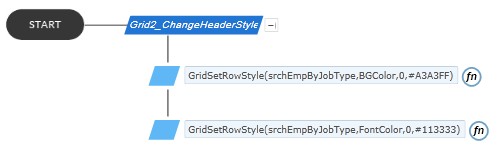
If the default color of the Header of the search grid2 is to be changed.

Based on the button click on the MainForm for filtering Employees by Job Status, the grid displays are swapped between grid1 and grid2.
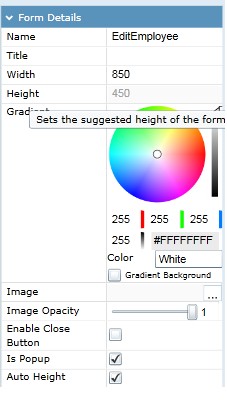
Click anywhere on the form to get the form properties loaded in the Properties window. Change the Name of the form to EditEmployee. Set the properties of the form as given below. Enable Close Button should be unchecked and IsPopup should be checked.
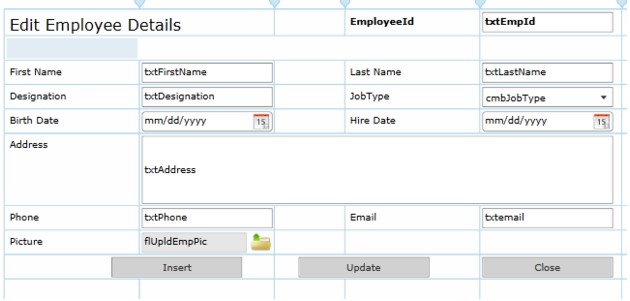
Add UI controls to the form as shown in the image below. The controls used are Label, TextBox, DateTimePicker, FileUpload, ComboBox and Buttons all from Toolbox -> Standard tab.
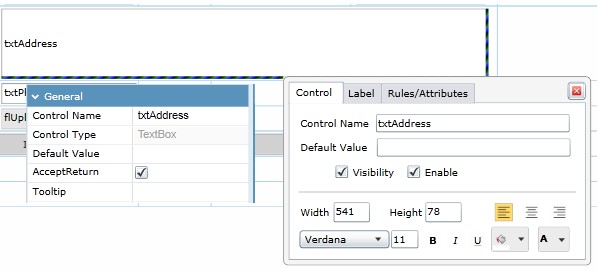
For entering the Address increase the size of the TextBox control and check the AcceptReturn property in the properties window.
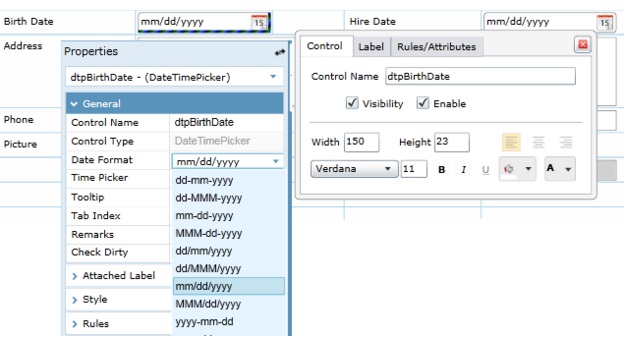
For DateTimePicker control, date format can be set from the properties window as shown below.

Add a SubForm in cell next to txtAddress and name it as subfrmHdnCtrls. Set the visibility of the form to False by unchecking Visibility in the Properties Window. Add a textbox to the SubForm and name it hdntxtEmpId.
Choose the Employee List and click Next.
Commands window is opened.By default, Select would be chosen in the dropdown. Click Add Button. Map the controls on the form to appropriate DataSource column from the list.
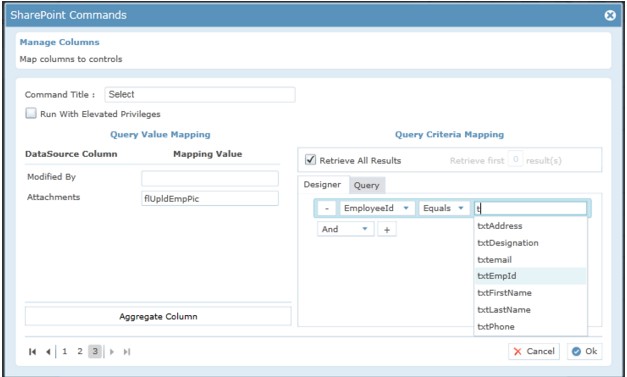
Map the Attachments column to the File Upload Control. And in the Query Criteria Mapping, select EmployeeId Equals txtEmpId. Please note that hdntxtEmpId is value is set from the calling form(EmployeeDetails here) and when the form loads, details for that EmployeeId are loaded onto the mapped controls.
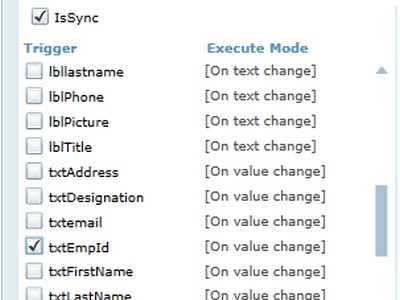
Click Ok to complete configuring the Select Command in the command configuration. Click on Add Trigger and select txtEmpId from the list of controls and click Create Rule, window will show that no triggers are associated with the Command.
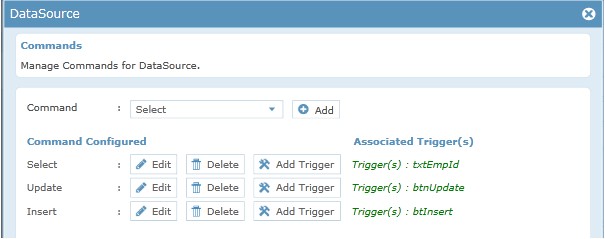
The command window will show txtEmpId as the associated trigger. Continue to configure the Insert and Update commands in a similar manner. Just the associated triggers will change to btnInsert and btnUpdate.
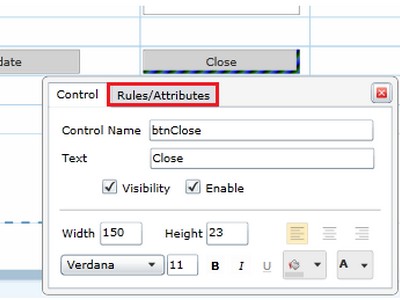
For configuring the Close button functionality, click on the button and select the Rules tab. Click on Create Rule which will take you to the Rules panel and attach the close button as the trigger for the rule.
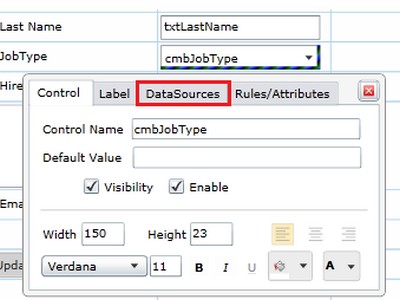
Steps for Configuring the DataSource for ComboBox – cmbJobType. The dropdown items for the Combobox have to be configured separately through its DataSource property. Click on cmbJobType and select DataSource tab.
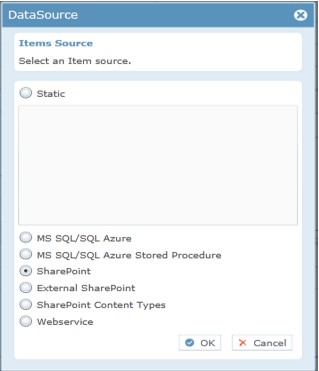
Click on New DataSource which opens the below dialog box. Choose the DataSource as SharePoint.
Select the JobType Table and click Next.
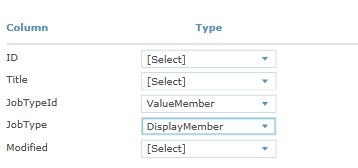
Click Next in the Criteria Builder window. In the Next window, select JobTypeId as the Value Member and JobType as the Display Member.
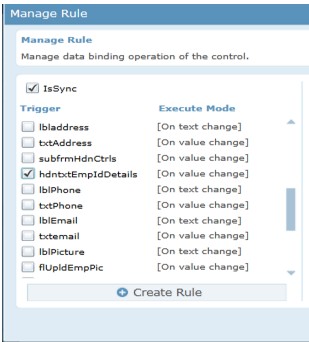
In the window that comes up next click Add trigger and select hdntxtEmpIdDetails and click create rule. This would close the Add Trigger Window. Click Finish to close the combobox DataSource configuration window.
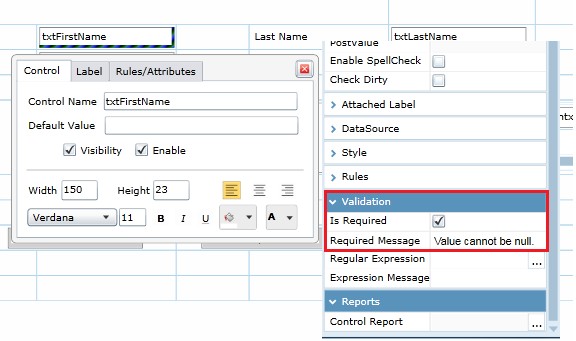
Steps for adding Validation to the Controls if the DataSource requires that certain fields are mandatory, you can configure the related controls on the form to show an error message if data is not for this field. EditEmployee form has validation configured for all textbox controls. To configure this first, select the control by clicking on it. In the Properties window -> Validation, check IsRequired.
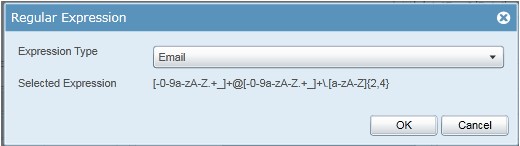
You can also set regular expression fields to check if it’s a valid EmailId or Phone number etc.
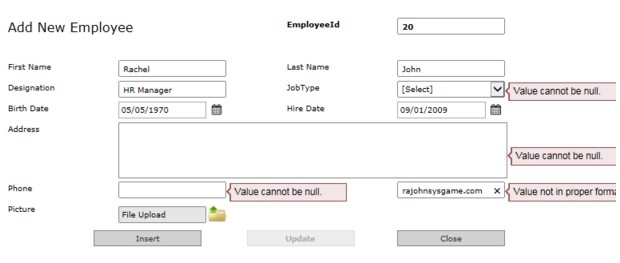
When Insert or Update button is pressed on the EditEmployee form, if the required fields are not entered or the data is not in the expected format, an error message is shown to the user as shown below.
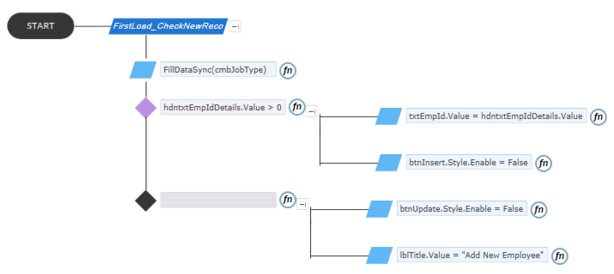
If the value of hdntxtEmpIdDetails is greater than 0, it is an existing Employee’s record to be loaded. Disable the Insert button and set the value of txtEmpId. If hdntxtEmpIdDetails value is 0, it is a New Record to be added. Disable the Update button. Load JobType dropdown.
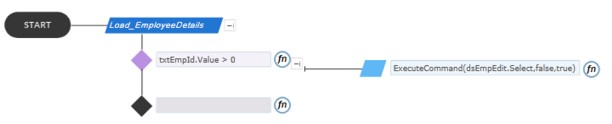
Execute Select on DataSource dsEmpEdit. This rule is automatically created when the datasource is configured. Add a decision to check if txtEmpid > 0 in case it is changed.
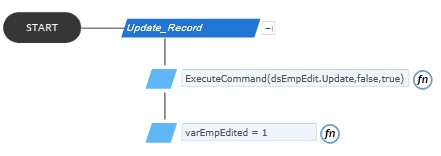
Automatically created when the datasource is configured for Update Command Trigger. Rule Name changed later.
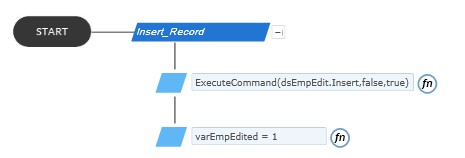
Automatically created when the DataSource is configured for Insert Command Trigger. Rule Name changed later.
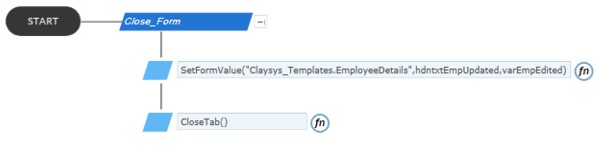
Close the form. To be Implemented later, Refresh the EmployeeDetails form if any change has been made.